How to Install Window Trim
Hi everyone, I’m Cristina from Remodelando la Casa, and I’m beyond excited to join the team of Pretty Handy gals and guys! I’m still pinching myself at such a wonderful opportunity.
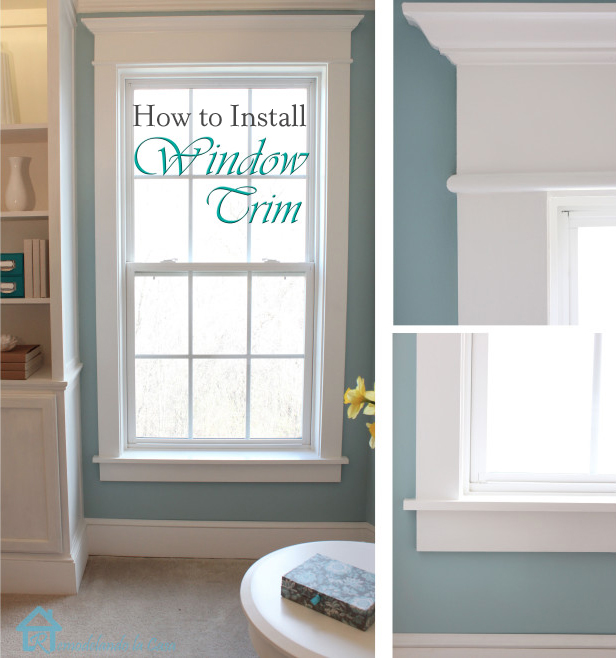
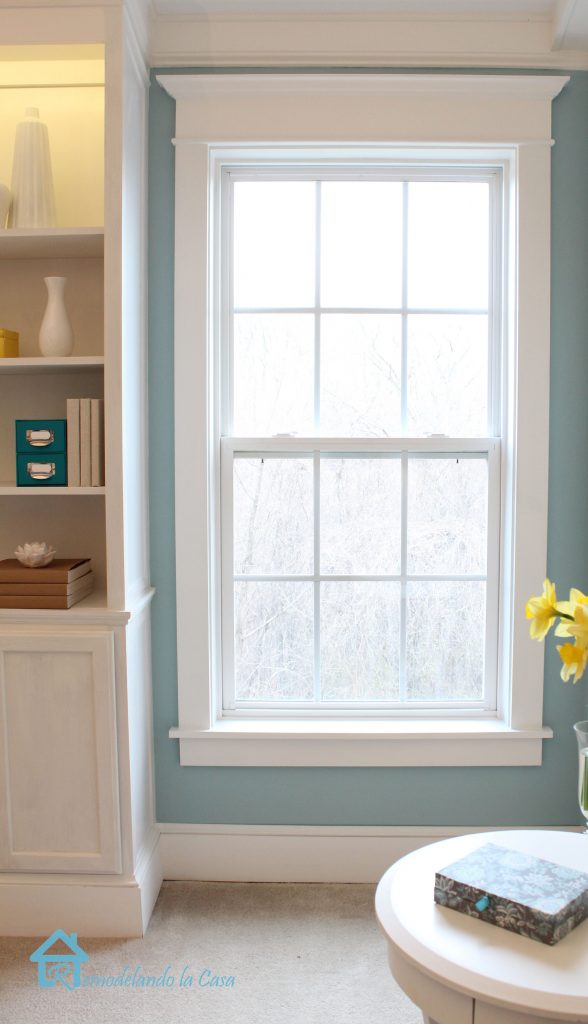
Today I’m going to show you a fairly easy way to transform your builder grade windows from plain and boring to beautiful with loads of character and with a more finished appearance.
Right now I’m working on updating my bedroom, where I have a couple of these windows.
They look like they are wearing skirts, but forgot to put on the tops! 🙂 Yeap, naked!

Let’s change that by dressing up those windows!
This is only a decorative treatment. All the wooden material (Poplar or Pine), can be found at your local home center.
(Affiliate links are included for your convenience. Brittany earns a small percentage from a purchase using these links. There is no additional cost to you. You can read more about affiliate links here.)
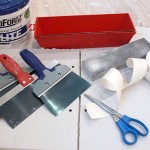
Tools:
- Miter saw (but you can use a Miter box and hand saw)
- Jig saw
- Sander
- Pneumatic nail gun
- Pry bar
- Utility knife
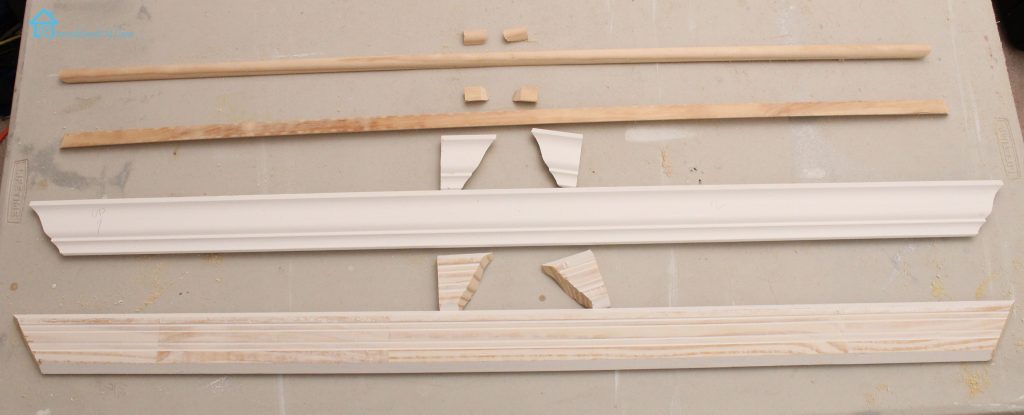
How much material you need depends on the size of your window, but this is what I used:
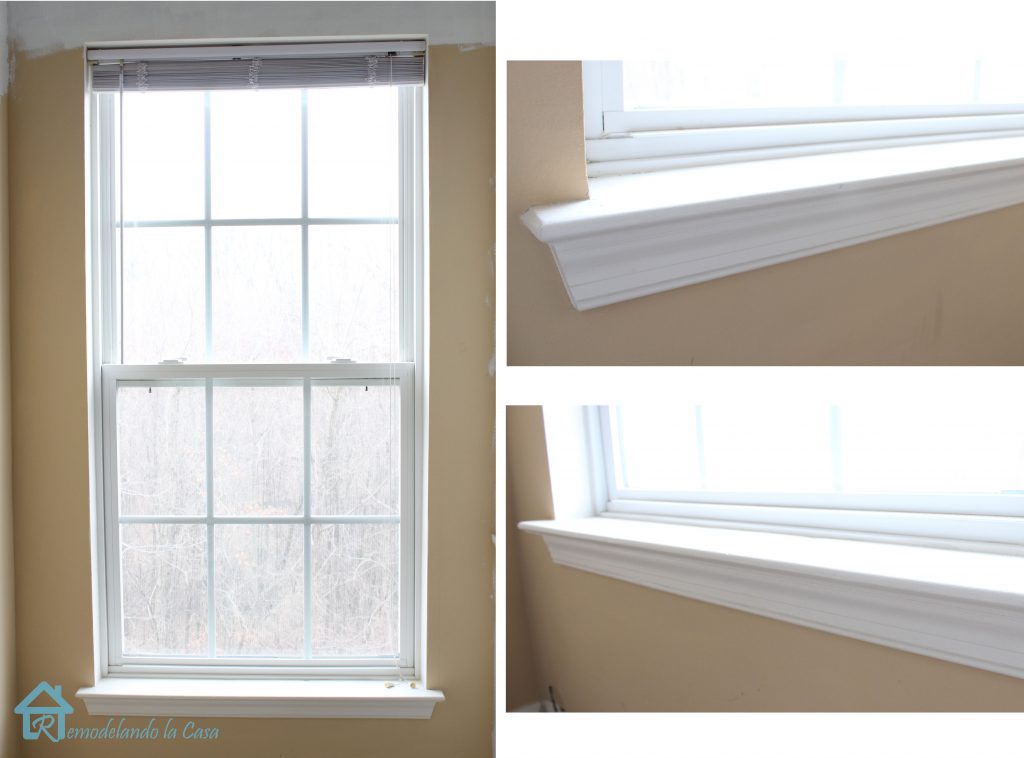
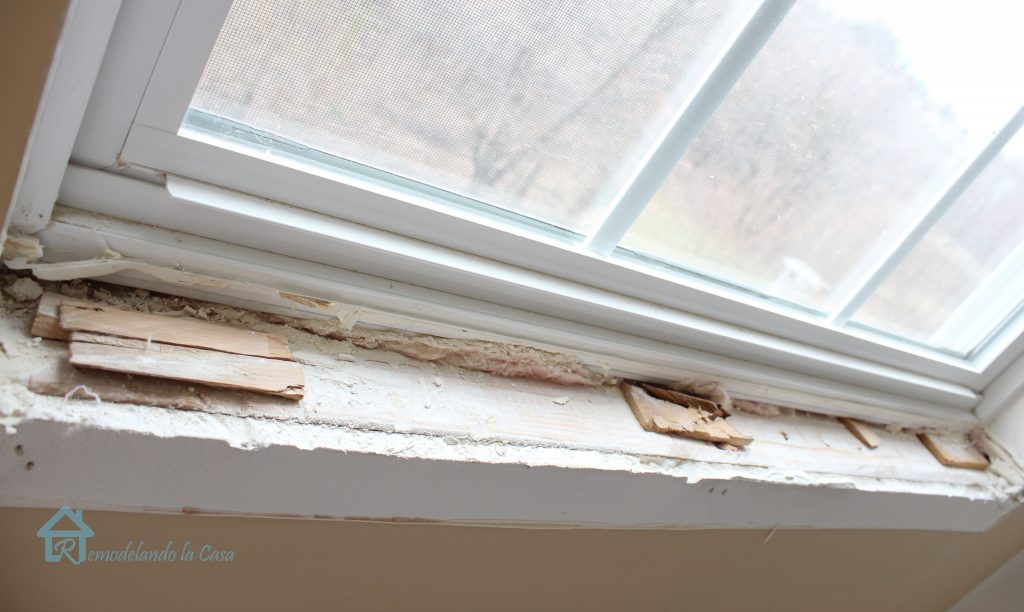
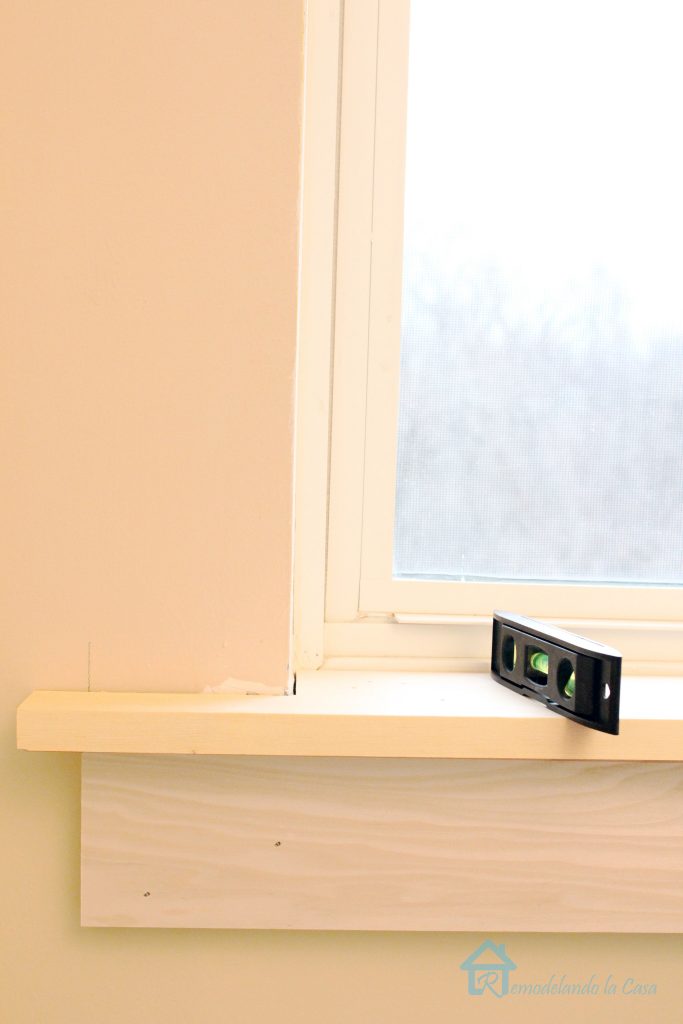
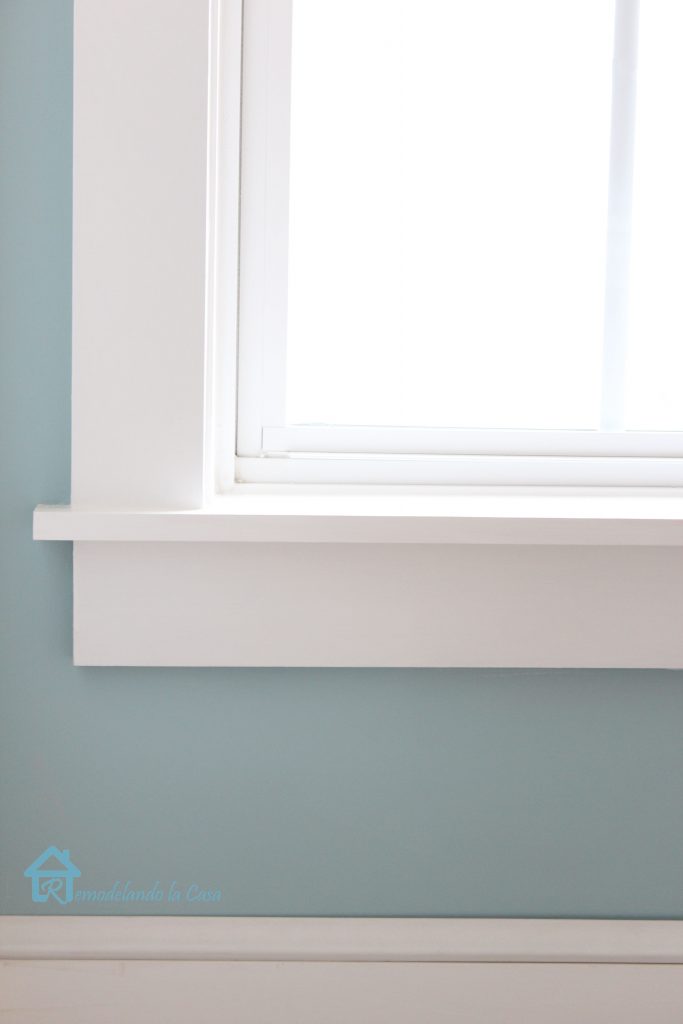
The first thing to do is getting rid of the old window stool and apron.
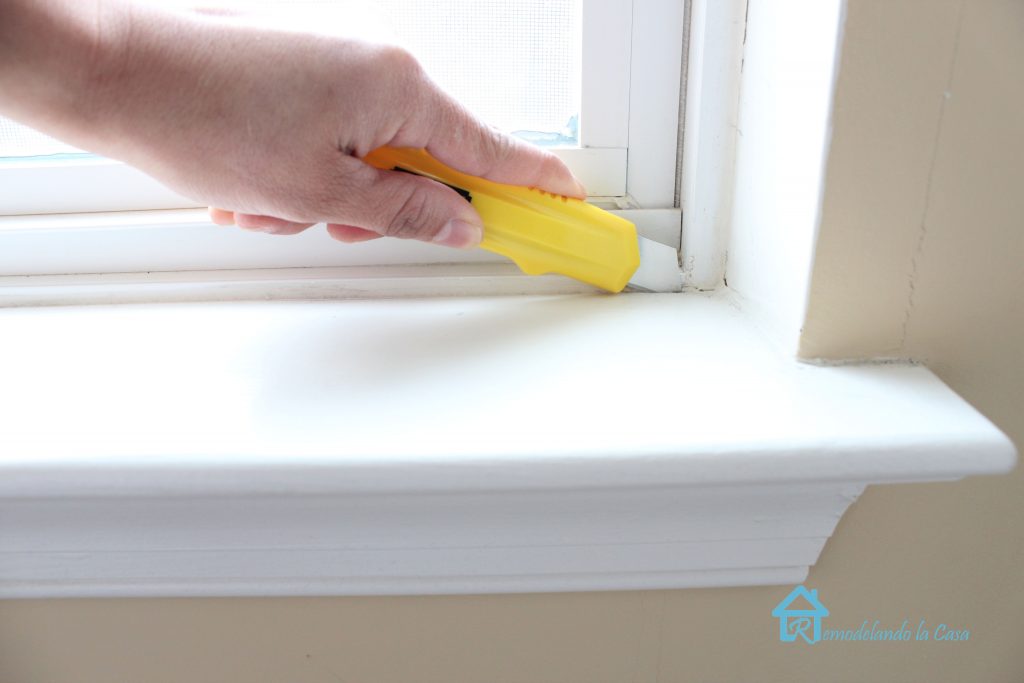
Using the utility knife, score around the window cutting the caulking. This is very important to prevent rips in the drywall.
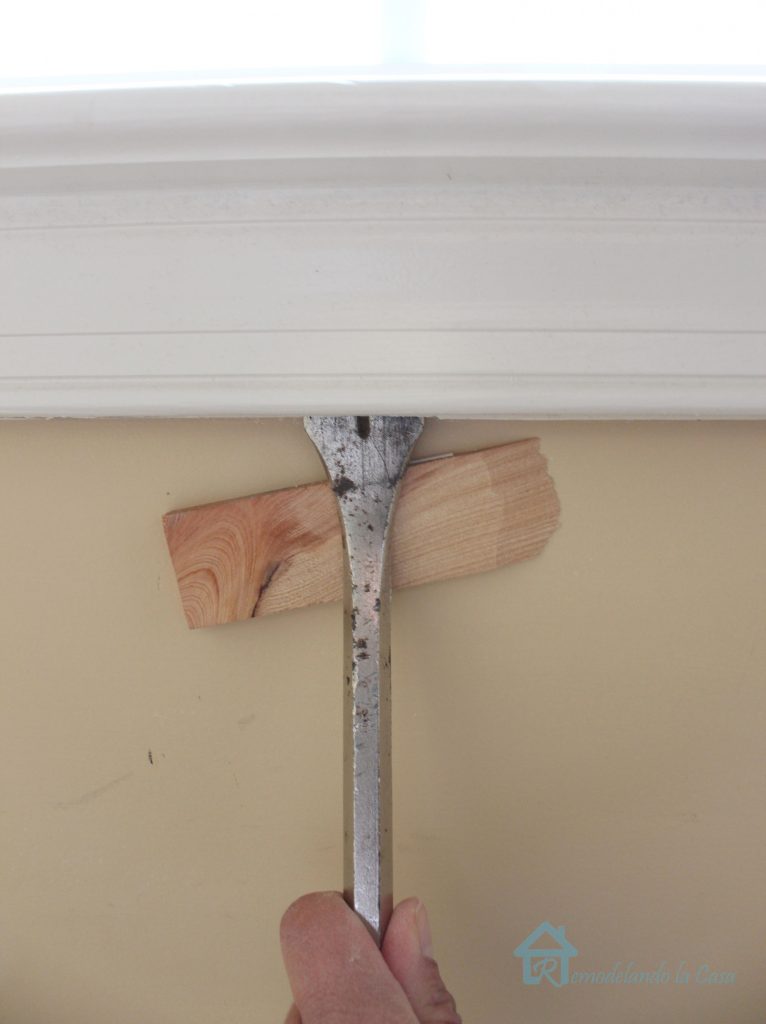
Using the pry bar begin lifting the apron, use a wood shim as support to prevent damage to the wall.
Once the apron is off, you can begin lifting the stool.
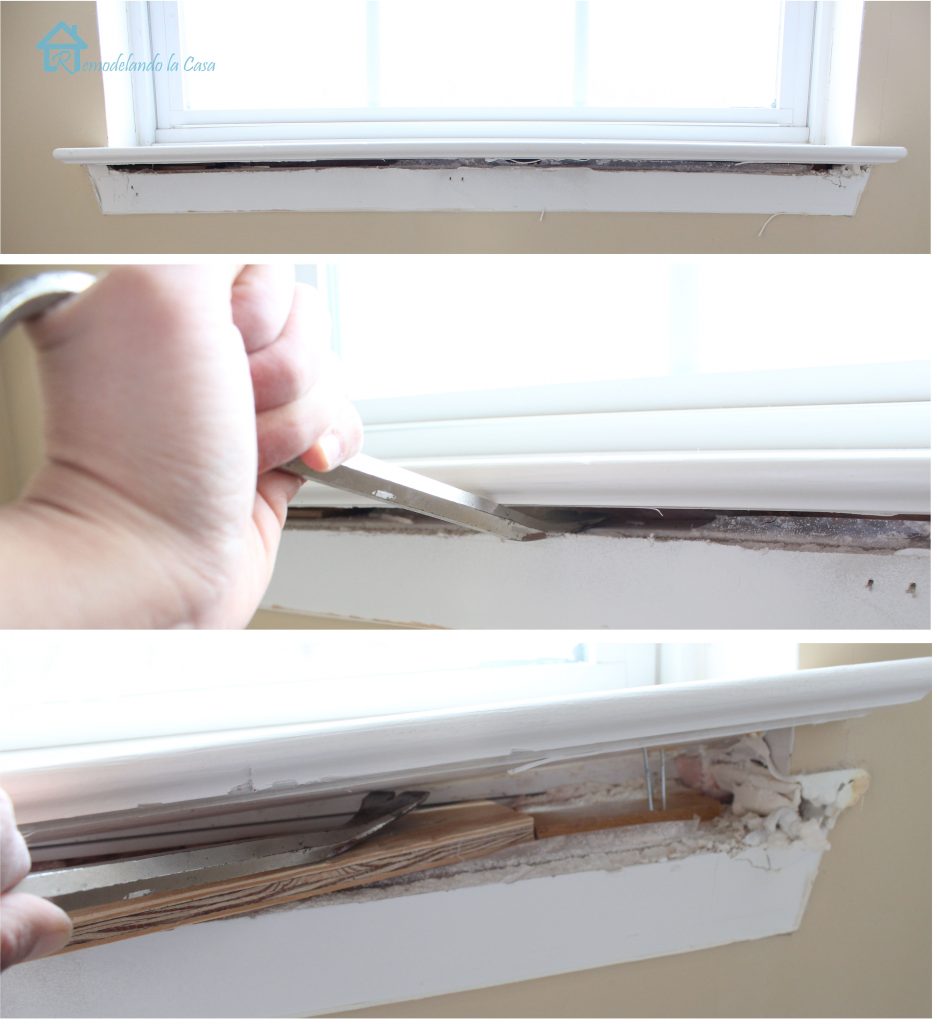
Underneath I found lots of wood shims that were used to level the stool. They were left in place. Scrape the old caulking from the window and wall.
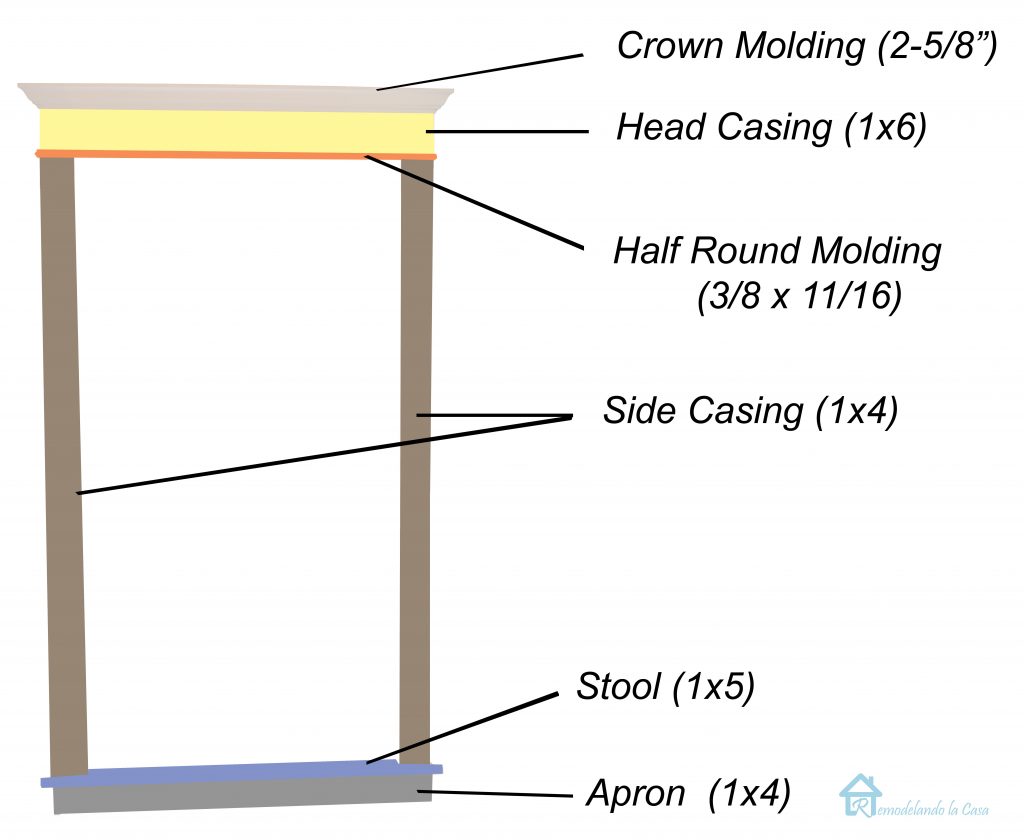
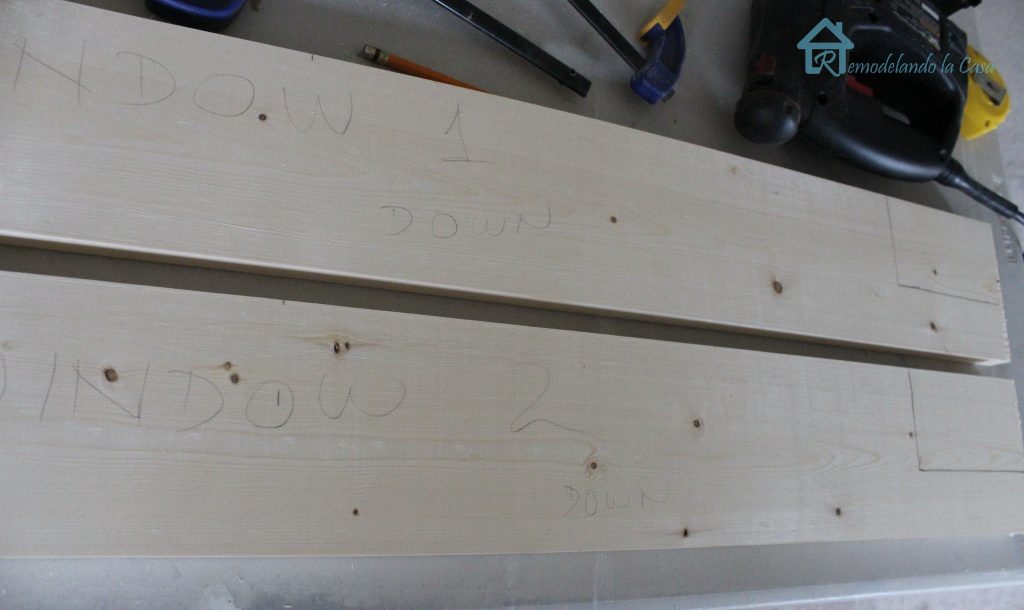
Don’t throw away the old window stool, you can use it to trace the pattern onto your new stool. Measure the width of your window, add the width of both side casings: 7 inches, add 1/2″ for reveals (1/4″ on each side) and add 2 more inches for the “horns” (The horns are those extra parts on the window stool that go beyond the apron. Allow one inch on each side of the stool.)
Mark the center on the old and new stool boards, align those centers and trace the new pattern.

If you are working on more than one window, it is a good idea to mark each board, even though they look pretty much the same, their measurements can vary.
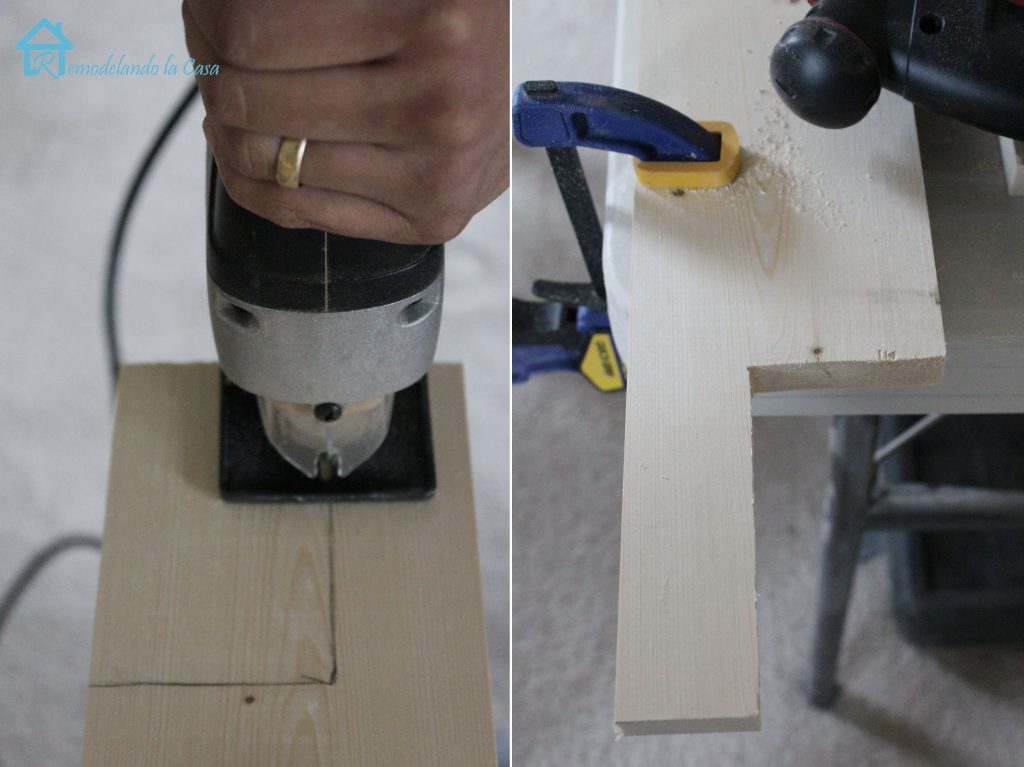
Use your jig saw to cut away those marked ends.
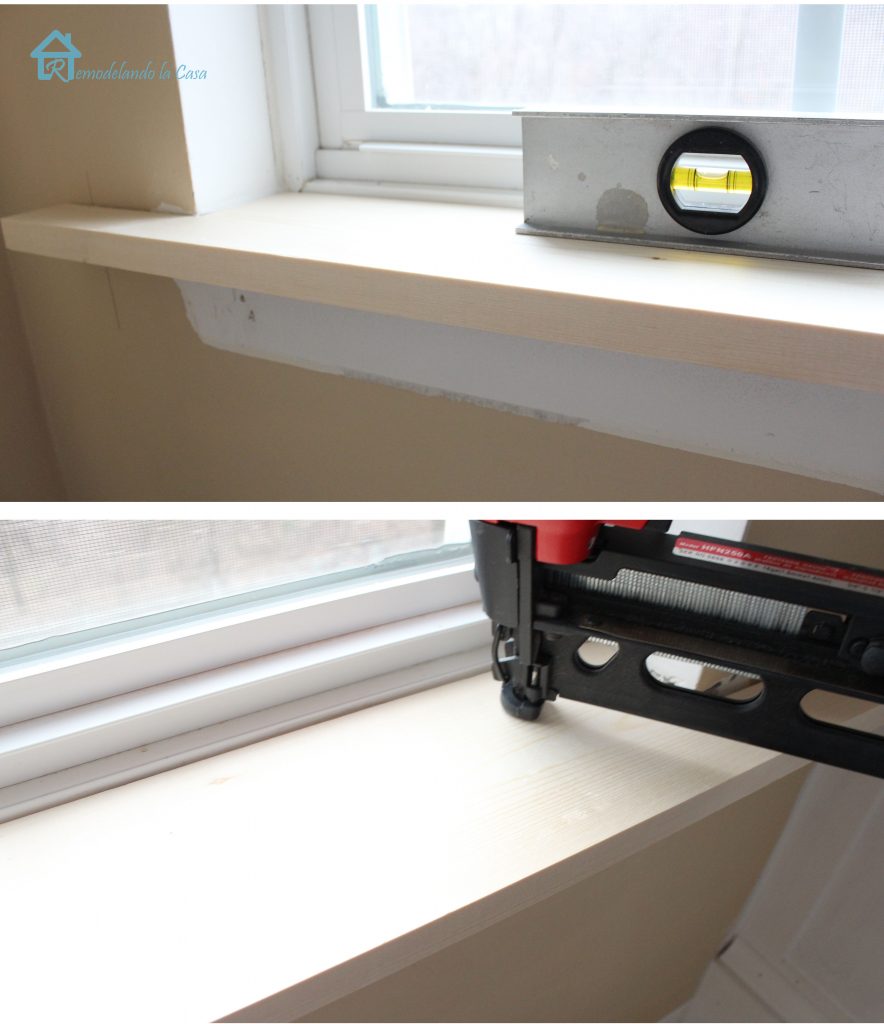
Place it on the window and make sure the new stool is level. Nail it in place.
The apron can be installed by centering it underneath the stool. The dimensions are the same as for the stool, but without the horns (2″). As shown below, the horns protrude an inch on each side beyond the apron.
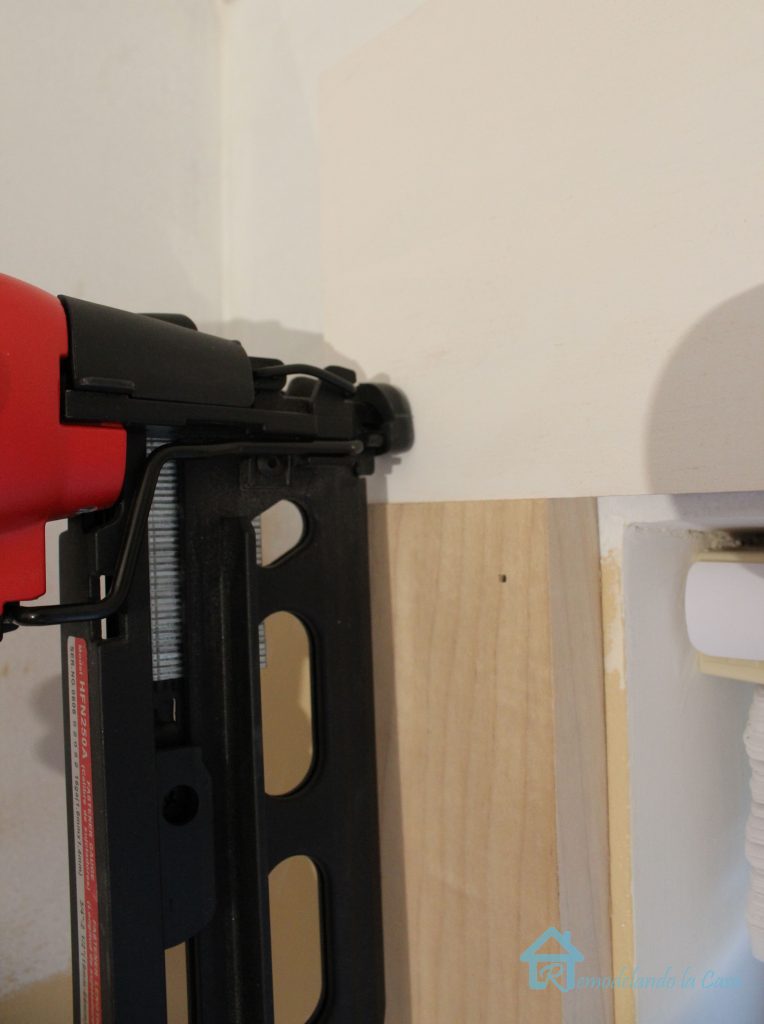
The side casings can be installed now. To figure the length of the side casings, measure the distance from the stool to the top of the opening of the window, add 1/4″ for reveal line. Secure the side casings with nails.
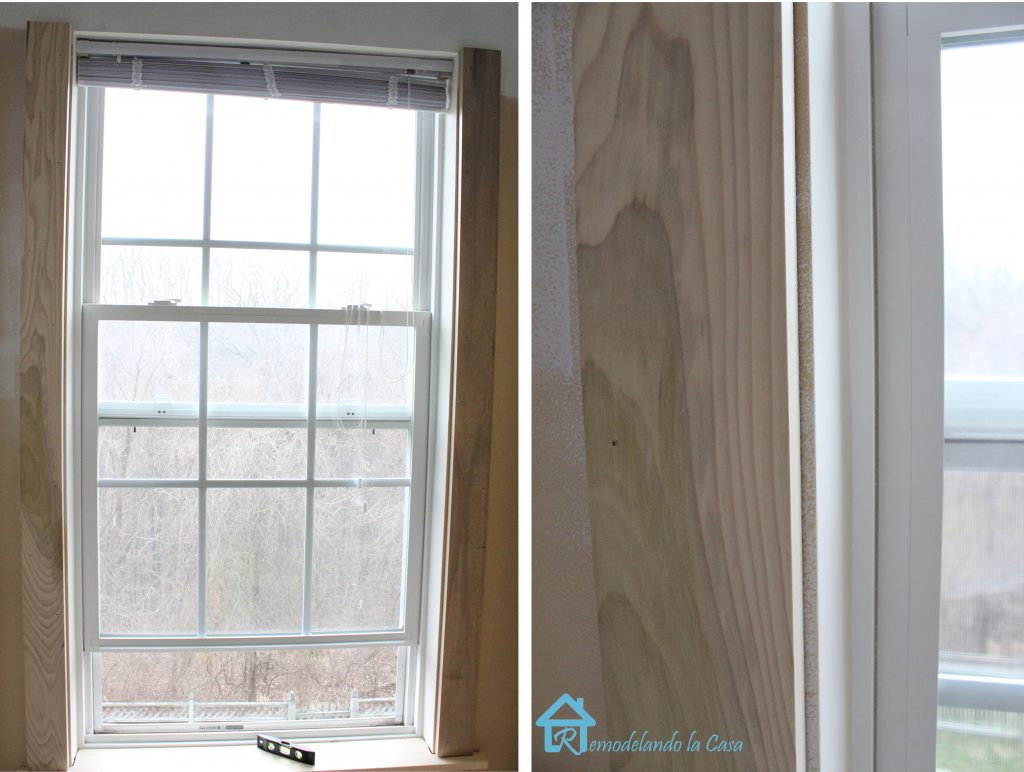
After the side casings are installed, measure the distance from the outer edges of the side casings. That will give you the head casing length.
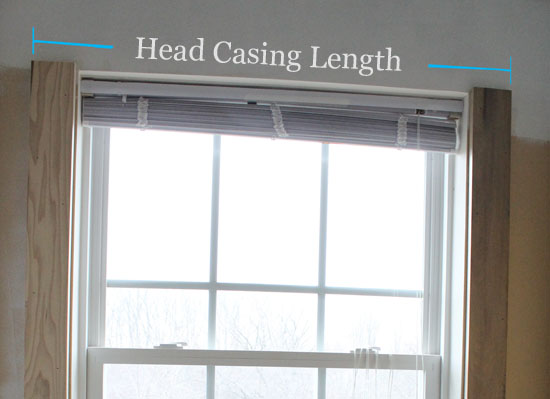
Nail the head casing in place.
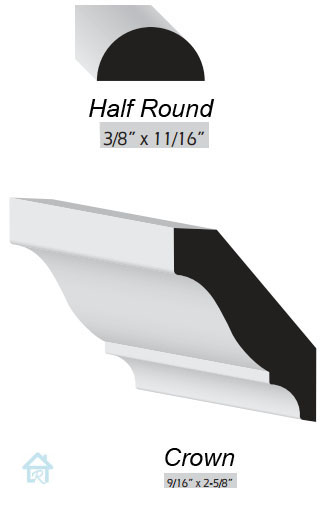
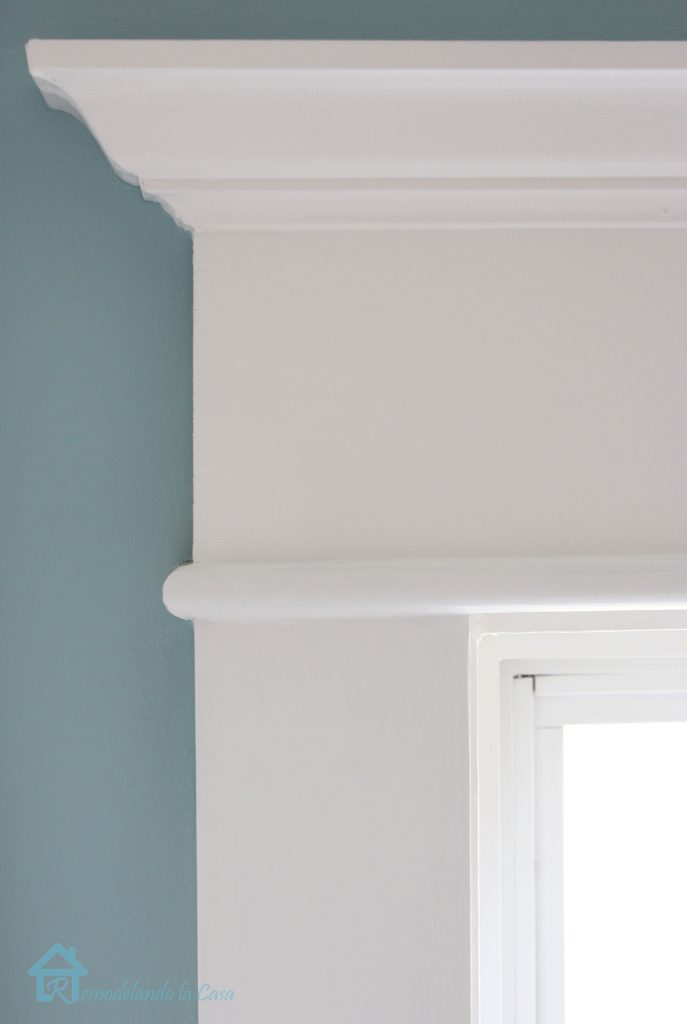
Cut the decorative molding, crown and half round.
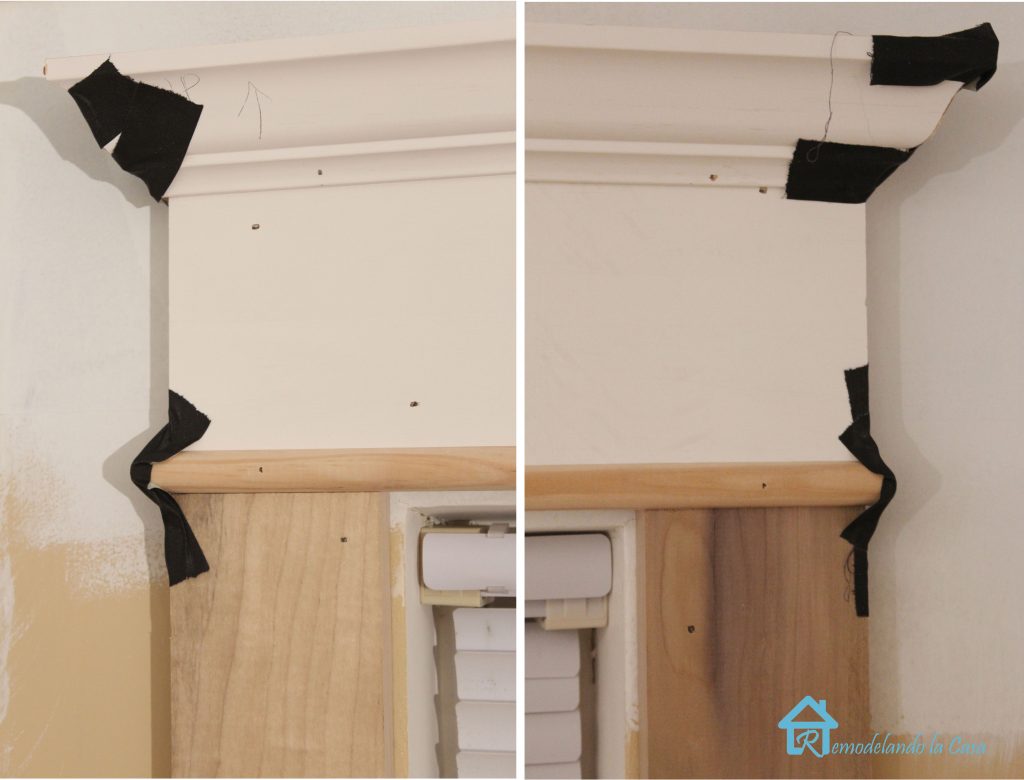
When cutting the decorative molding, miter the ends (cut at a 45 degree angle as shown below.) Remember to cut the molding upside down.

The crown is installed at the very top of the head casing and the half round is attached to the bottom of the head casing.

The returns (side pieces of the decorative molding) are glued in place and held overnight with tape.
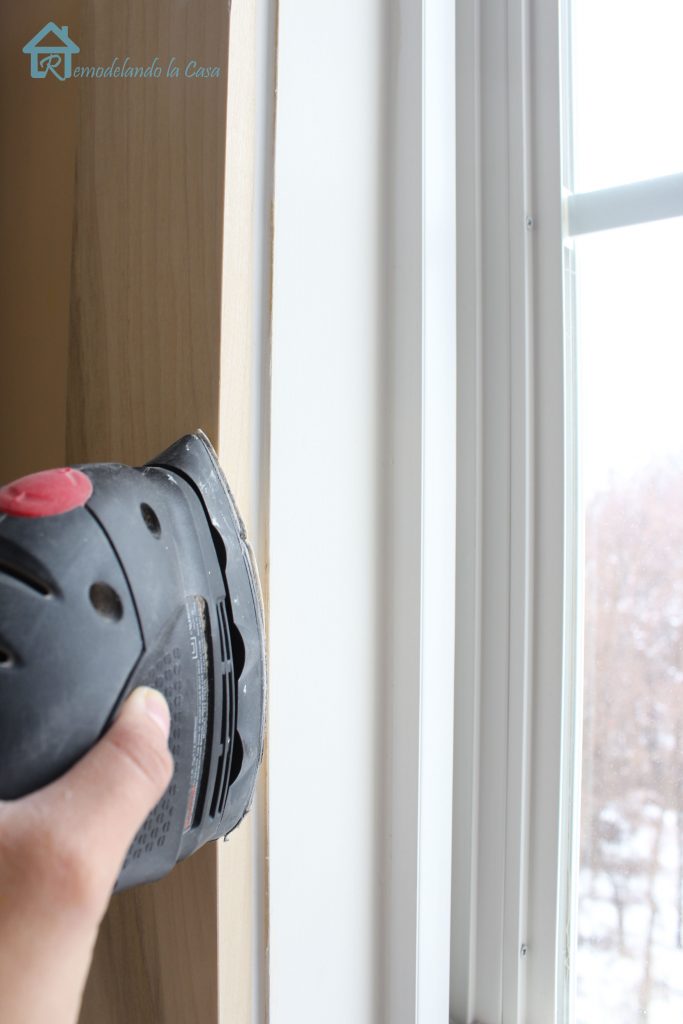
Fill the nail holes and gaps with caulking. After the caulk is dry, a good sanding is a necessity. Don’t forget to sand those sharp edges too.
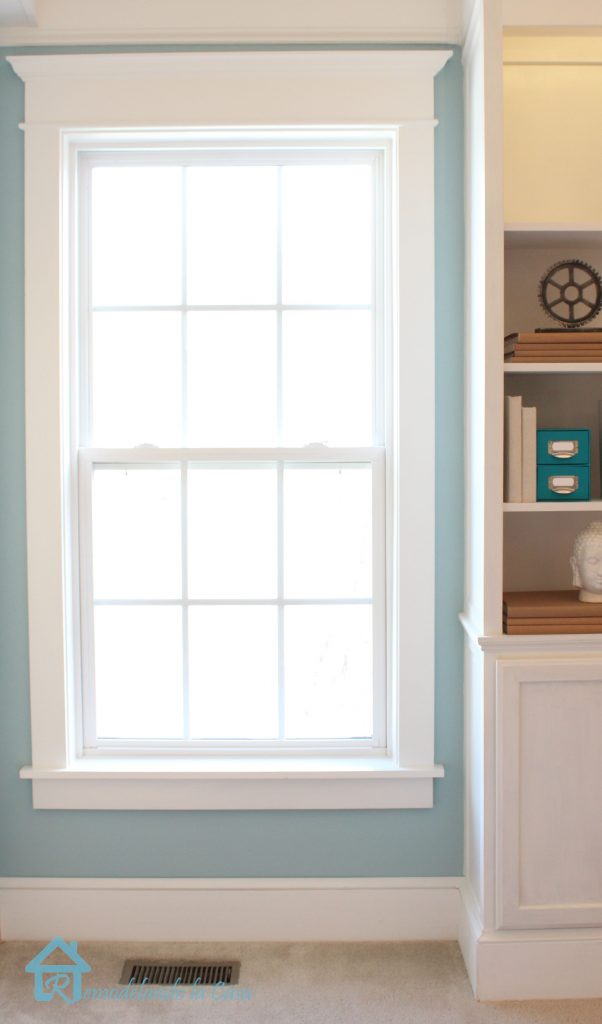
Paint the trim with one coat of primer and two coats of paint. Then you’ll have good looking windows in your room!
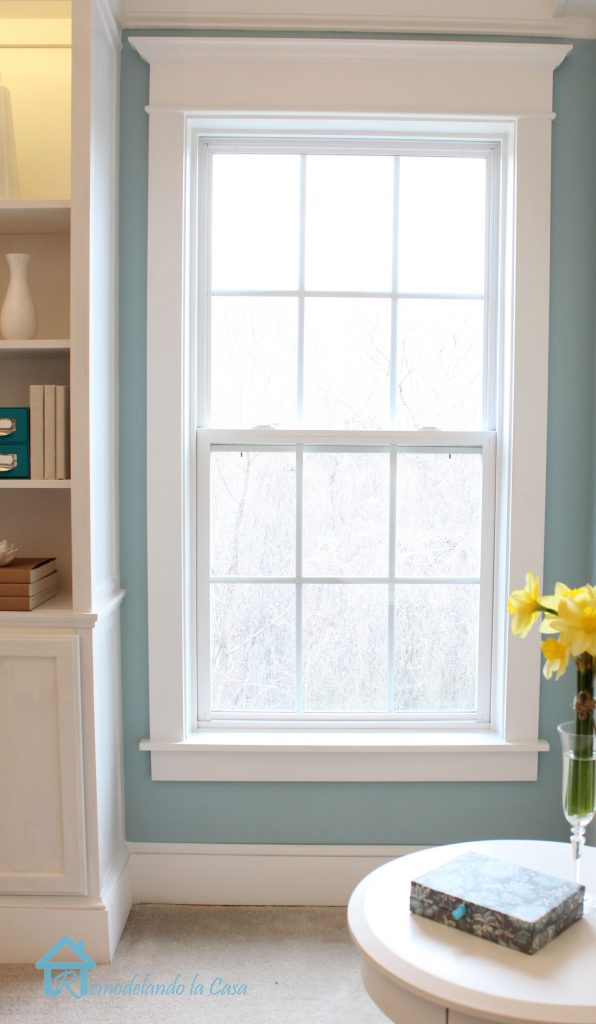
Add new paint in a contrasting color on the walls and the room is almost ready!
I had some leftover paint that I mixed to achieve this hue.
These twin windows really add a lot of character to the room.

The trim makes a big difference, wouldn’t you agree?
Thank you so much for having me here at Pretty Handy Girl! I can’t wait to share more with you!
Don’t miss Brittany’s great tutorial for trimming a casement window: How to Install Trim and Casing Moulding on a Casement Window by PrettyHandyGirl


is the top piece of your molding open to the wall? When I come down the steps I will see the very top of mine. Any suggestions? thank you
Angie, yes, the top is open but you can install a top cap, using lattice. Leaving a 3/8″ reveal at the front and both sides of the crown molding (measure the length between the outside edges of the returns and add 3/4″). Cut the lattice, then center and nail it over the crown molding.
I like adding a shelf on top of the crown — it will need to stick out 1/4 – 1/2 inch further than the sides and front of the crown. You’ll need a 1×8 board on the top instead of the 1×6. Your “shelf” or top piece will nail down into the top side of the 1×8. You’ll then tack on your crown which will be under the “shelf” and on the face of the 1×8. I hope that makes sense…..I can’t explain it well in words.
About how much did it cost to do this window?
JaWone, I would guess about $20. But prices will vary at your local store.
In Alabama, the crown is $11 for an 8 ft piece, the 1×4 casing is $5.50 for an 8 ft board, the half round is $7.00 for 8 ft piece, and the 1×6 I used for the sill is $10 for an 8 ft board. You’re looking at $39 for 1 window before tax, primer, paint, and caulk (although if you have small windows, you may can get 2 windows out of 1 length of crown and half round). This adds up quick when you do a whole house, but it’s permanent, and looks so wonderful that I’ll never have to buy drapes or curtains again.
Wait…it’s $44.50 for 1 window……in my above estimate, I forgot to add in the 1×4 that goes below the sill.
ive been searching for a post on this and finally i found one . thank you for sharing. i have two fears one removing the previous apron and second during another project that i know my husband will complain about. oh well ill let u know the outcome.
Thank you SO MUCH, Cristina! I have 6 windows to trim out and was unsure if that top header was a 1×4 or a 1×6, and wasn’t sure about the size of the half-round — you really helped me to clear things up. Thanks again!
What an amazing tutorial, thanks so much! The results are stunning indeed. I hope you don’t mind me asking a question: Why do you add 1/4″ for reveal line and not place the side casings right on the edge? I assume there’s a good reason for that, but I ‘m curious. Thank you!
Thanks Ana, great question! The reveal line helps to add definition to the molding, it also helps not to end up with an ugly seam where the edge of one board lines up directly over another.
Today was my first visit to this website…. I really want to thank you from the bottom of my heart for this window trim tutorial 🙂 Thank you very much.
I wish if somehow you can show some ideas about trims / casing for a ‘square’ archway [that are situated in corridors] with thick bottom plinths that can match a baseboard. Thank you!
Thank you so much, Dorine! I think Houzz and Pinterest are good places for you to find ideas about trims.
All of the windows in my house look like the one in your before picture. If we are going to be putting up blinds and/or curtains over them, do you think it’s unnecessary to trim them out? I love the look of trimmed out windows, I just don’t know if it’s worth it if I am going to be using curtains anyway (you wouldn’t see the trim, except for maybe at the top when curtains are drawn). What do you think?
The trim itself is not a necessity in our cases, but it brings architectural detail to a room, the windows look finished. In my dining room the floor to ceiling curtains were hang in a way to leave enough space on each side of the window to showcase the trim, the windows appear to be wider than they are when you do this. It creates openness in a room.
You are a lifesaver! I have looking for a tutorial on this and couldn’t find it anywhere – thanks so much!!
Love this! You are so incredibly talented Christina. Brittany or Christina I have a quick question about the materials. I just got back from Lowe’s buying wood to make something similar to this, but they told me there is not such thing as a 1 x 5 and to use a 1 x 6… did I miss read this or miss something? Please don’t laugh if I’m just being a complete dork.
Beca, oh we’d never laugh at you! You aren’t a dork. The employee probably didn’t realize you were looking for 5″ stool material. It is sold with all the other molding at the back of the store. IT has a flat edge on one side and a rounded edge for the front side. I hope it isn’t too inconvenient for you to go back.
Ha! Nope I am a dork, but thanks. I was didn’t realize that when it said “1 x 5 stool” that it was referring to stool “material” so I was in the wrong isle, ugh I thought stool was the official name of that top piece not the material, like apron, stool….HAHA wait till I tell the hubs about this, I’m sure he won’t have a problem laughing at me. Thanks you soooo much! I love you work. Will let you know how it turns out.
Great tutorial Cristina! What a huge difference the trim makes to your windows. It looks amazing!
Debbie
Cristina, this tutorial was perfectly timed! I used a lot of your tips and tricks to trim our new casement window. Can’t wait to see what you have up your DIY sleeves next!
You go girl – I’m all about adding interest with moulding – this rocks!
Kelly
I have a rotted window sill that I’ve been avoiding like the plague because of the lack og knowlege. Thanks to your brilliant tutorial, I can now face this without fear! Thanks so much Cristina, your window is awesomly beautiful!!
Brittany, you have a great team, I’m looking forward to all of the new projects!!
Thanks Christie, glad you love Cristina’s tutorial! She’s a rock star isn’t she!
HI! Excellent tutorial. I’m going to be trimming 7 windows and 4 patio sliders, then 15 pocket doors and 1 regular door. I have no trim whatsoever at this point.
Getting started has been difficult because I didn’t know WHERE to start! Now, I’m guessing if one doesn’t have … jams(?), they would be the 1st step. If the parts are actually called jams, I’m thinking of the wood that encircles the window, where you measured against to cut the stool. Would you say I’m on the right track? If so, you just took the fear of God, ok, fear of window trim out of me.
Got more tools than Home Depot (almost) and am teaching m’own darned self. Windows will be added to my portfolil. Thanks for taking the time.
Wow, that’s a lot! I think you are pretty much on the right track, jambs would be the first step. One thing you’re not going to regret is having all those tools 🙂 and your portfolio will be bursting with window experience when you finish this job. Good luck!
Love this!!! It looks awesome. I have a question…my window ledges have really ugly tile on them. Do you think I can bust that ugly tile out of there and put wood instead? Thanks for your help!
Thanks Kim! I guess so, if the tile was only installed for decorative purposes I think you should be able to get rid of it and give it a new look.