Hi everyone, I’m Cristina from Remodelando la Casa, and I’m beyond excited to join the team of Pretty Handy gals and guys! I’m still pinching myself at such a wonderful opportunity.
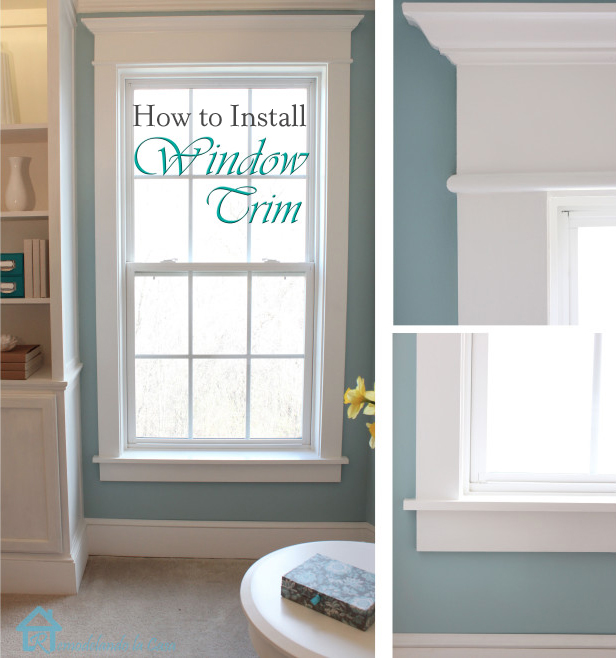
Today I’m going to show you a fairly easy way to transform your builder grade windows from plain and boring to beautiful with loads of character and with a more finished appearance.
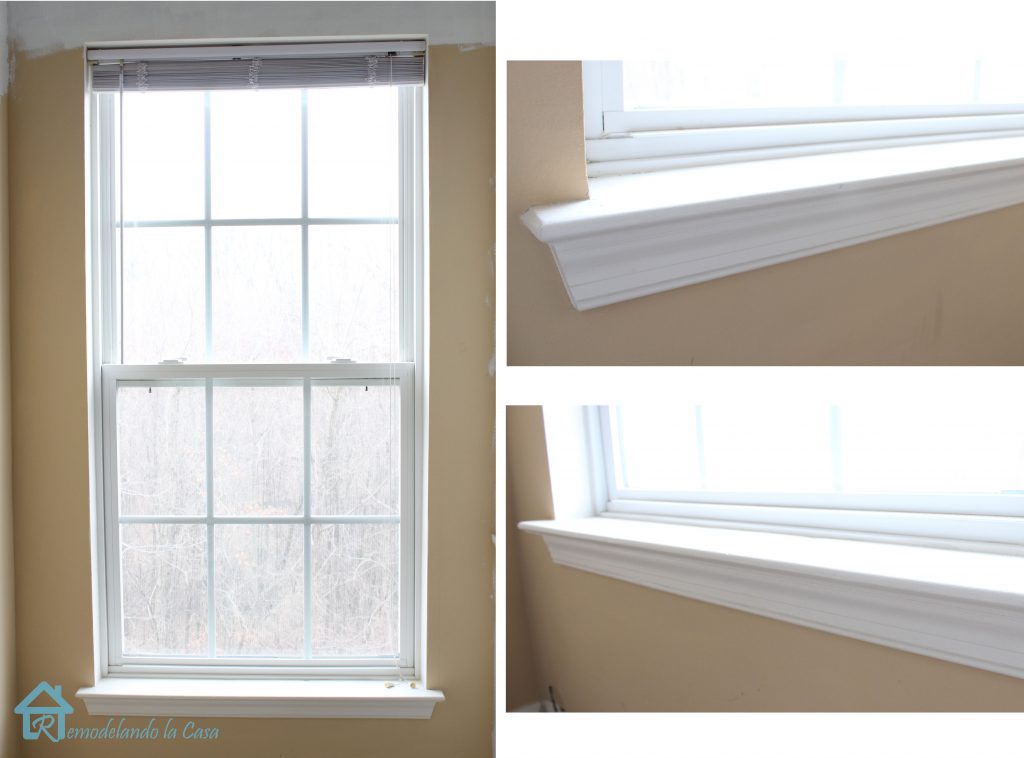
Right now I’m working on updating my bedroom, where I have a couple of these windows.
They look like they are wearing skirts, but forgot to put on the tops! 🙂 Yeap, naked!
Let’s change that by dressing up those windows!
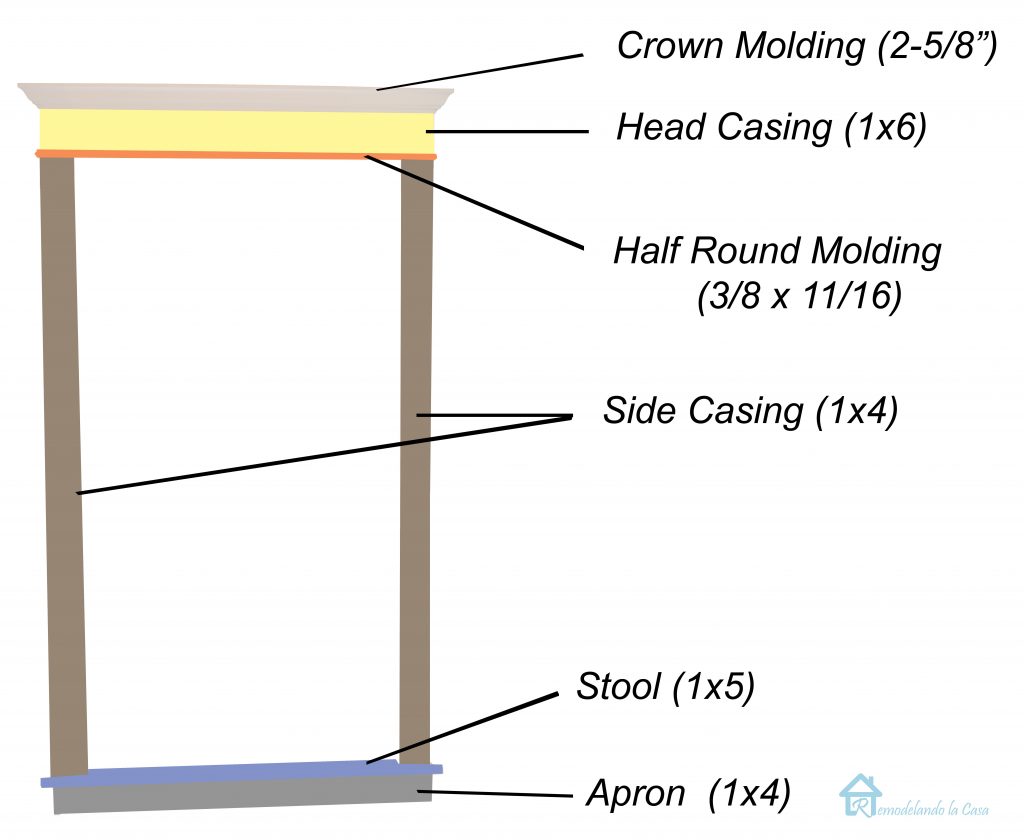
This is only a decorative treatment. All the wooden material (Poplar or Pine), can be found at your local home center.
(Affiliate links are included for your convenience. Brittany earns a small percentage from a purchase using these links. There is no additional cost to you. You can read more about affiliate links here.)
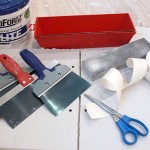
Tools:
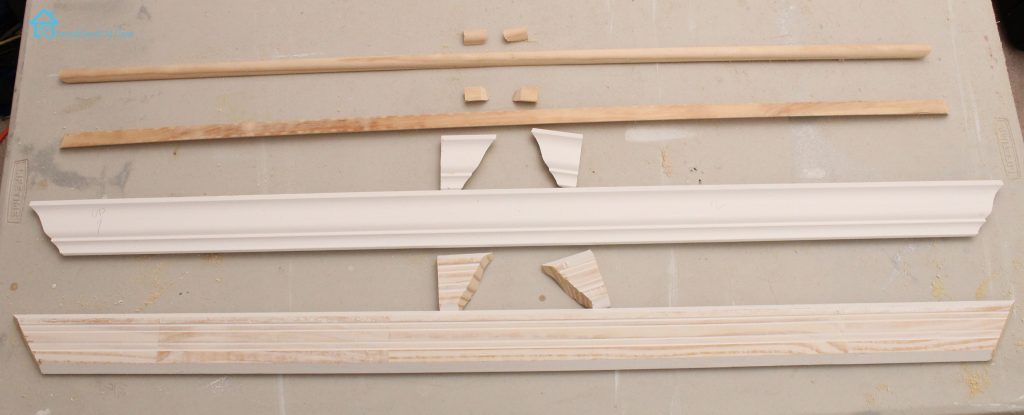
How much material you need depends on the size of your window, but this is what I used:
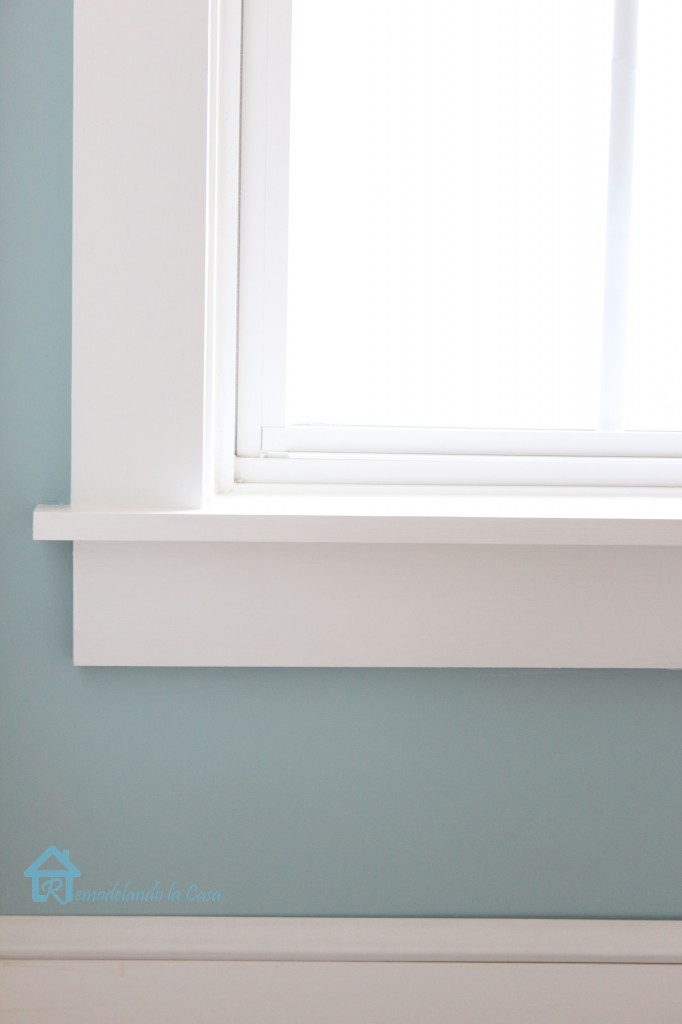
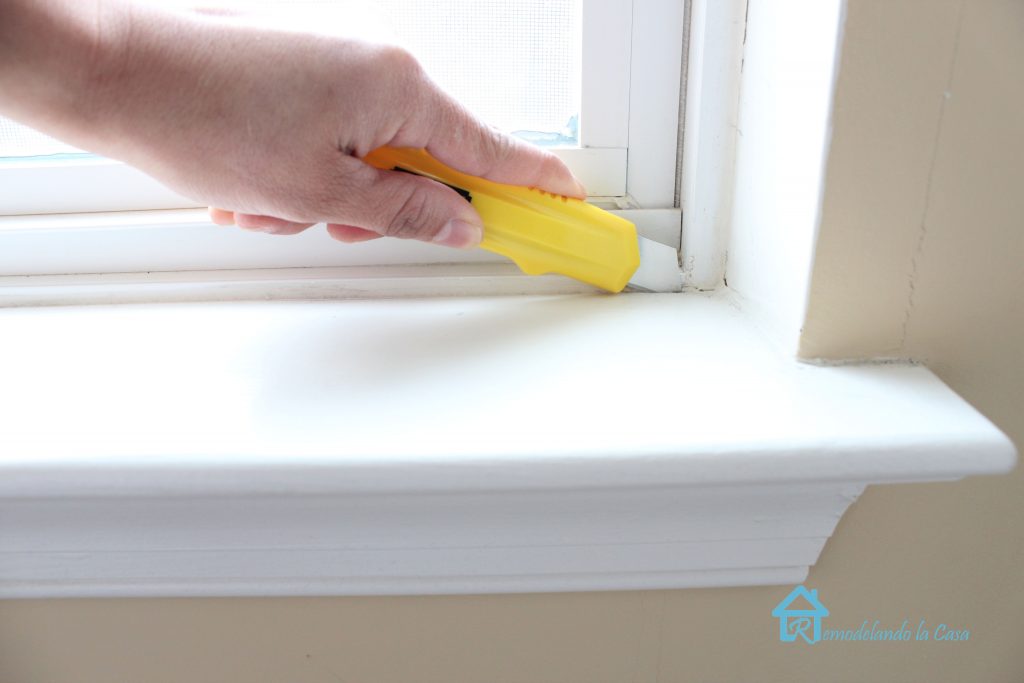
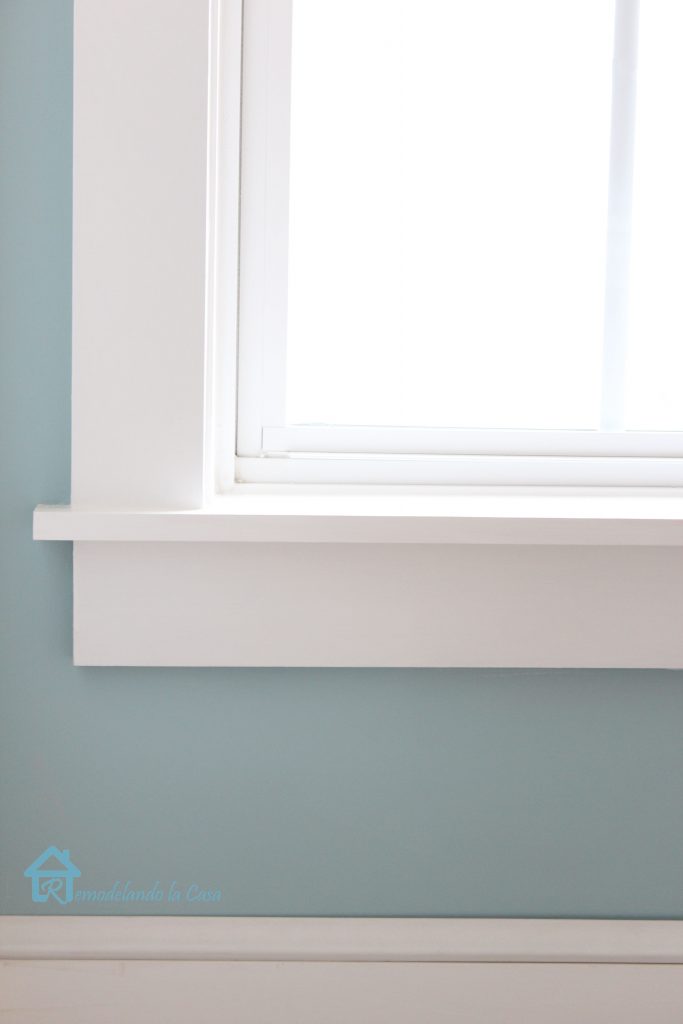
The first thing to do is getting rid of the old window stool and apron.
Using the utility knife, score around the window cutting the caulking. This is very important to prevent rips in the drywall.
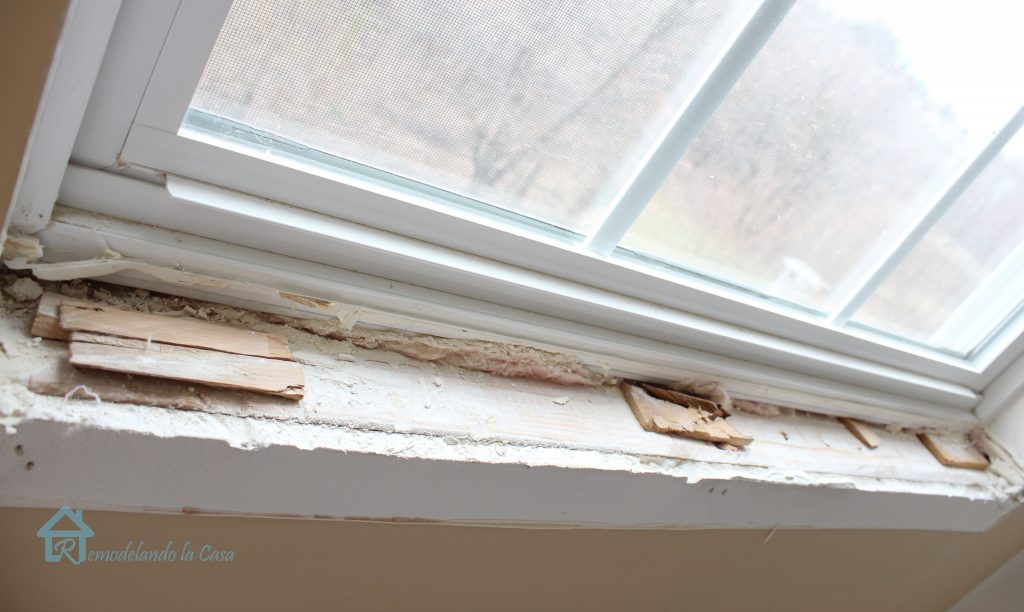
Using the pry bar begin lifting the apron, use a wood shim as support to prevent damage to the wall.

Once the apron is off, you can begin lifting the stool.
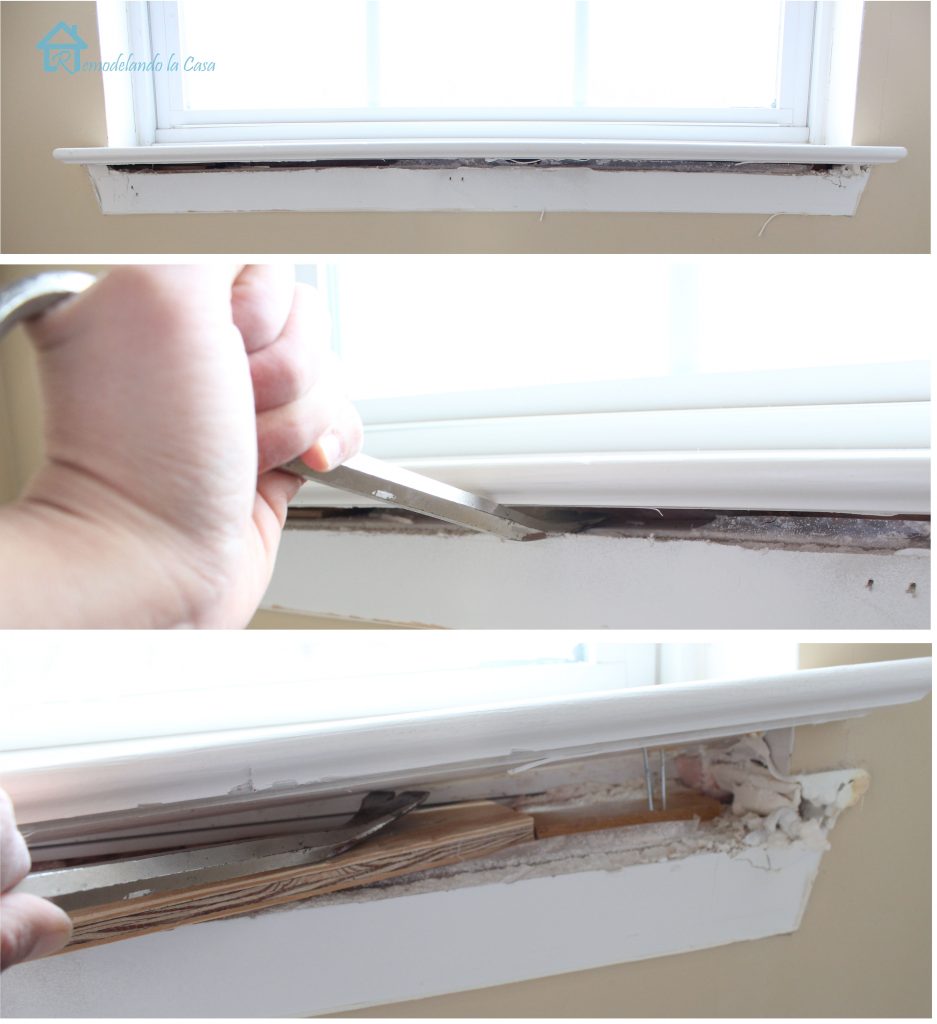
Underneath I found lots of wood shims that were used to level the stool. They were left in place. Scrape the old caulking from the window and wall.
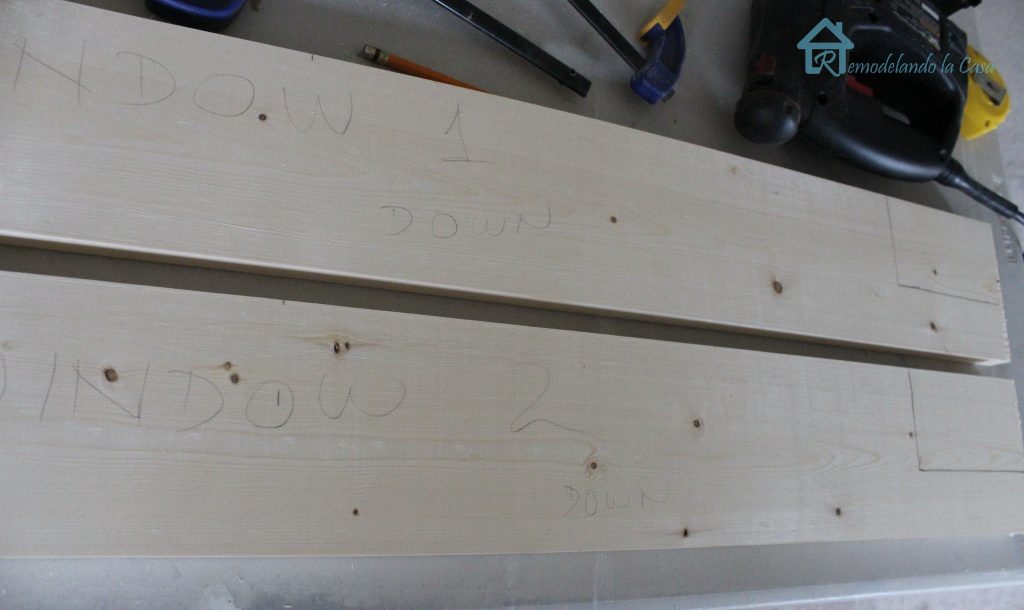
Don’t throw away the old window stool, you can use it to trace the pattern onto your new stool. Measure the
width of your window, add the width of
both side casings: 7 inches, add 1/2″ for
reveals (1/4″ on each side) and add 2 more inches for
the “horns” (The horns are those extra parts on the window stool that go beyond the apron. Allow one inch on each side of the stool.)
Mark the center on the old and new stool boards, align those centers and trace the new pattern.
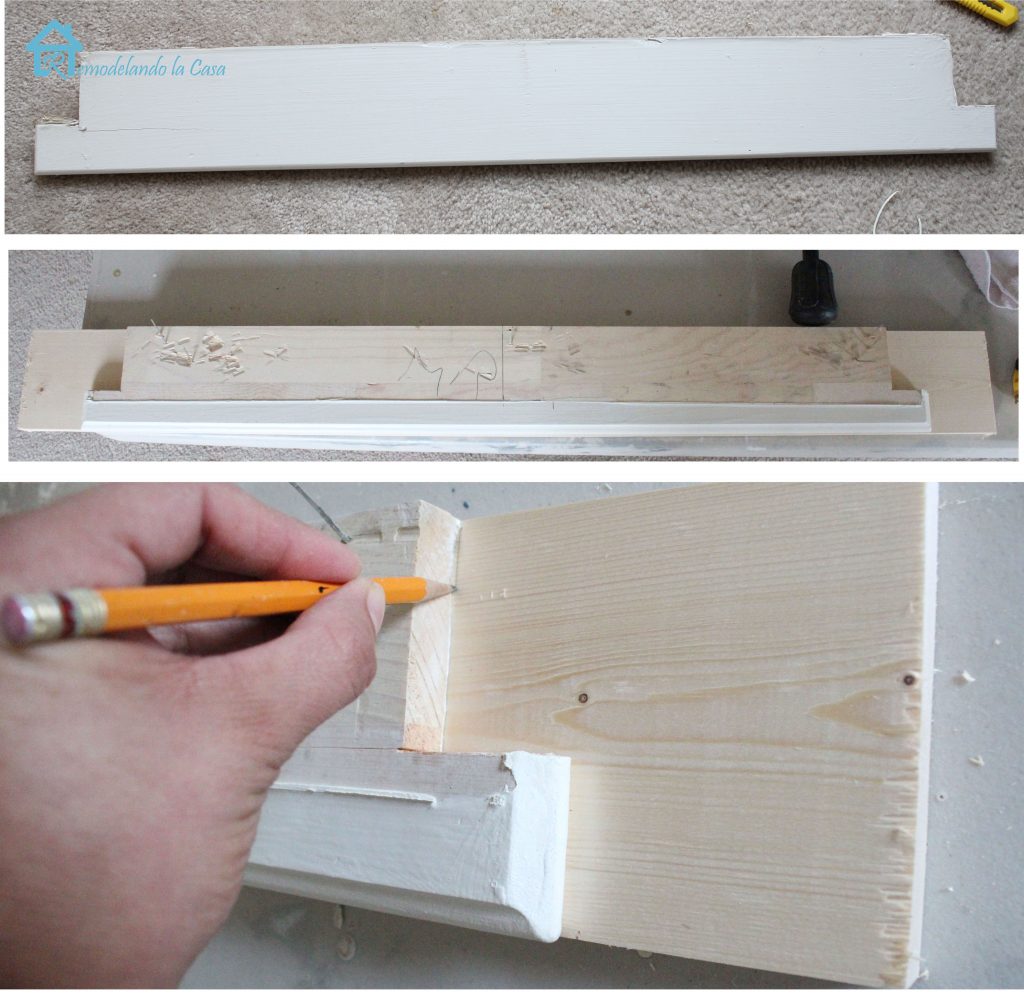
If you are working on more than one window, it is a good idea to mark each board, even though they look pretty much the same, their measurements can vary.
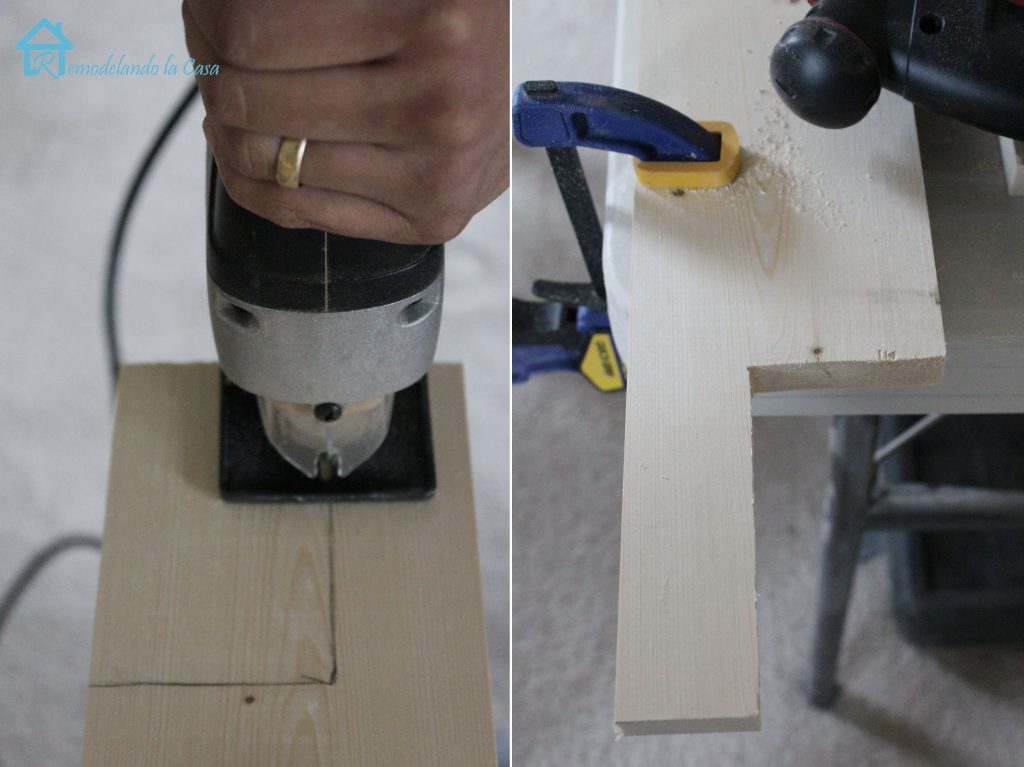
Use your jig saw to cut away those marked ends.
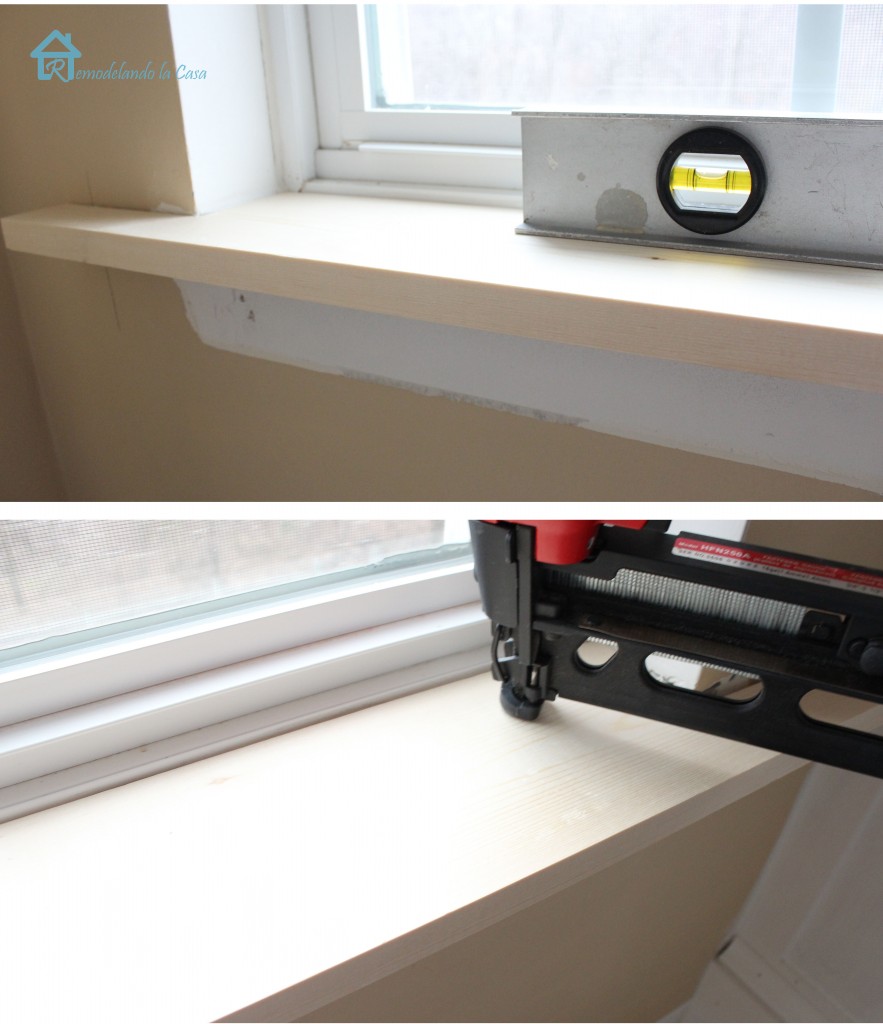
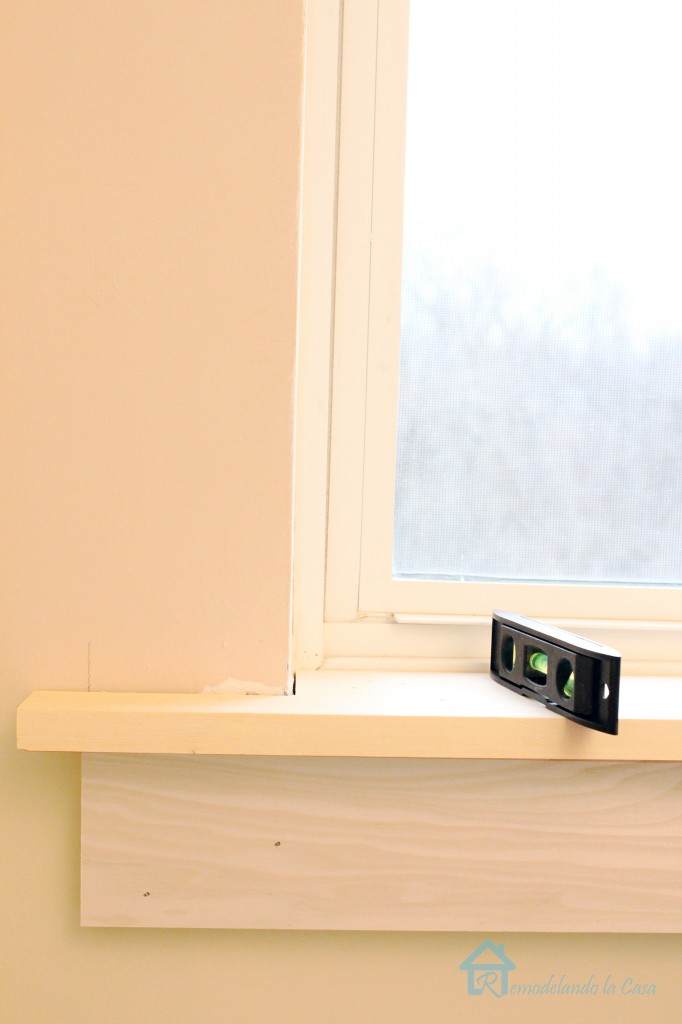
Place it on the window and make sure the new stool is level. Nail it in place.
The apron can be installed by centering it underneath the stool. The dimensions are the same as for the stool, but without the horns (2″). As shown below, the horns protrude an inch on each side beyond the apron.
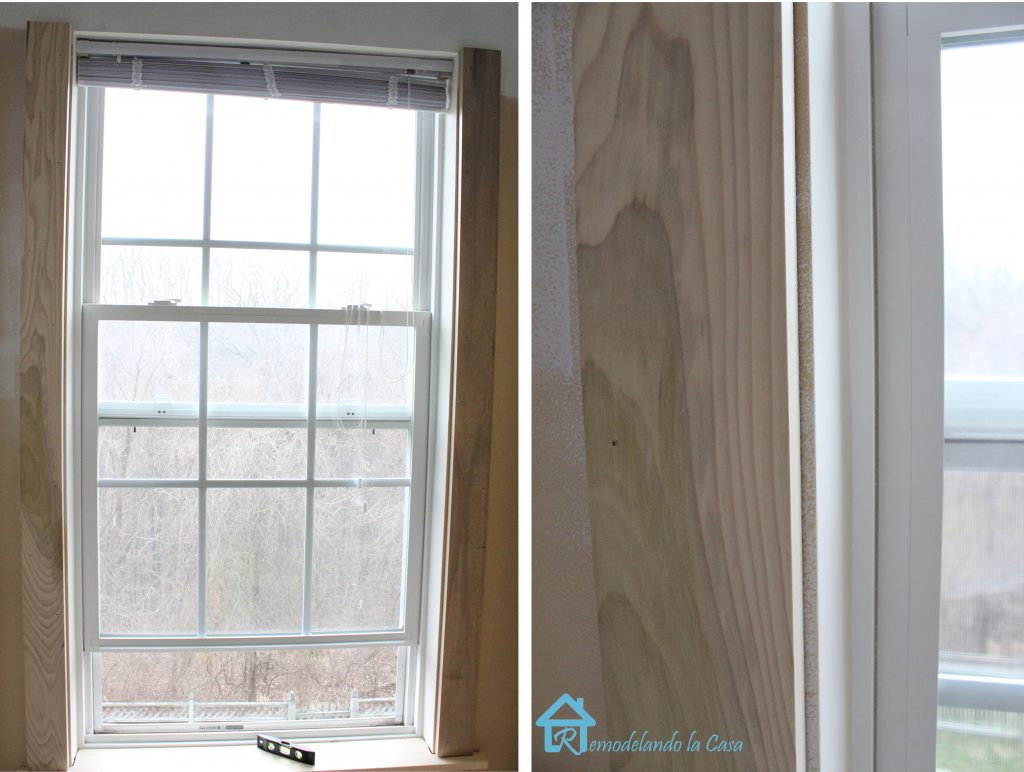
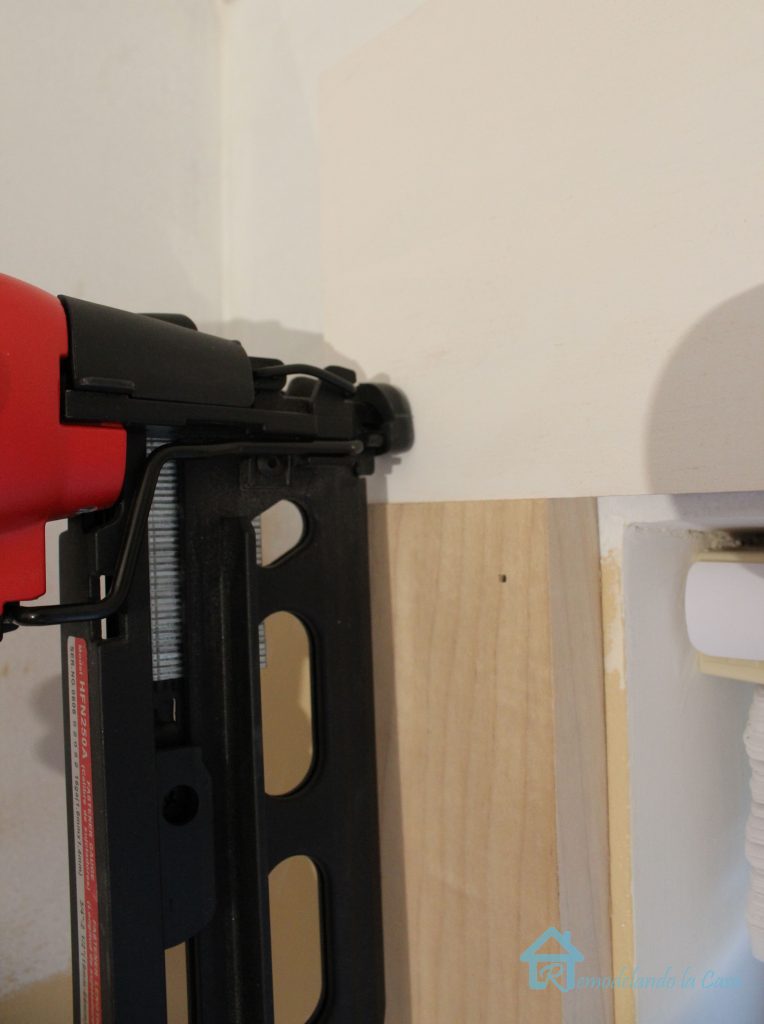
The side casings can be installed now. To figure the length of the side casings, measure the distance from the stool to the top of the opening of the window, add 1/4″ for reveal line. Secure the side casings with nails.
After the side casings are installed, measure the distance from the outer edges of the side casings. That will give you the head casing length.

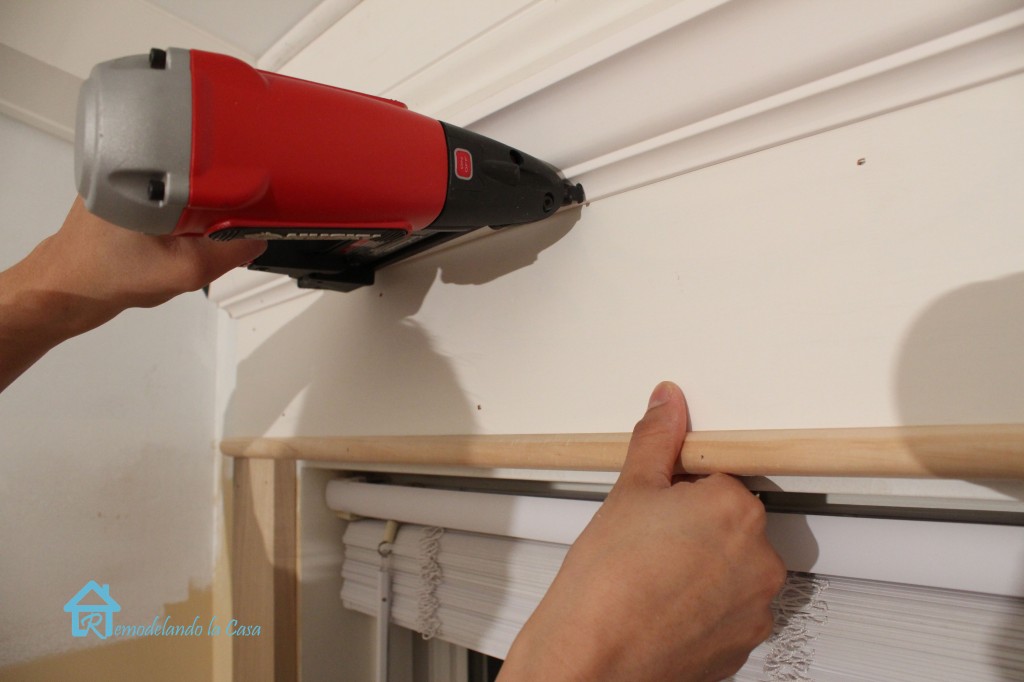
Nail the head casing in place.

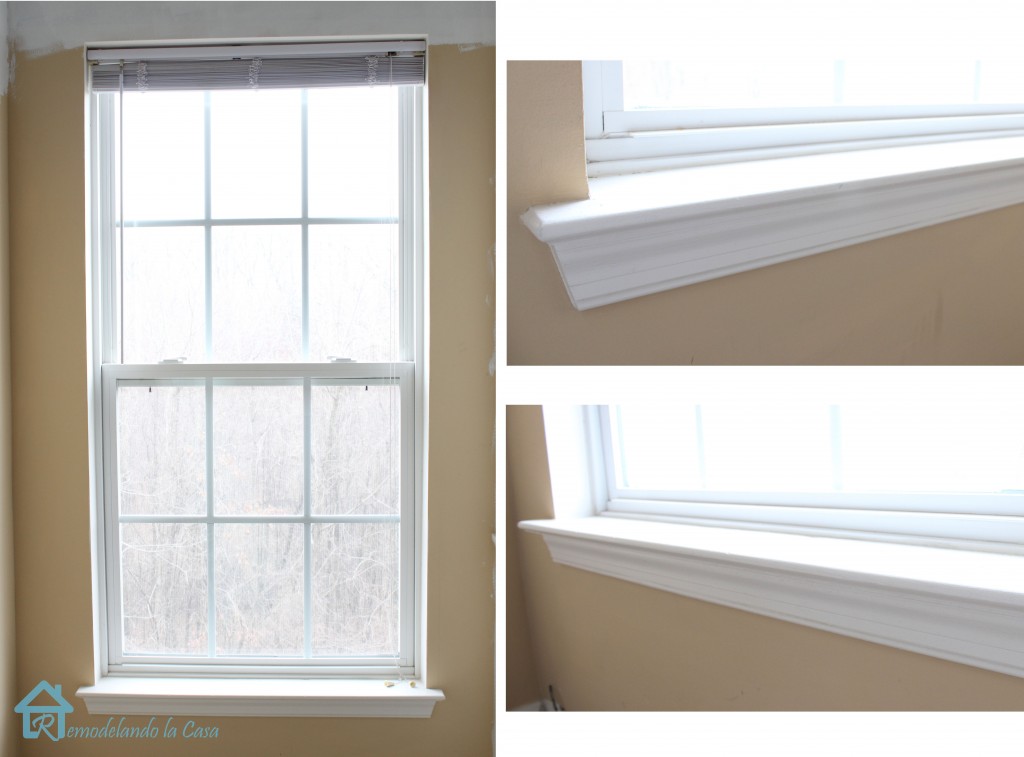
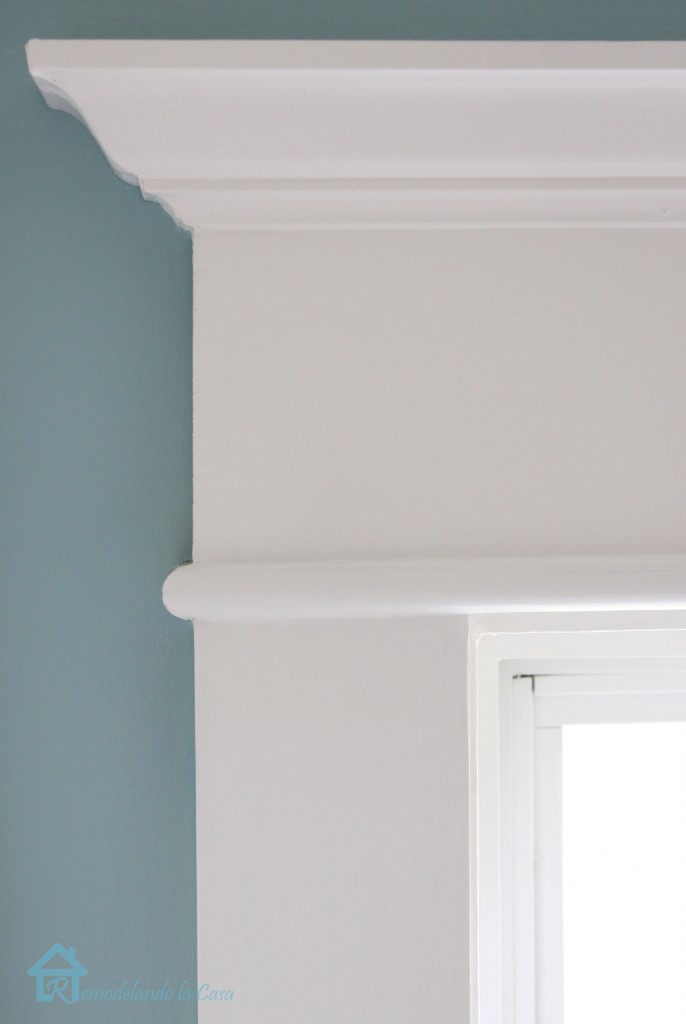
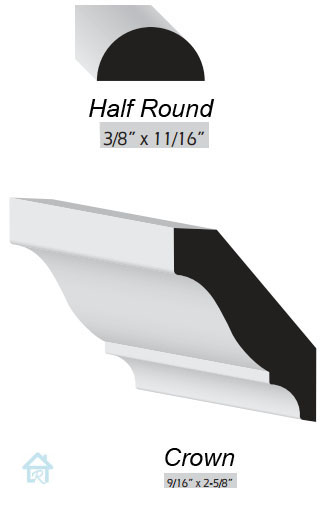
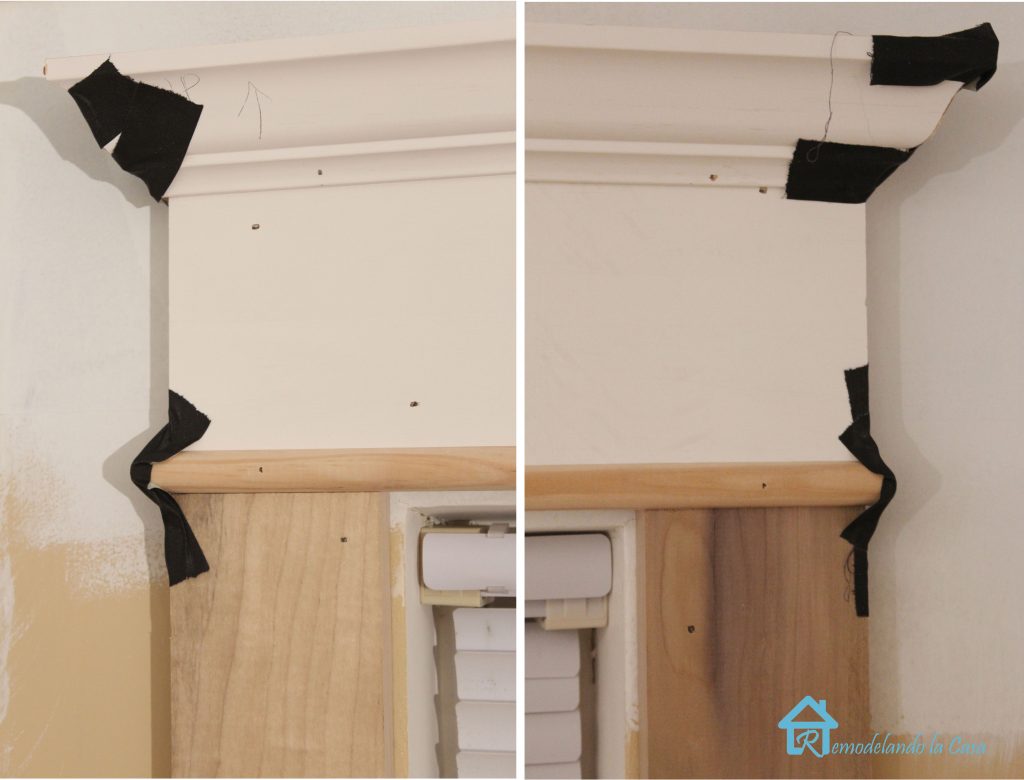
Cut the decorative molding, crown and half round.
When cutting the decorative molding, miter the ends (cut at a 45 degree angle as shown below.) Remember to cut the molding upside down.
The crown is installed at the very top of the head casing and the half round is attached to the bottom of the head casing.
The returns (side pieces of the decorative molding) are glued in place and held overnight with tape.
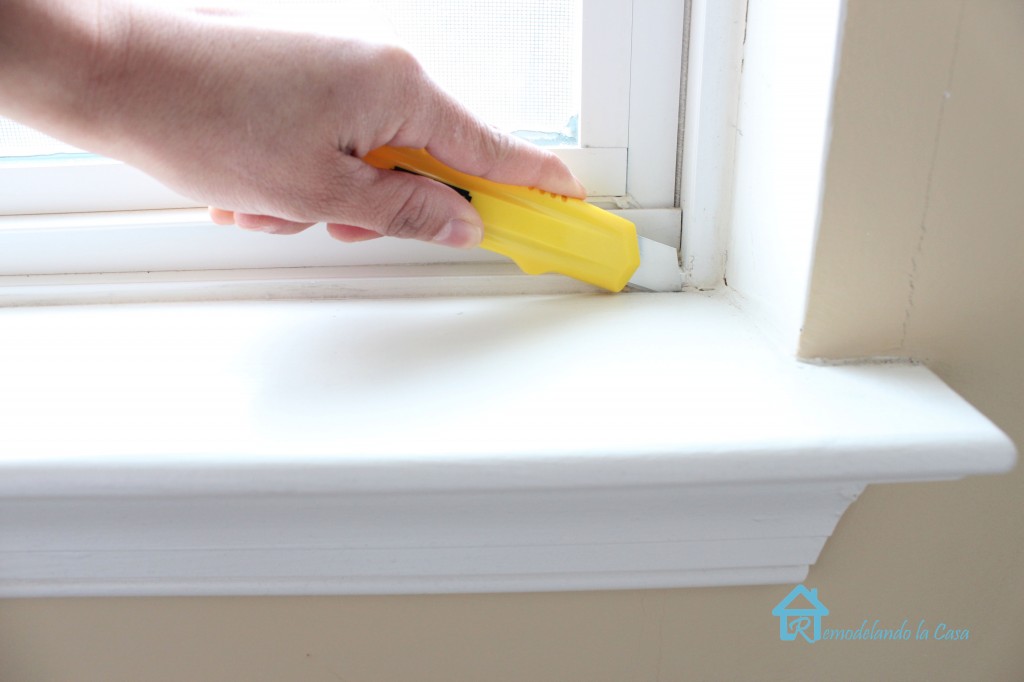
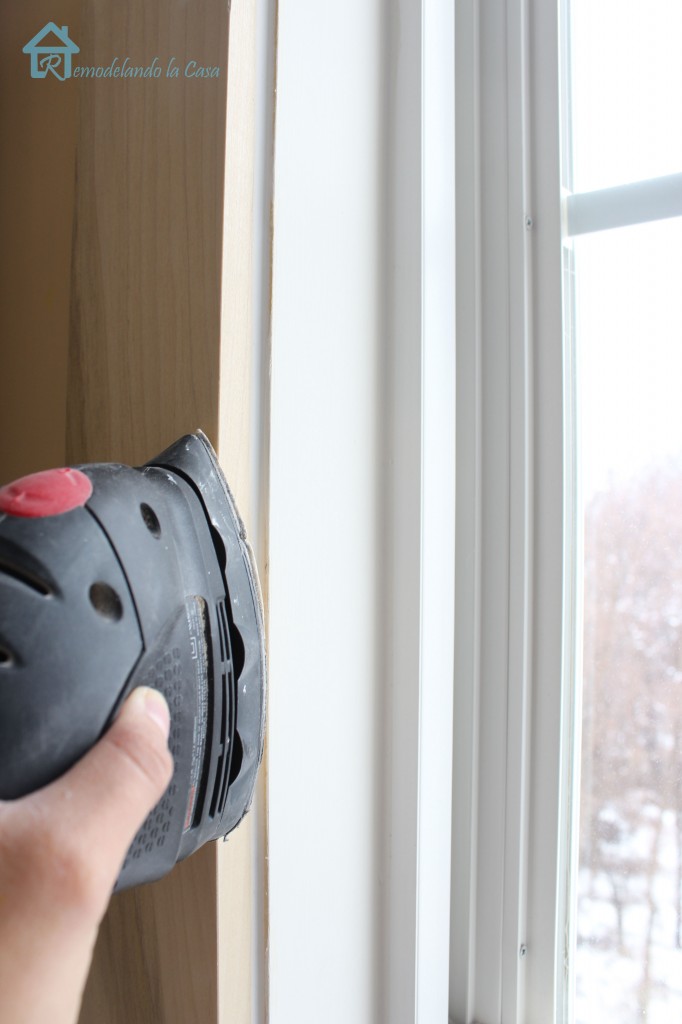
Fill the nail holes and gaps with caulking. After the caulk is dry, a good sanding is a necessity. Don’t forget to sand those sharp edges too.
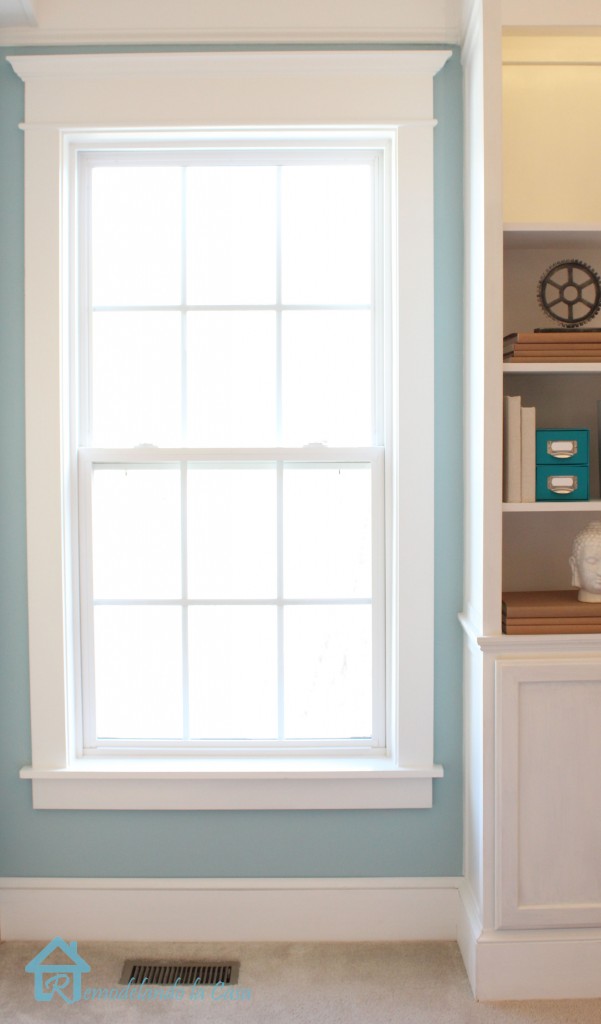
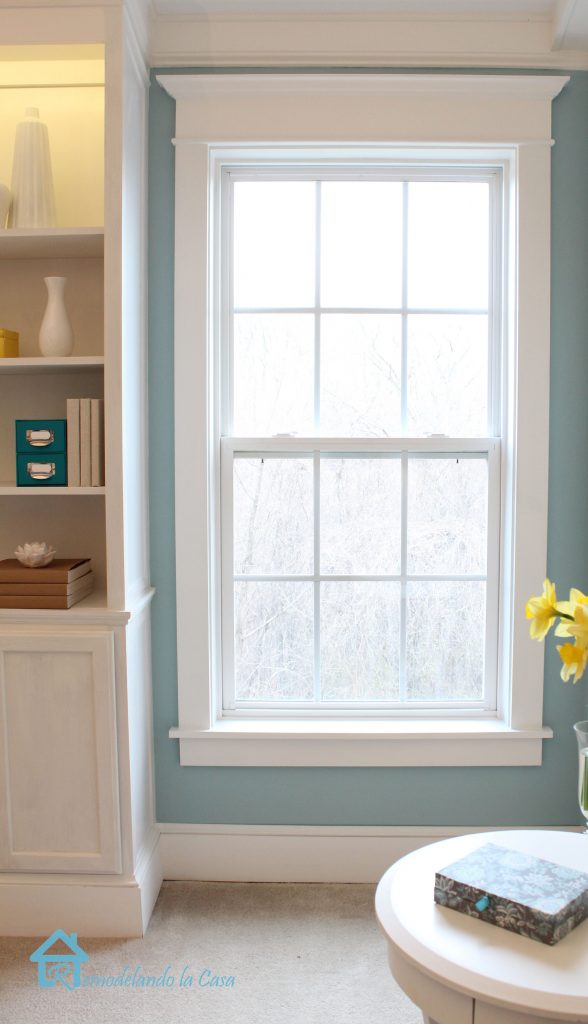
Paint the trim with one coat of primer and two coats of paint. Then you’ll have good looking windows in your room!
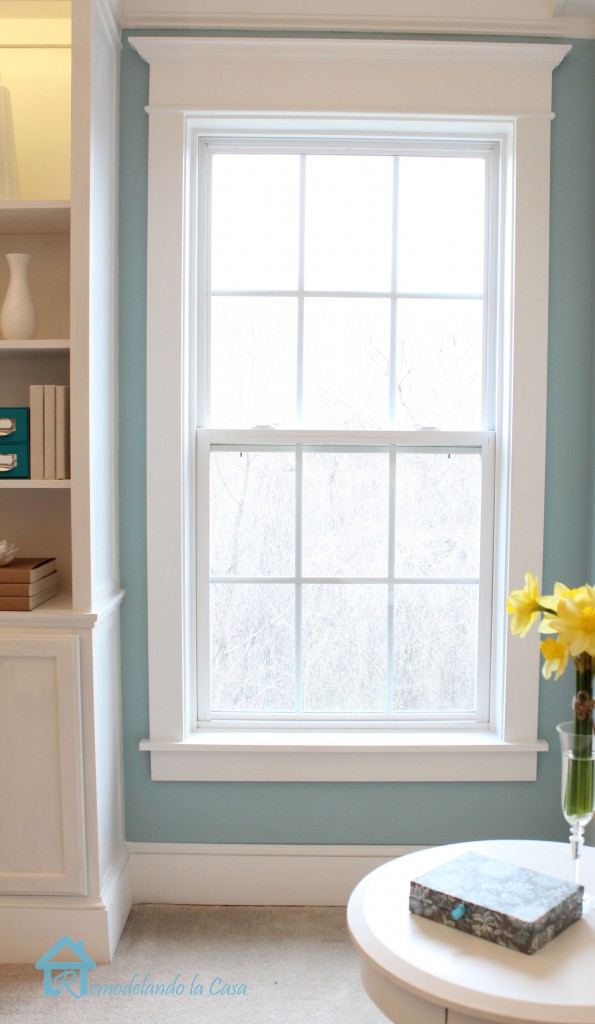
Add new paint in a contrasting color on the walls and the room is almost ready!
I had some leftover paint that I mixed to achieve this hue.
These twin windows really add a lot of character to the room.
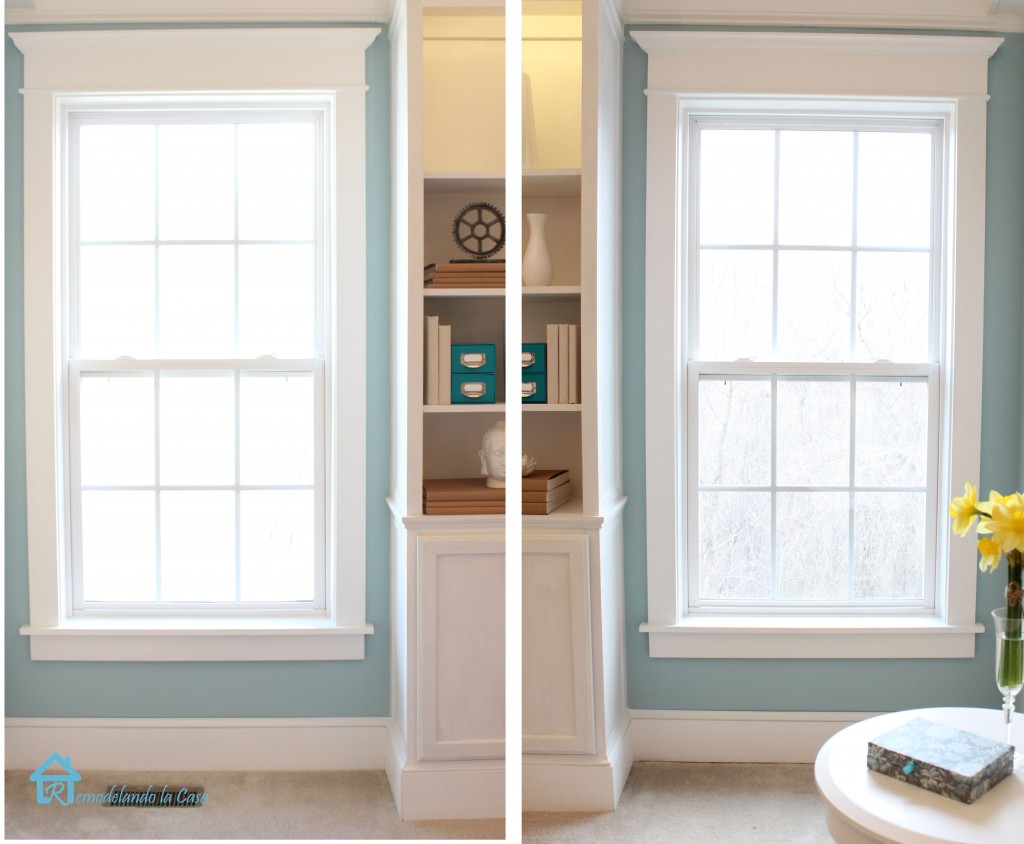
The trim makes a big difference, wouldn’t you agree?

Thank you so much for having me here at Pretty Handy Girl! I can’t wait to share more with you!
~ Learn more about Cristina~
Don’t miss Brittany’s great tutorial for trimming a casement window: How to Install Trim and Casing Moulding on a Casement Window by PrettyHandyGirl
More Window Resources:
How to Install a New Construction Window
How to Add Privacy Film to Any Window
How to Clean Your Windows Like a Pro
Things to Consider When Choosing New Windows
Stop! Don’t Replace Your Windows Before Reading This
 Right now I’m working on updating my bedroom, where I have a couple of these windows.


 Underneath I found lots of wood shims that were used to level the stool. They were left in place. Scrape the old caulking from the window and wall.
 If you are working on more than one window, it is a good idea to mark each board, even though they look pretty much the same, their measurements can vary.
 The apron can be installed by centering it underneath the stool. The dimensions are the same as for the stool, but without the horns (2″). As shown below, the horns protrude an inch on each side beyond the apron.

 When cutting the decorative molding, miter the ends (cut at a 45 degree angle as shown below.) Remember to cut the molding upside down.


 Add new paint in a contrasting color on the walls and the room is almost ready!


I know this is an old post so I’m not sure if you watch these, but how did you measure the length for the half round and crown?
You can also use a spackle knife or larger scrap wood to distribute the force of the pry bar if you want to be extra safe not to damage your plaster walls.
Would you pleas tell me the height and width of the windows as well as the height of the ceiling . I am debating on resizing my window so I can add some decent trim to it . Thanks in advance.
thanks for the great tutorial ! is it the same process for removing the old trim if you have plaster walls?
Yes, you can also use a spackle knife or larger scrap wood to distribute the force of the pry bar if you want to be extra safe not to damage your plaster walls.
Thanks for this great tutorial! I’m doing this in my kitchen & dining great room which is about 40 x 17 ft. We have a 9’ ceiling. How big should my ceiling crown moulding be? I’ve been advised 5 1/2 but my instinct is telling me 4 1/4-4 1/2. I’ve heard that a ceiling crown can take over if it’s not well propositioned to the room.
Chantal, I can’t give you an honest opinion. I’d recommend getting some scrap moulding and see how it looks before you proceed.
instagram is the best
always something new in the market to discover, so why to stand behind? Every month, a lot of new TV Shows and movies are added for the benefit of the viewers. You can watch them all if you own a Net
etflix is your perfect source to watch their exclusive shows and match the growing pace of the entertainment world. There is always something new in the market to discover, so why to stand behind? Every month, a lot of new TV Shows and movies are added for the benefit of the viewers. You can watch them all if you own a Net
ly no restrictions on how many times you want to view a same video. Nowadays, every week a new TV show is coming up, Netflix is your perfect source to watch their exclusive shows and match the growing pace of the entertainment world. There is always something new in the market to discover, so why to stand behind? Every month, a lot of new TV Shows and movies are added for the benefit of the viewers. You can watch them all if you own a Net
hows and movies that you can watch online exclusively on their service providers. This streaming service allows its customers to watch a wide variety of popular TV Shows of current time. A lot of movies, documentaries and much more stuff is available on Netflix for the users to watch from. Furthermore, it has a feature of streaming the shows and movies without any commercial or any click bait offer. It is a sigh of relief for many Internet users as who won’t like an ad-free online streaming of their favorite TV show? You can enjoy unlimited viewing of the content available exclusively without any single commercial. There are certainly no restrictions on how many times you want to view a same video. Nowadays, every week a new TV show is coming up, Netflix is your perfect source to watch their exclusive shows and match the growing pace of the entertainment world. There is always something new in the market to discover, so why to stand behind? Every month, a lot of new TV Shows and movies are added for the benefit of the viewers. You can watch them all if you own a Net
excellent, excellent instructions. may I add a few tips? lightly sand the edges of your wood before painting – use 150 to 220 grit (at least go over the edges that are facing out) just enough to “soften” them because paint does apply well to hard right angles, then use a tack cloth to clean off the sanded area or your brush or blow it with an attachment to your compressor. do this because your brush will pick up some of the sanding dust and you will be painting that dust onto your smooth surface. and don’t ever paint from the can, pour some paint into a cup and work from that cup. you want to isolate the dust from the fresh paint that is in your can. if you really want to get crazy, lightly sand after you apply the primer. this is recommended because the first coat of paint will make the wood fibers swell and “stand up” so the surface will not be perfectly smooth. you do not have to sand between the two coats of finished paint. some people like wood fill or Ready Patch rather than caulk to plug the nail holes because it is easier to sand flatly for a smooth finish then to flatten caulk. just apply it with your thumb and smooth it with a damp rag. now I have a question: how far beyond the side casing did you extend the half round?
thank you.
Thank you for the precise instructions. I have two sets of 3 side by side windows, I cased all three as if they were one. They turned out beautifully!
Wow!! Perfect! Exactly what we r going to do thanks to ur great tutorial!
If the stool is in good shape – do you need to replace it?
Not at all!
Yayyyy
I’m so glad I found it!!!!!
Thank you Cristina and Brittany!!!!!!!!!! ?
Very informative, thanks for sharing!
What is that beautiful color blue for the room?
I’m confused… so is the side casing trim 4inches or 3.5? Because if they were 4″ as per your materials diagram, adding the side casings together would be 8″, not 7.5.
I would like to use your exact measurements 🙂
She is using the nominal measurements. When you go to the store and buy 1 x 4’s, they are actually .75″ by 3.5″.
What’s up, its nice article concerning media print,
we all be aware of media is a wonderful source of
data.
Hi,
I am installing the window trims and the crown on the top. We have our present windows exactly like what you had before installing the new trim. I just want to know if we need to install any wood to the inside dry wall of the window (just inside and next to the trim). I am not sure if we need to paint white inside the window or if that goes with a wood panel.
Appreciate your help!
Hi this tutorial is excellently dictated. I have seen other types and have been left without complete instructions. This was clearly shown with pictures of the items needed, the tools used and descriptions of the window trim pieces. I plan on doing this to my home office window as a trial before tackling the others. I will have to rent a nail gun with the pneumatic. Thank you so much for the details!! awesome.
I don’t have any wood around my windows, just the wall material. Where would you suggest I start? Should I add wood around the window first then start off at the first step of your tutorial?
Hello! I’m so glad I found this post. We recently bought our first home and overlooked the fact that every window is dry walked in without trim… I hate it!! Our problem is that one window is set very deep and the dry wall is textured. Also, each window has a about 2″ piece of trim over the drywall next to the frame of the window. How do I go about this? I can send pictures if you need clarification! I would appreciate any insight you might have!! Thank you!!
Kate, feel free to send me a separate email describing what you are trying to do and send me a picture or two. [email protected]
About how much did it cost you to do that window, I have 14 of them to do?
We ordered beautiful moldings in molding creator, increadible moldings of houses, facades, I really recommend them because they are of a very high level of services.
I’m looking to replace the old wood trim around my wood windows. At the moment window, trim, stool, and apron all match but I was looking to update with the white trim that is used throughout the house. My question is this…can I remove the stool/apron and just have the trim?
I know it would leave a gap and I would hate to try and sand, stain, etc. the windows to match a new piece of wood where the stool would have been. Right now I am considering removing the current trim, cutting the current stool flush with the wall, and then adding the new trim around the window and cover the cut surface of the old stool.
Would this work? What is your advice? Please help!
in some of the pictures I see blinds. In the final picture I do not. I am going to keep blinds in my windows once I am done with the trim.
How would you recommend I “cover” up the bulky top of the blinds so as to keep my windows looking neat and clean? Thank you!
I’m following this as I have the same question as David. I want to leave up my blinds to retain privacy, but I don’t want to see the top of the blinds. Do you just install the Head Casing lower?
Jennifer, just making sure you saw the comment below:
Jennifer and David, Cristina took down the blinds at the end. But, you can certainly install them inside the window as you saw in her earlier pictures. To cover the top, you’ll need to add a fabric valance or get creative with a wood slat. You can also leave it exposed as she had.
Hello
Very nice indeed
2 quick questions:
1) did you use glue – or at least caulk – underneath each piece of wood, or nails only?
2) Why you didn’t install the side casing aligned with the flange of the wall? looks like you left a 1/4″ gap
Thanks
I have never done a window trim job or anything like it, but gave it a shot last year when the windows on my 15 year old home started to look like junk around them (only a stool and apron and no other trim…began cracking, and such). Your directions were great. The look is very simple, yet elegant. Thanks a bunch. The only challenge I had with your instructions was where you said to cut the molding at a 45 degree angle…to make it work on the style of molding you chose, the mitre saw angles you set are actually a bit different…don’t have them handy now, but you can look them up anywhere.
Hi! Where did you buy your half rounds? I went to Home Depot and Lowes and neither one carried them. Thanks!
Hi! I know this post is a few years old. I hope you are still able to reply to this.
I am starting this project soon. I have a question that I didn’t see posted yet. What do you mean by REVEALS? It says to add 1/2 inch for reveals but I’m not sure what is being revealed?!?
Thanks soooo much!
Jenny
Jenny, the reveal is the portion of the stool that sticks out beyond the window casing. You’ll see the side casings sit on the stool, but the stool extends out an additional 1/2″ on each side (that’s the reveal.) Hope that helps.
What a difference your new window moldings make! It looks gorgeous now!
Jennifer @ Decorated Chaos
I’ve been looking at doing this but I have seen over and over to remove the drywall return and replace that with a wood jamb instead of leaving the drywall return due to cleanliness of the lines. Did you leave the drywall return? It looks like you did leave the existing return in there and just used the outside trim pieces. I was curious about any spacing issues you may have had as this would save a lot of time in trimming the window without havingto remove the drywall and replace it with wood.
I’m hoping to hear the answer to this as well. People I’ve talked to have also said I’d need to remove the drywall and replace it with a wood jamb. Did you do this? I too would love to avoid removing the drywall and instead just trim around the outside of the window as it is, but I worry about how it would look without a jamb. Thanks!!
From Cristina Jay and Jason: I’m so sorry for my late reply! The drywall return on my windows was left in place. As I mentioned in my post, this is only a decorative treatment. The right way to trim this kind of window would be by first getting rid of the drywall returns, install a jamb and them add the outside trim. I didn’t have spacing issues doing it, they had sharp straight lines which was the main reason for me to leave the returns, well avoiding the drywall mess was another good reason. 😉 This would be like a “jamb cheating option” on this kind of window trim.
Did you use semi-gloss paint for the window trim?
Hi Rachael, yes, I used semi-gloss paint – Swiss Coffee color. – Cristina
Question for you: Is the inside of your window wood or drywall? If it’s drywall did you paint it white or the same color as the window trim? I’ve been having a time trying to find the answer to that question :/
Ashley, do you mean is the window wood or vinyl? Our window is vinyl and no I didn’t paint it. The trim I installed around it is all wood and yes, I painted it all the same color (but you can’t tell that the vinyl isn’t painted.
Ashley, this is from Cristina: Ashley, I’m sorry for my late reply! The inside of my window, the returns are drywall. I painted them the same color as the window trim , a semi-gloss Swiss Coffee color.
I kept the inside of my window as drywall as well, but I applied all-purpose joint compound over the drywall with a putty knife to cover the texture. The result is that you can’t even tell the inside of the window is not wood trim.
I FINALLY got every window and doorway in my home trimmed out. I absolutely could not cut that angle on the half round moulding — it kept splitting it. The only half round available in my local area was oak, which is VERY hard, and cutting that short piece with the angle on one side was too much for the wood. I ended up having to have flush ends on the half round. It still looks awesome…..but I still miss the little accent that could have been if the half round had wrapped around the casing. My miter saw blade was probably too thick or too dull for it.
To Michele from Cristina:
I’m so sorry for not answering before! Wow, you were on a train, I bet they look great! Most of the time the miter saw blade is too much power for those tiny pieces of trim. A miter box is a good option when making those small cuts.
is the top piece of your molding open to the wall? When I come down the steps I will see the very top of mine. Any suggestions? thank you
Angie, yes, the top is open but you can install a top cap, using lattice. Leaving a 3/8″ reveal at the front and both sides of the crown molding (measure the length between the outside edges of the returns and add 3/4″). Cut the lattice, then center and nail it over the crown molding.
I like adding a shelf on top of the crown — it will need to stick out 1/4 – 1/2 inch further than the sides and front of the crown. You’ll need a 1×8 board on the top instead of the 1×6. Your “shelf” or top piece will nail down into the top side of the 1×8. You’ll then tack on your crown which will be under the “shelf” and on the face of the 1×8. I hope that makes sense…..I can’t explain it well in words.
About how much did it cost to do this window?
JaWone, I would guess about $20. But prices will vary at your local store.
In Alabama, the crown is $11 for an 8 ft piece, the 1×4 casing is $5.50 for an 8 ft board, the half round is $7.00 for 8 ft piece, and the 1×6 I used for the sill is $10 for an 8 ft board. You’re looking at $39 for 1 window before tax, primer, paint, and caulk (although if you have small windows, you may can get 2 windows out of 1 length of crown and half round). This adds up quick when you do a whole house, but it’s permanent, and looks so wonderful that I’ll never have to buy drapes or curtains again.
Wait…it’s $44.50 for 1 window……in my above estimate, I forgot to add in the 1×4 that goes below the sill.
ive been searching for a post on this and finally i found one . thank you for sharing. i have two fears one removing the previous apron and second during another project that i know my husband will complain about. oh well ill let u know the outcome.
Thank you SO MUCH, Cristina! I have 6 windows to trim out and was unsure if that top header was a 1×4 or a 1×6, and wasn’t sure about the size of the half-round — you really helped me to clear things up. Thanks again!
What an amazing tutorial, thanks so much! The results are stunning indeed. I hope you don’t mind me asking a question: Why do you add 1/4″ for reveal line and not place the side casings right on the edge? I assume there’s a good reason for that, but I ‘m curious. Thank you!
Thanks Ana, great question! The reveal line helps to add definition to the molding, it also helps not to end up with an ugly seam where the edge of one board lines up directly over another.
Today was my first visit to this website…. I really want to thank you from the bottom of my heart for this window trim tutorial 🙂 Thank you very much.
I wish if somehow you can show some ideas about trims / casing for a ‘square’ archway [that are situated in corridors] with thick bottom plinths that can match a baseboard. Thank you!
Thank you so much, Dorine! I think Houzz and Pinterest are good places for you to find ideas about trims.
All of the windows in my house look like the one in your before picture. If we are going to be putting up blinds and/or curtains over them, do you think it’s unnecessary to trim them out? I love the look of trimmed out windows, I just don’t know if it’s worth it if I am going to be using curtains anyway (you wouldn’t see the trim, except for maybe at the top when curtains are drawn). What do you think?
The trim itself is not a necessity in our cases, but it brings architectural detail to a room, the windows look finished. In my dining room the floor to ceiling curtains were hang in a way to leave enough space on each side of the window to showcase the trim, the windows appear to be wider than they are when you do this. It creates openness in a room.
You are a lifesaver! I have looking for a tutorial on this and couldn’t find it anywhere – thanks so much!!
Love this! You are so incredibly talented Christina. Brittany or Christina I have a quick question about the materials. I just got back from Lowe’s buying wood to make something similar to this, but they told me there is not such thing as a 1 x 5 and to use a 1 x 6… did I miss read this or miss something? Please don’t laugh if I’m just being a complete dork.
Beca, oh we’d never laugh at you! You aren’t a dork. The employee probably didn’t realize you were looking for 5″ stool material. It is sold with all the other molding at the back of the store. IT has a flat edge on one side and a rounded edge for the front side. I hope it isn’t too inconvenient for you to go back.
Ha! Nope I am a dork, but thanks. I was didn’t realize that when it said “1 x 5 stool” that it was referring to stool “material” so I was in the wrong isle, ugh I thought stool was the official name of that top piece not the material, like apron, stool….HAHA wait till I tell the hubs about this, I’m sure he won’t have a problem laughing at me. Thanks you soooo much! I love you work. Will let you know how it turns out.
Great tutorial Cristina! What a huge difference the trim makes to your windows. It looks amazing!
Debbie
Cristina, this tutorial was perfectly timed! I used a lot of your tips and tricks to trim our new casement window. Can’t wait to see what you have up your DIY sleeves next!
You go girl – I’m all about adding interest with moulding – this rocks!
Kelly
I have a rotted window sill that I’ve been avoiding like the plague because of the lack og knowlege. Thanks to your brilliant tutorial, I can now face this without fear! Thanks so much Cristina, your window is awesomly beautiful!!
Brittany, you have a great team, I’m looking forward to all of the new projects!!
Thanks Christie, glad you love Cristina’s tutorial! She’s a rock star isn’t she!
HI! Excellent tutorial. I’m going to be trimming 7 windows and 4 patio sliders, then 15 pocket doors and 1 regular door. I have no trim whatsoever at this point.
Getting started has been difficult because I didn’t know WHERE to start! Now, I’m guessing if one doesn’t have … jams(?), they would be the 1st step. If the parts are actually called jams, I’m thinking of the wood that encircles the window, where you measured against to cut the stool. Would you say I’m on the right track? If so, you just took the fear of God, ok, fear of window trim out of me.
Got more tools than Home Depot (almost) and am teaching m’own darned self. Windows will be added to my portfolil. Thanks for taking the time.
Wow, that’s a lot! I think you are pretty much on the right track, jambs would be the first step. One thing you’re not going to regret is having all those tools 🙂 and your portfolio will be bursting with window experience when you finish this job. Good luck!
Love this!!! It looks awesome. I have a question…my window ledges have really ugly tile on them. Do you think I can bust that ugly tile out of there and put wood instead? Thanks for your help!
Thanks Kim! I guess so, if the tile was only installed for decorative purposes I think you should be able to get rid of it and give it a new look.
Christina, THANK YOU FOR THIS AMAZING TUTORIAL. We have the exact same windows wearing the exact same skirt, but not tops, lol. We have been thinking of doing the very same thing to our windows, and seeing what you’ve done makes me know it’s totally DOable!!
Hugs,
Betty
absolutely amazingly beautiful!! Nice job on dressing up the window. Love the extra height
The trim looks so simple to put on but what a dramatic change it makes to the window. could this be done on windows that hav a bull-nose (rounded) edge, to you think? How would you deal with the gap of the vertical pieces? Thank you
Thanks Tracie! I think you might need to install a jamb around the frame of the opening first, then it can be trimmed. Be aware that window hardware can interfere with jamb installation.
I couldn’t tell from the pictures. Is there a jamb installed on your windows? If not, are the insides of the windows textured? Ours have an orange peel texture and I am trying to decide if it would look awkward not being a flat surface?
Julie, I’m replying for Cristina. Since you have orange peel, I do think it would look a little funny. But, you can buy a small tub of joint compound and apply a layer to smooth that area. After the joint compound dries give it a light sanding. The other option would be to buy thin plywood or pine molding stock (sometimes called hobby stock) and glue that to the sides of the window opening.
The trim looks great and the explanation was perfect but I really enjoyed the paint color you used to contrast the trim.
Awesome tutorial Cristina with stunning results. You will bring so much to Brittany’s team! …. And to Brittany…. Excellent choice! Cheers.
Thanks Gal! I love having Cristina on board! She rocks!
THANK YOU for posting these clear instructions. When I shared them with my husband he went into a panic over the possibility that HE may be asked to follow the instructions! When I said a woman did this, he relaxed and said, “There you go! Do it!” He may not have allowed me to start without your proof! Thanks again!
Thanks Barb! That’s a similar reason why I got into this kind of projects! My husband wasn’t that helpful and was very scare of doing more bad than good! 🙂
Really interesting tutorial. For my skill level (and tool collection) it seems challenging but not completely beyond me. I like the final outcome (it would have been nice to see the before and after side by side). As someone who scours ReStore for windows rather than buying the custom made ones I’d need for our old house’s odd window sizes, I can see a use for this treatment. When you buy thrift windows, you take what you can get, whether it’s the right size or not. (If the window’s $18, I’ll buy it and deal with it!) This kind of treatment could cover up a gap at the top nicely. Thanks.
The trim looks amazing! Thanks so much for taking the time to write a tutorial to share with us! 🙂
Thanks Janet!
Why was it necessary to remove the original stool and apron?
It would’ve been to short with the added side casings.
Me encanto ese tutorial Cristina , Ese borde de la ventana le da mas elegancia a la ventana
cariños
Muchas gracias, Angelica! Que bien que te haya gustado!
I’ve been doing lots of trim and crown molding lately but I have to say yours looks amazing! A couple questions…
-Do you ever do any of the priming/painting before installing the pieces?
-And how do you get your cut lines against the blue so exceptional with 3 passes of white (primer/paint)?
Thanks!
Thanks Andrew! As soon as I began painting the trim I knew I should have done it before it was installed. It was hard to paint the trim sides, on one side I had the wall and on the other the bookcase!
The trim was painted first, a coat of primer and two of paint was all it needed, the wall got a good share of trim paint, that’s why I had to reach into my left over paint to create a striking hue for the trim to pop up! That’s not going to be the final color in that room.
Beautiful!!! Do you mind sharing the color of paint?
Thank you so much, Donna! That’s a custom color created by mixing left over paints from past projects. Sorry about that.
Its amazing how a little trim can really totally change the look of a window! I think I may have added a few new items to our to-do list!
Thanks Jacque! It is indeed a great change, I still need to do some more.
This is an awesome tutorial and totally inspiring, I think I could do this! Thank you so much Cristina! And I am excited for your awesome team Brittany!
Thanks Mindi! Good wood working skills is what you have, you can totally do this and lots more! 😉