
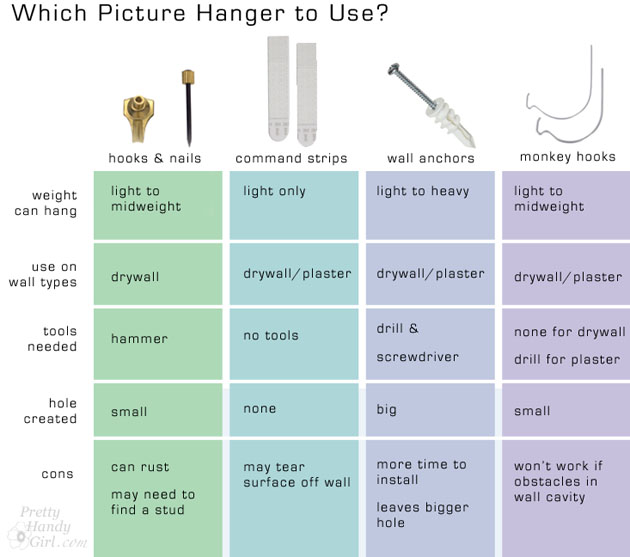
Which Picture Hanger to Use?
Hello! It’s Jessica, from Decor Adventures and I’m back this month with some very handy tips to help hang items up on the wall. Do you ever wonder which picture hanger to use? Did you know there are several ways you can hang things up? From curtains to art and mirrors to lightweight decorations — there are many options for hanging (and sometimes you don’t even have to put a hole in your walls.)
I live in a 115 year old house that has both plaster and drywall, and I’ve experimented with many types of ways to hang items on the walls. Today I’ve compiled The Pros and Cons of 4 Picture Hangers.
1. Picture Hooks and Nails:
This is probably the most common way to hang up items. Simply mark where your item will go and hammer in your nail and hanger. Brittany shows you how to hang up items when putting together a gallery wall here.
Pros:
Hooks and nails come in many lengths so they can work well in most walls and are easy to use. They are also affordable and go into a wall quickly. All you need is a hammer.
Cons:
Hooks and nails don’t always work in every wall type and can rust. They can’t be used in plaster walls. When hanging heavier art, you need to find a stud to nail into.
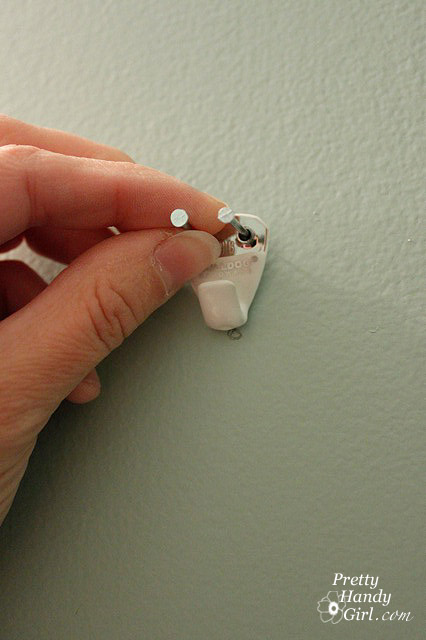
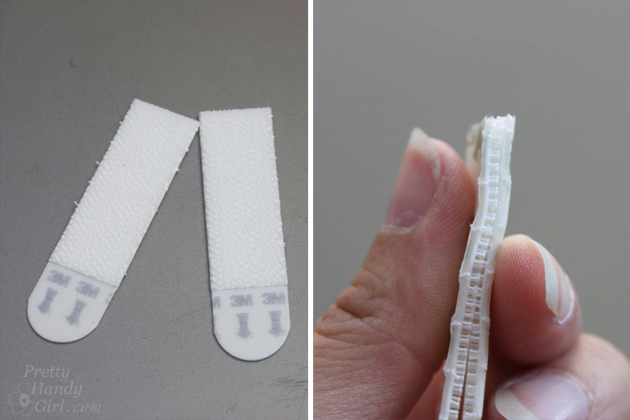
2. Command Strips:
Command Strips are the secret of hanging up items on the wall quickly, easily and with no holes. They come in different types and sizes and are 2 pieces of an adhesive-backed velcro material. You simply remove the backings and attach the strips to your art. Then remove the other backing and stick your object on the wall. The best part about Command Strips is that if you want to move an item, all you have to do is pull it off the wall, remove the wall strip and replace it with a new one in the new spot.

Pros:
They can be used to hang lightweight items; pictures without hardware on the back; and unusually shaped art. They are also good for plaster, drywall and almost any type of wall surface.
Cons:
Command Strips can pull off the surface of the wall if removed incorrectly (follow the package directions.) They have also been known to break apart when removing them. And if your object is too heavy it can release without warning.
I used Command Strips to hang all the art on the home office gallery wall (shown below.) When I take down the art, I won’t have to fill a single hole.

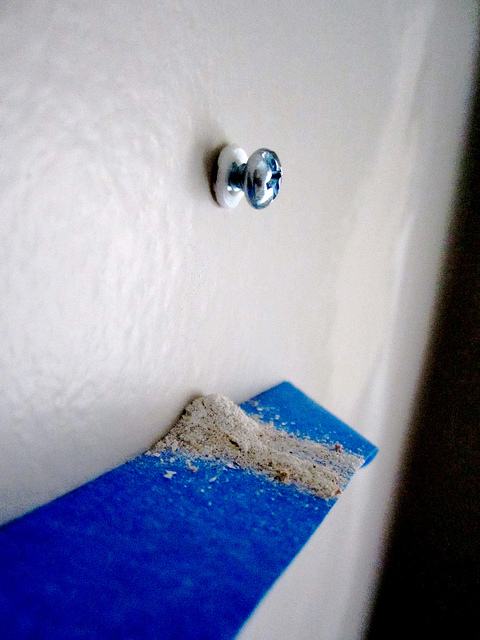
3. Wall Anchors and Screws:
Another common way to hang items on the wall are wall anchors and screws. It’s important to use good quality wall anchors (not the type that are free with your art or fixture.) Opt for Togglers or anchors you buy at the hardware store. Anchors are my go-to method for hanging items on plaster walls. Learn how to use anchors on plaster walls.
To use anchors, pre-drill a small hole in the wall, insert the anchor and then drill in the screw. (For dustless installation, place a piece of painter’s tape below the anchor.)
Pros:
Anchors hold more weight than nails and Command Strips. They can also be used on a variety of wall surfaces.
Cons:
Using both an anchor and a screw to hang up items takes a little longer and requires some tools. You also have to make sure you have the correct type of anchor and screw to hold the weight of your item. Anchors will leave a bigger hole than nails if you ever remove the anchor.
4. Monkey Hooks:
Have you heard of Monkey Hooks? They are a very easy and handy way to hang up items. You simply insert the wide curve into your wall and all that is left showing is the small hook where your picture hangs.
To use on drywall, poke the end into the drywall and position the hook. For use in our plaster walls, drill a very small pilot hole and insert the hook.
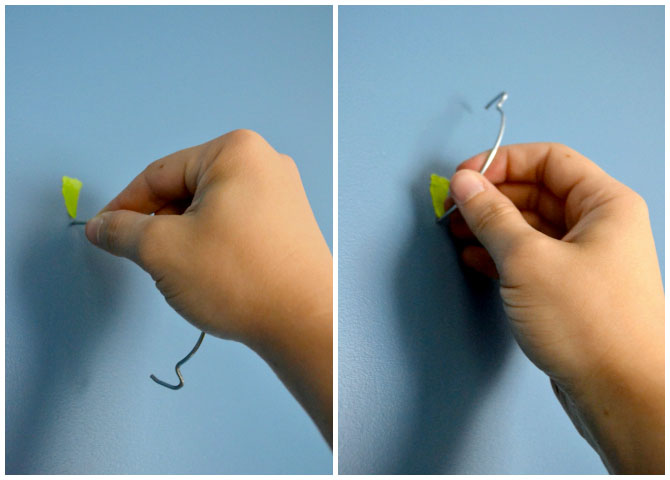
photo courtesy of The Ugly Duckling House
Pros:
They come in different sizes to hold more or less weight. They also leave a very small hole in the wall and don’t require any tools to use them.
Cons:
If there are obstructions within your walls (pipes or duct work), you won’t be able to insert the hook.
Pin this chart to help you next time you get ready to hang art in your home:
This guide should get you ready to hang all of your favorite artwork. I hope it helps make your home beautiful. Come visit me at Decor Adventures soon and have a wonderful rest of your summer.


Thx this is very helpful