Tool Tutorial Friday – Circular Saw Tutorial
Today is Friday! And you know what that means…it’s time for another Tool Tutorial Friday! Today I’ll be introducing you to the circular saw.
But first, how are you? I don’t know about your week, but I’ve had a busy one. If you follow me on Twitter (I’m not sure why anyone would), you would have been privy to the rainbow of color casts my son has been collecting. He received his 4th cast yesterday. But, who’s counting, right?! Anyway, I learned two things about casts in the process.
- Little boy arms will swell to adult proportions post surgery, but will eventually return to normal size…eventually. At that point, a new cast is desired to keep the arm from finding a way to wiggle out.
- If you put two brothers in the bathtub and leave the room for one nano-second they will find a way to water log a tightly plastic bagged and saran-wrapped cast that is merely 5 days old!

Mr. Green up there, he only lasted a mere 5 days! You could probably tell by the one signature on it. My mom is trying to convince us to paint white stripes around his current red cast to make it into a candy cane. Hee, hee.
And now let’s plug in some power and start this tutorial!
A circular saw is essentially a portable power saw that can make easy cross cuts like a miter saw. But, it can also rip long boards like a table saw. This little hand held bad boy is a necessity if you are working on an exterior project like a deck or a fence, or anything that is too big to put on the miter saw or table saw work surface. Trimming the varied lengths off newly laid deck boards would be near impossible without a circular saw.
Before I owned either a table or miter saw, this was my power saw. And this baby has cut a lot of wood in its life.
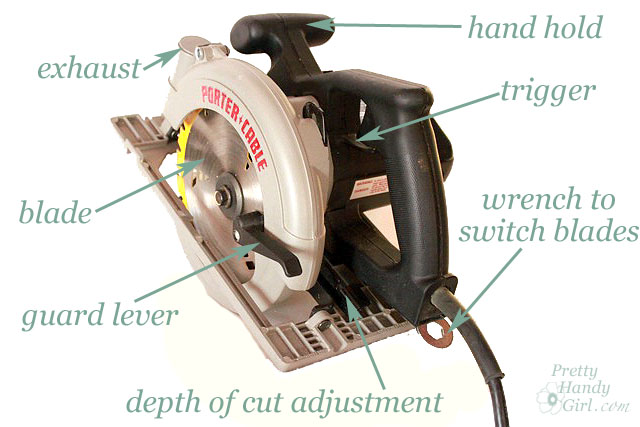
If you are familiar with circular saws, this particular model may look a little bit backwards to you. That is because this is a left-sighted circular saw. I think Porter Cable is one of the few companies (if not the only one) to make one. I am right handed, but for some reason, this saw seemed more comfortable to me. When I was shopping for my circular saw, I spent about an hour or so picking up, holding and imagining using the saw. What I liked about the Porter-Cable is that it had a smaller grip and I was able to span my hand width between the hand hole and the guard lever while cutting.
If you go shopping for a circular saw, spend some time holding them and see what feels most comfortable to you.
Circular saws range in price from as low as $30 up to $300 or more. They come in a variety of sizes (5 3/4″ – 9″) which refers to the blade size. The most common size people buy is a 7 1/4″.

Before you make any cuts with a circular saw, you must set your depth of cut. If cutting through a board, set the blade about 1/8″ – 1/4″ lower than your lumber. Support your lumber on saw horses or a raised surface (4″ x 4″ posts on the ground work well.) It is imperative that you think through your cut before you actually saw a board. Make sure that your waste end will fall away from the saw after it is cut. Otherwise, the blade will get pinched between the boards and can kickback (see the example in the video.)
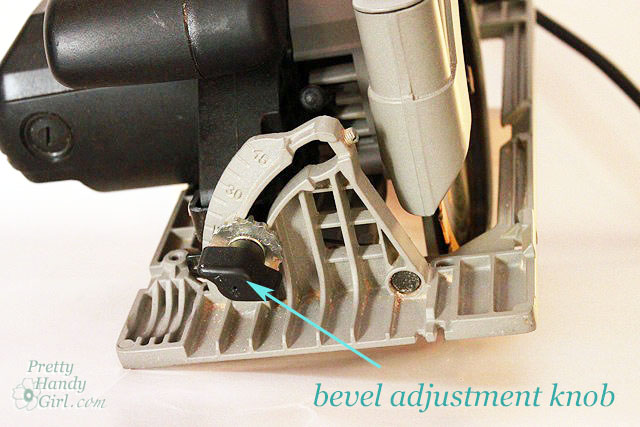
You can also change the bevel angle of your cut by adjusting the base of the saw after loosening the bevel adjustment knob.
As with any other power tool. Take the time to familiarize yourself with your power tool. Read the manual and only use a power tool when you are alert and not distracted.
DISCLAIMER
The viewer assumes all responsibility and liability associated with the hazards of woodworking. Pretty Handy Girl is not responsible for any errors or omissions that may be present in this tutorial. She also assumes no liability for any action or inaction of a viewer.
Please use extreme caution when using power tools. Read your tool manual thoroughly and wear protective safety gear. Take your time familiarizing yourself with a tool before using it. (If you are missing the manual, you can easily find it online by going to the manufacturer’s website or google your saw’s make and model + manual.)
Please recognize that I have tried to put together a basic circular saw usage tutorial to get you started. I have tried my best to show the safest way to use a circular saw. That being said, I am not a professional (I only play one on this blog ![]() .)
.)


Thanks for this website, I had one brief lesson from my brother a couple of years ago but I needed a refresher – plus all the tips you provided were really helpful. I love the feeling after using power tools – it’s liberating!
Great tutorial. I just told Santa what I wanted to Christmas & I’m glad to see this tutorial as one of the things I asked for was a circular saw.
My circular saw is one my father bought at a garage sale and gifted me as a house-warming present when I bought my house. We like good buys and I thought it was an act of love that he spent time looking for a good one. He and I both hate shopping, so he made an extreme sacrifice! It even has a handy hard-side case. Thanks for another good tutorial. I look forward to them but am a bit behind. Keep ’em coming!
Great tutorial! Thanks for all the lessons this year!
Great tutorial, I will have to check back Friday to see what your next one is on. Thanks for making it simple for people like me who are a complete novice when it comes to DIY, so thank you.
Thanks for the great tutorials! They really help a lot.
the Candy Cane cast could be done with some white tape so it would easily return to a solid – or other colors of tape could make alternate designs!
‘Working Girl’ of course!
Thank you SO MUCH! I bought the same Porter-Cable saw and it is still in the tool bag. I have begged my husband to show me how to use it and he always says he’ll do it later. Later hasn’t happened yet. There have been so many times I needed to use it but didn’t know how. (I’m fine with a drill, jig saw, or just about any other tool in the box.) I am so happy that I found your blog. It helped me believe that I
CAN do this. Even when there is no support anywhere else, I look here and get re-energized to let my creative side out. Didn’t mean to ramble but had to tell you that THIS IS AWESOME!!!
I love your tutorials! Thank you for taking the time to make them 🙂