Tips & Tricks to Self-Level a Floor at Millie’s Remodel
After demolition, I realized several water leaks left some low spots in the kitchen floor at Millie’s Remodel. Today I’m going show you how to use self-leveler to fix a sagging floor. I’ll also show you a few tools you’ll find helpful when pouring self leveler.
![]()
Tips & Tricks to Self-Level a Floor at Millie’s Remodel
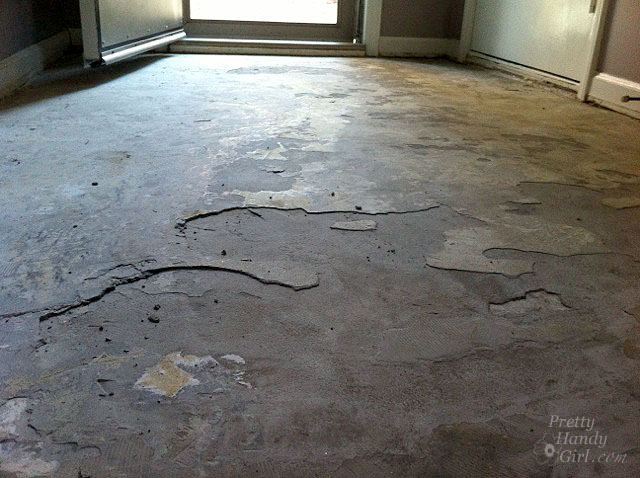
Can I level with you? LOL. Seriously, when I bought the Millie’s remodel house I knew there were some plumbing leaks. But, I had no idea how much damage the water had done to the floor in the kitchen. I discovered a pretty decent hump in the middle of the room with low spots on either side. To combat the hump my assistant, Stephanie, and I secured cedar shakes to the floor in one of the low spots. Then we laid 1/2″ OSB plywood on top. This helped a little bit with the bow, but we still had some issues.
One corner of the room was 3/4 of an inch lower than the other corner. Plus you could still detect the hump. I decided the best way to deal with the dips, hump, and creating a flat surface to tile onto was to pour a self-leveling concrete in the kitchen.
Prepping the Room for Self-Leveling Concrete Pour
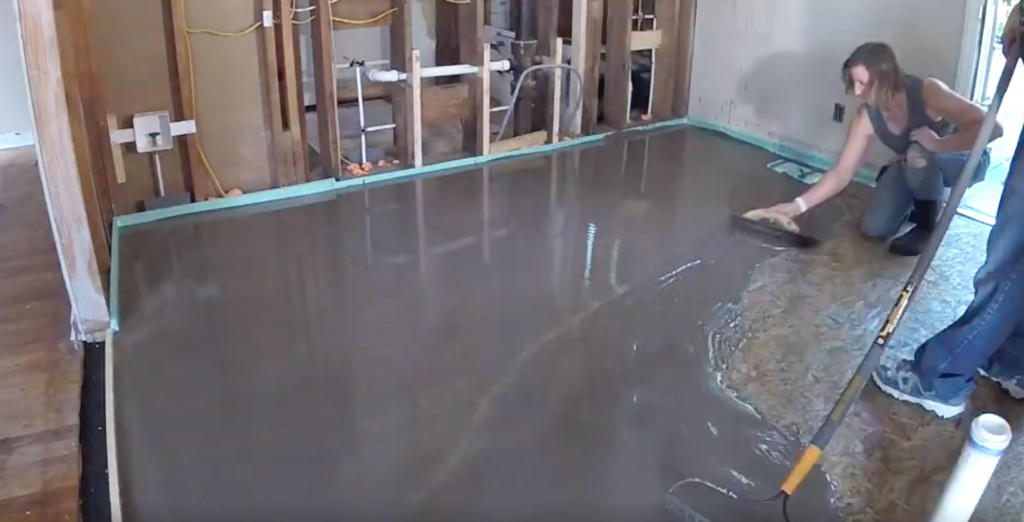
Before pouring self-leveler, you should understand the properties of this mix. When you first mix the product, it’s very liquid and will flow to the lowest spot in your floor. It’s important to seal any cracks or gaps in the floor or your mix will seep through the cracks. You also need to cover any vents or you’ll watch all the mix pour into your ducts (no bueno!)
I like to use rigid foam insulation to prep the perimeter of the room. This creates a form and keeps the liquid from flowing outside the room. I use a sharp utility knife to cut strips from a big 4×8 sheet of rigid foam insulation. I found it easiest to use my trim nailer to nail the pieces to the perimeter of the room. Then I sealed the joint where the insulation and subfloor meet with a line of caulk. If you’ve never mastered spreading caulk quickly and cleanly, you’ll want to see my tutorial for using a caulk gun.
Now that the prep work is done, you’ll need to gather a few tools for this project.
(I’ve included affiliate links for your convenience. I earn a small percentage from a purchase using these links. There is no additional cost to you. You can read more about affiliate links here.)
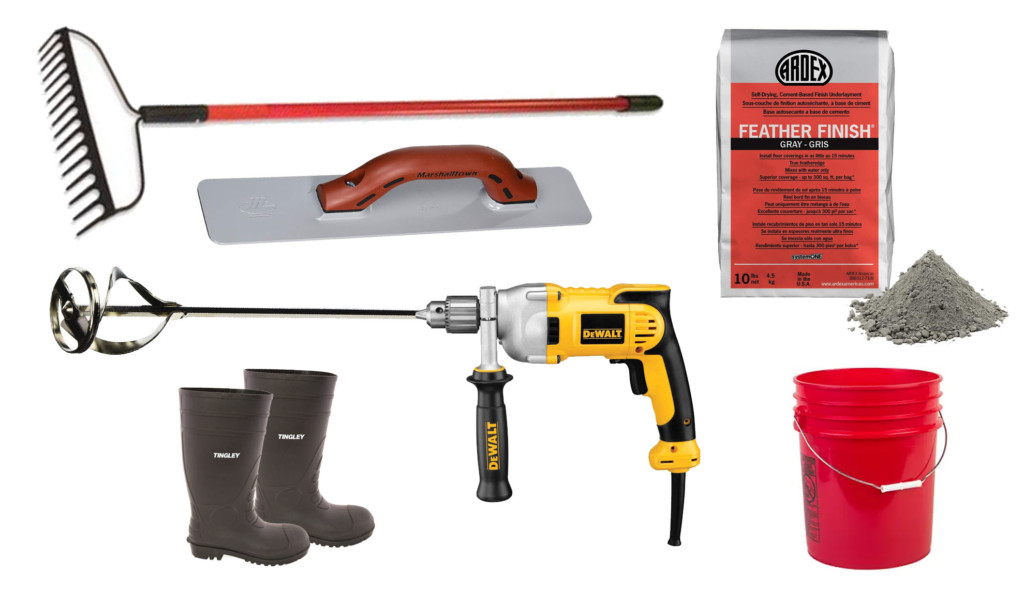
Materials:
- Mixing drill
- Mixing paddle for your drill
- Garden rake
- Concrete float trowel
- Bags of self-leveler (Read the bag for calculating the amount needed)
- 5 gallon bucket
- Long level
Optional: Work boots you can clean off easily
Priming the Floor:

Before pouring the self-leveling concrete, read the directions on the bag. Most leveling mixes specify you apply one coat of primer to a clean floor and let it dry before pouring the self leveler.
Tips for Spreading Self-Leveler:
Watch this video to see how we quickly and efficiently spread the self-leveling concrete mix:
Can you believe how helpful a simple garden rake is for spreading self-leveler? Me either!
After pouring your self-leveler, use a long level to check to see if you need to pour in more areas. Finally, use the concrete float to smooth and feather the edges of the self-leveling material into the floor.
Stay off your concrete pour until it has hardened. Make sure you clean any self-leveler off your tools, boots, or areas you don’t want it to harden onto.
After the self-leveling concrete has hardened, you are ready to tile or install your flooring!
I hope you found this tutorial helpful! Are you subscribed to my YouTube channel? If not, you’re missing out.
![]()
P.s. You might also find this tutorial helpful if you have a concrete floor that is damaged or chipping. Follow this tutorial for patching a damaged concrete floor.
A special thank you to the Millie’s Remodel Sponsors:
The Millie’s Remodel project sponsors have donated materials for the Millie’s Remodel project. As you know I am very particular about the brands I work with and recommend. As a general contractor, I choose the products used on my projects wisely to make sure they last a lifetime. Therefore, I have no reservations putting my name behind each and every one of these sponsors.

Was the cost and labor of putting down leveler a lot less expensive and labor intensive verses tearing out the whole floor and putting new sub floor down? If you were to live in this house yourself rather then rent or flip would you make the same decision? Does the leveler eventually crack or break down? Just asking in case I need to make this decision someday.
New subfloor wouldn’t fix the sag and crowning. I’d have to replace the entire floor system (joists too.) It was much better to pour self leveler. And yes, I’d do the same thing if I was living in this house. I never compromise the integrity in a house. I don’t think it would crack, but we’ll never know because there is tile (on top of an uncoupling membrane.)
I think I need to send this to a friend with a terrible garage floor. How would you do a garage floor where you also needed to account for potential drainage out the door due to a water heater? Thanks for this.