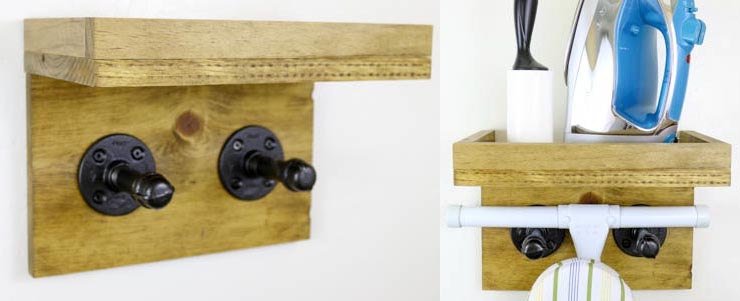
Scrap Wood Industrial Ironing Board Rack

Hey there, everyone! It’s Katie from Addicted 2 DIY again. Today, I have a project that is not only quick and easy to put together, but it’s also made of scrap wood! My lumber rack is getting a bit full, so I’ve been on a scrap wood purge kick lately. If you remember, last month I shared a tutorial for how to build a rustic wine holder out of scrap wood. This time I wanted to make a project that would solve two problems. The first being my growing scrap pile, and my second being that I hate not really having a good space to store my ironing board. I came up with a solution that took care of both of those problems and it was so fast to put together!
Materials:
- 1×8 scrap wood (or purchase a 6′ x 1″ x 8″ pine board)
- 3/4″ square dowels (I used leftover scraps from some wood I ripped down)
- Kreg Jig
- 1 1/4″ pocket screws
- Brad nailer
- 1 1/4″ brad nails
- wood glue
- two 1/2″ steel pipe flanges
- two 3 1/2″ steel threaded pipe sections
- two 1/2″ steel pipe caps
- oil rubbed bronze spray paint
- 3/4″ wood screws
- D ring photo hooks
Instructions:
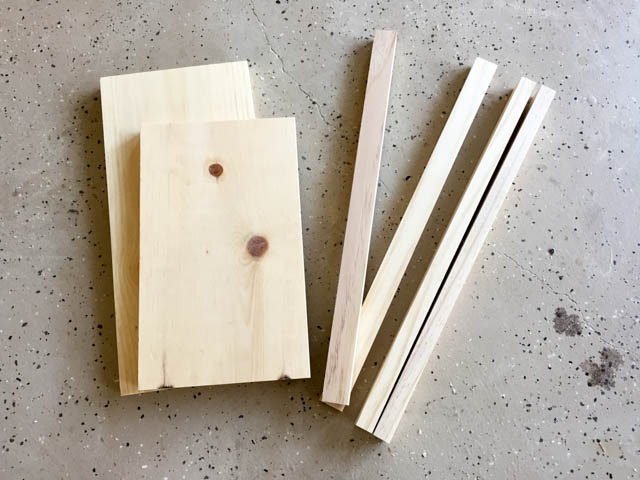
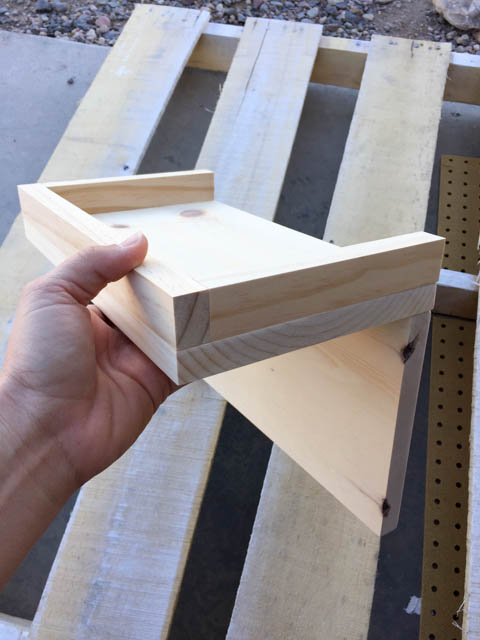
STEP 1: Dig through your scrap pile or head to your local home improvement store to gather your wood pieces together. I used 1×8 pieces of pine and rather than purchase 3/4″ dowels, I used 1″ scrap pieces that were leftover from some boards I had ripped down from another project. Cut the 1×8 pieces to 12″ long. Cut one 3/4″ dowel to 12″. Cut two 3/4″ dowels to approximately 6 1/2″. You’ll want to measure the exact length as not all woods are created equal and sometimes the thickness varies slightly.
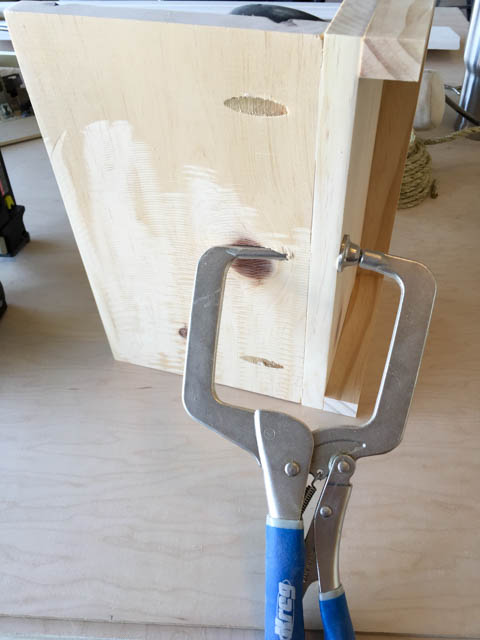
STEP 2: Choose the board for the backing of the ironing board rack and drill 3/4″ pocket holes into the long edge of the piece. Apply glue to the square dowels to attach to the piece that will become the shelf.
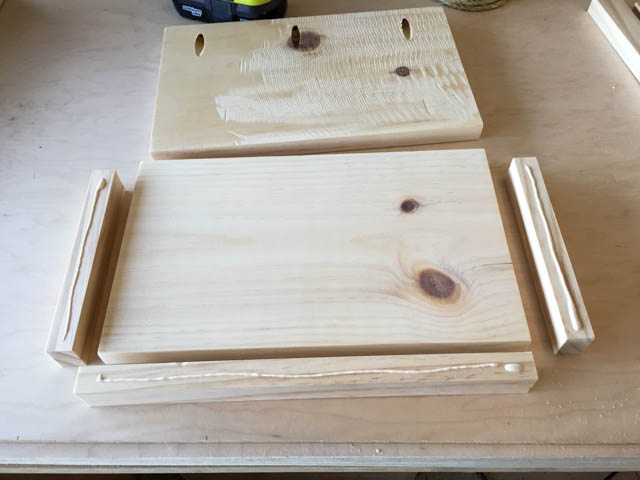
STEP 3: Line the dowels up flush with the edges of the shelf and nail into place using 1 1/4″ brad nails.
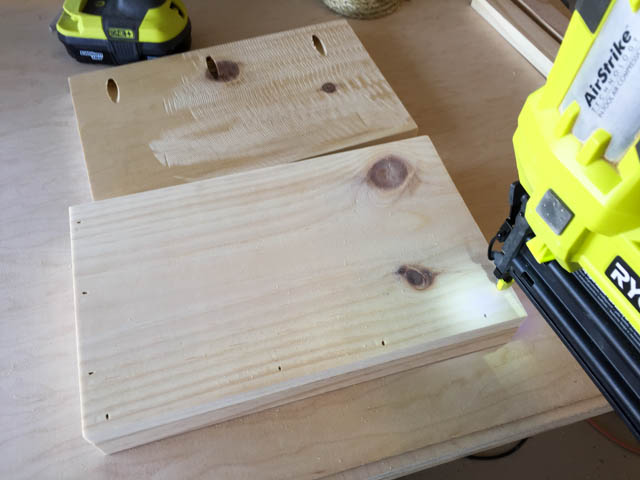
STEP 4: Attach the back to the shelf with wood glue and 1 1/4″ pocket screws.
STEP 5: Sand and finish the ironing board rack with desired finish. I used Minwax stain in Golden Oak.
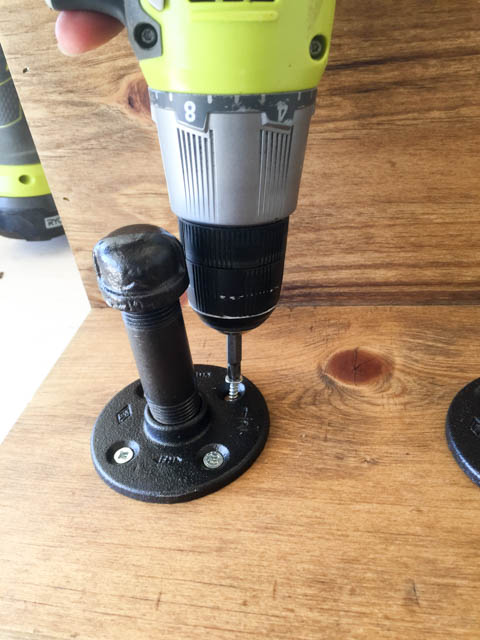
STEP 6: Screw the pipe flange, pipe and cap together, making sure that each set of pipe fittings are threaded together to equal the same height. Clean with an all-purpose cleaner to remove any dirt and grease from the pipe fittings and then dry well. Spray paint the pieces with oil rubbed bronze spray paint. Let dry.
STEP 7: Once the stain and the pipe fittings are dry, position the pipe flanges onto the ironing board rack. I placed mine 2″ up from the bottom of the backer board and 1 1/4″ in from the sides. Attach them to the backer board with 3/4″ wood screws. You can choose to paint the screws or leave them as is.
STEP 8: Attach to the wall using two D ring hooks. If there is not a stud in the area where you wish to mount the rack, use drywall anchors and screws to mount it to the wall. 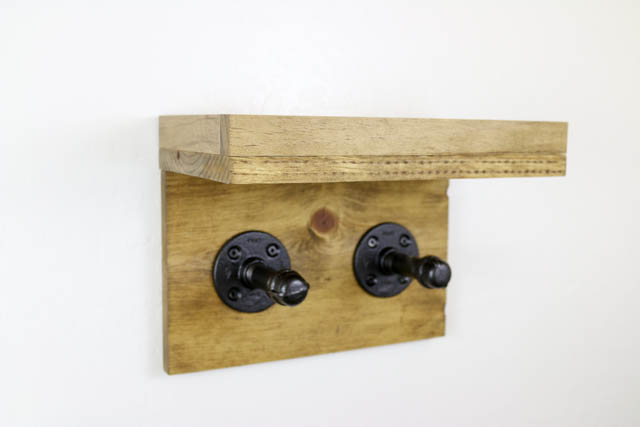
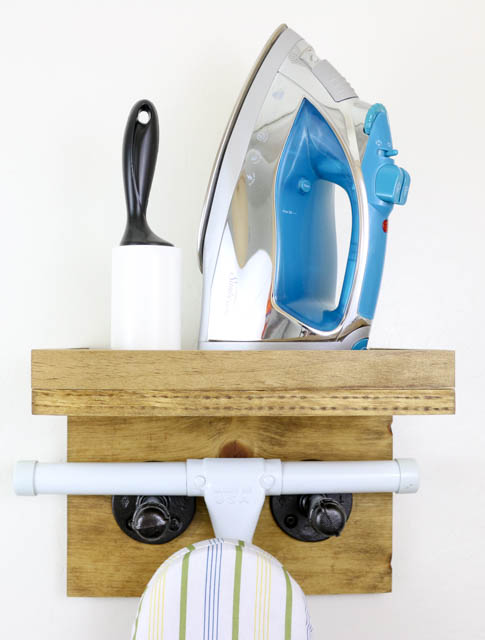
The finished ironing board rack holds my ironing board perfectly and my iron and lint roller have plenty of room on the shelf. Everything stays together and out of the way. I love the rustic, industrial look and that I whittled my scrap pile down. It’s a winner all around! Can you see a use for this in your laundry room? I think it would be great for a towel rack in the bathroom, too!

~Read more of Katie’s tutorials here~

hey Katie,
great idea I have never thought like this I am gonna try this right now I have two irons 😉
thanks again 🙂
Hi Katie,
Take a bow. I have 2 irons and want to keep theme together. Will I double all materials you have mentioned in this post? Any idea?
I really appreciate your work.
Regards,
Machael
Bookmarked! Amazing wood rack. It will fit well in my loft style room. With your tips, I am ready to make it by myself. Thanks
Thank you for sharing and really awesome blog!!
Cool idea and easy to make. Absolutely perfect for a small apartment where space is limited.
Katie from one scrap wood lover to another this is the most clever project!! Such a beautiful way to store the iron versus one of those ugly plastic versions. Nice work.
I love this!
This is such a cool idea! I have to make something like this soon. Our ironing board is just leaning on the wall in a corner!
I agree !!!!!!!!!!!!!!!!!!!!!!!!!!!!!