Rustic Wooden Caddy with a Branch Handle
 Rustic Wooden Caddy with a Branch Handle
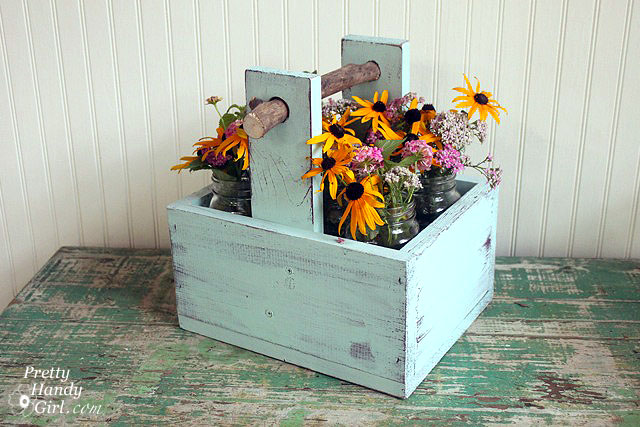
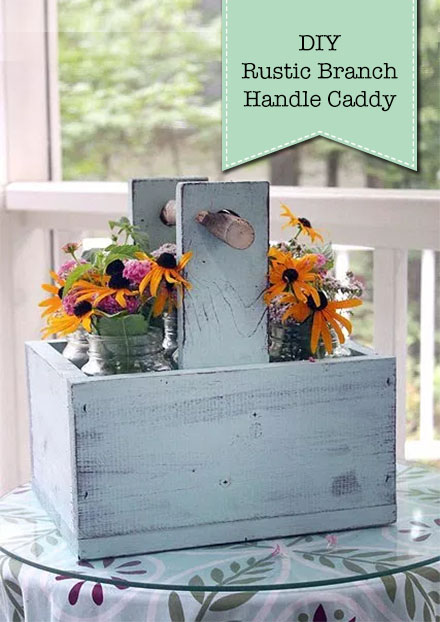
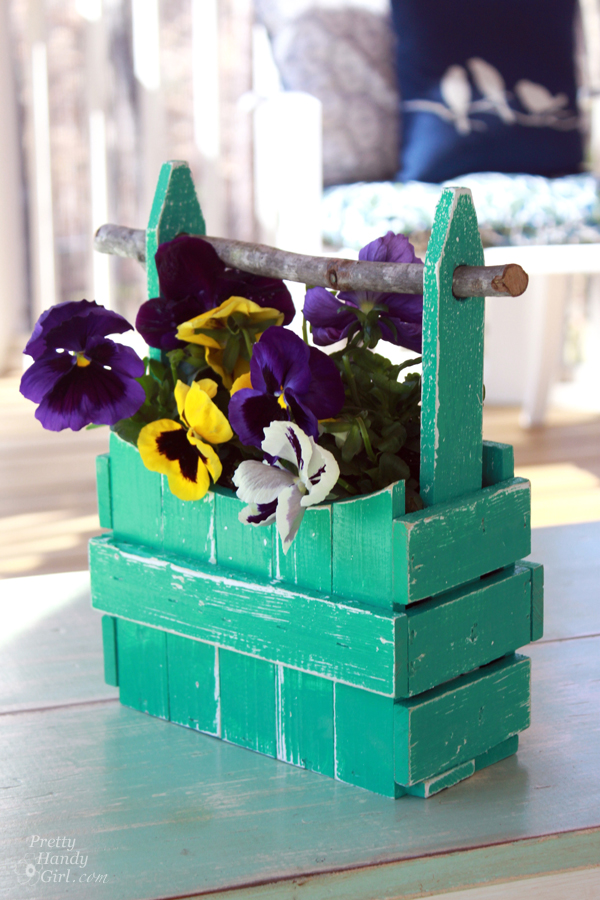
Spring is right around the corner and I’m itching to cut some fresh flowers to bring inside. I love displaying them in jars placed inside rustic wooden caddies. Making a little caddy or tote out of salvage wood and branches can be an easy beginner DIY project. But, it’s also satisfying for experienced woodworkers looking to use up some old scraps or upcycle an old wooden box. Here’s how to elevate a simple wooden box into something more quirky and special by adding a branch handle.

Materials:
(I’ve included affiliate links for your convenience. I earn a small percentage from a purchase using these links. There is no additional cost to you. You can read more about affiliate links here.)
- Old wooden box (Don’t have one? Make your own wooden box with this tutorial.)
- Thick branch
- Pry bar
- Pliers
- Clamps
- Wood screws
- Drill
- Hand saw (coping or hack saw)
- Spade bits
- Paint
- Sandpaper
I happened to be browsing through a yard sale and spotted a sad little box begging for me to buy it and give it a new life:
 How could I say no! It was only $3. I couldn’t leave it at the yard sale in its sad burgundy dust-covered state. I brought it home so it could sit in my garage collecting more dust. (This happens more often than I’d like to admit. It’s a sickness I have.)
Using the pry bar and pliers, I pulled off the lid of the box and removed any nails.

Then I had a basic box to work with. You can use this tutorial to create a simple box if you don’t have one.
Instructions:
Cut upper handle supports out of 1×3 or other scraps. Clamp them inside the box.

Pre-drill holes and drive wood screws through the sides of the box and into the vertical supports.

Now it the time to finish the wooden caddy using your choice of paint or stain. (I like to create a rustic look using a relatively dry brush and by letting some of the wood grain show through your brush stokes.)

While the paint is drying, use a hack or coping saw to remove any bumps or burrs from your branch.

Measure the ends of your branch and select the spade bits that are closest in diameter to your branch (you want the holes to be equal to or wider than the branch.)

Drill a hole into each side of the vertical handle supports.

Insert the branch into the side of the caddy. You might have to experiment with which direction to install the branch.

Fill some jars with flowers and set them inside the crate.

Set it out in a prominent spot in your home.

Enjoy your shabby chic crate, caddy, tool box, or whatever you like to call it.
Personally I can’t get enough of this branch handle:

I’m curious, would you have bought that little dusty box too?!
 If you liked this tutorial, you’ll love these other easy DIY Projects:


This is a great idea for my table settings and a great replacement for my flower vase.
What clear, great instruction!! Beautiful caddy 👍!! Ty!!
I love making wooden caddies, tool boxes and trudges, but I always use dowels for handles, because that’s what we’re supposed to do. Thank you for kicking me back outside of the box! Just moved to 25 acres of pine and oak trees. I love branches, stripping the bark off and feeling the beauty of the natural wood. Time to go make a new, old caddy! Love your site, are we sisters from another mother?
We may be! 😉 So glad you came out of that box to explore new materials for the handles!!!
I love this idea! I have so many trees branches that have fallen from the winter storm here in Wisconsin.
You have my brain on a major spin!! I have some of my “scrap” wood under a bed. I live in apartments and don’t have a “shop”. So, I have my wood under a bed! Of course it was wiped off before being put under there. But, Look out, my creative juices are in a full blown rapid rush!! OH, yes i would have bought that box too!!!
Blessings,
SusanB
Junk to Treasure
Beautiful! I wish I was that creative 😊❤
You inspired me so I made my own box. I used old barn wood I had laying around. It was so much fun! Thanks!
http://pinterest.com/pin/74802043781839665/
I love your version Beka. I pinned it.
Love how you turned the box into a very pretty caddy. I really love the color that you used and the rustic look, the branch just adds to the rustic charm. Now when I go garage sale shopping, I will be looking at boxes through new eyes. Thank you for sharing.
Cute and love the color!
Love this! Sweet idea and I have yard full of old branches LOL. I’m thinking this would make an adorable planter for some potted herbs on my back porch. Thanks for the inspiration!
Sweeeet! I love the cheater build on this one… little boxes, you are no longer safe as is with me! 🙂 Fab photography!!
Shared on FJI Facebook and pinned for SNS 142. 🙂
https://www.facebook.com/photo.php?fbid=10151040078816141&set=a.192514281140.164586.175378011140&type=1&theater
Donna
How pretty.
Would I have bought that box? Girl, if I had been there, you and I would have FOUGHT over it! LOL
You made this wonderful, but left me worrying: What did you do with that adorable tin star on the side? Might it show up later in another project?
I still have the star but don’t know what I’m going to do with it (if anything) yet. hmmmm. Any ideas?
HI, Brittany
This is Awesome! Love it and I do the same thing you do. I Buy something and leave it in my garage for a while. It’s sad, but sometimes life takes over. LOL Have a great weekend.
Vanessa
It’s a sickness, right?!
This is so sweet! It would make a great utensil holder on a patio table too!
Kelly, oh that would be a cute use for it. I’ll have to try that!
That is awesome! I want one!!
Ha, ha! Hands off my caddy. Make your own 😉
really, really cute caddy Brittany! love the color.
gail
ps have a great weekend, stay cool!
Thanks Gail! hope you have a great weekend too. 😉
Cauuuute! Nice remake of a less than beautiful box. Love the branch handle!
Thanks Deborah. Isn’t that branch handle the best 😉
As an altered artist I {heart} this caddy! This is such a big stumbling block for some people…to see past what an object is to what it can be. Great job on this one Brittany! Awesome color choice & the branch keeps it rustic & charming :~)
Thanks Jen! I know you have vision. I can’t wait to see what you do with your little safari themed child-sized bench. I had the adult version that got sooo weathered that it cracked beyond (my desire to) repair. I ended up trashing the wood and putting the ends upright in my flower bed.
PHG I love your crate! As a matter of fact I love all kinds of boxes and crates! Yours is beautiful and I love that you upcycled another box. I can’t stop making boxes and crates myself, stop by and see what I’ve come up with this week…. Yours is a great inspiration and I love the color! I pinned it!
Susan