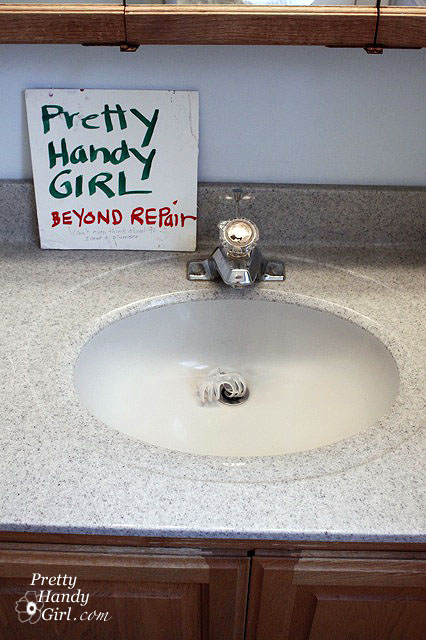
We just got back from a short trip to Vienna, Virginia to visit my family for the holidays. When we arrived, my mom had left me a note in the bathroom we were using.
Here it is:
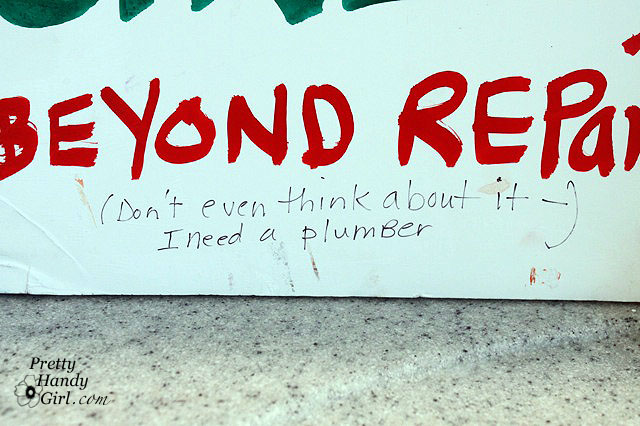
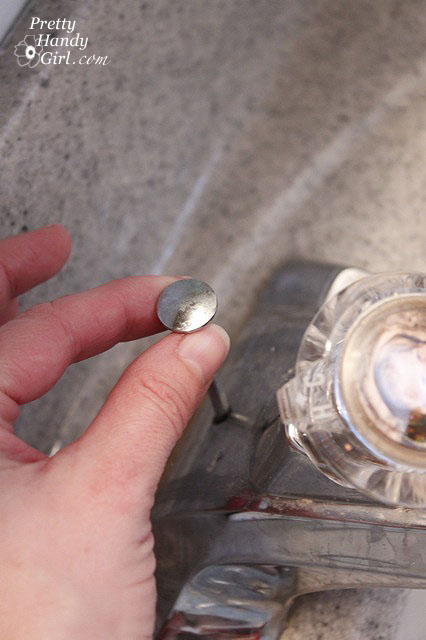
My mom, she’s so cute, doesn’t she know that this sign taunted me the whole visit?
Besides, what kind of daughter would I be if I left this minor repair to a plumber? Puh-lease!
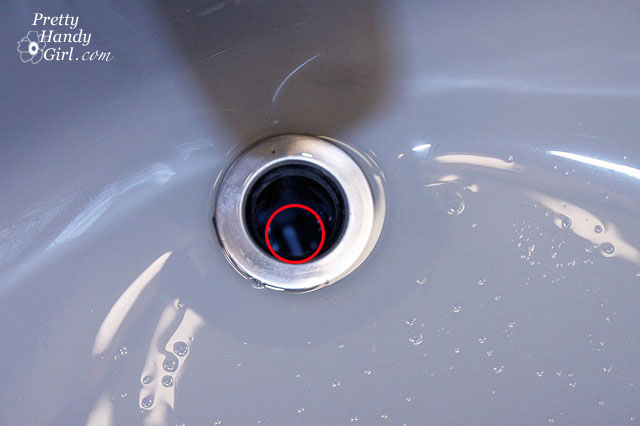
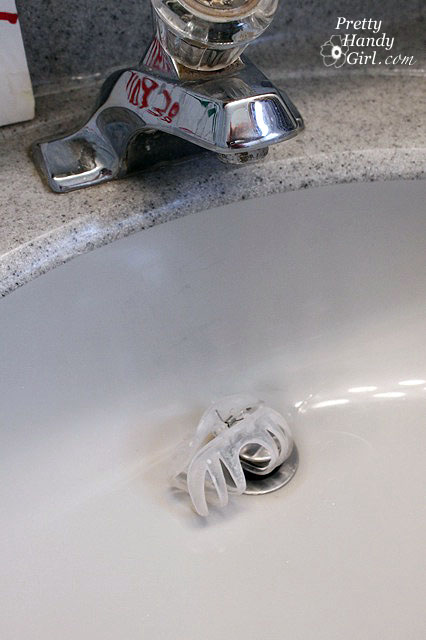
So, here was the deal with the hair clip in the sink. It was her way of holding the stopper up because the rod inside the sink had rusted and broken off. (Pretty creative in my opinion.)
But not the real fix for a sink stopper that would not stay up.
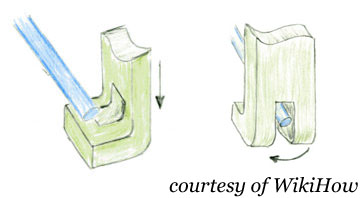
Let’s back up before I show you how to repair the stopper. Thank you to Dvorty Girl for the excellent illustration above that she posted on WikiHow.com.
Sink parts:
- Drain Down Rod
- Joint Clamp Clip
- Horizontal Rod
- Nut
- Ball, Rod, Nut & Gasket
- Stopper Notch
- Pop Up Drain Stopper
Materials:
(I’ve included affiliate links for your convenience. I earn a small percentage from a purchase using these links. There is no additional cost to you. You can read more about affiliate links here.)
Universal Pivot Ball Replacement Kit
Pliers (maybe)
Repairing a Pop Up Sink Drain Instructions:
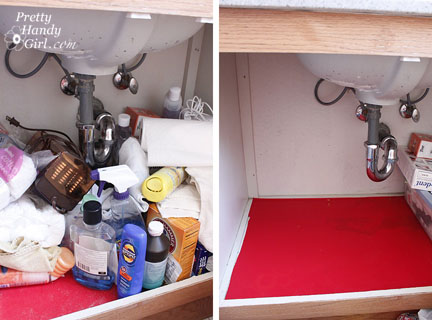
1. Clear out enough room so you can work under the sink. (Okay, my mom is going to kill me for showing you her cluttered sink vanity. But, who’s sink vanity doesn’t look like this?! Please leave a comment and tell her that she’s not the only one!)
2. Lay down some towels to cushion the edge of the vanity (or your back, rib cage or hips will be in screaming pain.)
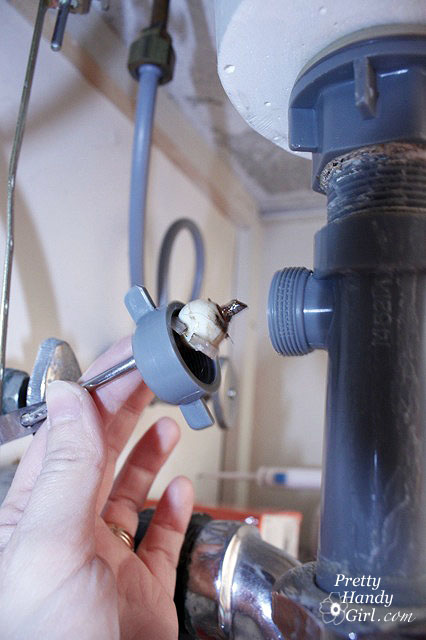
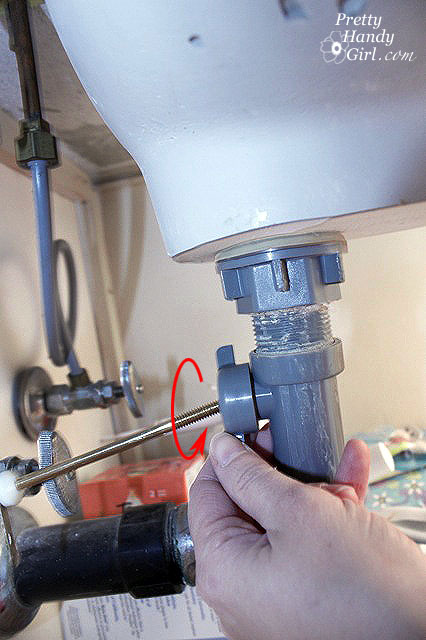
3. Locate the (3)horizontal rod and (5) nut at the back of your drain that holds the (5) ball, rod & gasket.
4. Unscrew the (5) nut with your fingers or use pliers if it is really tight. Pull out the ball and gasket.
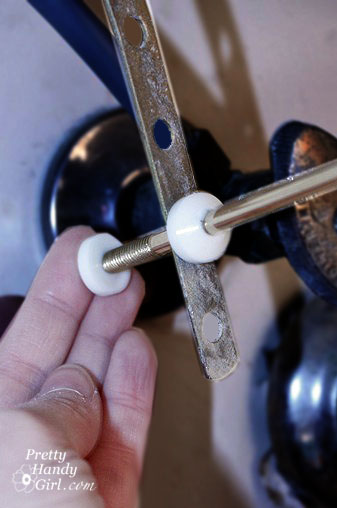
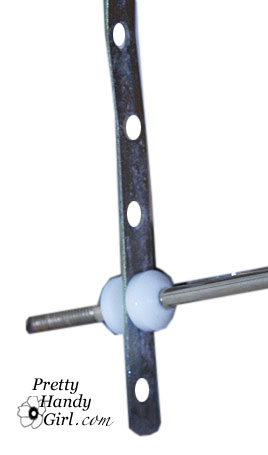
5. To release the (3) horizontal rod from the (1) down rod, squeeze the (2) joint clamp clip between your fingers and slide it off the end of the horizontal rod.
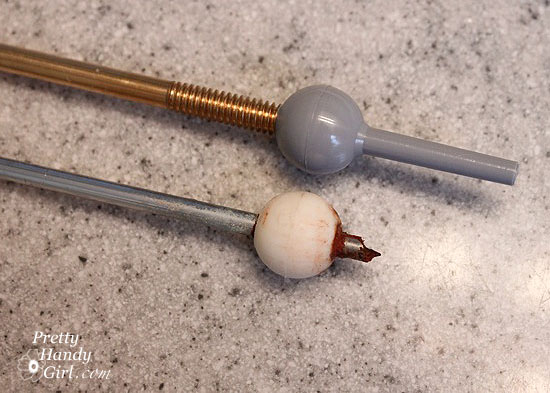
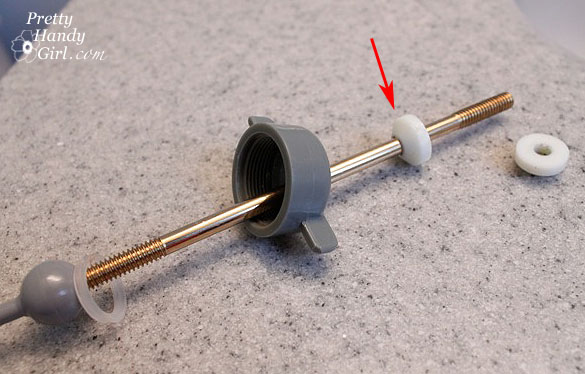
6. Lay out your old pieces to assess the damage. You may or may not need a new gasket (which is sold separately.) This one was broken and needed replacing.
7. Match the old pivot ball with the new ones in the kit. Be sure to choose the one that is exactly the same size. Thread the (5) new ball onto the new (3) horizontal rod.
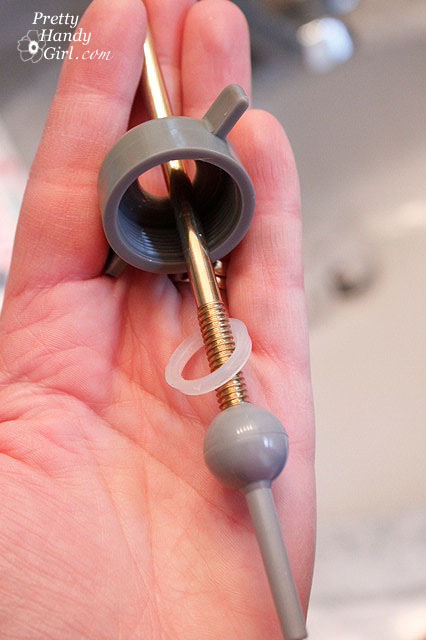
8. Next thread the new gasket onto the horizontal rod and then the nut.
9. Next feed one end of the (2) joint clip clamp (the kit I bought contained two white stoppers instead of a joint clip clamp). Only add one side or one stopper at this point.)
10. Feed the (3) horizontal rod into the (1) down rod.
11. Line the other end of the (3) horizontal bar up and slip the ball joint into the hole at the back of the drain. Ideally the horizontal bar will be parallel to the floor, but you may have to make some minor adjustments at the end.
12. Screw the nut back onto the drain making sure the ball joint and gasket are lined up properly.
13. Now add the second stopper or the other end of the (2) joint clamp clip to the back of the (3) horizontal rod.
14. Look inside the drain, and notice the post end of the (5) ball joint inside the drain.
Pull up on the (1) down drain rod and make sure that it moves up and down freely and the post in the drain moves as well.
15. This next step requires a little patience, so put your patience cap on. Feed the drain stopper back into the drain. You want the end of the stopper to be at a 90 degree angle from the ball joint post as show below.
Gently rotate the stopper 90 degrees until the end of the stopper hooks the post.
16. Once the stopper has been properly rotated and hooked onto the ball joint post, test your sink by pulling up and own on the (1) drain down rod.
And you are done!
Pretty Handsome Guy thought it would be funny to re-arrange the letters in the sign.
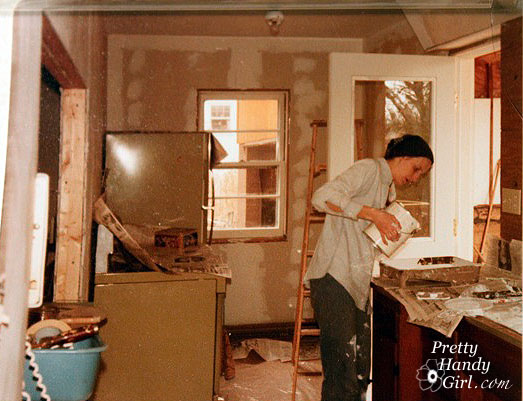
And just to prove to you that my Mom can also be handy, this is a photo I found of her from the 1970’s when my parents were building my childhood home.
Next time your drain stopper is broken, I hope you will put off calling a plumber and fix it yourself!


Absolutely the best instructions for this DIY procedure I have seen. Pics & drawings are perfect!
Hi, thank you for this tutorial, it is very detailed. I was wondering if horizontal rods come in different sizes? I have already bought two kits, including the one you did the tutorial with, and am having a tough time inserting the horizontal bar up with ball joint into the hole at the back of the drain because the bar is much longer than the space between the wall and the drain. You mentioned possibly making minor adjustments to have the horizontal rod parallel to the floor, but what exactly does that mean? How do you recommend I do this without breaking the bar? Thank you for your help.
I wonder if your drain pipe is an odd size. I didn’t have to cut the rod at all.
Hi there my boyfriend pulled out the sink plug not realizing your supposed to unhook the rod under the sink. Now when i put the plug in the rod is moving up and down but the plug won’t move or open. Any advice? My boyfriend and I are not good with this kind is stuff lol
Ugh, it’s a real pain to reattach the drain plug. You might have to put on your patience cap and try to pry it up with a flat head screwdriver, then try to reattach it to the rod paying attention to the diagram in this post.
I used a small suction cup and got it off. I ordered the new part 2 weeks ago and should have it soon. I believe I should have no problems assembling it now.
Many thanks for your excellent explanation. This has saved me hundreds of dollars and really stoked my confidence.
It all sounds great, however, I can’t get the plug out of the hole no matter what I do. I tried releasing the rod and ball from the lever and moving it up and down manually, but it still will l not move the plug up at all, not even enough to grab it with something and leave it out until I can do the rest.
Hey Grace, can you get it up enough to insert a flat head screwdriver underneath? If it’s truly stuck, you might have to replace the entire drain assembly.
Ugh, my ball d assembly kit did not come with a new washer!! I just assumed it would. Now I have to go to the store yet again!
You would think the person helping me at the store could have asked if I needed a gasket. (They also could have pointed out thst i did not need to buy the pop up rod clips, since those cone washers were included in the kit.I did not realize that.)
But, your tutorial is spot-on! Most helpful, thank you!!
If I just want to take out the stopper all together do I need a new pipe? Do I keep the “Ball, Rod, Nut & Gasket” in without the stopper or do I need something in its place to keep the water from spilling through?
As long as the gasket, ball, rod and nut stay, you can take out the drain plug.
Thank you for this excellent post. Found it when doing some research on how to fix my broken sink stopper and it gave me all the information and confidence to fix it myself!
Thank You! Thank You! I just repaired my sink using these instructions. My husband was shocked. I have always loved learning new tasks and I can add this one to the list. Keep up the good work you are doing to educate homeowners. Thank You!
Wow! After much frustration with other websites with no detailed diagrams or explanations, I found your site … best diagrams and explanations!!! am bookmarking your site. Keep up the super work … will be back for more help. Thanks!
Thank you! The corroded pivot arm disintegrated when I was cleaning my sink the other day, so you and Ace saved my day. And I just noticed that your post was seven years ago to the day. So, Merry Christmas!
The plastic washer between the ball and nut wasn’t actually there when I took it apart, and I don’t know where to get one or what size it should be. Since it has worked for ten years without it, until the metal arm corroded (just like the one in your mom’s) I installed it without the washer, and it seems to work just fine! And tell your mom that most under-sinks look messy. Ours sure does!
Erin, be sure to keep an eye under your sink for any potential leaks. But, hopefully it will continue to be okay without.
Thank you for this tutorial! I took the nut and ball parts to Our local Ace. I bought the kit, noticing the balls were the same. I would advise anyone making this repair to keep the old parts until the job is a confirmed fix. When doing the repair, the nuts in the kit were not the right size. Thank goodness I hadn’t chucked the old parts. I used the old nut with the new ball/rod and it all worked beautifully. I put on my patience hat and tried hard to hook the stopper onto the ball end, but eventually gave up. It still stops and in-stops the sink. Actually, all four of our lav sinks do not have stoppers that are connected. I, too, do a lot of stuff around the house that people would normally think were man’s work. I don’t care, I have the capacity and the willingness. Thanks for being yourself. Janet in PA
For almost a year I’ve been without the stopper in the sink drain and went to get a sink strainer that didn’t fit. I came home and found this site and am so grateful to you! I finally fixed it! Tonight, in fact. I returned the sink strainer for the drain and got the correct ball rod. It wasn’t easy but I did it with some more finagling of the clevis (lol, just learned that term) and low and behold it’s fixed. I can’t thank you enough and I can’t wait to check out the rest of your site.
Unfortunately, this repair kit didn’t come with the washer that is included in this post. Our washer is broken, too!! My husband is now so frustrated that he’s going to ask our plumber to do the work!!
is that always the cause, that it rusts inside and breaks off?
Greg, yes, seems to happen a fair amount.
Thank you so much for posting this. I spent several hours struggling with posts by men about ‘how the drain works’, when all I needed was your post about how to fix a broken drain. If it’s broken, I couldn’t care less about how it works- just how to fix it!
Yay!!! #Girlpower
Hi,
Thank you for the information. I installed a new faucet with the horizontal ball and cap (picture 9).
My question is that the ball & cap part is dripping after hand tightening. There was never a plastic washer with the ball (between the ball and the cap).
Would you know where I can purchase one?
Regards,
Udi, without a washer the water will drip out. Check at a plumbing supply store. Bring the cap with you to get the right size. Good luck.
Where did you get the gasket. The one by the ball? I got the repair kit…..and am going to give it a try…..
I accidentally pulled the pop up rod out…it should be the same idea to put it back in, right? Just take out the pieces and examine?
Thank you so much for this guide!!! In a college apartment where the drain in the sink isn’t working but somehow no one broke it this was a life saver. Just need to pick up a ball and metal stick and It’ll be as good as new. Thank you so much!!!! Literally fixed the sink in less than 5 minutes
Brittany, thanks for the step by step instructions , including photos! I fixed 2 broken sink stoppers in 15 minutes. Your tutorial was a (minor) life saver. Thanks!
I fixed it! Thanks for the easy instructions!
So the hubby has been out of town for a few weeks. One drain has been broken for 6+ months and I “broke” the second one a week ago in the same bathroom. Through this tutorial I learned that both were actually rotted just like the one in your mothers bathroom. I fixed them both and hubby isn’t home yet. Feeling pretty accomplished. Thanks for excellent tutorial!
Michele, yay! You go girl!
Thank you so much for posting this! My husband & I would have had to call a plumber if not for your very detailed instructions. We saved enough money on the plumbing call to buy a new grill for father’s day….you’re awesome!!!
I’m the oldest of 2 daughters and I was the one handing tools to my dad while he worked on our cars daddy always told me I can do anything and there’s no need to wait for a man when you can do it yourself. Thank you Daddy. And thank you pretty handy girl because I am truly a girl yet not at all helpless.
Excellent! Being a single home owner often presents these little problems that seem too silly to actually call a professional in. These instructions were great and it took no time at all!!
You saved me!!!! Thank you sooooooooo much for the awesome pictures, so that I knew exactly what the heck I was looking at and what does what!!! You are a-ma-zing!!! Thank you, truly… Saved me a lot of explaining and now it works better than it did before… THANK YOU!!!
Great explanation and diagrams. The only problem/question I had was how should the ball be attached to the rod? I used the same kit as you did. The ball would not really screw onto the rod. I ended up gently tapping the ball piece onto the rod with a hammer.
Thank you!
Well, my stopper was stuck down so it wouldn’t drain. The kit I bought apparently won’t work on this because it’s a Moen brand. So…I have to order the part (the universal Danco doesn’t seem to work). In the process of your directions I at least got the stopper up…but my lift rod won’t stay up to plug the sink. What am I doing wrong? I have the clamp kind versus plastic washers. Thanks….I feel incredibly empowered doing these repairs when hubby is off at work!
Mae, the pop up rod inside the drain is what will make the drain pop up. If you haven’t replaced that you won’t be able to keep the stopper up. I admit, I’m not sure I understand your question. Can you send me a picture to my email?: [email protected]
Thank you for this! I fix my sink for $8. It feels good!
I just found out that one of the sinks in our master bath had a similar problem. Is it common for the pivot rod to break as yours (and apparently mine) did? Do you think it is necessary to see if the broken piece is still in the trap?
Thanks!
Wilbur, it probably wouldn’t hurt to open the p-trap to make sure it’s not there.
Thank you for this tutorial. This was the kind of day when one problem led to another and unfortunately when it came to the sink stopper I was at a loss as to what to do AND I refused to wake my napping husband to only have him grumble and complain. It took me a few attempts, and I was close to being in tears…but persistence paid off and I did it! YEA!!!!
Thanks you got me through fixing my disconnected stopper instead of paying over $100. to someone else.
OK, I know you asked for encouraging words regarding your mom’s under sink situation–but it distracted me so much I couldn’t read the rest of the article! I want to help her, and I’m not sure if anyone suggested it yet, but shoe box-sized rubbermaids will make a world of difference under there. They stack nicely, close out water or dust, and you can organize ‘like’ items (sunscreens in 1, meds in another, hair products, etc. . .). Another easy fix! Now I can concentrate on the article and fix my sink–thanks so much for a jargon-free tutorial.
Wow! This was easy. A little realignment and my stopper stays up again. Thank you for the post.
Been bugging me for months pop-up closing when basin half empty
Took 5 minutes to fix!
Took 25 minutes to get a 78 year old body into and out of confined space!
Excellent info
Thanks
Nice! Glad to hear that.
I have a vessel sink with a soft pop up drain. There are no rods, etc. It is stuck in the down position. How do I open it? Thanks
I’m sorry I don’t know how to help you fix that.
I have replaced everything that can be replaced, but my stopper still will not go up all the way. If I turn it to the right a quarter of in inch, once it is up, it will sort of lock in place and stay. But if it gets hit, it goes back down to only giving me about a centimeter opening, which doesn’t allow for water to drain appropriately. I have tried moving the location of the pull up and down the rod and about everything else I can think of, to no avail. Do you have any suggestions? Also, it doesn’t give me a very good seal when it closes either, unless I give it a little push to close it the rest of the way.
Great job. I really like the pictures, and drawing, along with the easy to understand steps on how to do this.
Just replaced my stopper today after reading your blog for the last week. I would like to say it was easy but I had a hard time unscrewing the cap to get the old stopped out. I finally did but it wasn’t easy. I bought the same kit you did. But I needed new washers. Very difficult to find. Big box store didn’t have it. I went to the local hardware store, and they had a better kit with washers and 2 stopppers attached to the rods, and 2 different screw caps. Finally worked w the new kit. Although I had to figure the washers myself. I think I did it right. Your pictures were helpful. Thank you pretty handy girl!
I accidentally pulled the drain stopper out of our sink. It came out very easily! Our stopper has a hole at the end of it. When I pull the up on the drain rod from the faucet, you can see the rod moving in the drain. It seems like it will be so easy to hook the hole onto the rod. But, it isn’t easy. Two of us tried without success! Is there a way to hook the hole onto the rod by inserting the stopper into the sink and pulling up on the drain rod from the faucet? Is there a way to do this without going underneath the sink and disconnecting things down there? It came out so easily. And I’d like to repair this without calling a plumber or taking anything apart under the sink. I know I couldn’t do that! Thank you for your advice!
Lara, yes, it takes a lot of patience sometimes. I’ve been guilty of just setting the pop-up on top of the rod and trying another day ;-).
What simple and great working instructions with pictures! I was blank in pluming but I fix my drain stopper in 15 minutes. Thanks for saving my money and trouble. I love.
What great and simple instructions with pictures to follow! Just for not handy man. Thanks for making it and saving my money in fixing drain stoper. I love you.
Thank you so much for this post! The photos and clear instructions were very helpful in my first bathroom sink drain stopper repair. Thank you again!!!
Thank you! I loved the clear and thorough directions. Many diy sites assume you know things and skip over details. This was great and my sink drain is fixed. I never imagined it would be that simple! Thanks again!
Thanks! Now I can fix mine real easy. Pictures really help.
Thank you so much! My sink stopper was stuck in the plugged position for a week and your tutorial helped me to finally fix it! I’m bookmarking this for future reference.
Thanks! My fix wasn’t that complicated but just looking at the diagram made me realize I should at least take a look before dumping money on a rubber stopper. (Although I did find a cool one that looks like a fish!)
Oooo, a fish stopper! Sounds like a keeper. 😉
Appreciated the how-to, I had exactly the same problem and I liked that you had a picture of a broken pivot rod because when I pulled mine out I wasn’t sure if it was supposed to be that way or not. Also that the name of it is ‘pivot rod’ and not ‘doohickey thing’ so I looked like I knew what I was doing when I asked the guy at the hardware store for a new one.
Great instructions and drawings. Thanks to this site I was able to fix it perfectly. Our sink which we have not used for months is now ready for our guests. Please keep up the helpful repairs. You are my go to girl!
Hi there,
I have a somewhat weird problem. The hole that the pivot rod goes through is big causing water to leak into my cabinet. Anyway to fix this problem?
Thanks,
GiGi
Sounds like you need a new gasket around the ball joint. Have you replaced the part as shown in this post?
Thank you! I am an extremely clumsy guy, and most of DIY works I reluctantly did were unsatisfactory. This one seems to be in working order thanks to your detailed instructions.
Your picture shows the Universal Fit Ball Rod Assembly, Dunco #88532. I think the one I got at Home Depot, Universal Lavatory Pop-Up Ball Rod, Partsmaster Pro 58423, is exactly the same thing.
I have a question: What if I did not insert the gasket? Does that affect the longevity of this fix? The old broken system did not contain it anyway.
The gasket is necessary to keep water from running out around the ball joint. I wouldn’t remove it unless it doesn’t fit with it on. Good luck.
Thank you. It was your hand-drawn diagram that led me to this site. I’ve spent more time than I should have on this bathroom sink job, as I couldn’t get the rod into the hole in the bottom of the pop top stopper. So, I got out some thread and looped it through the hole and voila! Thank you for your detailed instructions!
Thanks for these instructions. My stopper has been stuck for months. This handy girl (me) knew that she wanted to try fixing it herself. Will have out of town visitors this week, so I said “better now, then later”. It’s fixed!!!
I use a scrap piece of leather. I find that my tools will still mar through cloth or rubber. But the leather gives good traction and is tough enough to prevent the tools from doing damage. Find an old belt or purse or shoe and cut it up!
Not a bad thought. After looking at the images of your mom’s broken actuator, it may be the easiest to just nip off the post that catches the pop-up, and put the thing back together with just the ball as the sealer. I’ll figure it out. Thanks again!
So I ended up on this page while searching for a way to *eliminate* the pop-up stopper. Basically, I want to remove everything, and cap off the actuator hole. Anybody sell a little kit for that, do you suppose? I ask, only because I had no idea there was a universal repair kit for the actuator as you’ve shown. I’ve just always kluged mine back together when I clean them out. I’m just done with the hair-catcher post actuator in there. I don’t need to ever stopper the sink, and just want to use a drop=in strainer.
And one other note to get off my chest: Why don’t we have something better than this “technology” for our drains now? Yikes.
Thanks for the great write-up. If I hadn’t known how to do it before, it sure would now. You’ve helped a lot of people save time, money and frustration!
Darell, You should check at your local hardware store and ask someone in plumbing. Okay, but here is something that you could try (although keep all your parts because it may not work. What if you cut a piece of rubber (like from an old inner tube) and fit it in the nut before screwing it back on? I’d put a basin underneath while you test it out for a while. In theory it should work…maybe?
Your directions are great & easy to follow! But I still have a problem with it leaking. Did you have only 1 gasket. I replaced the faucet & it came with a ball & rod, but the ball was too large. so I bought the replacement kit with correct size ball. The faucet came with 2 gaskets, 1 for each side of the ball. I don’t remember if there was a 2nd gasket on the old ball that broke.
Extremely easy to follow. Awesome help.
I just have to unscrew and remove the faucet and then the screen etc? What kind of wrench won’t scratch the chrome.
I’ve used a cloth between the wrench and the faucet before. Or a rubber jar opener.
I brought it to work and had it cut. I need to buy a Saws All Thanks.
One other thing. Now my Moen faucet leaks if I don’t leave the handle turned all the way to the right. Do I really have to replace the entire cartridge? The faucet has one handle that you lift and I don’t see how to get into the cartridge.
Well, you can just replace the rubber washer if you still like your faucet. But, you’ll still have to take it apart. Usually by the time our faucets leak they look awful (because of hard water) and I like to just replace them. but, that decision is up to you.
I have everything apart and keep my phone with your great directions by my side. Thanks so much!!! Here is the issue. The new horizontal rod that I have attached to the new ball is a bit too long and I can’t get the darn ball back into the pipe no matter how much I twist. ( my sink cabinet is only 18″ wide. Shall I cut off a bit of the rod? Also, the gasket is almost broken and my local hardware box store doesn’t carry them. Help.
Marylynn,
You’ll probably have to contact Moen to see if they can send you a new gasket. And, I’m not sure I follow the issue with the down rod correctly, but if you have to you can probably cut it short. Or would it work to attach the horizontal rod before inserting the ball into the drain?
Hi, I purchased the repair kit after seeing your website. It works fine now. Other sites tell you to replace the whole drain piece, which is crazy.
Thank you, thank you, thank you! Great tutorial–photos helped tremendously! Just fixed our bathroom sink this morning thanks to you. 🙂 Do you have any advice on how to get the drain stopper to sit up higher to allow more water to go down? I’ve moved that rod into 3 different holes but am not getting the results I’m wanting. Thanks again–will definitely bookmark your blog!
Thanks Pretty Handy Girl. I’ve just fixed my sink pop up for less than £10. Would have been at least £45 if I’d called a plumber. Not only have I saved money, doing it myself has made me feel great! 😀
YEAH!!! That’s what I like to hear.
I followed all the directions, and everything seems to work, except for the last step. I cannot get the stopper to hook on to the rod. I am trying to be patient but it’s not working. 🙁 Please advise.
Thank you. Perfect illustration! It’s much better than written instructions. I think I can do this now!
Thank you for woman instructions and pictures. After reading and seeing, I said, “I can do that, ” and I did in about 10 minutes.
Thank you for your simple, easy to follow instructions!
I just fixed my sink in under 15 minutes thanks to your tutorial. Thank you so much!
Hooray! So glad to hear it Rachel.
This tutorial saved me $400+ in plumber bills. THANK YOU! great stuff.
Awesome! Glad to hear it Ken!!!
I have been trying this repair all weekend (independently of finding your site), and I can’t figure out how to get water to stop leaking out around the ball joint. I actually rejected that universal kit because it didn’t have that little gasket and I couldn’t find them anywhere separately. I found a different kit that had a gasket in it but that one keeps leaking too. Any suggestions?
Samantha, you might need a whole new drain assembly. You can unscrew the drain from the collar around the stopper. And then loosen the large nut above the PVC p-trap. It’s not too difficult to replace AFTER you get the drain out. That can prove a tad tough, if it is old and has been there a while. Try googling replacing sink drain.
This is a real handy article. Can you also please list of each item name and where I can get it?
I am really going to try this for this weekend, wish me luck! :-))
Thank you. Thank you. Thank you. The pictures — awesome.
I every time spent my half an hour to read this
blog’s articles or reviews every day along with a mug of coffee.
I did it! I did it! I did it!!!
Thanks!
hi, thank you for such an informative piece, i got mine all fixed up! Bought a replacement kit, but small gaskets and used teflon tape to rig it up.
Thank you for taking the time to write this and put it online with pictures and drawings.
sean
Perfectly understandable directions and illustrations! Thank goodness I found your post after so many I found too difficult to follow. I will attempt this on Monday.
Your directions were wonderful! The pictures really helped. I had to cut off the end of the rod because of some pipes at the back of my sink cabinet, but the stopper is working find now. Without your step-by-step directions I would have had to hire someone to do a relatively simple job. I am a 72 year old woman.
You go girl!!! I’m so glad you took the time to comment and so glad you fixed your sink. I gave you a high five and shout out on my Facebook page: https://www.facebook.com/PrettyHandyGirl/posts/420556131362211
I have fixed some plumbing problems in the past so my husband calls me Josephine. She was on a commercial for Draino or something years ago. Anyone remember her? So the stopper in the sink broke and we were stumped. My husband took it apart, but we were stumped. This is perfect so now Josephine can take over I guess. Love the pictures. Thanks for the detailed posting. Can’t wait to use this to get it fixed.
I need to do this, so I am bookmarking for future project. All the pictures are soooo helpful. Thanks.
Mine just broke, and this information gives me the courage to try it myself! Thanks!!
This was the best guide I found to help me do this exact repair. The broken/deteriorated ball rod looked the same and I happened to buy the same kit. I had trouble with the tension of the pull road (i.e., the rod wouldn’t stay up), but your helpful photos helped me fix the problem. I am indeed a man, and I only care about the advice, not who gives it! The “who needs a man?” comments hurt a bit :-), but I understand the sentiment. Save the plumber’s time for the complicated stuff.
ST, thank you so much for your comment. Glad the tutorial helped. I hope you don’t take that comment personally, there are so many women who were brought up to believe that they couldn’t be handy or fix things because they aren’t men. They are just expressing their new found confidence ;-). BTW, I always like to hear from the handy men out there too.
This web site was perfect and totally EASY to follow. Thanks for the help!!!!!!
God Bless and Happy Thanksgiving!!!!!!!
What exactly is the gasket called? When my sink was taken apart it got lost and I don’t know what to replace it with !!!!!!!!
Very helpful! Thanks for posting,
I can’t believe your step-by-step instructions gave me the courage to tackle this project by myself and it was so easy! Who needs a man around the house when you have the internet!!! Thank you so much for taking the out to take the pictures and for the comprehensive narration!
Gale, way to go girl!!! That’s the spirit. I’m so glad this tutorial helped you. And thank you so much for taking the time to share with me.
I so enjoyed this article immensely! The Teflon tape is not needed for screwing the plastic piece. That’s overkill. The best part is that the pivot ball assembly is made of plastic so it won’t rust anytime. I can see in your moms sink here that most other parts (water lines,etc) were replaced by nylon/plastic tubing as well. The trap is definitely original. It appears she has very hard water usage there.
The pictures and illustrations were on the money handy girl. I loved the step by step. Even a guy can now fix this without having to read. lol
In the end, the apple doesn’t fall far from the tree. You got your moms great brain genes. The hair clip idea was excellent and very funny.
The finale here was the ingenious way Handsome Guy re-arranged the letters on your moms sign!
Oops! I can see he didn’t use Teflon tape to make them stick! ;D
-=Cool=-
Thanks this was right on time for me. I can't wait to repair this. I kept thinking why bother I have to yank that ugly sink out one day when I remodel.The truth is it will be a while before I can afford to do the whole job and in the mean time miscellaneous things keep falling down the hole. Most recently a screwdriver clogged it rather well and wasn't easy to extract. So now that I know what that kit is called I am going to pick one up. Love ya for this.
You are THE BEST!!! Thank you for the tutorial. I will be working on each of our sinks tomorrow!
Always, Teresa T.
Can you come live with me for a week!! 🙂 Mom….you're not the only one with a messy under the sink cabinet. I bet it's all organized now…. thx to your daughter 😉
Merry Christmas to you and your family.
What a great daughter you are! I ALWAYS love a simple solution tutorial, especially from a woman's perspective. Way to go. 🙂 Merry Christmas!
Very cute post. Did you wrap those threads in teflon (sp?) tape?
That is so awesome! I love that you not only fixed it, but of course stopped to take pictures so you could fully document this on your blog.
You rock!! 🙂
i love this! you are sooooo handy!!!
Wow! I am SO impressed! We had a plumber here to fix a clog in our sink (among other things) and he took our stopper out when he did it, that was over a year ago, we still have no stopper because he told us he CAN'T get it back in. HA! Now I have proof that it CAN be done! Needless to say, that guy is NEVER coming back to our house (not just because of that, but because every room he worked in [bathroom, powder room and kitchen] he scratched, dented or plain broke something and cursed a blue streak) I envy you for being so handy, I would LOVE to be able to do these things myself or hire a WOMAN to do the job for me!
I WILL be showing this post to my hubby!
Have a wonderful Christmas!
You're my hero! Thanks for this 🙂
Definetley not only under the sink vanity to look that way. Don’t give it a second though. I want to meet the person who has a beautiful organized area down there and what’s the big deal anyway, not like it would ever be examened .
Thanks sooo much for the info, most helpful. I was able to fix the sink myself!