• Home
  • About
  • My Home
  • Project Gallery
    • Decorating
    • Painting & Antiquing Techniques
    • Arts & Crafts
    • Build It
    • Electrical
    • Plumbing
    • Gift Ideas
    • Sewing
    • Tool Tutorials
    • Home & Auto Maintenance
    • Landscaping & Gardening
    • Photography
    • Recipes
    • PHG TV
  • My Toolbox
  • Contributors

Pretty Handy Girl

A DIY Blog Empowering You to Complete Your Own Project. Build it, Fix it and Do it yourself. Home project tutorials.

  • Contact
  • Advertise
  • Home
  • About
  • My Home
  • Project Gallery
    • Decorating
    • Painting & Antiquing Techniques
    • Arts & Crafts
    • Build It
    • Electrical
    • Plumbing
    • Gift Ideas
    • Sewing
    • Tool Tutorials
    • Home & Auto Maintenance
    • Landscaping & Gardening
    • Photography
    • Recipes
    • PHG TV
  • My Toolbox
  • Contributors
Home » arts and craft » Presto Chango Christmas Wreath

Presto Chango Christmas Wreath

December 4, 2010 Brittany Bailey 16 Comments

2.0Kshares
  • Facebook
  • Twitter
CloseUpWreath.jpg
Sneak Peek at my Christmas Wreath

I am getting a lot of mileage out of my white base wreath I bought at Target several months ago. With it I’ve been able to make a Magnolia Leaf Wreath for the fall.

welcomewreath.jpg

I made a Feather Wreath for Thanksgiving.

SideViewWreath.jpg

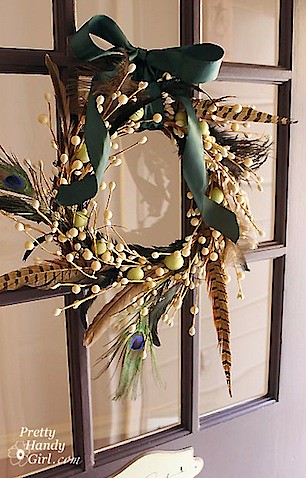
Now it was time to give the wreath an injection of Christmas spirit. I removed the feathers, but left the green nuts on it. I had a green fabric leaf wreath that I made out of some floral filler stalks. All I did was twist 4 of the stalks into a circle shape and secure with a few pieces of floral wire.

2Wreaths.jpg

I set my white base wreath inside the green leaf circle.

TogetherasOne.jpg

To secure the two together, 1) I fed some of the base wreath twigs under the leaf wreath and 2) twisted them over to hug the green leaf wreath.

FoldUpSpring.jpg

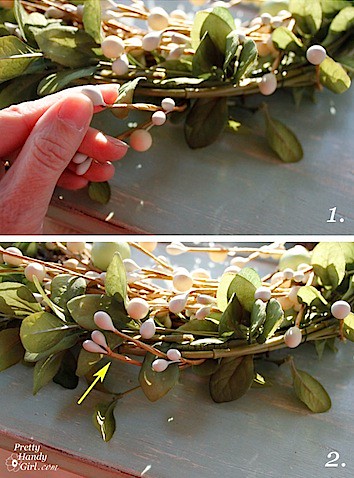
That couldn’t be any easier! No glue, no mess.

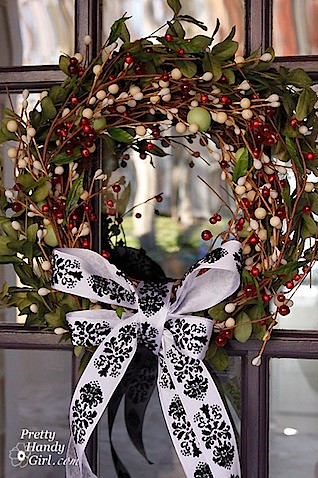
I compared two different ribbons next to my wreath and ultimately chose the black and white one.

2Ribbons.jpg

Tied a pretty bow and stood back to admire.

BandWWreath.jpg

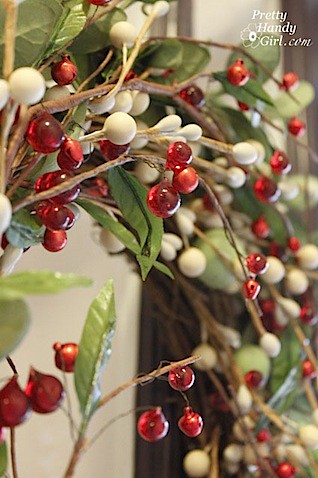
Hmmm, I like it, but it just wasn’t feeling Christmasy enough, so I quickly tucked some red floral sprigs with teeny bells on them into the wreath and gently curved them to match the shape of the wreath.

FinalWreath.jpg
Now that is more like it!
In less than 10 minutes I have my Christmas wreath! This base wreath has been the best $10 I’ve spent all year!

I’m going to try to use this wreath all year and will be sure to share the transformations with you.

2.0Kshares
  • Facebook
  • Twitter

You might also like:

arts and craft, Crafts, Decorating, Holiday decorating, Home Decor, wreath

Comments

  1. Marilyn says

    August 30, 2016 at 2:40 pm

    I love your green leaf and berry wreath. Where did you find the green leaf base?

    Reply
    • Brittany Bailey says

      August 30, 2016 at 3:20 pm

      Thanks Marilyn, I made out of some floral filler stalks. You can get them or something like it at Michaels 😉

      Reply
  2. [email protected] says

    December 2, 2014 at 9:21 pm

    This idea I LOVE! Makes so much sense instead of having endless wreaths for every season.

    So cool!

    Partying with you at Nester’s tonight!

    ;-}

    Reply
    • Brittany Bailey says

      December 9, 2014 at 10:19 am

      Linda, thanks for stopping by and the nice compliment!

      Reply
  3. Karie's Chic Creations says

    December 6, 2010 at 11:55 pm

    They are all just beautiful. Love them. Thanks for sharing.

    Reply
  4. HILLARY says

    December 6, 2010 at 6:05 pm

    I love all of the ways you have used it! That's so creative, I REALLY like your Christmas transformation! Way to go!

    Reply
  5. Caitlin Campbell says

    December 5, 2010 at 10:21 am

    I do the same thing with a boxwood (I think) wreath I got a few years ago and I just change out the floral elements. It has help up really well and I always love the new look it gets from season to season. I usually use the same red flowers for Fall & Winter but you have inspired me to do something a little different to it now for the Christmas season. Thanks!

    Reply
  6. Erin says

    December 5, 2010 at 12:26 am

    Brittany, I love the idea of having one base wreath you can alter with the seasons and holidays. I decided to do a similar thing with a grapevine wreath my MIL gave me a few months ago. I adorned it with fauxliage for fall (grapevine, like your wreath, is perfect for temporarily inserting foliage in) and used an autumnal-colored ribbon to hang it for extra pizazz. I transformed it into a Christmas wreath by removing the fall decorations and then added holly leaves and berries. I rehung it using upholstery webbing. It takes 10 minutes to arrange the foliage and it's great not to have to keep up with multiple wreaths!

    Reply
  7. alittlefrenchloven says

    December 4, 2010 at 1:44 pm

    Beautiful and unique, glad I found your blog!

    Reply
  8. Ashley says

    December 4, 2010 at 10:57 am

    Oh I love it! What a great idea!

    Reply
  9. Katie @ On the Banks of Squaw Creek says

    December 4, 2010 at 10:40 am

    That is so gorgeous!!! You are a genius!

    And I love a good bargain – can't believe you've used that wreath that many times!

    Reply
    • Ann Marie Zinowich says

      August 30, 2017 at 10:10 am

      Awesome ideas! Thank you. Ann Marie

      Reply
  10. marty (A Stroll Thru Life) says

    December 4, 2010 at 9:50 am

    They are all so beautiful. You are so creative. I love them all. I can't wait for all the changes. Fabulous. Hugs, Marty

    Reply

Leave a Reply Cancel reply

This site uses Akismet to reduce spam. Learn how your comment data is processed.

Hi, I'm Brittany aka Pretty Handy Girl. I like the smell of coffee and sawdust in the morning. I live to break stereotypes and empower you to take on your own DIY project.

  • Email
  • Facebook
  • Instagram
  • Pinterest
  • Twitter
  • YouTube

Saving Etta - Follow the Adventure to Flip a Historic House

  • Email
  • Facebook
  • Google+
  • Instagram
  • Pinterest
  • Twitter

Privacy Policy

Affiliate Link Disclosure:

Pretty Handy Girl is a participant in the Amazon Services LLC Associates Program, an affiliate advertising program designed to provide a means for sites to earn advertising fees by advertising and linking to Amazon.com.

Copyrighted Content Permission

All images and tutorials on this blog are copyrighted material. Please contact me if you would like to borrow any media (photos, video or audio files), tutorials, or ideas from this blog. 99% of the time I would be happy to allow you to use one photo with appropriate credit and link back to PrettyHandyGirl.com (preferably to the same post it was borrowed from.) I can be contacted via email: PrettyHandyGirl (at) gmail.com.

© 2021 · Pretty Handy Girl ·