• Home
  • About
  • My Home
  • Project Gallery
    • Decorating
    • Painting & Antiquing Techniques
    • Arts & Crafts
    • Build It
    • Electrical
    • Plumbing
    • Gift Ideas
    • Sewing
    • Tool Tutorials
    • Home & Auto Maintenance
    • Landscaping & Gardening
    • Photography
    • Recipes
    • PHG TV
  • My Toolbox
  • Contributors

Pretty Handy Girl

A DIY Blog Empowering You to Complete Your Own Project. Build it, Fix it and Do it yourself. Home project tutorials.

  • Contact
  • Advertise
  • Home
  • About
  • My Home
  • Project Gallery
    • Decorating
    • Painting & Antiquing Techniques
    • Arts & Crafts
    • Build It
    • Electrical
    • Plumbing
    • Gift Ideas
    • Sewing
    • Tool Tutorials
    • Home & Auto Maintenance
    • Landscaping & Gardening
    • Photography
    • Recipes
    • PHG TV
  • My Toolbox
  • Contributors
Home » arts and craft » Perpetual Menu Board

Perpetual Menu Board

February 12, 2014 Jacque Knowlton 13 Comments

496shares
  • Facebook
  • Twitter

Reusable monthly menu board with magnetic meals - perpetual menu board

We were recently in North Carolina visiting with Matt’s family.  While we were there I took the time to visit an old dear friend of mine.  This girl has known me for years!  In fact I just realized it’s been 21 years since I first met her.  Needless to say it’s important to catch up with friends like this whenever you get a chance. While visiting her, I noticed she had an adorable menu board in her kitchen where she keeps track of all of her meals for the month.  Since “What’s for dinner?” is one of Matt’s favorite things to ask me, I knew I had to make one of these menu boards.

Materials:

  • 12×12 Frame
  • Clear Plastic Calendar Page
  • Scrapbook Paper
  • Magnets
  • Dry Erase Marker(s)
  • Printer Paper or Card Stock
  • Printer
  • Laminator or contact paper
  • Sheet Metal
  • Magnetic Paint
  • Tin Snips
  • Safety Glasses
  • Gloves

Instructions:

Start by measuring the inside of the frame.  (In my case that measurement was 12″ by 12″.)  Using a marker, mark a dot 12″ down from the edge onto your sheet metal.  Repeat this on the opposite side.

Reusable monthly menu board with magnetic meals - perpetual menu board

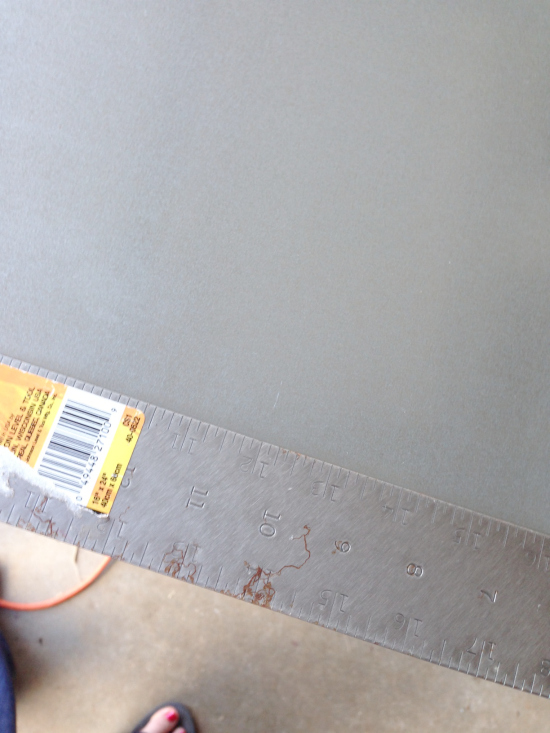
Use a straight edge (or carpenters square) lined up on the dots and draw a line.  This will be where you make your cut.

Reusable monthly menu board with magnetic meals - perpetual menu board

Once your line is marked, check your measurements, making sure is it 12″ from the edge of the metal.

Reusable monthly menu board with magnetic meals - perpetual menu board

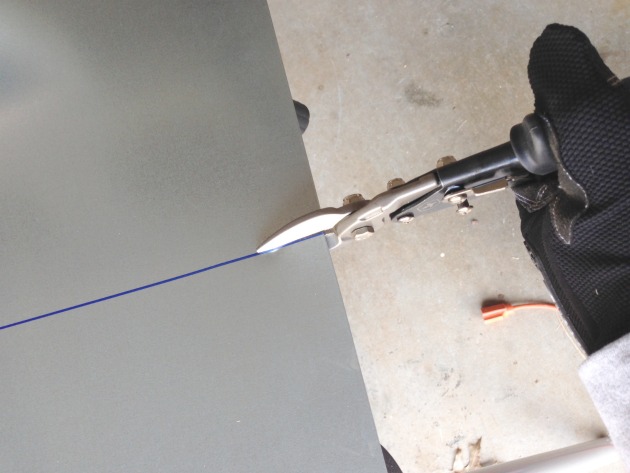
Using tin snips, carefully cut the metal.  Make sure to use gloves and safety glasses while cutting the metal.  It will be very sharp and can easily cut you.   After cutting the metal, you can take a coarse grit sand paper and smooth any sharp edges.

Reusable monthly menu board with magnetic meals - perpetual menu board

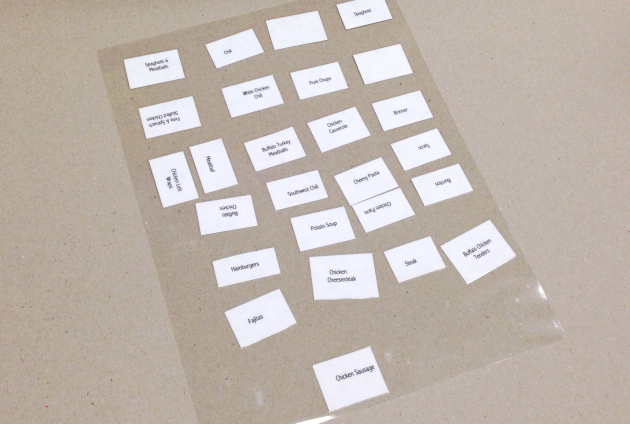
Type and print your meals onto card stock.  Have at least twenty go to meals.  If you plan on repeating a meal within the month make sure to print more than one.  Cut the meal print outs small enough to fit inside the grid of your calendar page and laminate.  If you do not have access to a laminator, you can laminate your meals using clear contact paper or even clear packing tape.

Reusable monthly menu board with magnetic meals - perpetual menu board

Trim and apply the adhesive side of the magnets to the meal cards.

Reusable monthly menu board with magnetic meals - perpetual menu board

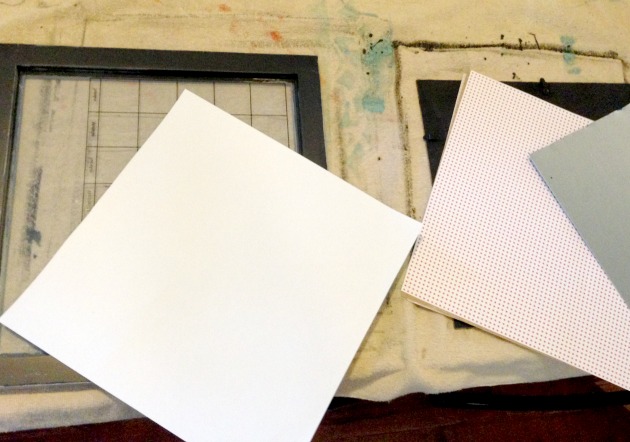
Time for assembly.  Remove the glass from the frame and first insert the calendar page. Followed with the scrapbook paper, then sheet metal, and add the frame backing last.  Using the tabs on the frame close everything snug and tight.

Reusable monthly menu board with magnetic meals - perpetual menu board

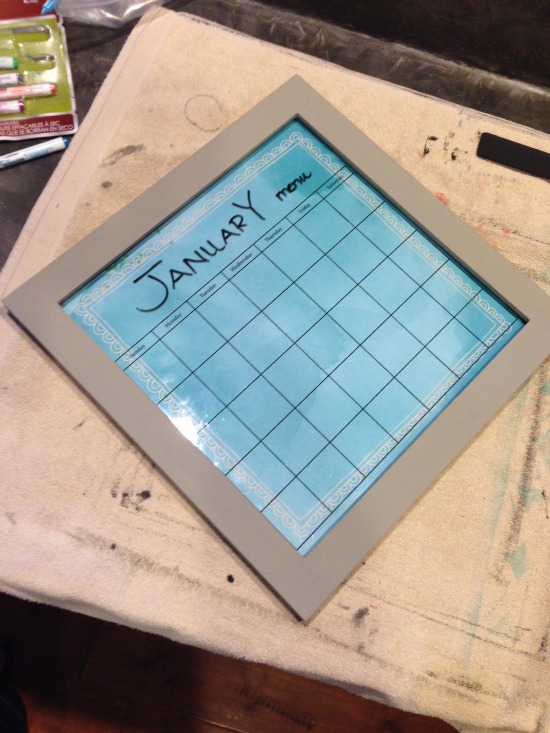
Flip the frame over, add the month and dates to the grid.

Reusable monthly menu board with magnetic meals - perpetual menu board

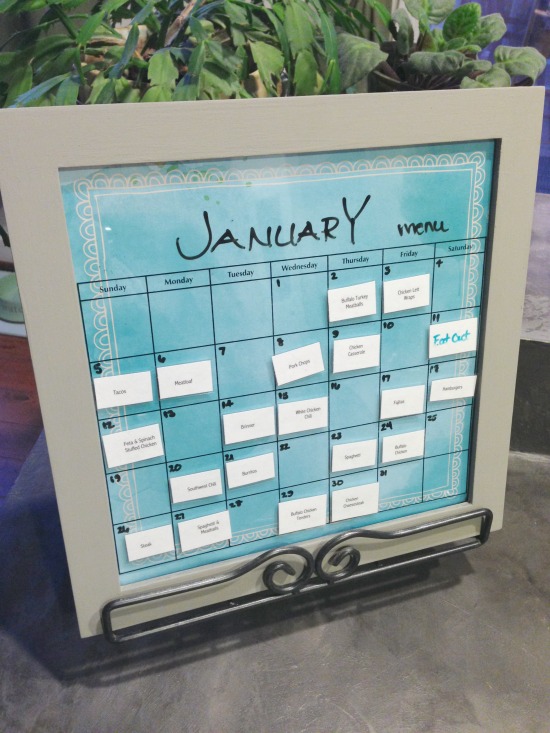
Plan your meals out on the perpetual calendar and enjoy the splendor of pre-planning!  Gone are the days of “What’s for dinner?”, which is music to my ears!

February Menu

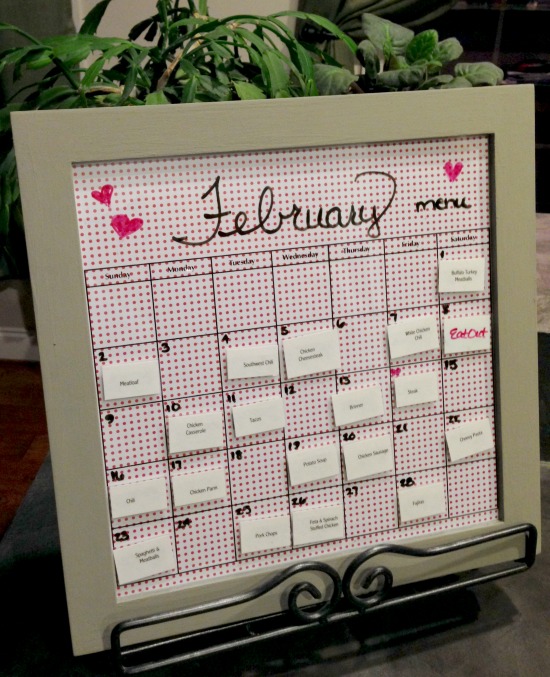
Just for fun you can change your scrapbook pages to coordinate with that particular month!

Jacque_signature~Learn more about Jacque~


496shares
  • Facebook
  • Twitter

You might also like:

arts and craft, Contributor, Crafts, decor, DIY, Home Decor, organizational tips, Tutorial

Comments

  1. Yvonne says

    January 10, 2019 at 9:26 am

    If you are going to change out the scrapbook page each month, why not make 7 calendar pages, one starting on each day of the month? The you only have to add the month. Less work than renumbrring every month. You can make a couple of non-menu cards to cover up extra days for February and the 30 day months.

    Reply
  2. Feral Turtle says

    March 6, 2014 at 8:24 pm

    Pure genius!!! I feel like I could pop by for a meal anytime and you would be ready for me…lol. Just kidding. It really is a fantastic idea though! Cheers.

    Reply
  3. Gwen says

    February 13, 2014 at 12:26 pm

    That is BRILLZ, Jacque!!! I’m always just making new menus every week, but something like this would make it SO much easier!

    Reply
    • Jacque Knowlton says

      February 14, 2014 at 9:32 pm

      Thanks Gwen! So far so good, I even kept a few blank ones for new meals or eating out!

      Reply
  4. Jessi @ Practically Functional says

    February 13, 2014 at 1:11 am

    Oh I love this! What an awesome idea!

    Reply
    • Jacque Knowlton says

      February 14, 2014 at 9:33 pm

      Thanks Jessi!

      Reply
  5. Jennifer Crabtree says

    February 12, 2014 at 8:36 pm

    Love it! Where do you find the clear calander pages?

    Reply
    • Jacque Knowlton says

      February 12, 2014 at 10:37 pm

      Thanks Jennifer! I found it online at Create for Less just search for -Paper Accents Calendar Page 12×12 Clear Plastic. The shipping was almost as much as the sheet so I added other things I needed to the order.

      Reply
  6. Laura Beth says

    February 12, 2014 at 1:25 pm

    LOVE this idea!! While I love to cook I hate deciding what! It would be so nice to have it all planned out where I can see it at the beginning of the month :o)

    Reply
    • Jacque Knowlton says

      February 12, 2014 at 10:37 pm

      YES, it’s great and keeps me from making the same thing over and over again!

      Reply
  7. Angie @ The Country Chic Cottage says

    February 12, 2014 at 11:53 am

    Love this Jacque!

    Reply
    • Jacque Knowlton says

      February 12, 2014 at 10:39 pm

      Thanks so much Angie!!

      Reply

Leave a Reply Cancel reply

This site uses Akismet to reduce spam. Learn how your comment data is processed.

Hi, I'm Brittany aka Pretty Handy Girl. I like the smell of coffee and sawdust in the morning. I live to break stereotypes and empower you to take on your own DIY project.

  • Email
  • Facebook
  • Instagram
  • Pinterest
  • Twitter
  • YouTube

Saving Etta - Follow the Adventure to Flip a Historic House

  • Email
  • Facebook
  • Google+
  • Instagram
  • Pinterest
  • Twitter

Privacy Policy

Affiliate Link Disclosure:

Pretty Handy Girl is a participant in the Amazon Services LLC Associates Program, an affiliate advertising program designed to provide a means for sites to earn advertising fees by advertising and linking to Amazon.com.

Copyrighted Content Permission

All images and tutorials on this blog are copyrighted material. Please contact me if you would like to borrow any media (photos, video or audio files), tutorials, or ideas from this blog. 99% of the time I would be happy to allow you to use one photo with appropriate credit and link back to PrettyHandyGirl.com (preferably to the same post it was borrowed from.) I can be contacted via email: PrettyHandyGirl (at) gmail.com.

© 2021 · Pretty Handy Girl ·

We use cookies to ensure that we give you the best experience on our website. If you continue to use this site we will assume that you are happy with it.Ok