Millie’s Remodel: Revealing the Ugly Ranch to Mid-Century Modern Dream House
It took me six months to renovate the three bedroom Millie’s Remodel house, but it’s taken me much longer to share the reveal with you. Today is the day, I’m taking you inside for a full tour! Are you ready for this amazing transformation?
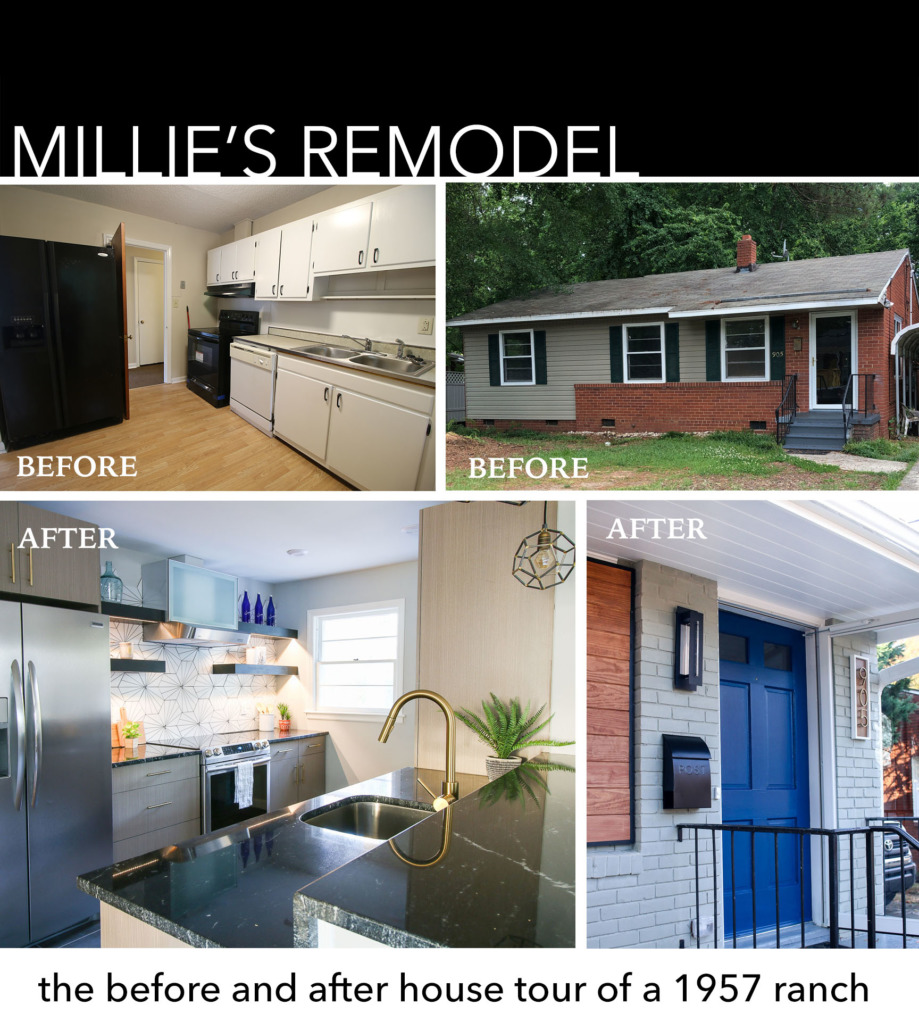
Millie’s Remodel: Ugly Ranch to Mid-Century Modern Dream House
I’m so honored to take you on a tour of the Millie’s Remodel house today! I know you’ve been so patient, and I can’t thank you enough. To be totally honest, the house has been finished for a year, but life has been upside down for me this last year. Regardless, I am excited to invite you in to see the progression of this house from an ugly ranch to a mid-century modern dream house!
Video Tour:
To give you the full experience, I created a video tour just for you! If you like, you can read on to see still photos and learn more about all the work that went into this house. I hope you enjoy the tour and feel free to leave me a comment on YouTube or here. If you are looking for the source for anything in the house, scroll down to the end of this post.
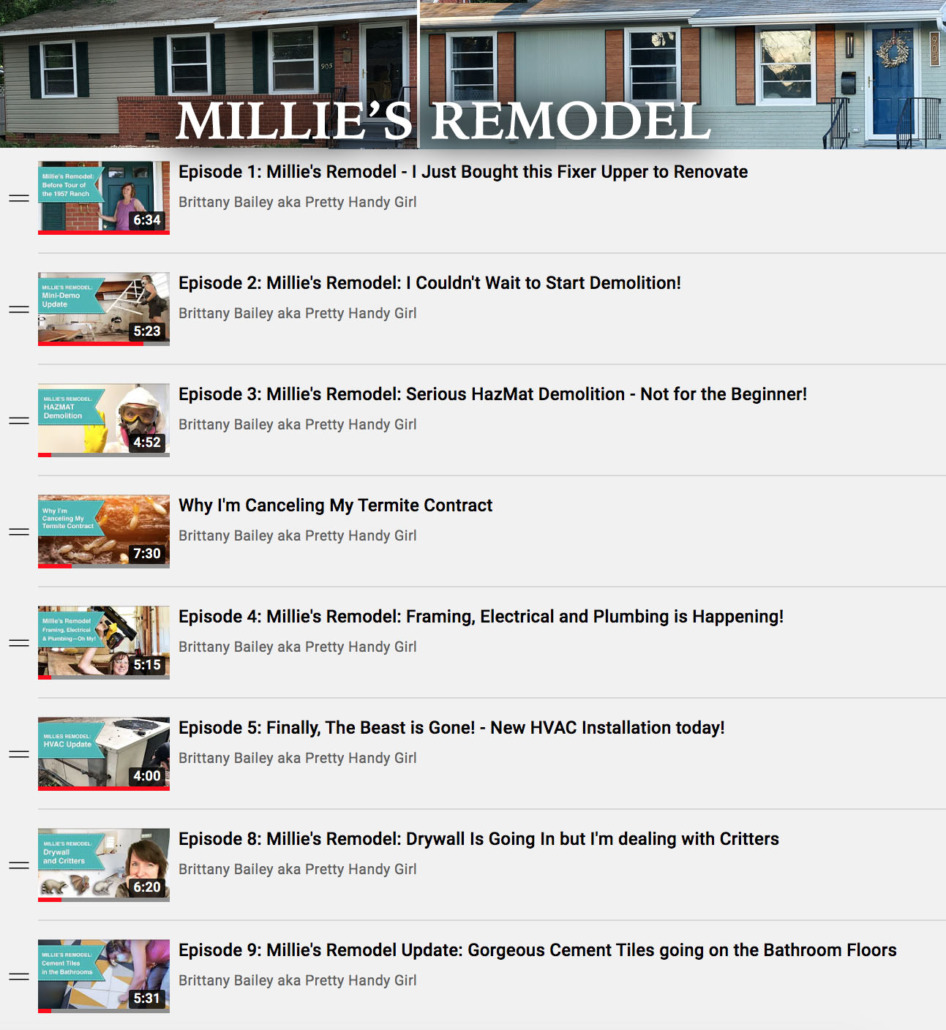
Did you enjoy that video? Want to dive deep into the entire Millie’s Remodel? You can watch all the videos in the Millie’s Remodel playlist:
Millie’s Remodel Before and After:
(I’ve included affiliate links for your convenience. I earn a small percentage from a purchase using these links. There is no additional cost to you. You can read more about affiliate links here.)
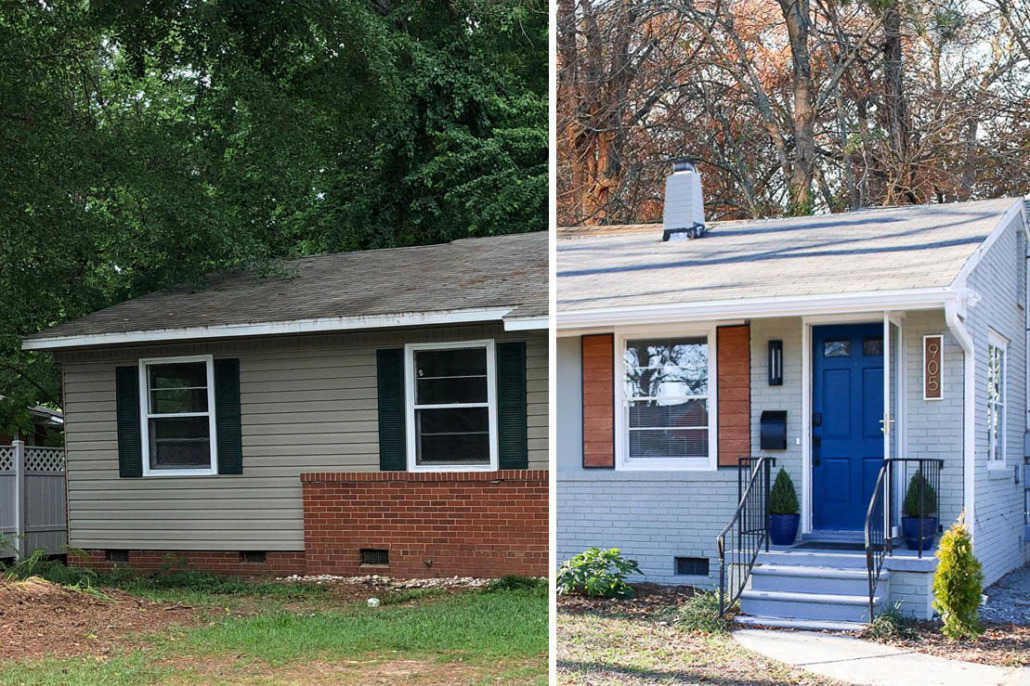
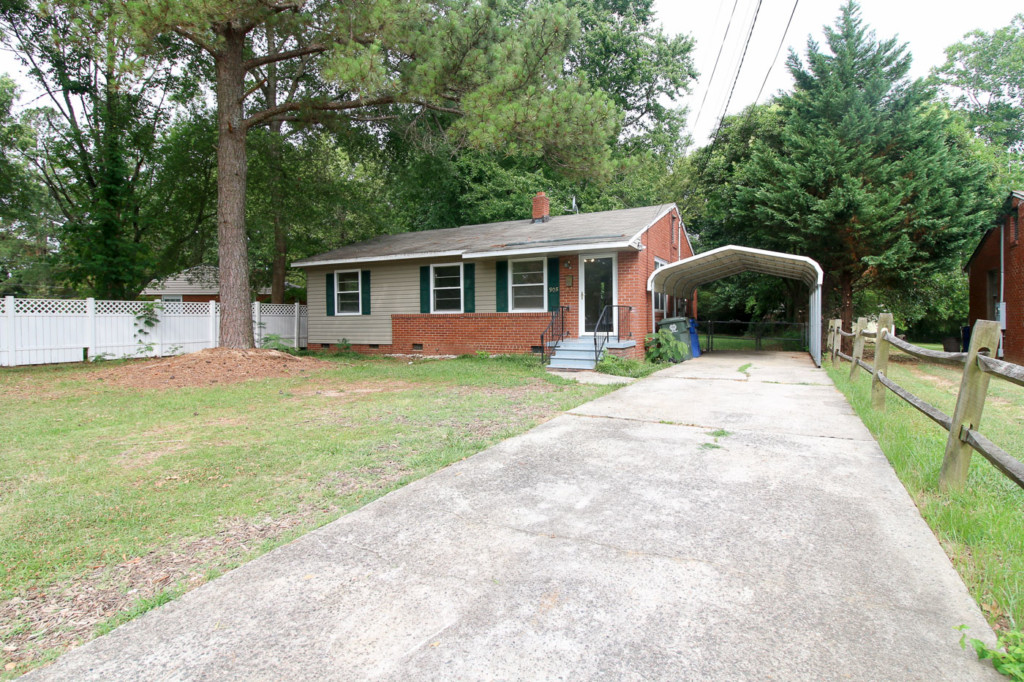
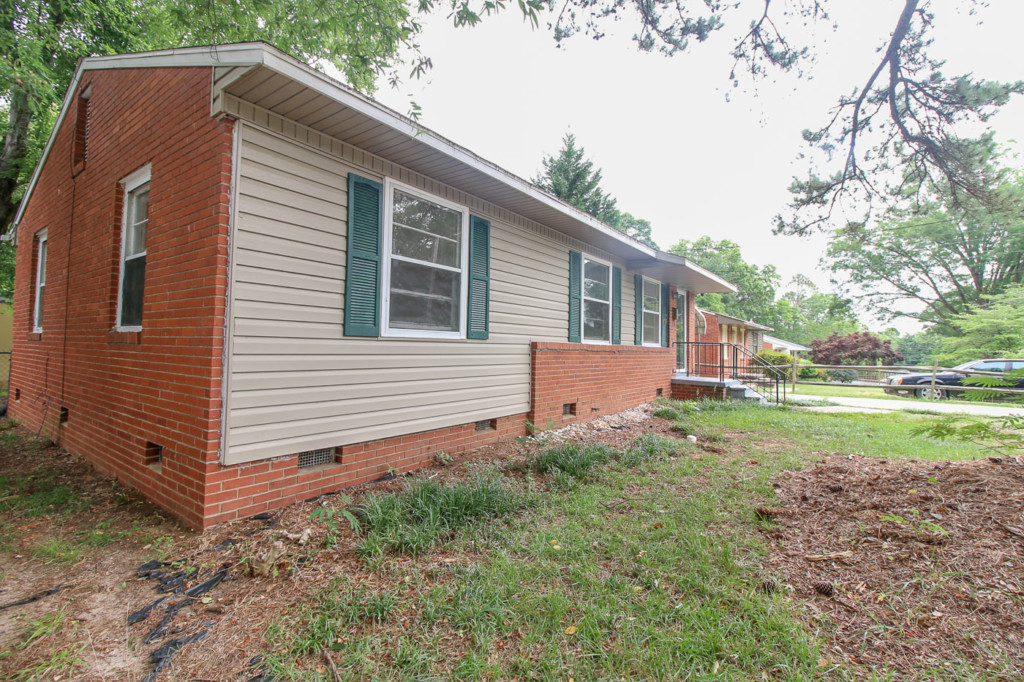
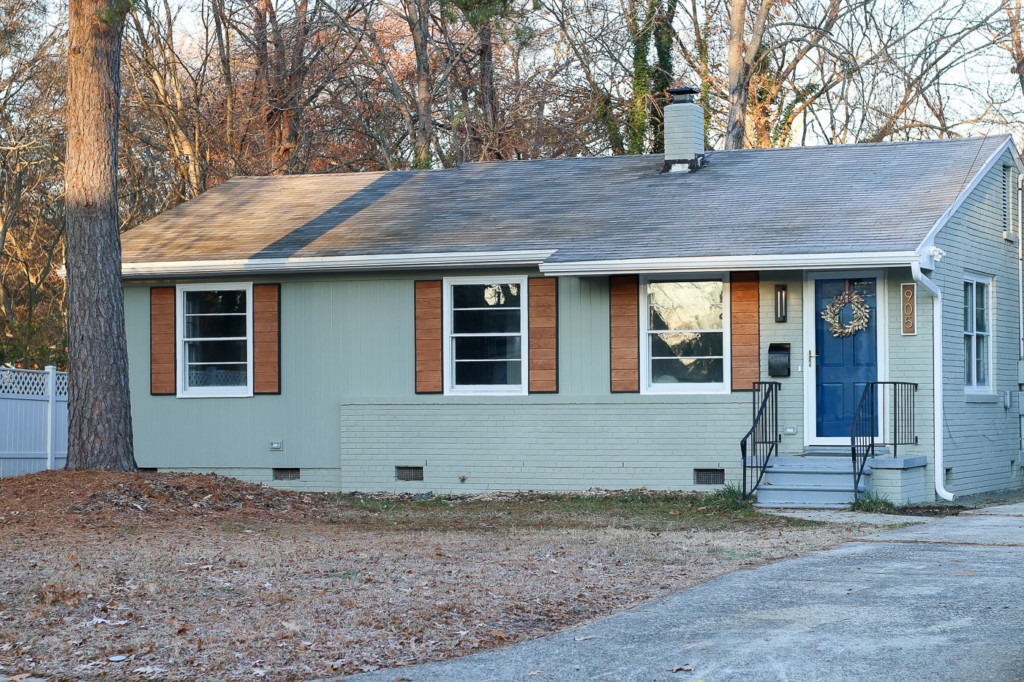
When I bought the house, it was a bit of an eyesore from the curb. Especially with an ugly carport, weeds, and the leaning split rail fence.
The color scheme had to go. Nothing screams 1990’s like a house with tan vinyl siding paired with hunter-green vinyl shutters. Speaking of hunter green, I hear it’s making a comeback. What do you think, is it time to embrace it again?
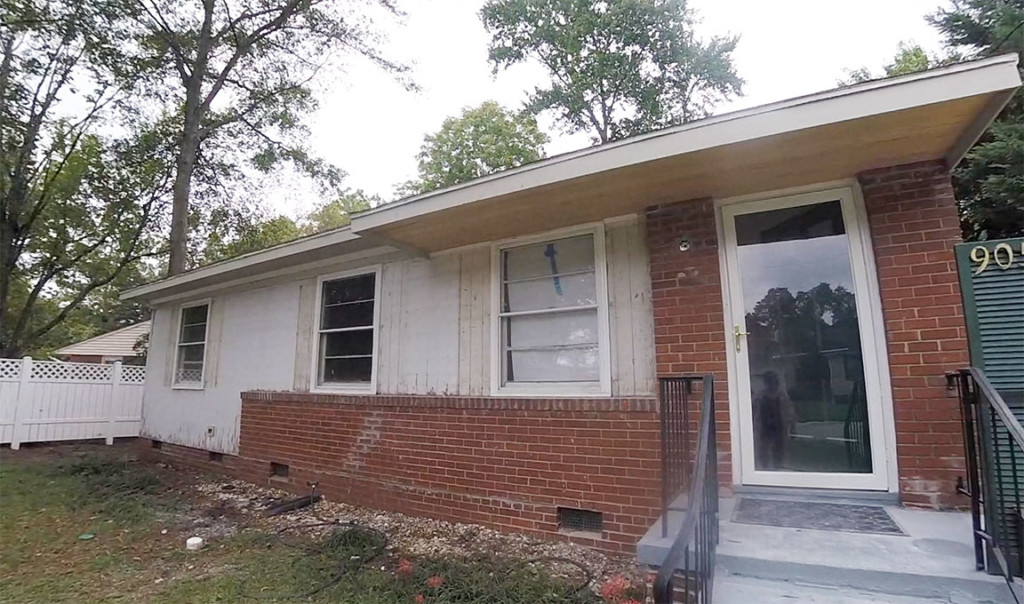
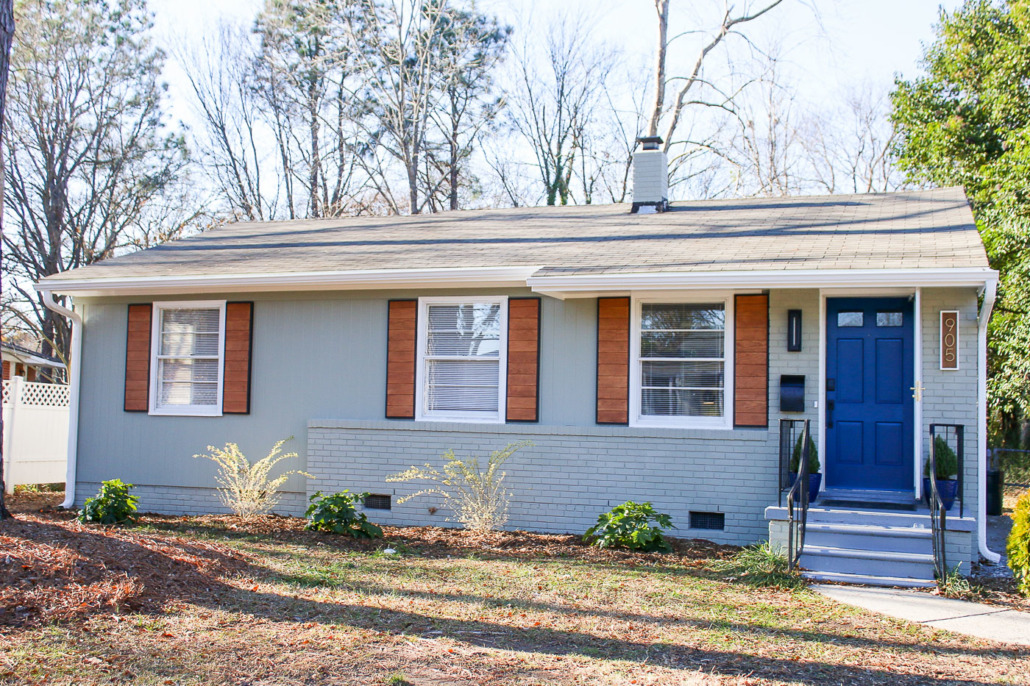
I knew I wanted to paint the entire house from the start and luckily I discovered Romabio Masonry paint, a mineral paint that allows the brick to breathe after application. This prevents the paint from bubbling and flaking, but more importantly, it protects the brick from deterioration. Before painting, my siding contractor stripped off the dated vinyl siding. We were both amazed when the original wood siding was discovered underneath in perfect condition. Many times adding aluminum or vinyl siding over wood will lock in moisture and cause wood rot.
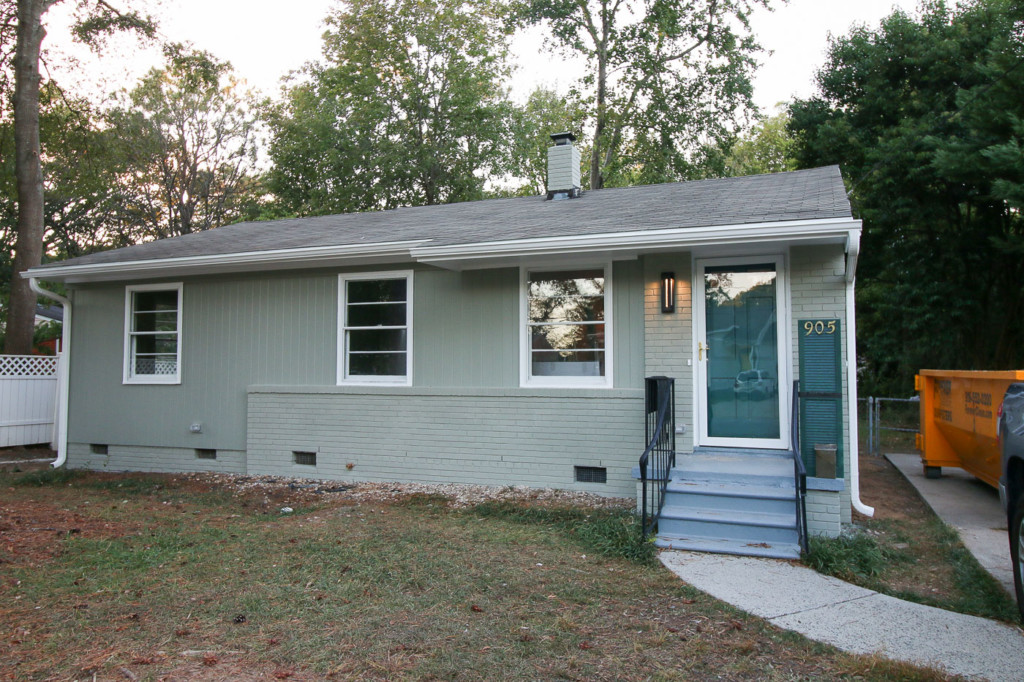
After agonizing over the color choices, I chose Romabio’s Sage Advice as the color to paint the house. I love the green color and the fact that it is completely different from the adjacent houses.
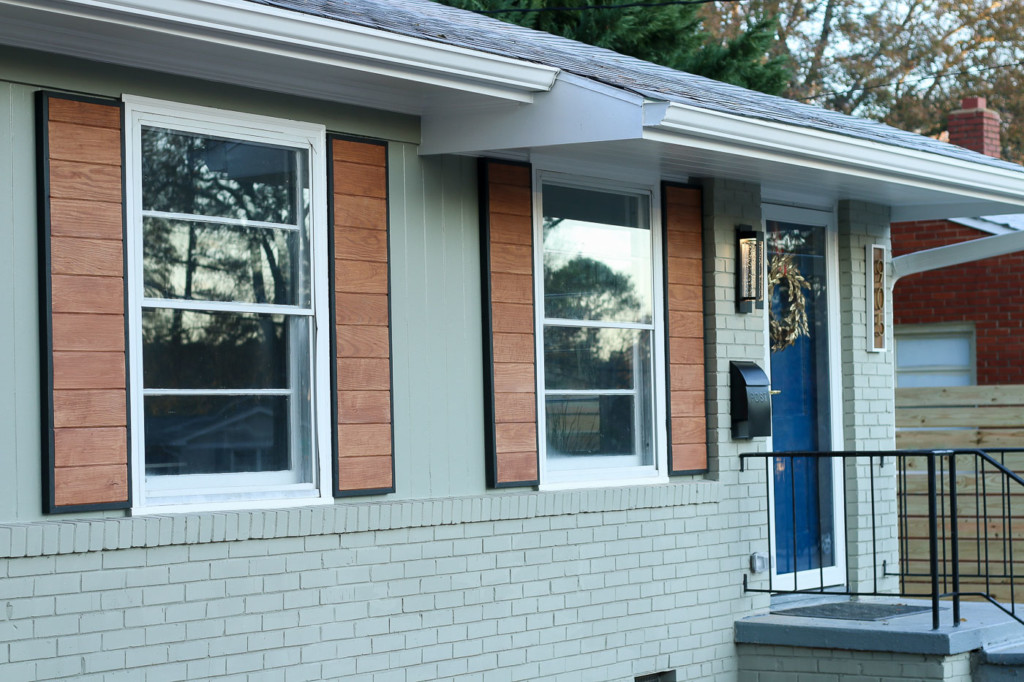
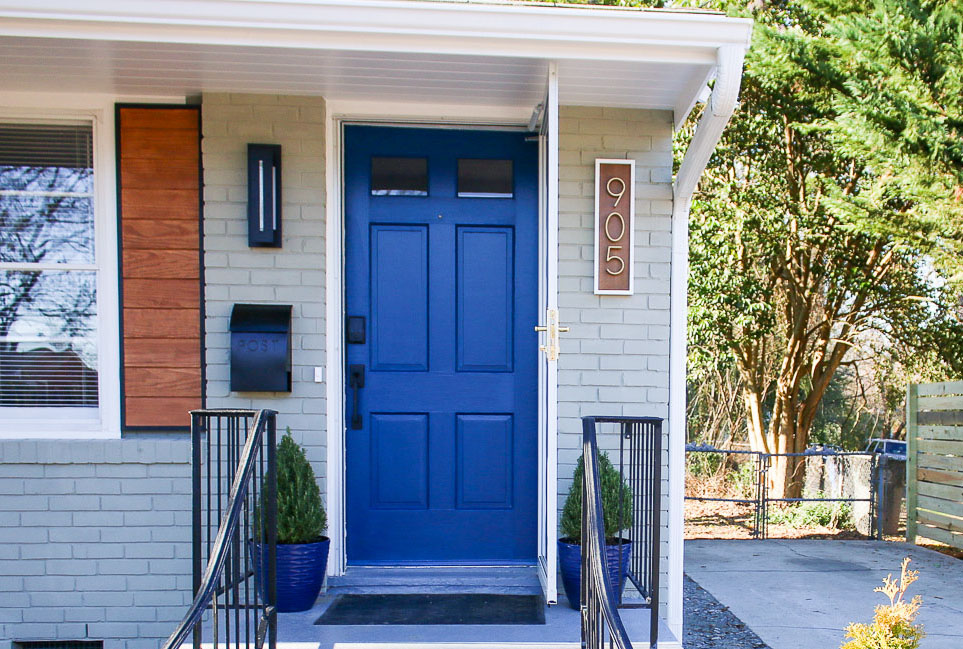
But, Millie still needed a little more style, so I decided to try my hand at building shutters. These DIY Modern shutters were remarkably easy to build and I was able to finish them over the weekend and install them around the front windows.
You probably noticed I painted the front door too. It’s called Loyal Blue by Sherwin Williams. A DIY modern address number sign, a modern mailbox, and a modern bubble glass light completed the transformation of this home’s curb appeal.
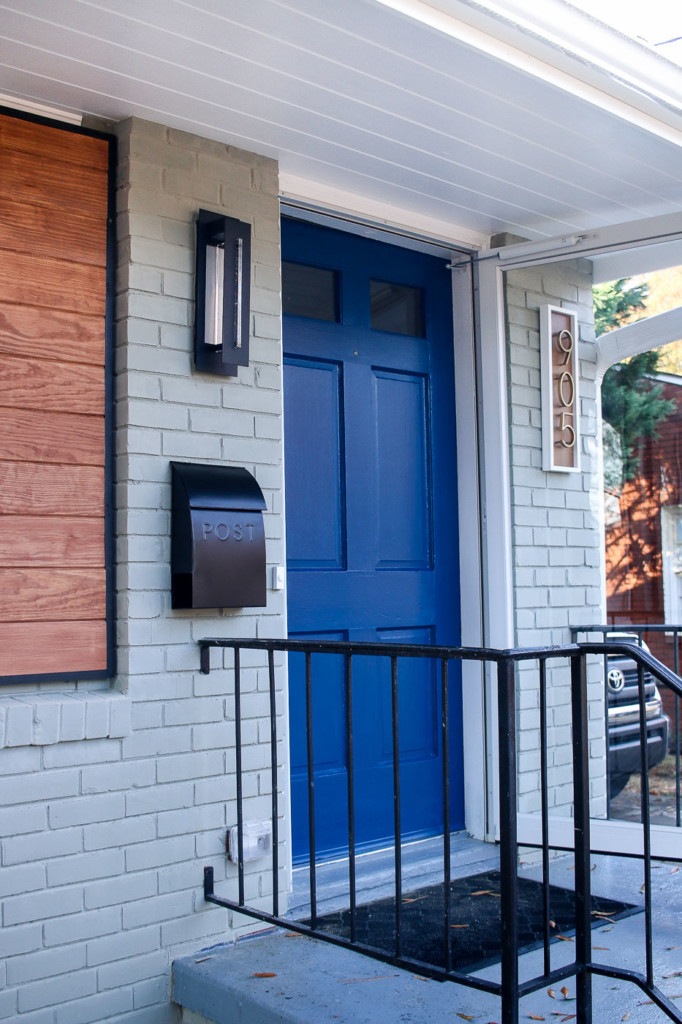
The only thing missing was some foundation plantings. After all, we can’t have Millie looking a little naked from the waist down!
My friends at STIHL sent me the KombiSystem to clear gravel from the front, till the soil, and plant new bushes. You can see more details about this amazing battery-powered motor that has a huge variety of interchangeable heads in my mailbox garden bed tutorial.

That looks much better. Within a year, the Japonicas have really filled out. But, the privets aren’t too happy. I might switch them out this fall.
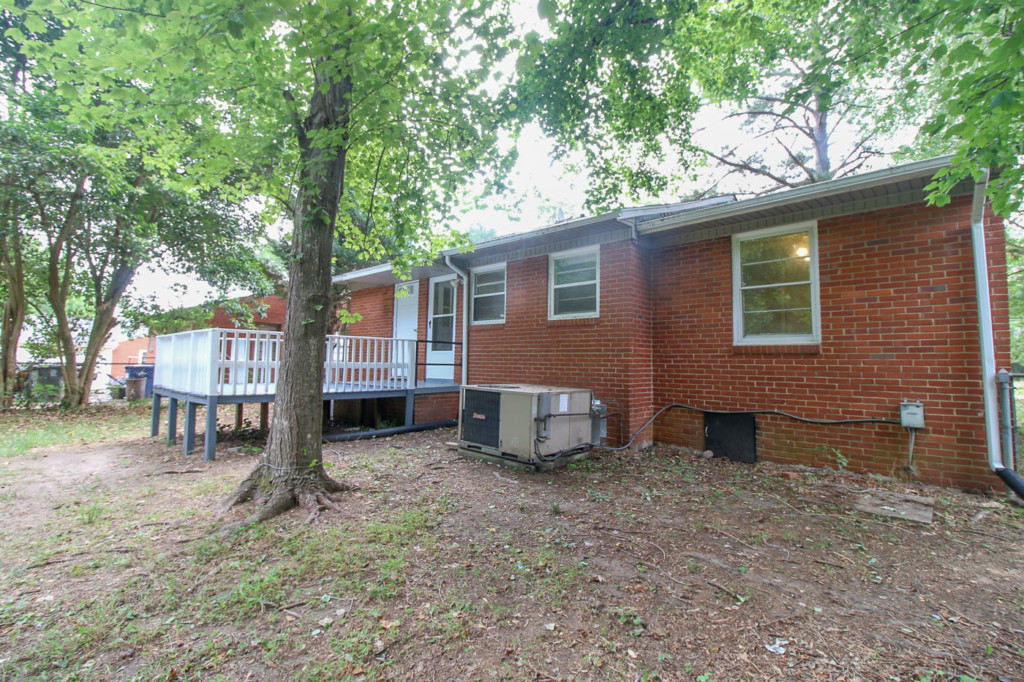
Although the back of the house will only be visible to the tenants, it got some major changes as well.

The first thing to go was the very loud and broken HVAC unit. During the inspection, it was cooling fine, but wouldn’t heat because a safety feature had kicked on. I was more than happy to let my friends at TRANE install a new system. You can read the amazing story of how long a TRANE will really last here.
One of the strategies I implemented when renovating this house was to replace all the systems to eliminate lots of repair calls. Installing a new HVAC unit was a smart decision and gives potential tenants peace of mind knowing that they won’t have any issues with the heat or air conditioning. We also ran new electrical wiring in the house (because there was no ground wire) and new plumbing because of the plethora of leaks from the old pipes.

Another thing that needed to go was the ugly dilapidated shed. From the looks of it, I worried the shed would fall apart when we tried to move it. At a minimum, it needed to at least be raised onto concrete blocks because the floor system was built on the ground giving easy access to termites and other insects.
My husband, my teenage son, and I spent a day rolling the shed to the back of the lot. It was slow going at first until we learned the easiest way to roll it. You can see our adventures moving the old shed. Believe it or not, it was a very rewarding experience!
After adding paint and trim, it’s hard to believe this is the same shed! I’ll let you in on a little secret: the new windows are actually the old window sashes from the bathroom window. Keep scrolling to find out why I replaced the bathroom window.

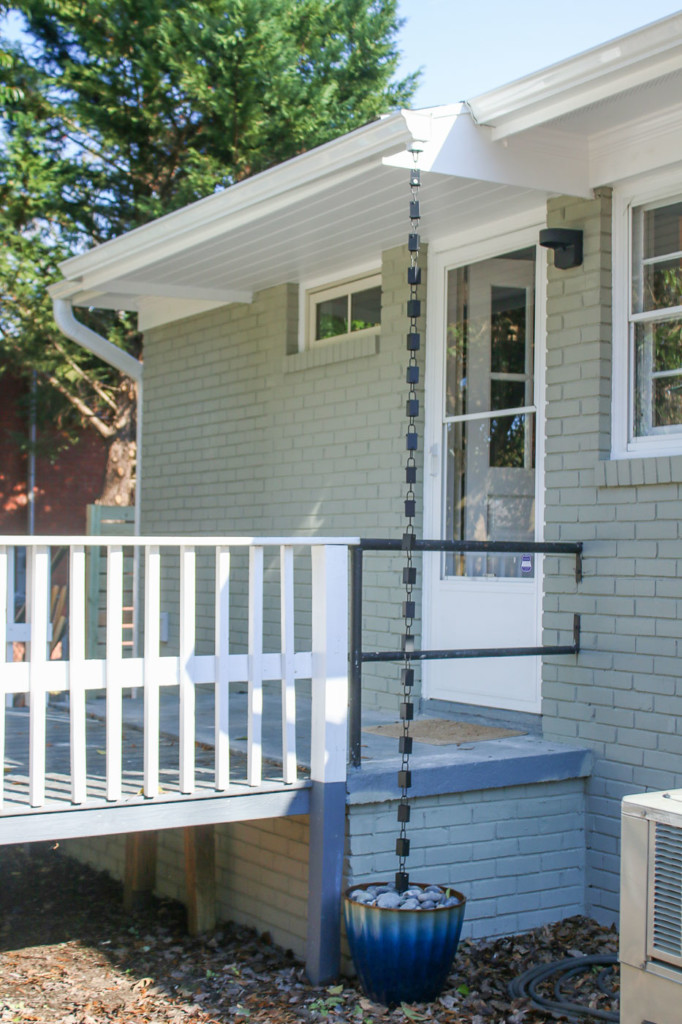
The front and back of the house got new gutters to prevent wood rot and protect the foundation from water damage. Do you like the rain chain? It was the best solution for an area that would have been difficult to add a downspout.
Interior Transformation:
Enough about the outside, let’s go inside to see the transformation!
The Living Room:
It’s a good thing you can’t smell this picture. Although the house looked clean, the smell was a horrid concoction of mold, menthol cigarettes, and fish odor.

Just inside the front door was the combined living and dining area. Besides a dated ceiling fan and boob light, there was a decent amount of natural light in this room. However, the carport outside the windows facing the driveway was ugly and blocked the view. I sold the carport on Facebook Marketplace and someone came and disassembled it and hauled it off in one day.
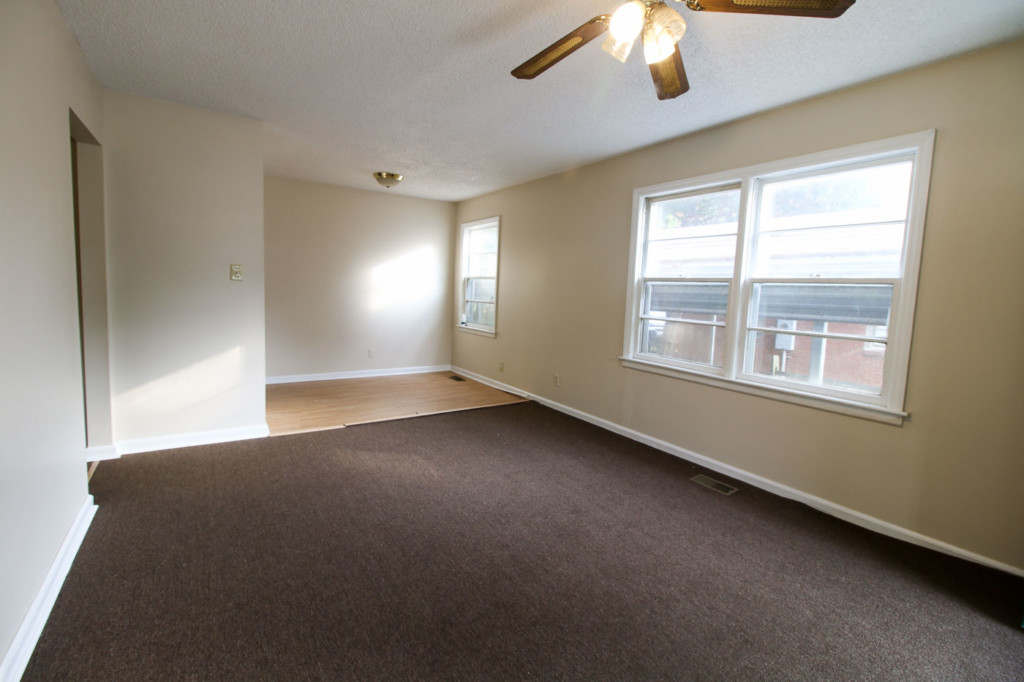
The carpet appeared to be brand new, but it was just cut and laid on the floor. No floor pad, and thankfully no staples! This made for super easy removal of the carpeting throughout the house. Likewise, the laminate flooring in the dining area popped up easily. But, underneath was peel and stick vinyl tiles that left a gooey mess on the wood floor. I spent the better part of a day cleaning it off the wood with Citristrip and mineral spirits.
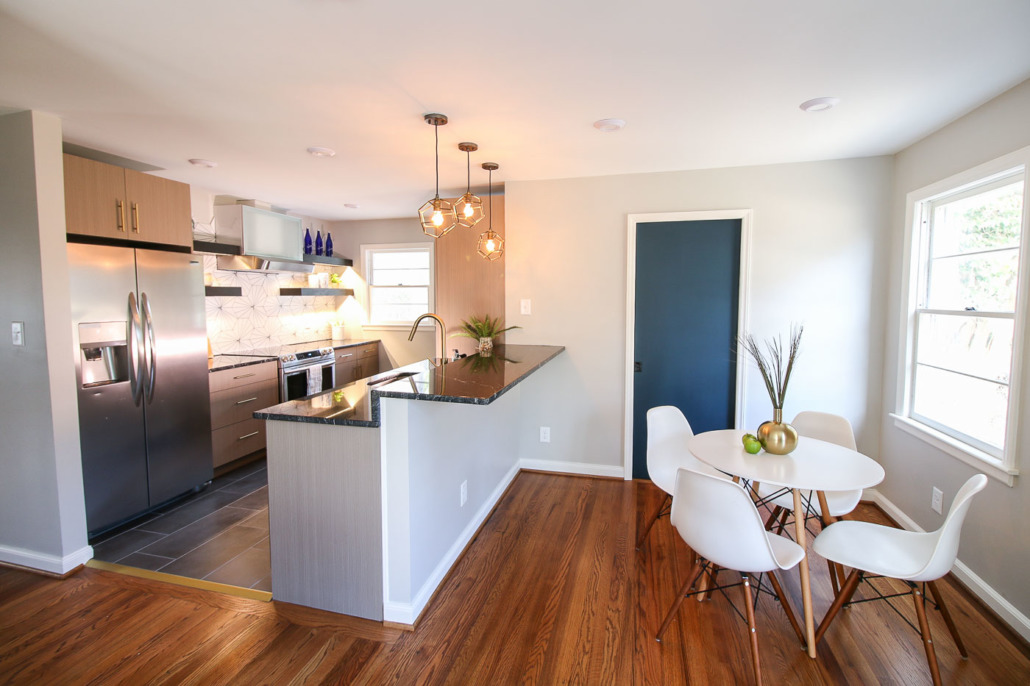
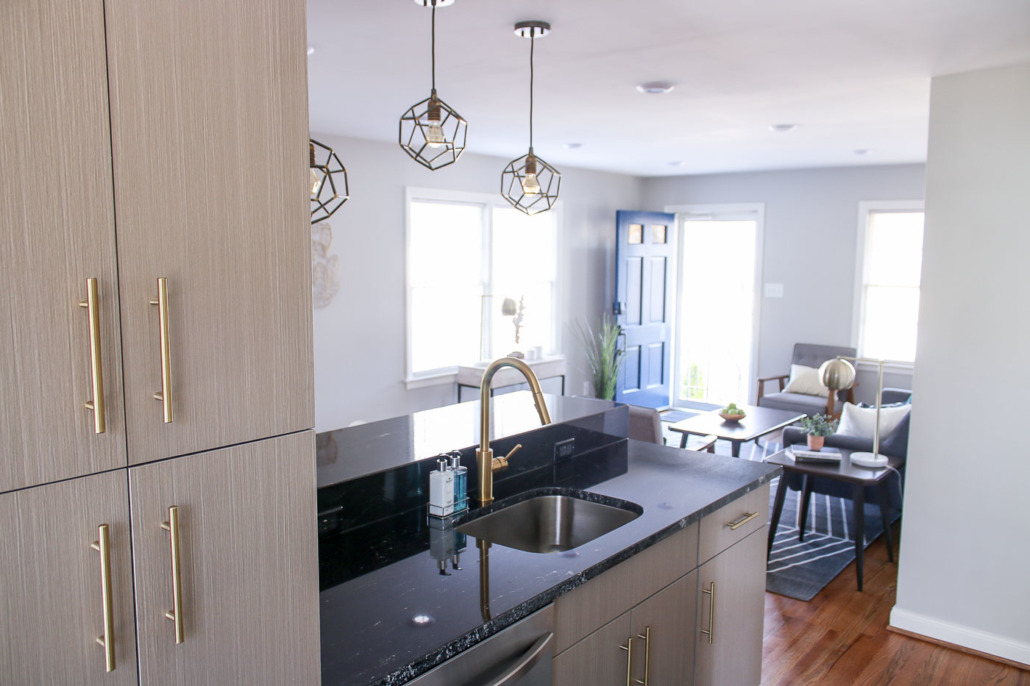
To capitalize on an open concept layout, the corner wall to the kitchen had to go. (I consulted with my structural engineer, who showed me how the roof system was a series of trusses that supported the weight of the roof without this wall.) This one small change made a big difference in the entire feel of the home.
Yes, I swear this is the same house! The doorway you see in the dining area leads to a newly added powder room and laundry area. More on that space later.
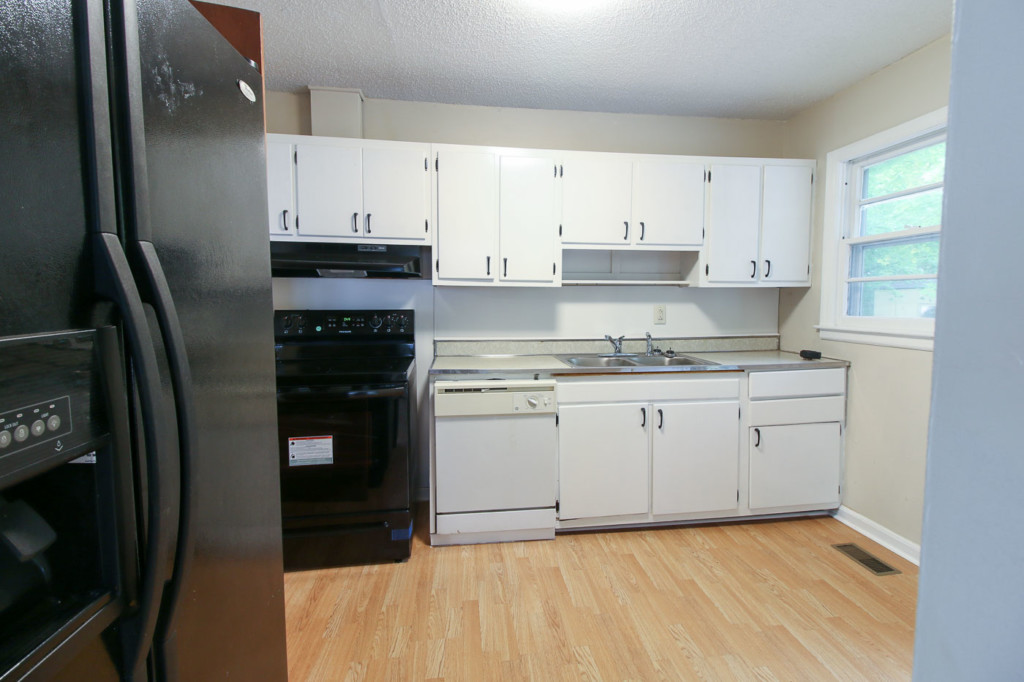
The Kitchen:
The kitchen needed the most work of any room in the house. The floor was rotted under the fridge.
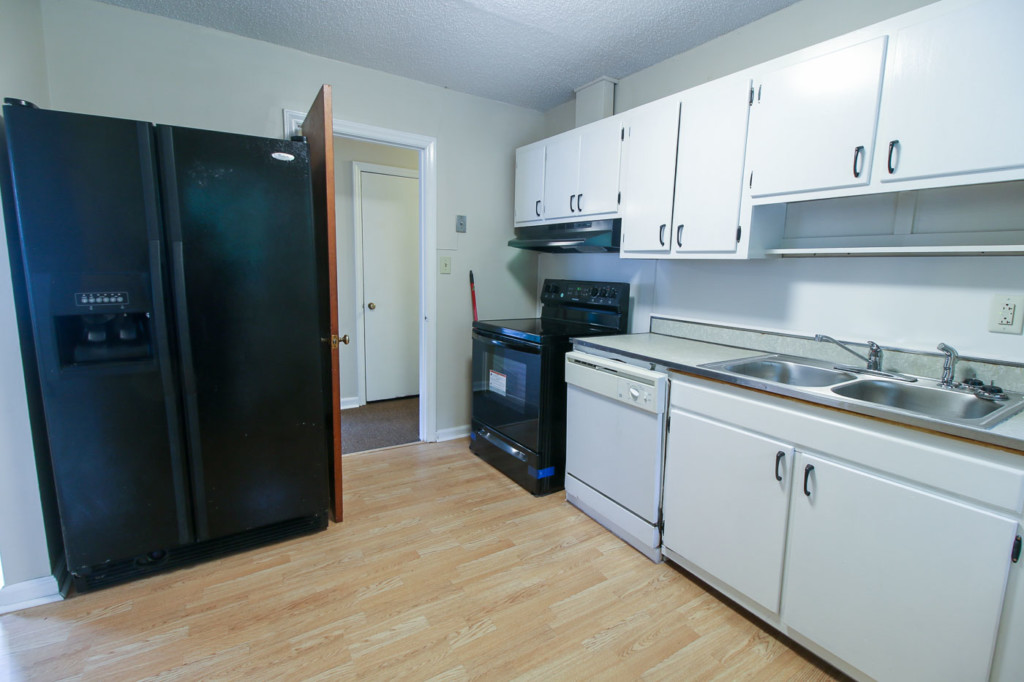
The walls behind the cabinets were filled with plumbing leaks and consequently mold growth.
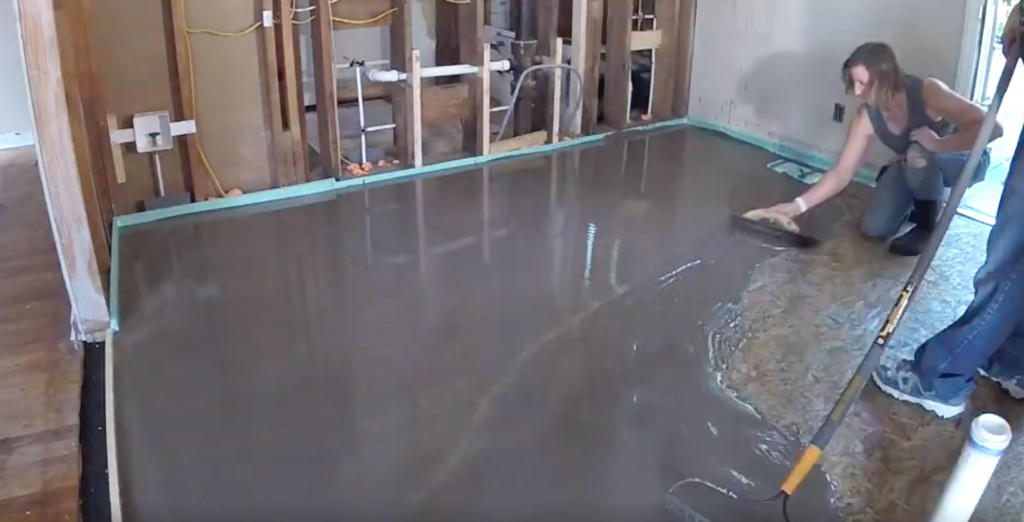
But, the biggest feat was leveling the kitchen floor for tile. It was a good 1.5 inches out of level and ultimately I had to pour self-leveling compound and use cedar shakes to shim along the sink area.
But, the results were well worth the effort! Don’t you agree?
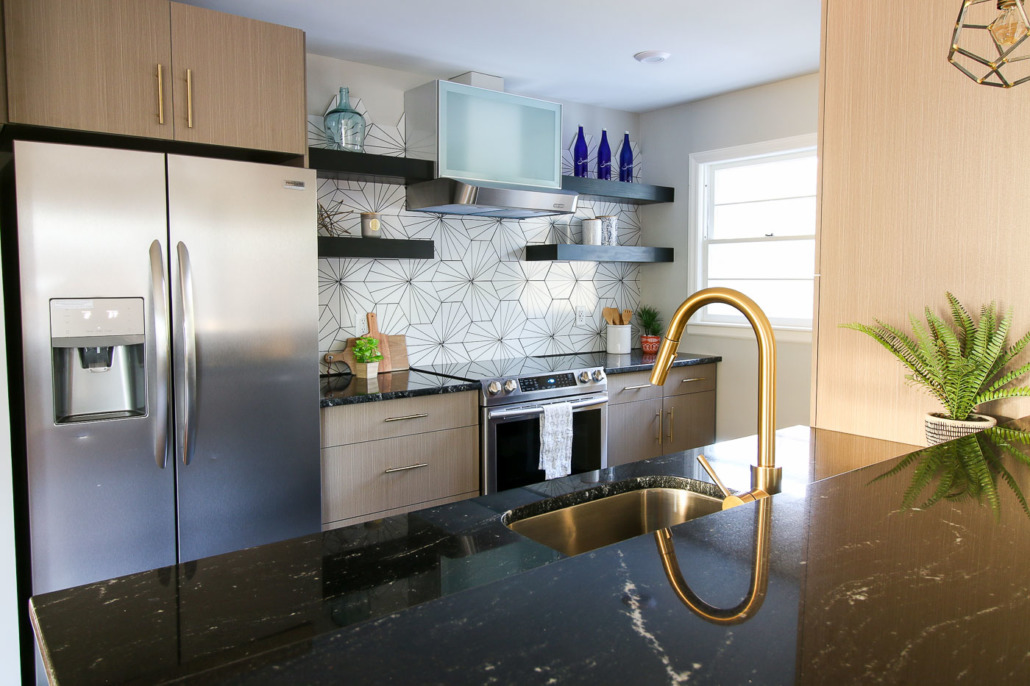
I embraced the black and white color palette and used gold accents to add warmth.
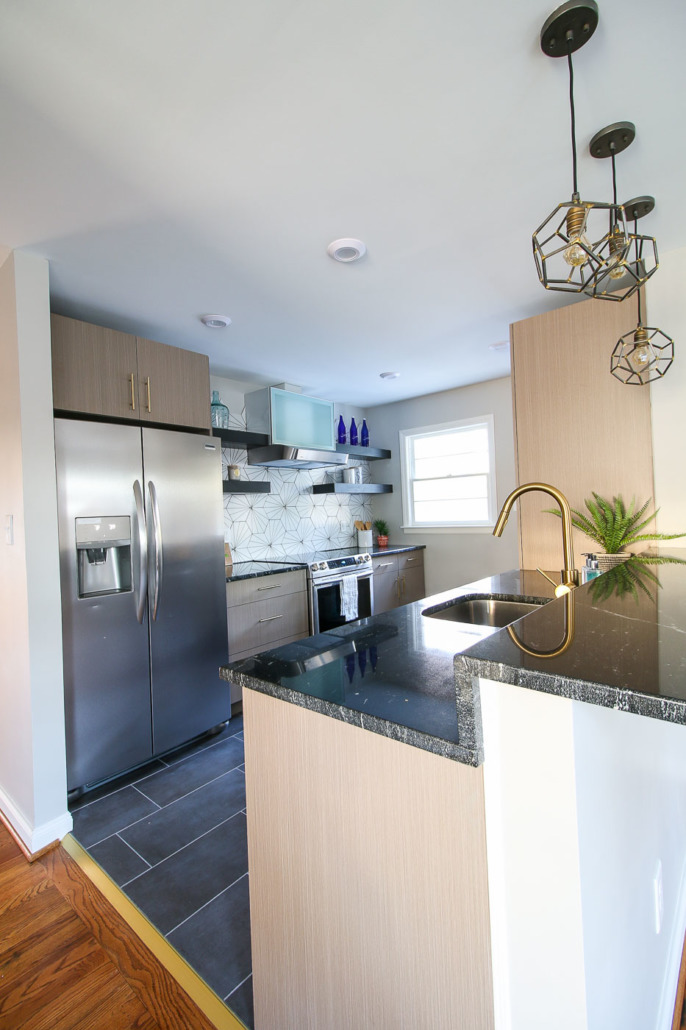
Those hexagon pendants are my favorite light fixtures in the house.
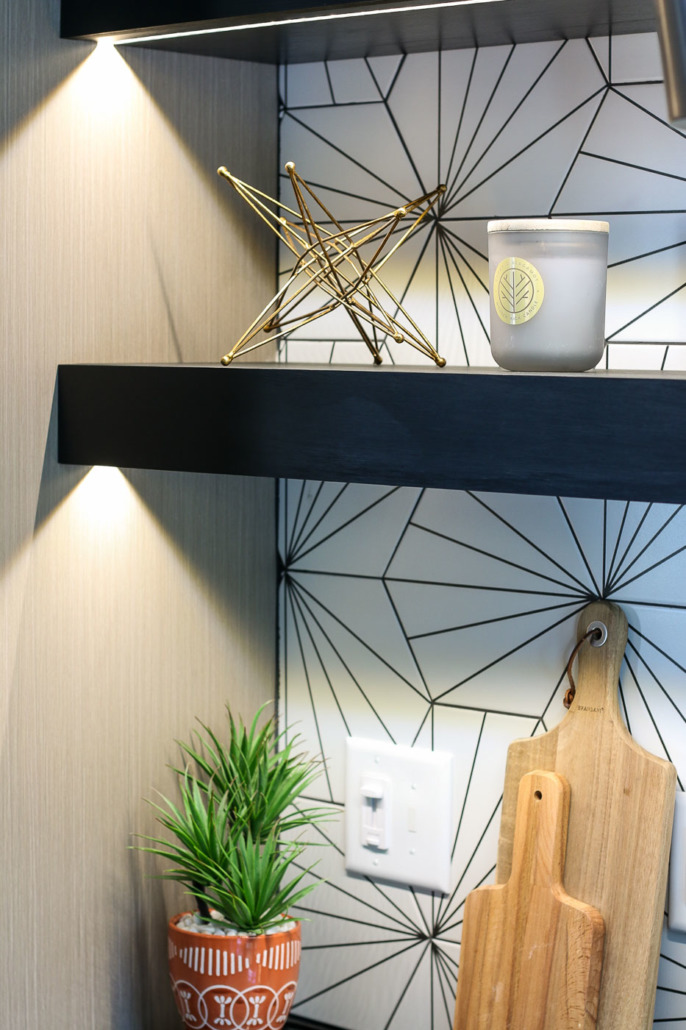
Besides the pendant lights, my second favorite features are the floating shelves with under cabinet lighting. You can follow my tutorial to build these super-strong display shelves.

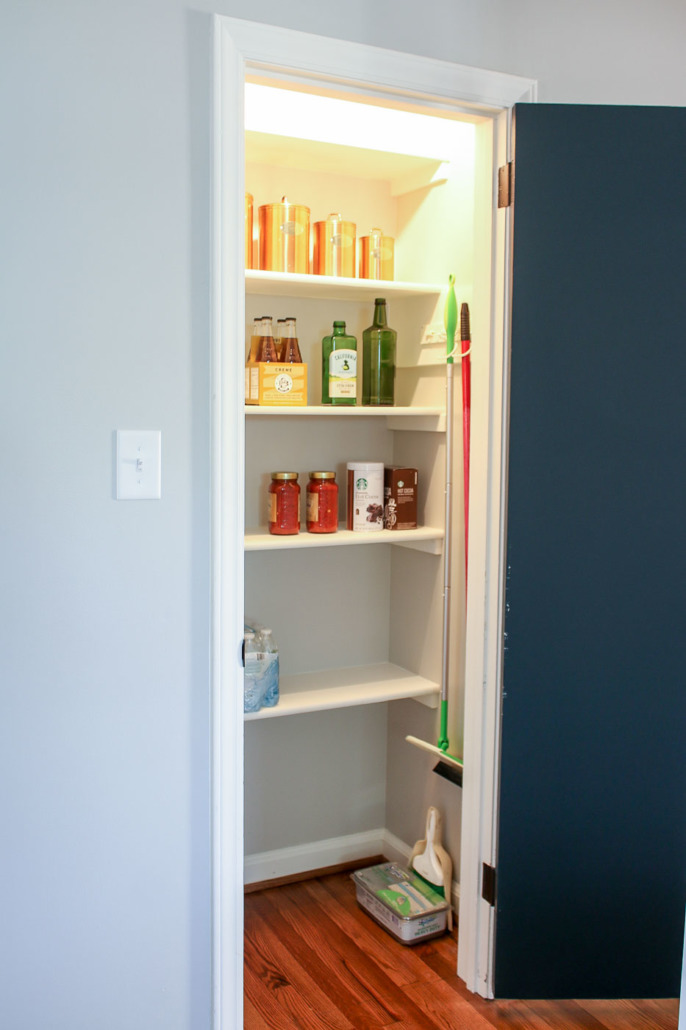
The coat closet across from the kitchen got a light and shelves to create a much-needed pantry storage area.
To make up for the lack of a coat closet, I created a coat rack area inside the back door.
The Main Bathroom:
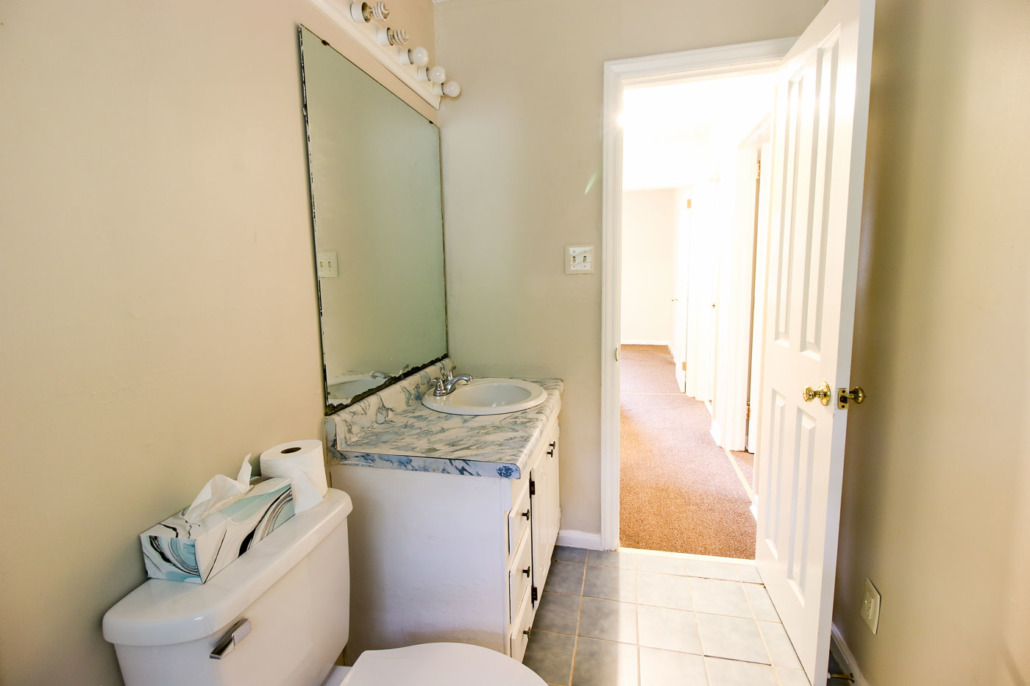
This was the only bathroom in this house and it had definitely seen better days!
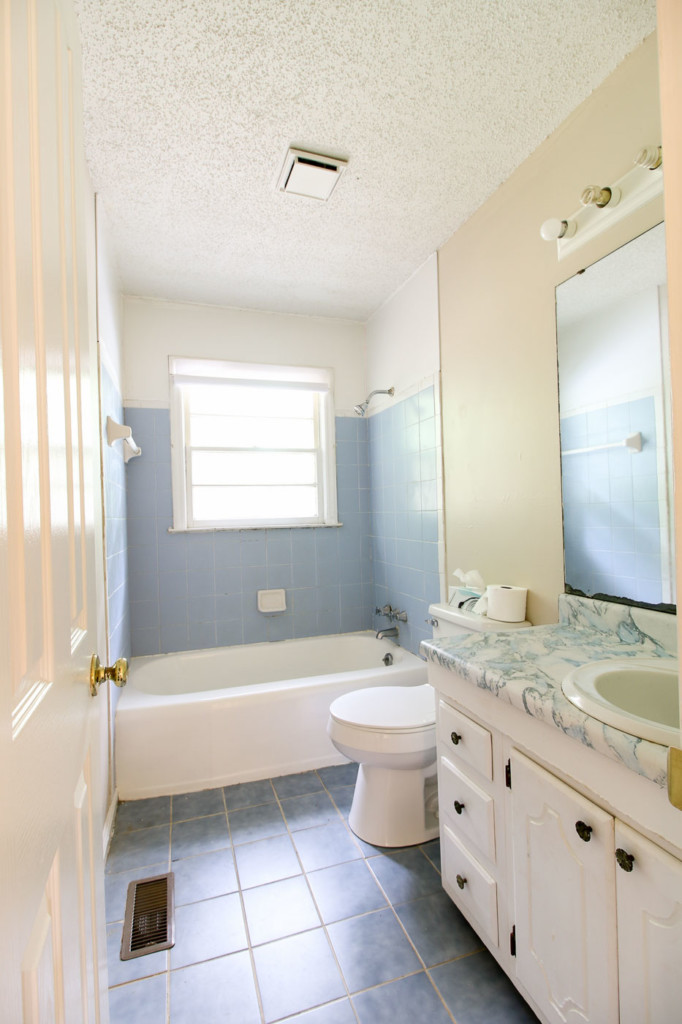
The chipped frameless mirror, super short vanity, and Hollywood light fixture had to go.
Although the tub was cast iron, it had a horrible DIY paint job on it. The window was an original wood window that was deteriorating from the water and moisture in the shower. I removed it and used the sashes on the shed you saw up above.

During demolition, I found a nest in the wall behind the shower walls, a huge rotting hole under the toilet, and a mouse hotel under the tub. After a full gut, the bathroom received the royal treatment with all new tile, plumbing fixtures, and a stylish mid-century modern vanity (which was previously a dresser! See how to make a vanity out of a dresser here.)

The lighted mirror from Kichler puts off the softest and most flattering light. Now I need to incorporate lighted mirrors in my own bathroom project!
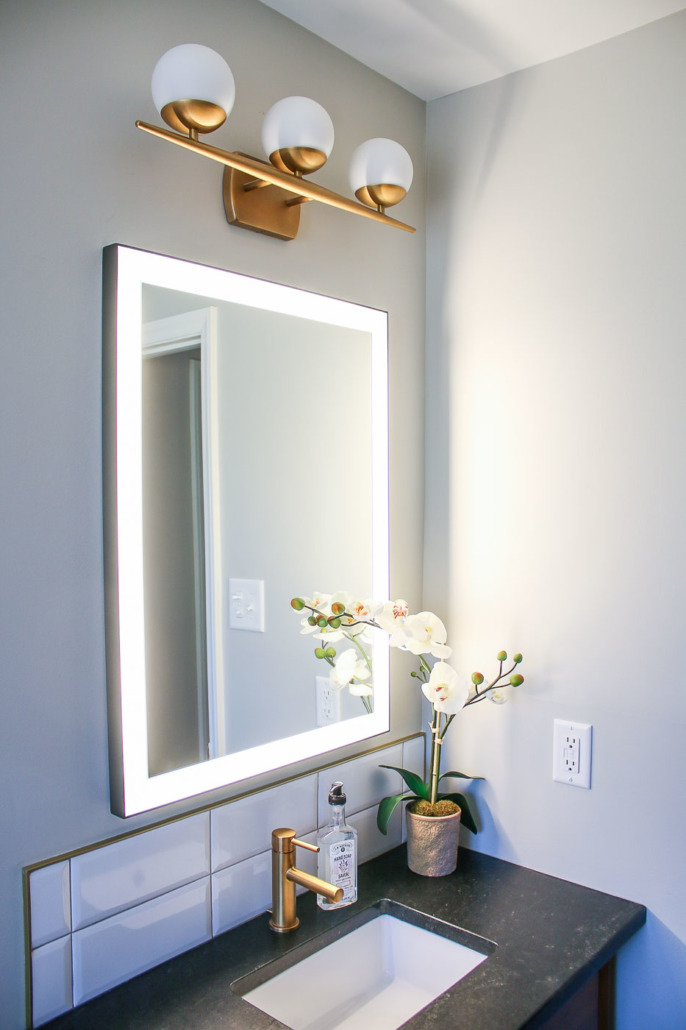
This was my first time using Schluter Profiles instead of caulk joints. After a year, it’s wonderful not having to replace or clean moldy caulk.
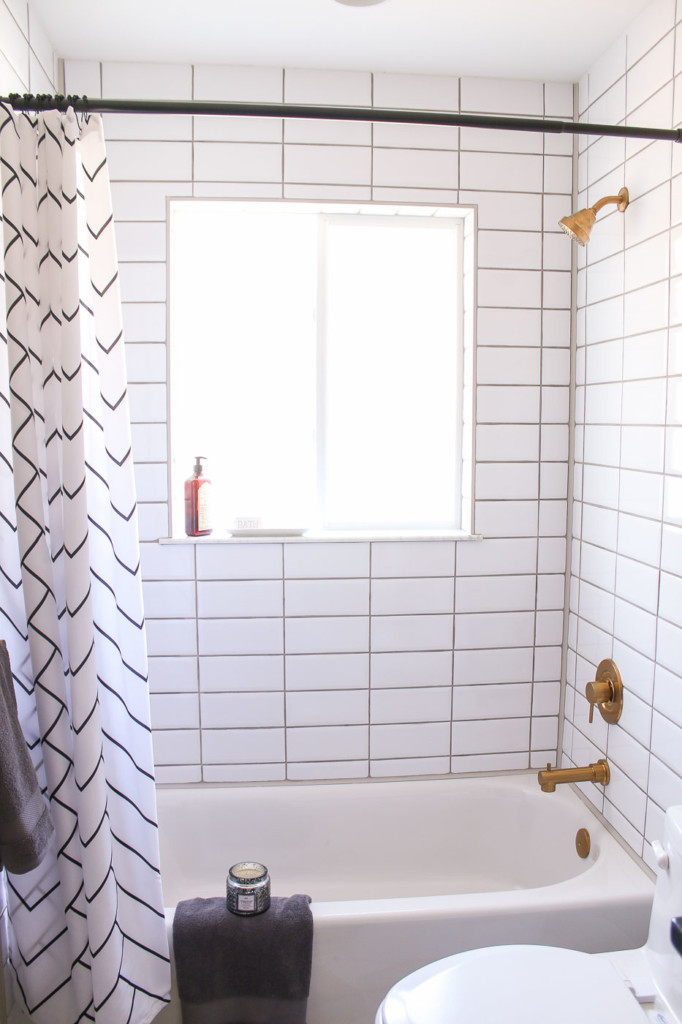
The new window is vinyl so it won’t rot or deteriorate. It also has obscure glass so no one can see into the bathroom.
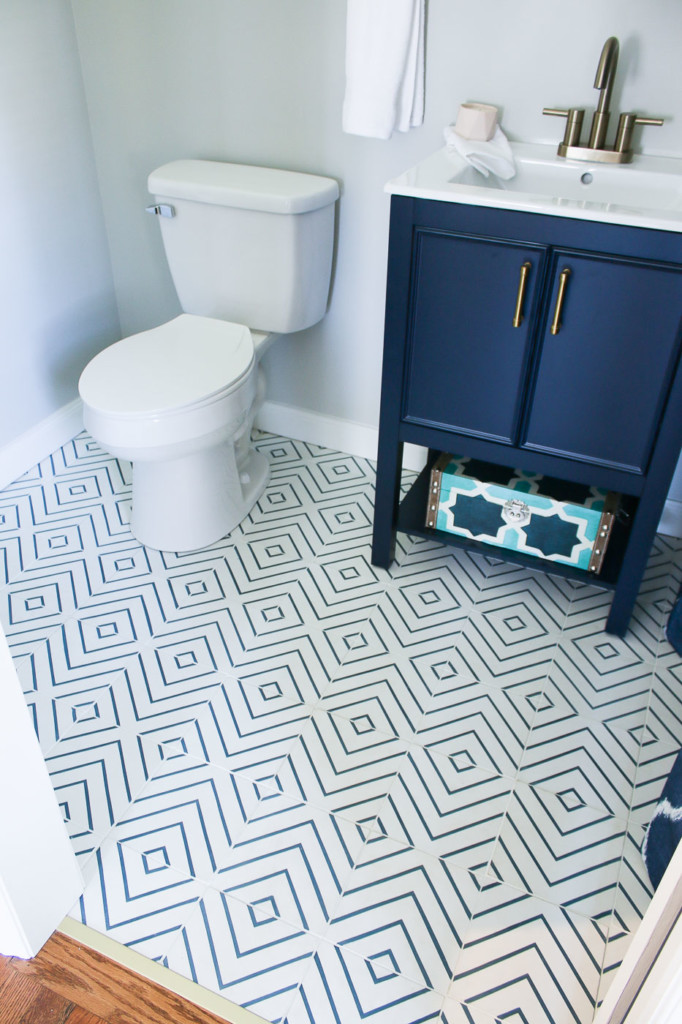
While my plumber was replacing the plumbing lines, he ran new lines to the old laundry room for a new half bathroom. Adding a second bathroom was a huge improvement to this small house.
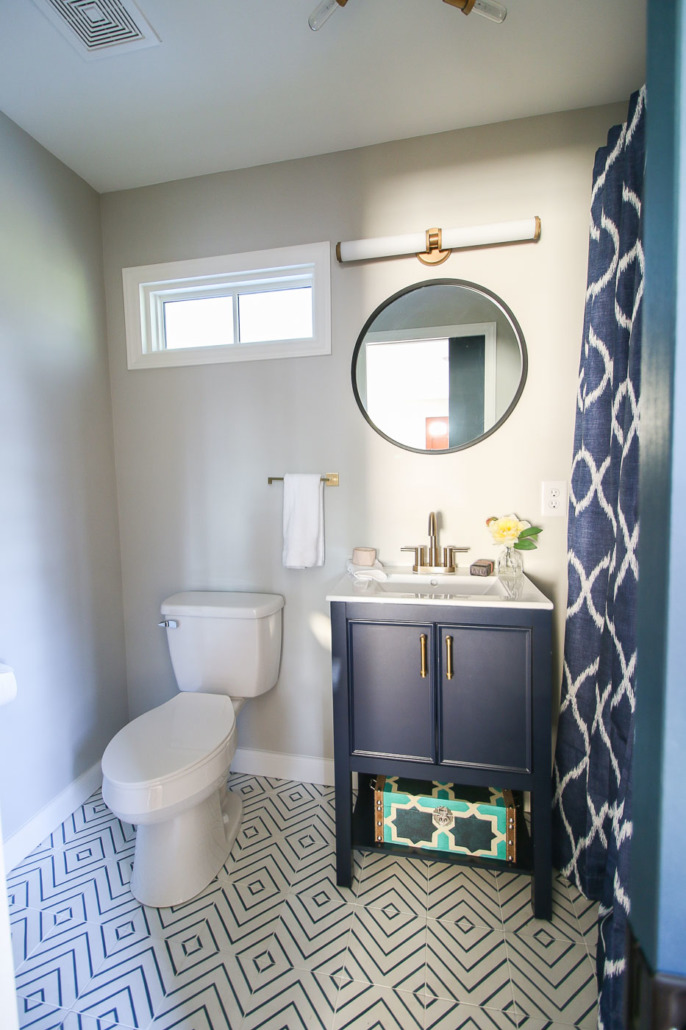
The powder room shares space with a stacked washer and dryer, but you’d never know because usually it’s hidden behind the curtain.
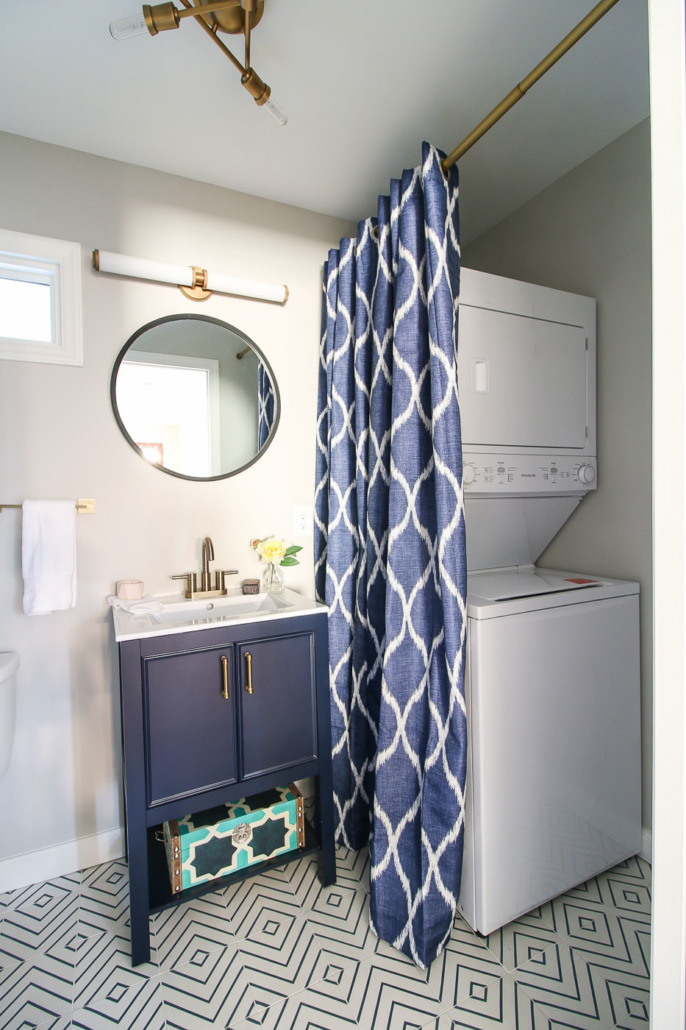
Using the light patterned Mia 4 Lili Cement tiles kept the room bright even though the only window is the transom over the toilet.
The Bedrooms:
Down the hall from the kitchen and living area are three bedrooms.
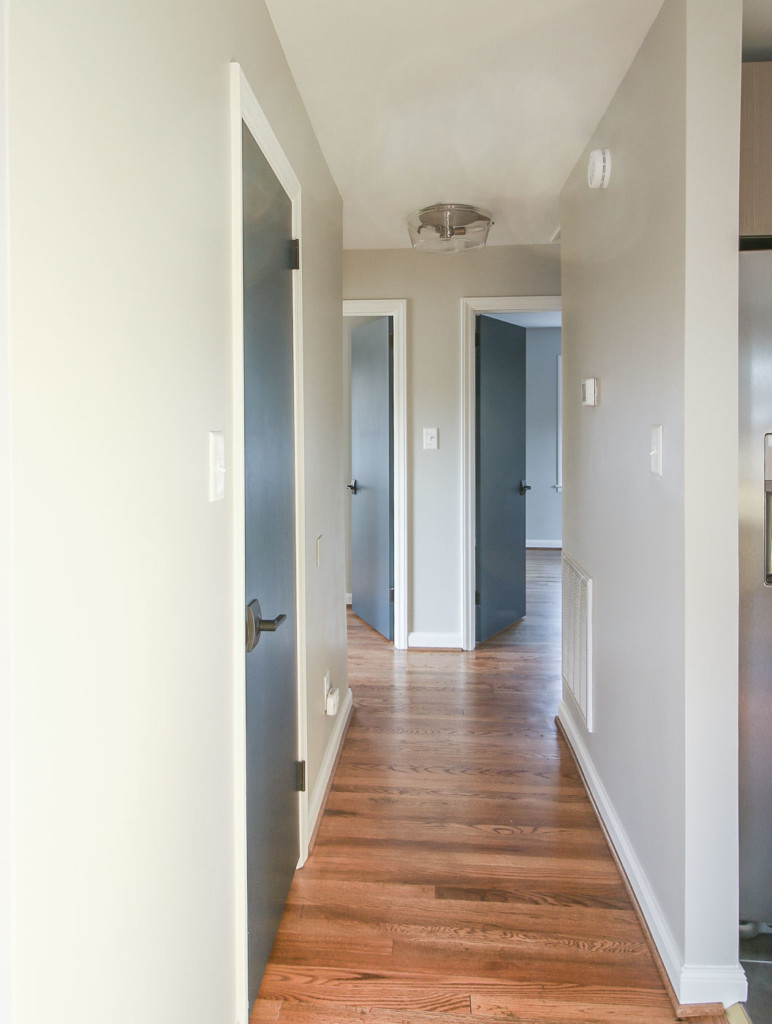
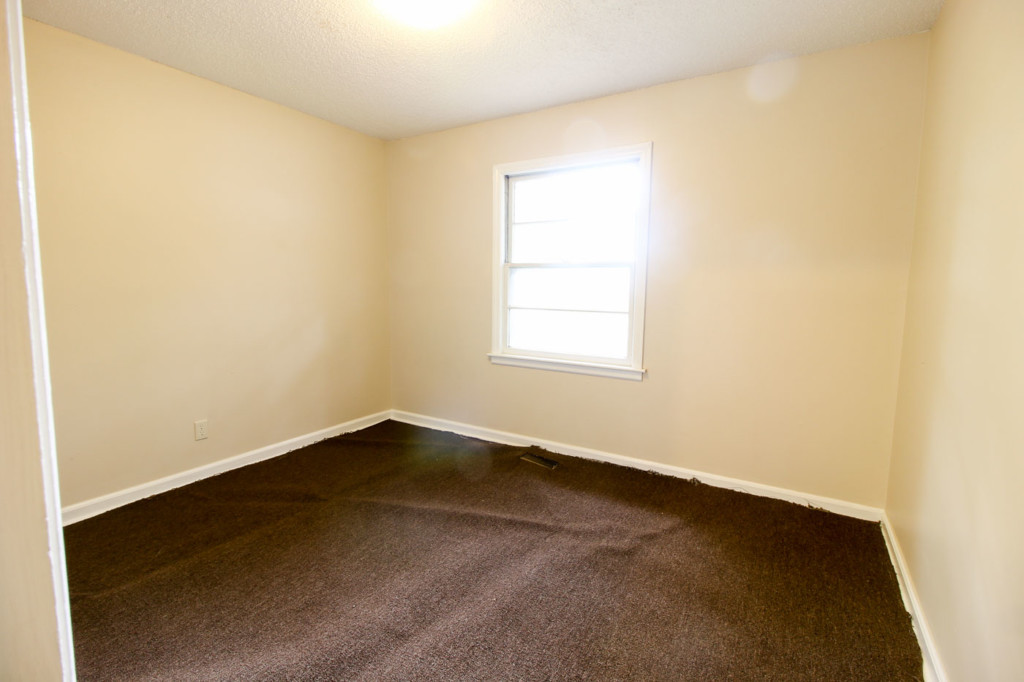
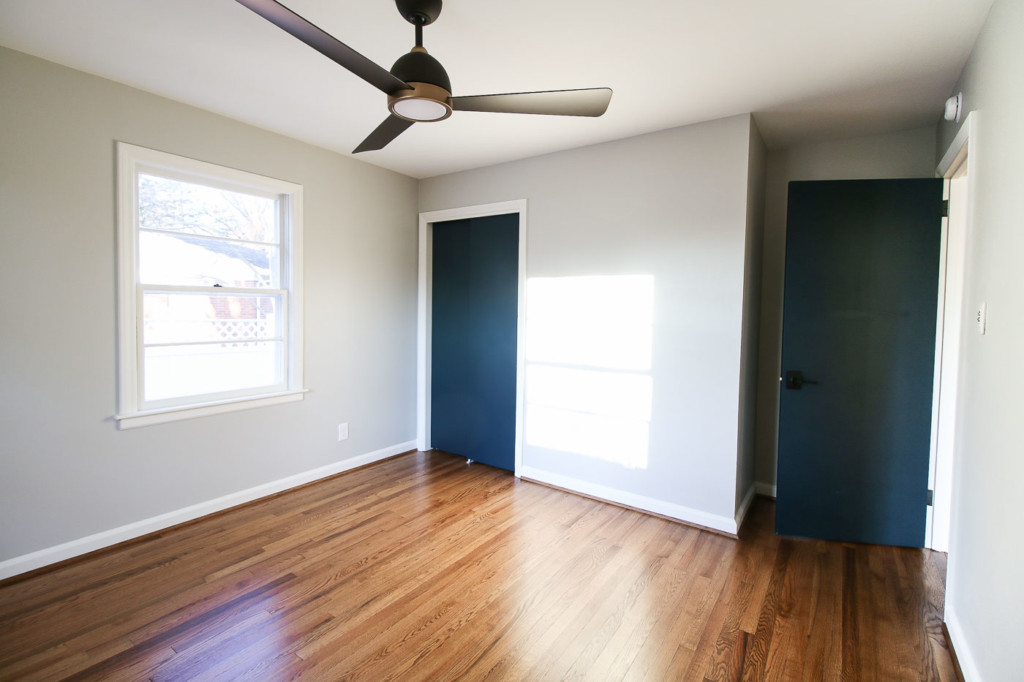
Lucky for me, the bedrooms needed minimal work. After removing the carpeting, I had the wood floors sanded and refinished.
Unfortunately, the house had a variety of door styles. Luckily, I found a few flat panel doors at my local Habitat ReStore that was more fitting of the house age and style. They all got a few coats of Dark Night paint by Sherwin Williams and new doorknobs from Schlage.
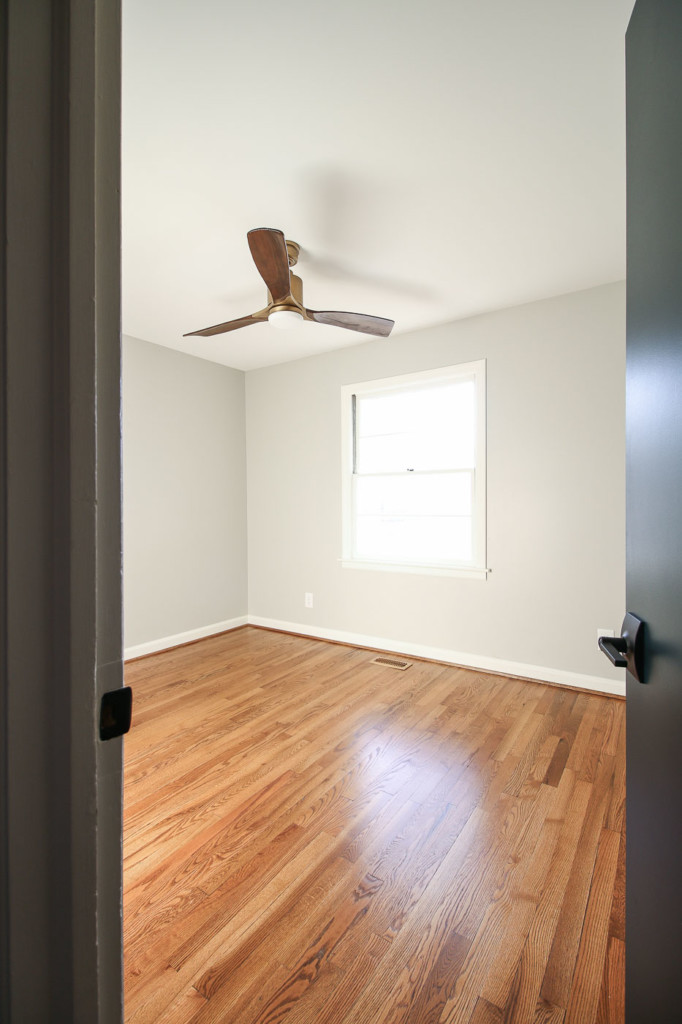
My favorite upgrade in the bedrooms was adding modern LED ceiling fans. The fan above is the Ridley II from Kichler, and this one below is the Incus fan, also from Kichler.
This concludes the tour. I hope you enjoyed following the Millie’s Remodel project. Would you love to see me transform another investment house?
In the meantime, I’ve already started working on some projects in my own home for a change. I can’t wait to share them with you.
Sources:
Living Room:
LED lights: Horizon II from Kichler
Wall color: Repose Gray by Sherwin Williams
Wood Floor stain: Golden Oak by Minwax
Century Smart Lock Front Door Hardware from Schlage
Kitchen:
Cabinets: Charleston Driftwood by Cabinets to Go
Countertop: Via Lactea Granite
Forious Gold Faucet with Sprayer
USB charging outlets by Leviton
Floor Tiles: Iron Anthracite by Happy Floors
Backsplash Tiles: Misha Hex Tiles
Lighting:
Rocklyn Hexagon Pendants from Kichler
Industrial Coat Hooks from Liberty Hardware
Bathroom:
Integrated Light & Exhaust Fan
Vegas 3 Cement Tiles by Lili Tiles
Vanity Top: Honed Negresco Granite
Modern Dresser turned into a Vanity
Door Hardware: Schlage Latitude Door Knobs
24″ Towel Bar & Toilet Paper Holder
Ryame Lighted Mirror from Kichler
Jasper Three Bulb LED Light from Kichler
Wall Color: Repose Gray by Sherwin Williams
Door Color: Dark Night by Sherwin Williams
Powder Room/Laundry Room:
Sink Vanity & Top: Allen + Roth 24 inch Presnell Navy Vanity & Porcelain Top
Sink Faucet: Keeney Delphi Matte Gold 2-handle 4-in centerset Bathroom Sink Faucet with Drain
Modern Black Frame Round Mirror
Indeco LED Light by Kichler
Armstrong Ceiling Light by Kichler
Mia 4 Cement Tiles from Lili Tiles
Toilet Paper Holder & Hand Towel Bar
Bedrooms:
Incus Fan from Kichler
Ridley II Fan from Kichler
Wall Color: Repose Gray by Sherwin Williams
Door Color: Dark Night by Sherwin Williams
Door Hardware: Latitude by Schlage
A special thank you to all the sponsors of the Millie’s Remodel house. As you know, I’m very particular about the brands I work with. I only recommend brands and products I’d use in my own personal house because I want to use fixtures that will outlive me.
![]()
Thanks for joining me on this journey! It was a lot of fun and I can’t wait to start on a new project.


Leave a Reply
Want to join the discussion?Feel free to contribute!