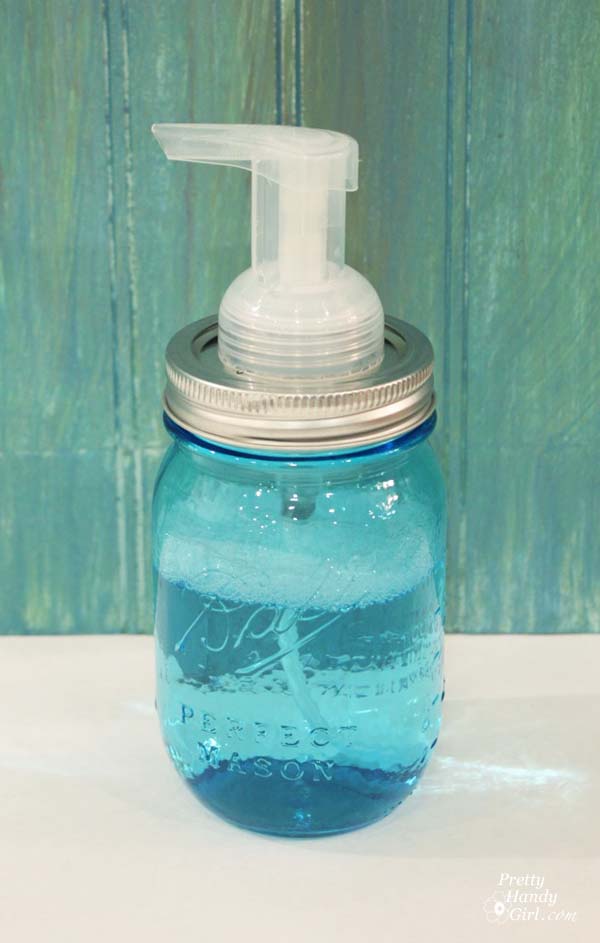
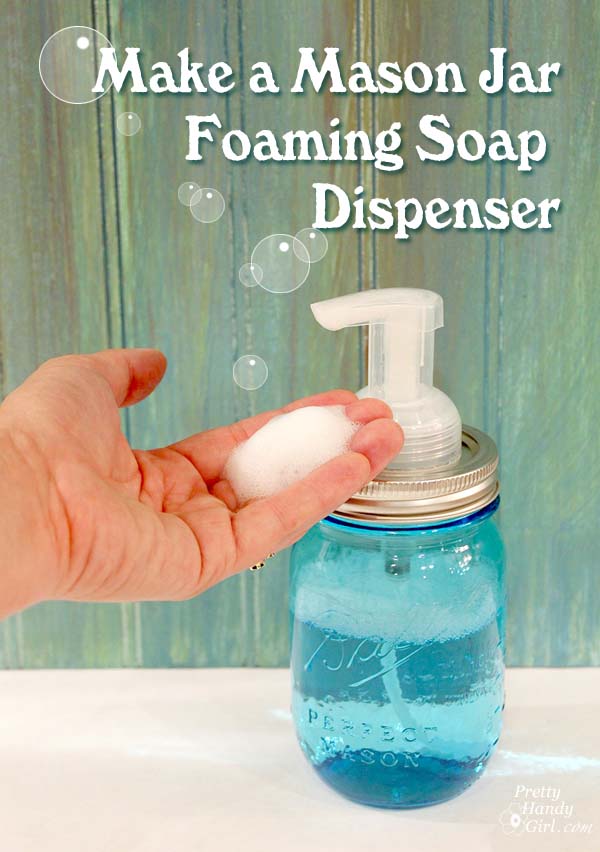
How to Make a Mason Jar Foaming Soap Dispenser
My sweet little sister, Caitlin, sent me vintage blue Ball Mason jars for my birthday. I had resisted buying them because I might have a bit of a jar hoarding problem. (If you’re in my home, don’t open the cabinet in the laundry room. You might be horrified or shocked by all the jars I’ve rescued from the recycling.)
When I opened the package of six brand new blue jars, I knew I had to keep them and find some ways to display these beauties. Caitlin suggested I should turn one into a soap pump. I agreed, but decided to make it a foaming soap dispenser. Any one else addicted to bubbly foamy soap like I am? Raise your hand and be proud. We can start a foaming soap addicts group (right after the recycled jar addicts group meeting.)
Here’s my tutorial for turning a blue mason jar into a foaming soap dispenser.
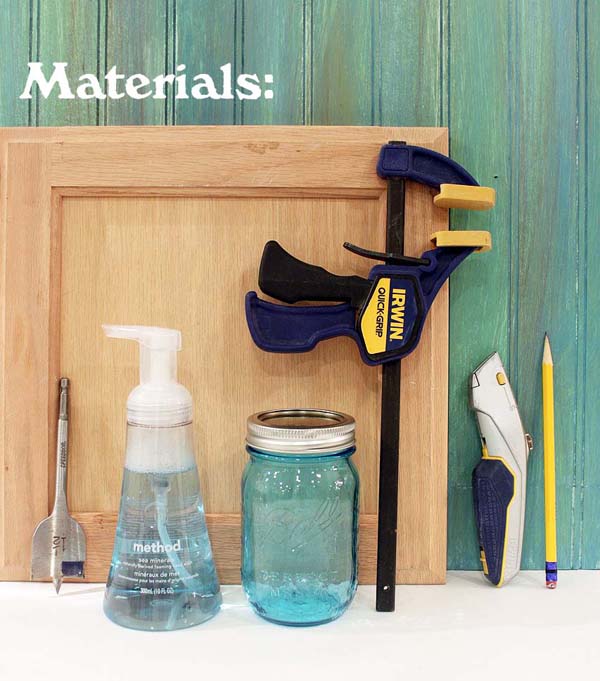
- Scrap of wood
- Drill
- 1 1/2″ drill bit
- Foaming soap (Method had the longest stray and the perfect blue liquid)
- Blue Ball Mason Jar with lid
- Clamp
- Utility Knife (with sharp blade)
- Pencil
- Safety glasses
Mason Jar Foaming Soap Dispenser Instructions:
Unscrew the lid off the Ball jar. Measure and mark the center of the jar lid. Clamp the lid securely to the scrap wood.
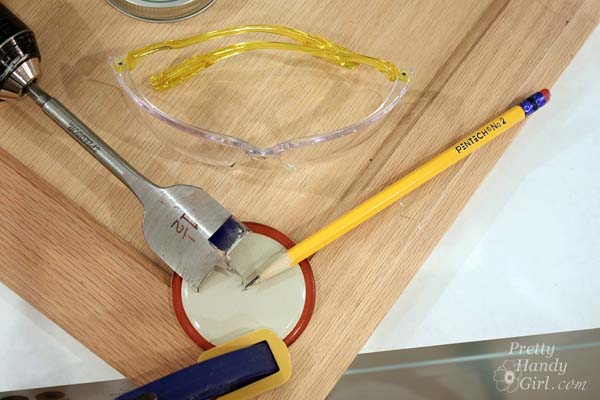
Very gently drill a hole into the lid with the spade bit. At some point the bit may bind in the lid. You can finish cutting the hole with a sharp utility knife. (Just be careful not to cut yourself on the sharp edges.)
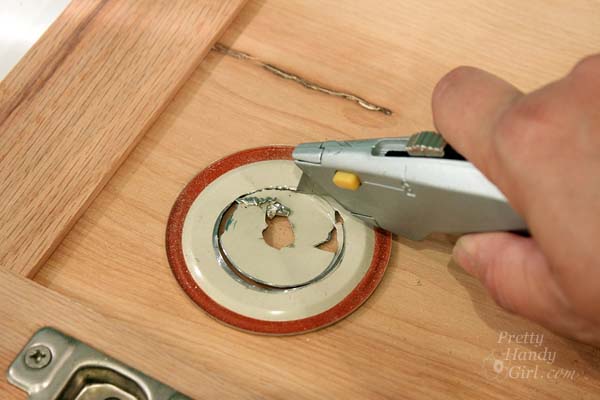
Test the fit of the hole over the soap bottle.
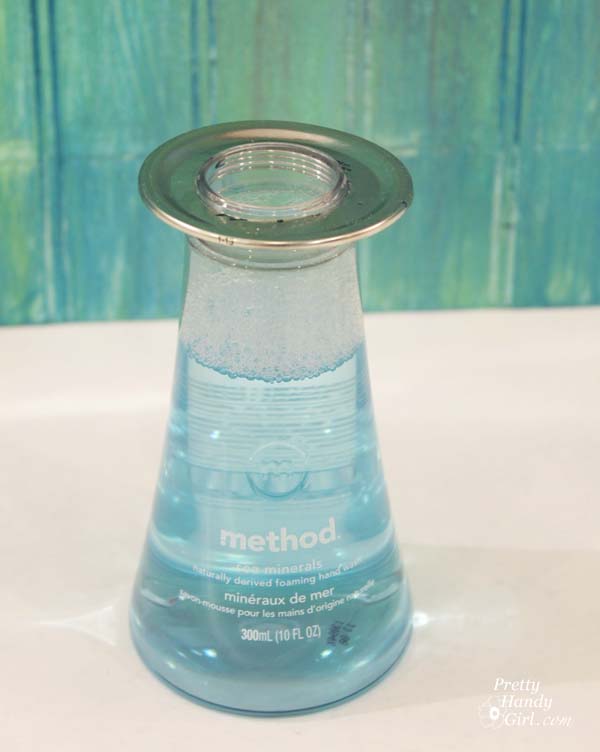
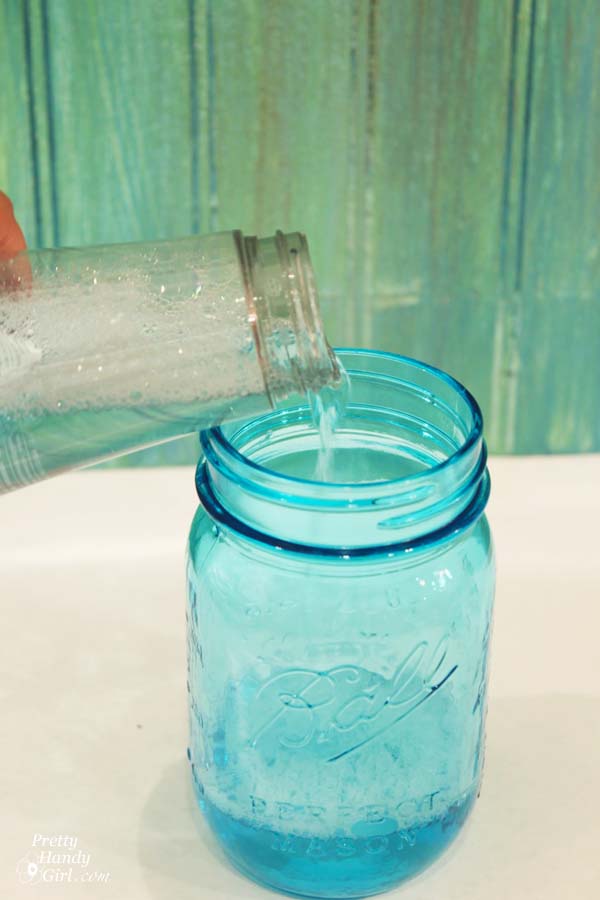
Pour the liquid foaming soap into the Ball jar.
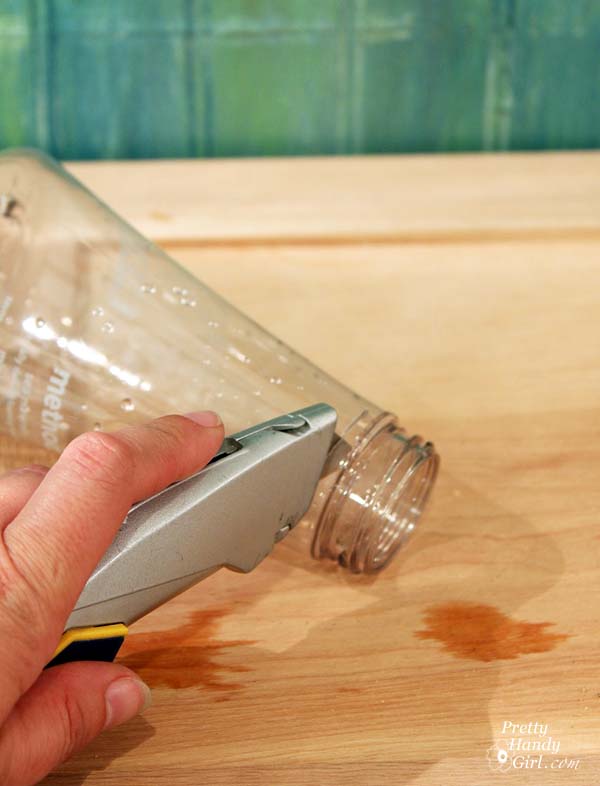
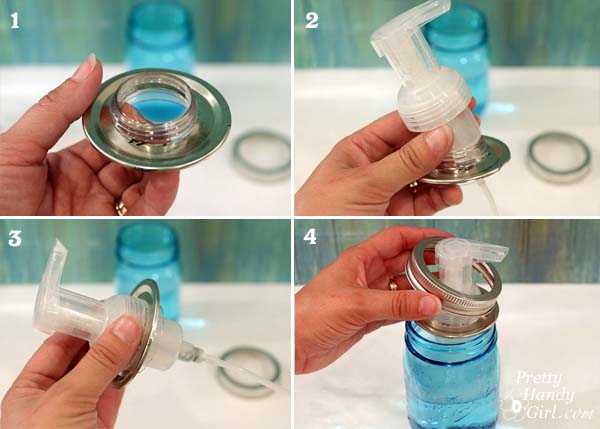
Use the utility knife to carefully cut off the top threaded portion of the soap bottle (leave enough collar to fit under the hole in the jar lid.)
Line up the pump dispenser, the plastic collar, the jar lid and lid ring.

Assemble the pump dispenser inside the lid as shown below (1. Insert plastic collar into the jar lid. 2. Thread pump onto the plastic collar. 3. Tighten pump lid. 4. Insert pump into jar and screw on the lid ring.):
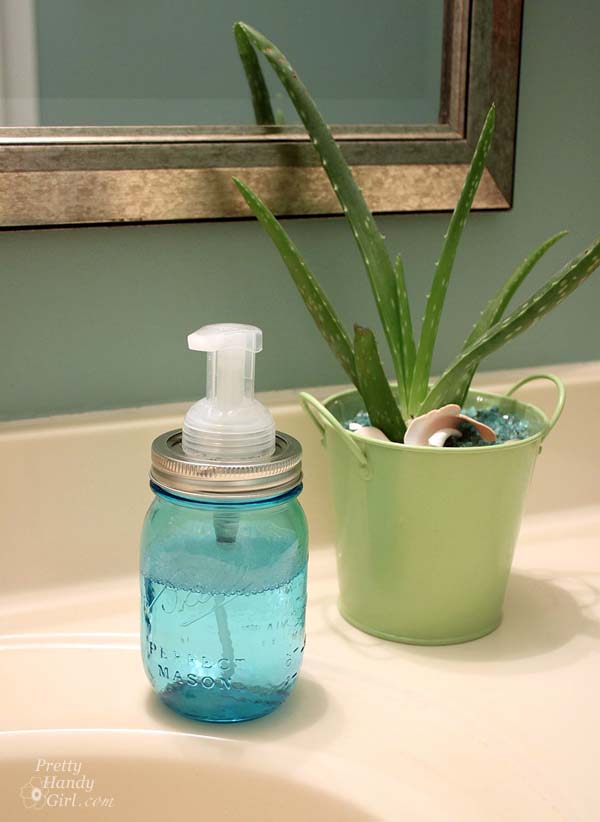
Pump out luscious foamy soap to your heart’s content!
When it’s empty, refill with more liquid foaming soap (it’s better than using one time soap containers!) Did you know you can make your own foaming soap by mixing water and your favorite liquid soap? Hand soap or dishwashing liquid soap will work.)
I have five more Blue Mason jars. What do you suggest I use them for???
UPDATE: Many people had asked if my jar lid rusted. The answer is, Yes, it did. But, I was able to clean off the rust and seal the lid with clear nail polish and so far it isn’t rusting (four months now.) Also, Michelle from Counting Willows has her own solution!

I have a couple of questions. How long have you been using it and has the jar lid rust out? I did a couple similar to yours a while back but I glued the pump directly to the lid (bath and body works pumps) and no matter how I tried to seal it it would rust out in a few months. TIP: A step drill bit will make quick and easy work of the hole on the lid! 🙂
Yes, I found the same issue, it would rust.
Thank you for this great, simple tutorial! So smart to include the threading in the lid to hold the pump in place (instead of sitting it on top of the metal and fighting with glue and having it still wobble around lol). I just want to add- you can switch the drill to reverse once it becomes “stuck” in the lid and it will finish cutting a nice circle!
Thanks again!
This is such a good idea! I love reusing old glass jars, and I love foaming dispensers because it’s so cheap to make your own with watered down soap. This is the perfect combo for me!
I have a few white plastic tops for mason jars. I am going to try to use on of these. They can be painted or left plain.
I’m from Canada and am looking for foaming soap dispenser pumps. I use Dollarama bottles but the dispenser quits working. Online there are some but ships from the US so that will cost an arm and a half a leg.
Pat, I think a lot of the soap dispensers quit after a while. Stick with your Dollarama ones and try to soak in vinegar once in a while.
I’ve used the same Dial foaming soap dispenser for nearly 4 years. I’ve got 3, one at each bathroom sink and one in the kitchen. I’ve refilled them with every kind of soap you can imagine. When I go to make these super cute jar dispensers, I’ll use the same pumps. They cost more than the dollar store brand but less than Bath and Body or Method!
Keep in mind that „this is the simply working Crack Tool”, we now have tested many
tools and this also is the simply working compromise.
I don’t have a drill , isn’t there a way to make it( the lid) without a drill?
It’s in reality a great and useful piece of info.
I am satisfied that you simply shared this helpful info with us.
Please stay us up to date like this. Thank you for sharing.
There are some very good reasons to reuse pump soap dispensers. One is that by using a fraction of soap it can be quite a money saver. Another is that the environment does not get as much soap back into the earth. But using a design like this just makes it special. And I can think of many more ways that this idea could just take off using other types of containers. Great! Thankyou
Just made this with a clear jar and snuck it in my boyfriends bathroom, hummmI wonder if he will like it? I will have to wait and see, how could he not? right?
I love Neutrogena facial cleanser as well. I have saved some of my hand soap “foamers” from Bath and Body Works. Do you use the cleanser in the light blue bottle? What ratio do you use? I hope you can help and guide me. Thanks!
Cheryl, I used the method foaming soap undiluted. Other soaps, I just pour enough to cover the bottom, then add water to the rest.
Can you explain how you “sealed the lid with nail polish”. Did you paint the entire flat jar lid with polish on both sides, just the bottom side? I have made some of these jars and mine rusted fairly quickly and mostly on the inside bottom of the flat jar lid.
Beth, I painted clear nail polish over the spots that were rusting before (around the ring where water sits and around lid where the plastic pump sits on top of it. For best rust prevention coat the whole lid and ring.
There are clear coat spray paint that is much easier to use
I made it!
Well, my Hubs helped…a lot…
Okay, Hubs made it.
It’s pretty, and I love using another Mason Jar in my house!
http://journeyswithjuju.blogspot.com/2014/06/no-rust-mason-jar-foaming-soap-dispenser.html
Thanks for the inspiration, Brittany!
Blessings, Juju
I found Canning Jar Lids (Mainstays Brand) at Walmart that are plastic, one piece lids, that fit Regular Mouth Mason jars!
I’m going to try out your idea using them, and I’m excited that it won’t rust here in Hawaii!
Juju, that’s awesome!!! Thanks for letting me know. I’ll have to check that out.
I went to JoAnn fabrics and they had all the jars but no pumps, lady there said go to dollar store they have empty containers with pumps. I did they were all glass. Then came home and found your website thru facebook. I love your site!!!!! Thank You
I wonder if painting the lid would help with any rusting that is sure to occur?
Thank you so much for this tutorial! I did it! And I love it!
Bless you,
Marilyn
Made this in under a half hour. Very pleased with the way it came out exactly how you explained. Thank you for sharing.
Love! I think you should make some more and sell them on Etsy. (I didn’t read the comments before posting so forgive me if I just reiterated someone else’s comment).
I made a liquid soap dispenser out of a mason jar and lid, the lid rusted very quickly. I found that a plastic peanut butter lid fits my jar. So I cut a hole to fit covered it in some scrap material and put matching ribbon around the edge and it looks so cute. Cotton material worked better, polyester would not stick.
Becky, awesome idea! Mine has started to rust. I was going to try putting a bead of silicone around the pump to see if that helped. But, great tip on the PB lid.
Love the foaming soap. I have a special needs son in his 20’s that had problems washing his hands and getting the soap all over like he should. Foaming soap was just the right thing. He can easily see where the soap goes, and he likes the feel of the soap. We now also put his body wash in a foamer for his showers.
I have a vintage jar that has turned a pale lavender. I will have to do this as my kitchen is yellow and lavender. Wonderful idea. Thanks.
We love Neutrogena facial cleanser and we use it in the foamer. Product lasts MUCH longer, and cleaning the face with foam works just as well as using full strength product. We keep one in the shower, but take care NOT to get water in the foamer. Water ruins the foamer.
What size is the blue mason jars? Thnx.
By the way love this idea. THANX
What’s your foaming hand soap recipe❓
It’s not scientific. I never measure, but basically I pour some of my favorite liquid soap into water. Use maybe 1 part soap to 4 parts water. Or even less soap.
I went to the Dollar Store and got a few foaming hand soaps…I dumped them out and made my own soap! :0) just wanted to share the least expensive option for the foamers that I’ve found!
Awesome resource Danese! Thanks for sharing.
This is a great idea, thanks for the tutorial. One question, have you experienced any problems with corrosion of the lid over time?
John, not yet, but if it does it will only add an aged patina look 😉
I’ve been wanting to try this. Thanks for the great tut! 🙂
Love it!! The blue mason jars are so cute!! I love that you made it into a soap dispenser. Thanks for the tutorial!! Love them!!
Yes, I have a mason jar hoarding problem. My excuse is that I do can produce. I couldn’t eat all the produce that I have jars for if I did fill all the jars but that is my excuse.
I see a beautiful blue jar chandelier.
Love this idea. I’d been roaming the web to see if any company had come out with a foaming type dispenser top for the jars. Yeah! Someone did! You! 🙂
Talking about these jars. I ordered my first set. The shipping was pitiful! Found the second set at K-Mart for $10. Way cheaper than the ordered set. eek. I should have known to wait.
Thanks. Jake’s a Girl
I was just pricing these … I too have a mason jar hoarding problem. The pumps to fit these are VERY expensive for what they are. Such a great idea!!! Thanks so very much!
Carol
Lakeside, CA
Fab! I love me some foaming soap!