Installing Cork Tile Flooring in the Kitchen
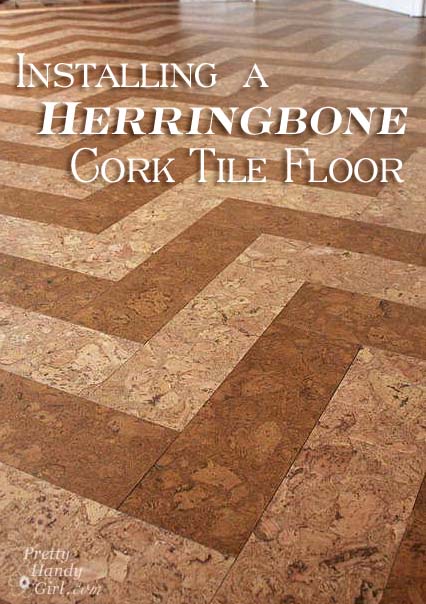
One of the best decisions I made in our kitchen renovation was adding cork tile flooring. I was exuberant when Globus Cork agreed to work with me on my kitchen renovation! Now that they are installed, I am in total love with the cork flooring. It is warm, water resistant, cushy under foot, attractive, and best of all the two tone tiles help tie the different wood floors in our home together.
![]()
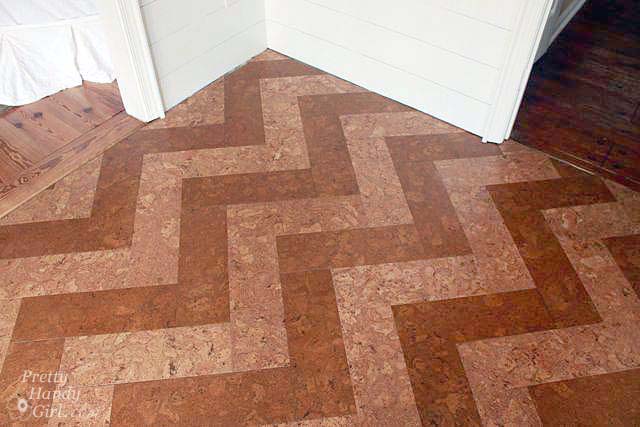
The light pine flooring in the living room matches nicely with the lighter natural floor tiles. And the darker golden oak color tiles match our darker heart pine floors in the rest of our home. It’s as if the differing wood floors in our home are woven together in the kitchen.
The installation of the cork tiles was fairly easy (if you are precise). The prep work was a bit tedious, but worth the effort.
Preparation to Install Cork Glue Down Tiles:
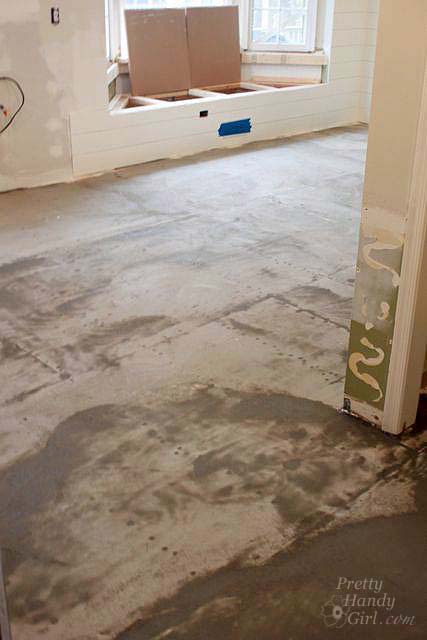
Before installing the flooring, you need to create a perfectly smooth surface to lay your tiles on. Seams between the plywood sheets have to be sanded down to be equal heights.

A self-leveling compound must be poured to fill in cracks and knots in the plywood subfloor. Before pouring the self-leveler, use a primer on the subfloor (the self-leveler you chose should have a recommended primer to use.)
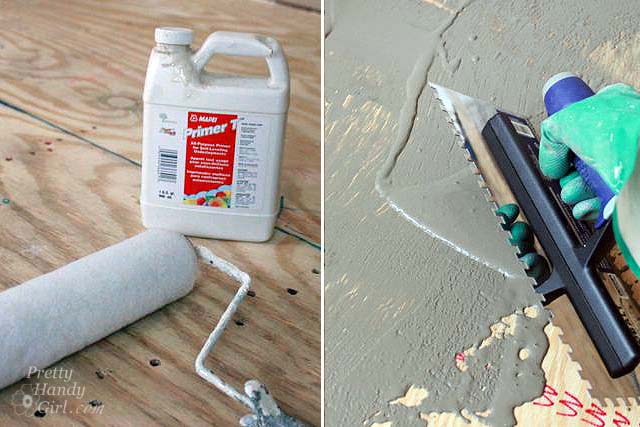
Working in sections, mix and spread the self-leveler onto the floor. Then trowel off most of the liquid. The leveler will settle into cracks, nail and knot holes. Globus Cork has a great slideshow showing this entire process.
After the self-leveler has dried (up to 24 hours), sand down any bumps and rough spots.
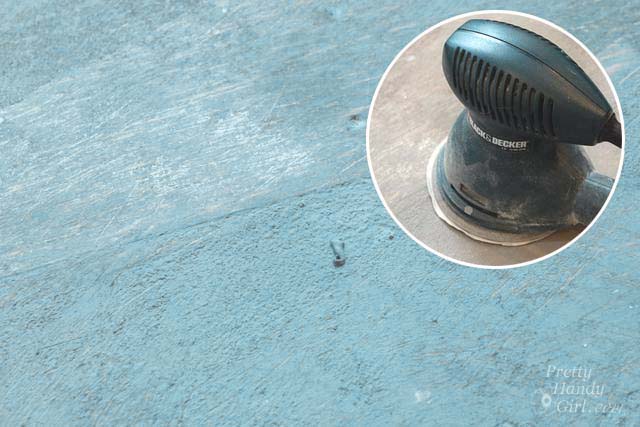
It is very important to eliminate any imperfections in the flooring before installing the glue down cork tiles. Any imperfections will show up in the flooring later as you walk on the floor and continue to increase the adhesion of the cork tiles to the subfloor.
Once the subfloor is properly leveled and sanded, it’s time to have fun laying out your glue down cork tile pattern (there are oodles of patterns you can create for your cork flooring.)
Materials to Install Cork Tiles:

- Carpenter’s Square
- 45 degree triangle
- Chalk line
- Tape measure
- Utility knife
- Putty knife or painter’s tool
- Pencil
- Tack
- Hammer
- Scrap board
Creating Guide Lines by Drawing a 3-4-5 Triangle:
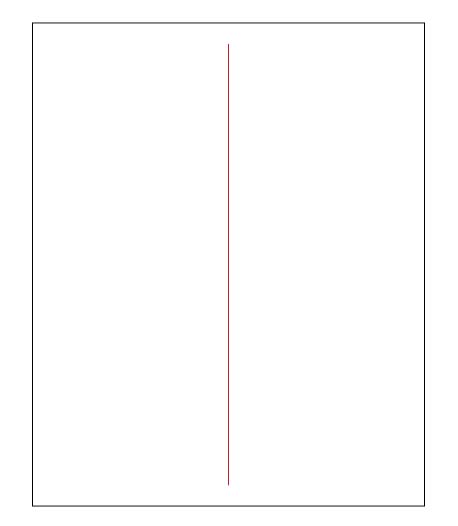
Find the center of your room vertically. Measure out the same distance from one side wall. Snap a chalk line.
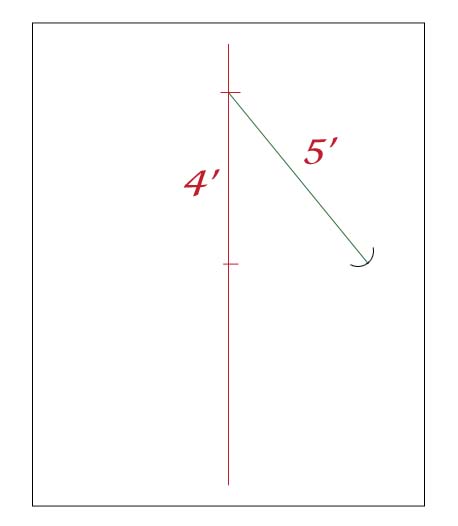
Find the center of the vertical line and mark that point. Measure 4′ up from the center point along your vertical line. Make a mark.
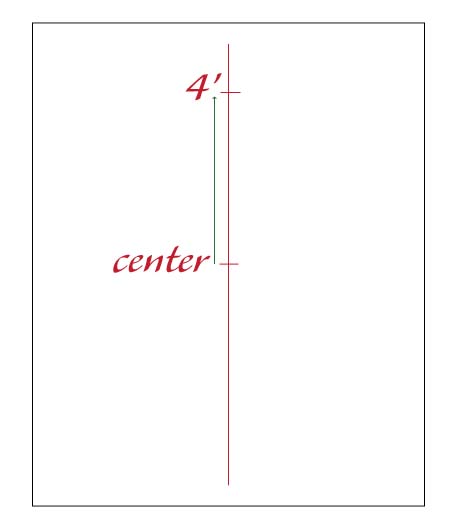
From that mark, extend your tape measure out 5′. Draw a small arc where you think a horizontal line will intersect with the center point.
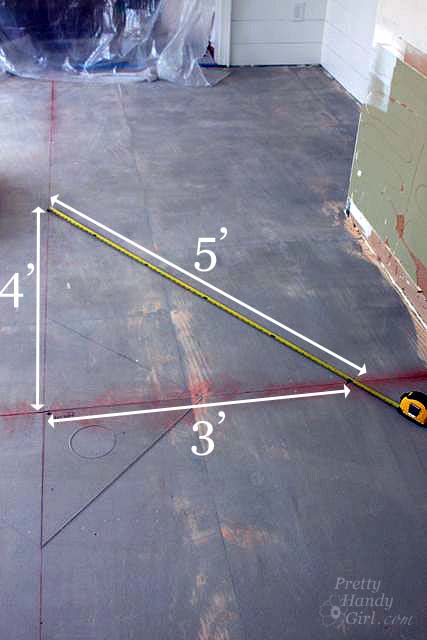
From the center point, measure 3′ out to the arc. Where the 3′ line meets the arc, draw your line. Each side of your triangle will be exactly 3′, 4′ and 5′ to give you the perfect 90 degree angle from the center of your room.
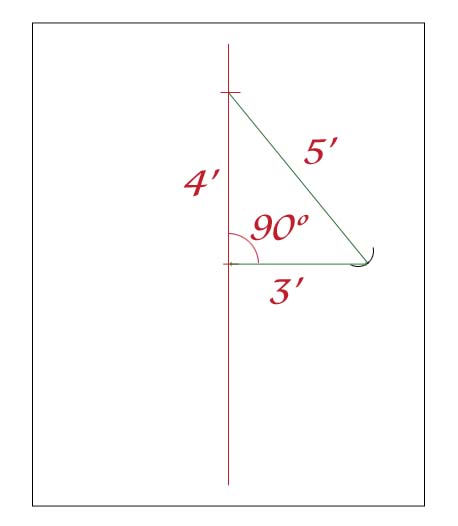
Snap a chalkline horizontally across the room, using the 3′ section as a guide.
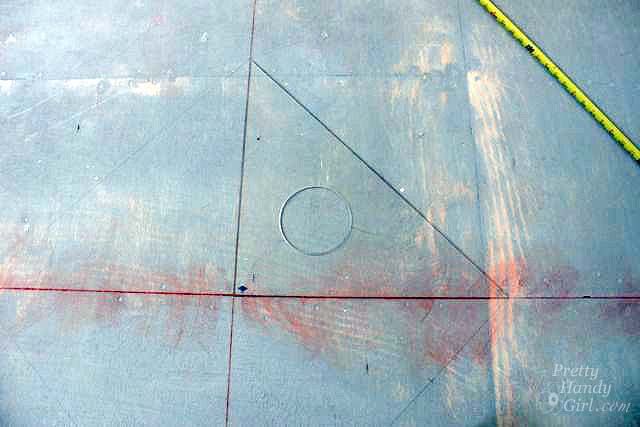
After you have your horizontal line marked, measure (and mark) approximately 2 feet in each direction from the center point. Connect the marks to create a diamond. This will give you the perfect 45 degree installation angle.
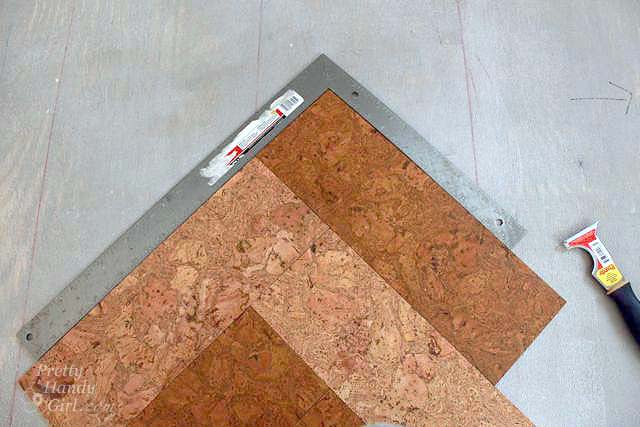
Dry Fit Your Glue Down Tiles:
Set a carpenter’s square on the 45 degree diamond you drew.
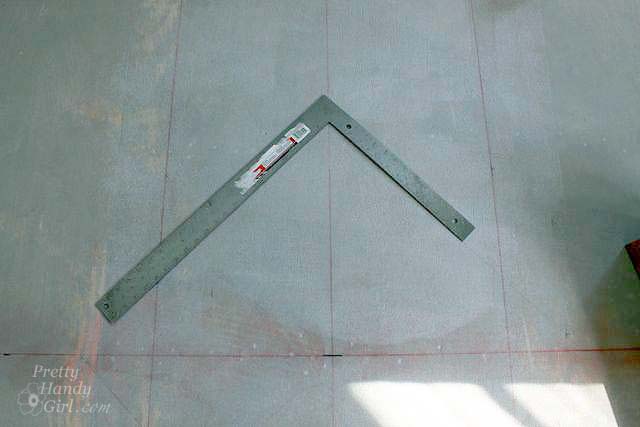
Set the first tile inside the square so the top corner of the tile touches the vertical room line.
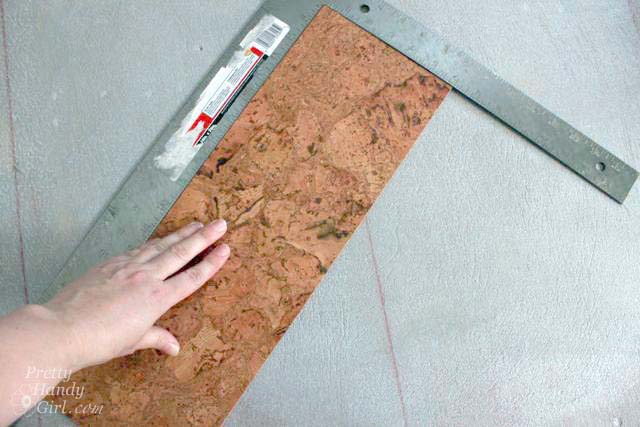
Move the square up enough to make room for the second tile. You can use the 45 degree triangle to aid in achieving a perfect 90 degree angle for these first two tiles. (Staying square and precise is the most important part in the process. If you are off by a slight amount, it will become more prominent as you install tiles out from the first row.) Make a mark at the outer most corner of the 2nd tile.

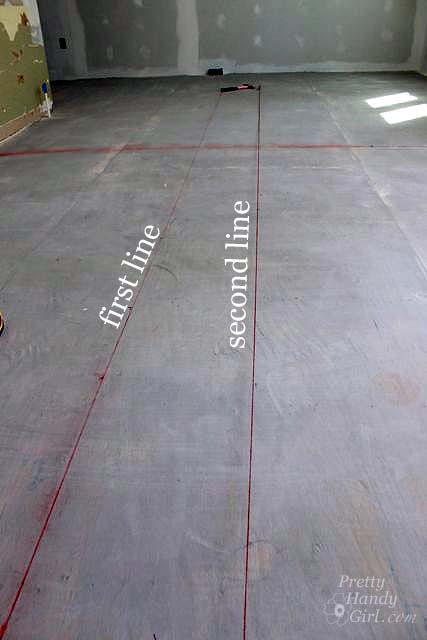
Measure the distance from the first line to this point. Make a few marks the same distance from the vertical line at the top and bottom of your room. Snap a second chalk line parallel to the first line.
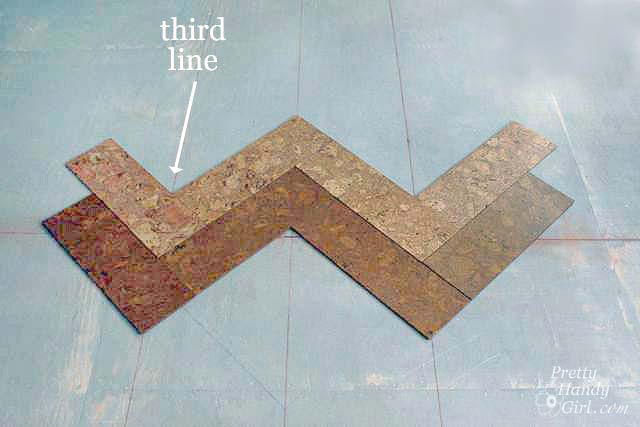
If you want to help stay precise, set a third tile down to the left of the first two and make a mark. Again, measure this distance from the first line and snap a chalk line parallel for a third guide line.
Pick up the tiles. Sweep and vacuum the floor thoroughly.
Installing Glue Down Cork Tiles:
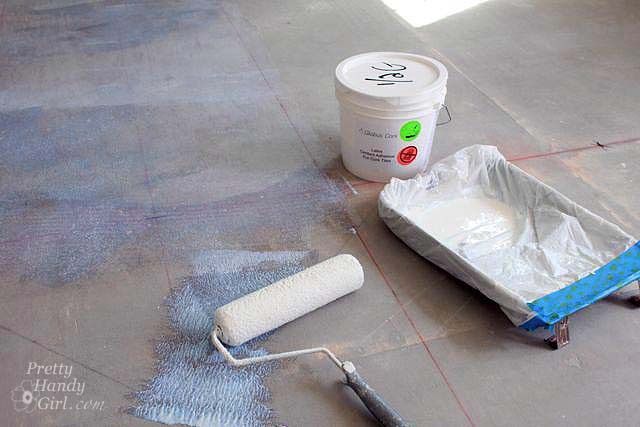
Using a paint roller and tray, roll out the floor adhesive provided by Globus. Let it completely dry (about an hour depending on your conditions.)
Take a big breath and get ready to put the giant puzzle that will become your floor together!
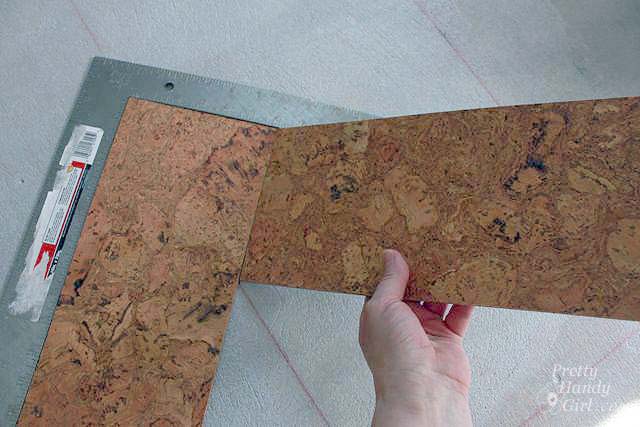
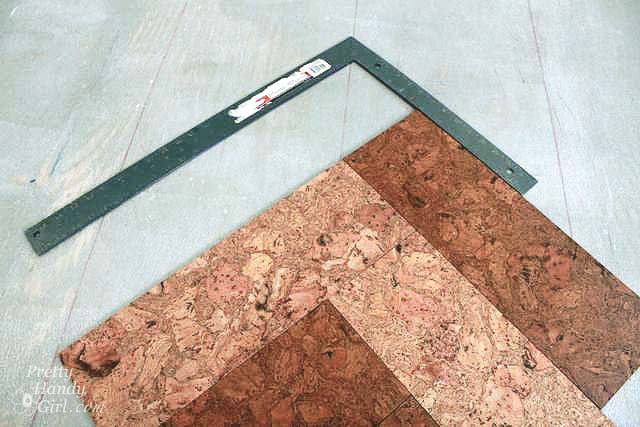
Lay your carpenter’s square out as you did in the dry fit phase.
Lay your first tile down within the square (the top corner of the tile should touch the vertical center line.) Set the second tile at a 90 degree angle from the first. Tiles can be gently positioned by setting it on its edge. Then lay it down. Once the back of the cork tile (which has a coating of dried adhesive on it from the factory) touches the dry glue on the floor, they will STICK REALLY WELL!)
Resist the urge to press down on the tile in case you need to re-position the tile. If you need to remove a tile, you can carefully pry it up by sliding a putty knife or scraper between the floor and the tile. You will discover that this is no easy task.
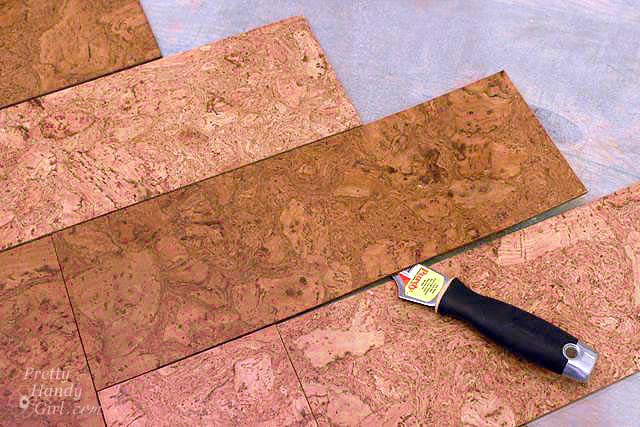
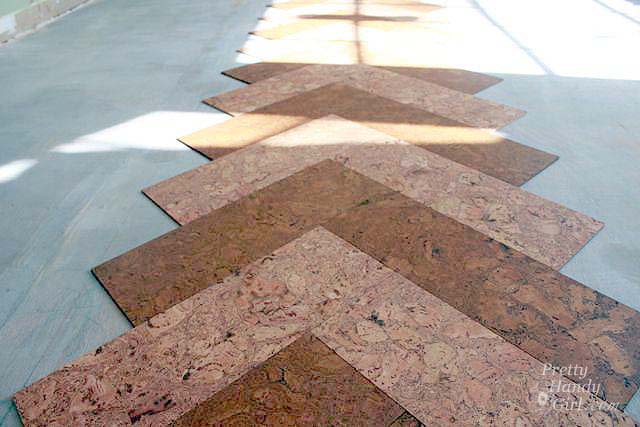
From the first two tiles install more tiles downward. (For my chevron pattern, I alternated the two tones.) Use the carpenter’s square or the 45 degree triangle to make sure your tiles are installed at a perfect 90 degree angle.
Once you reach the bottom of the room. Start installing tiles from the first two tiles up toward the top of the room.
Use the carpenter square to keep tiles in line with one another and at a 90 degree angle.
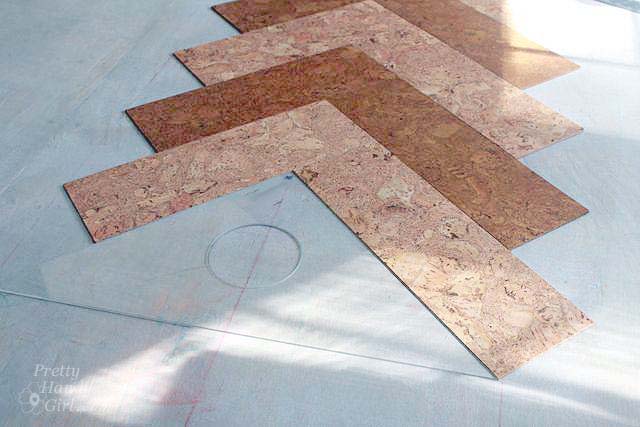
Within no time, you’ll have your first row of tiles installed from one end to the other of your room.
(Study the herringbone pattern from Globus to get the hang of the correct tile placement. As you work out from the first row, it’s easy to get mixed up. Especially if you are alternating colors for your rows. Note that I alternated colors on the horizontal, not the vertical as shown in the drawing to create a chevron pattern.)

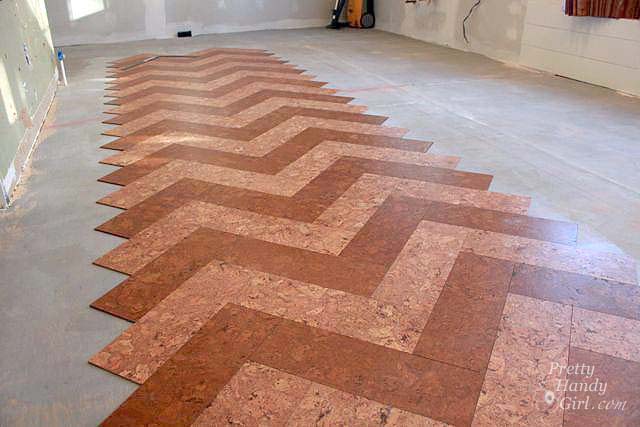
Work out from the starting row. This time you can start at the top of the room. Lay a tile at a 90 degree angle from the first ones.

Continue installing tiles onto one side of your initial row. In no time you’ll have a second row of tiles installed. Work out towards the sides of the room one row at a time.
As you reach the walls of your room, trimming the tiles to size is as easy as pressing a paint scraper into the corner where the wall meets the floor. The tiles are flexible but will break under pressure.
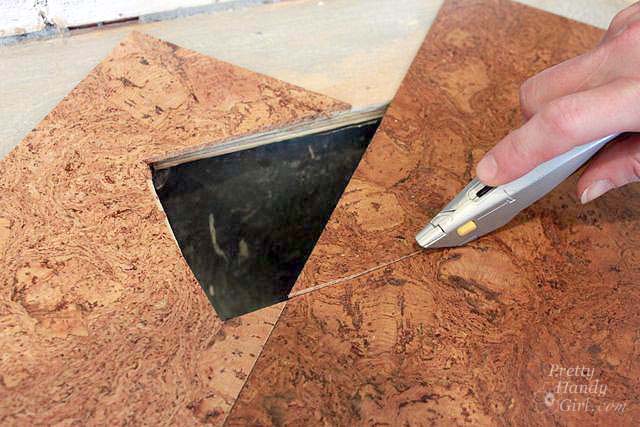
Cutting around floor vents is easy. Lay the tiles over the vent and cut along the edges of the opening with a utility knife.
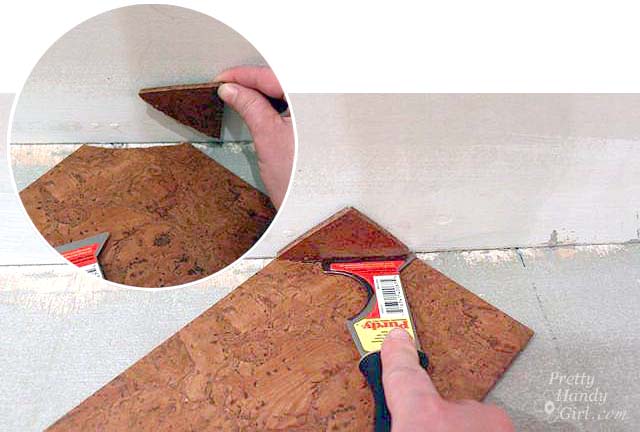
To fit tiles around walls or objects that jut out. Cut a corner shape around the object first. Then lay the notched tile in place and let it overlap the other tiles. Use a straight edge to score along the tile where they meet the pre-installed tiles.
Remove the excess and press the tile into place.
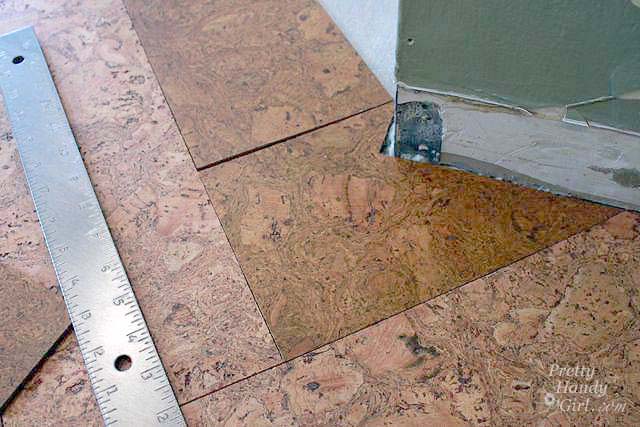
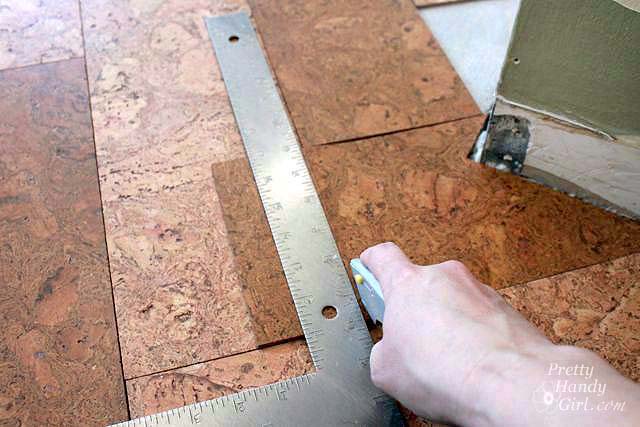
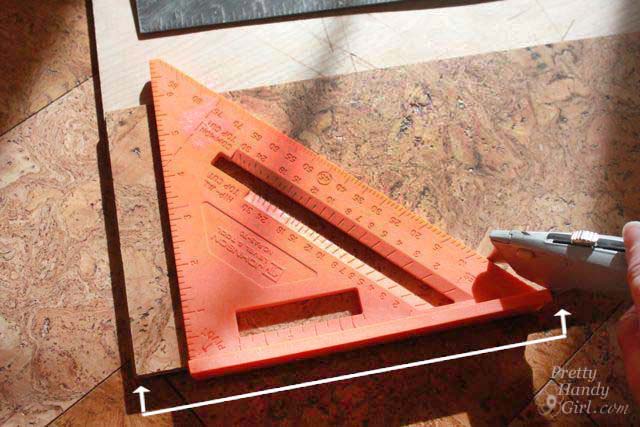
Cutting triangle “holes” against the wall is a little tricker. But, not difficult. Simply measure the side of the triangle.
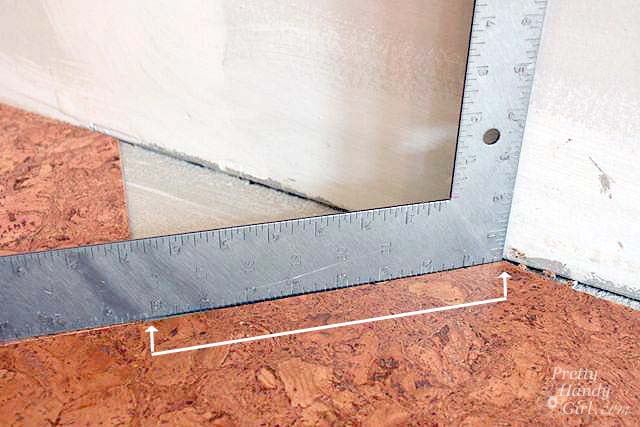
Transfer the measurement onto a cork tile. Use the speed square to cut at a 45 degree angle from that measurement. The tile should fit perfectly in the hole.
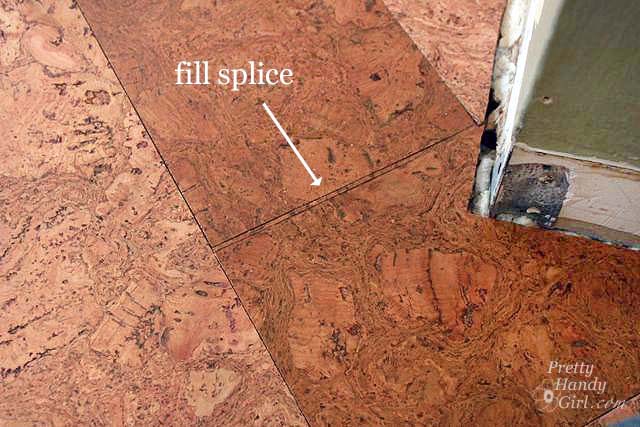
Inevitably, your installation may shift every so slightly.(Hey, no one’s perfect, right?!) As you near the sides of the room you may need to trim a tile to fit or add a splice to fill a larger gap.
After every tile has been laid, you should stand up to admire your work. But, then it’s time to get back down on your hands and knees and secure the tiles with a rubber mallet or a piece of scrap wood and a hammer. Pound every inch of the tiles to achieve full adhesion to the subfloor.
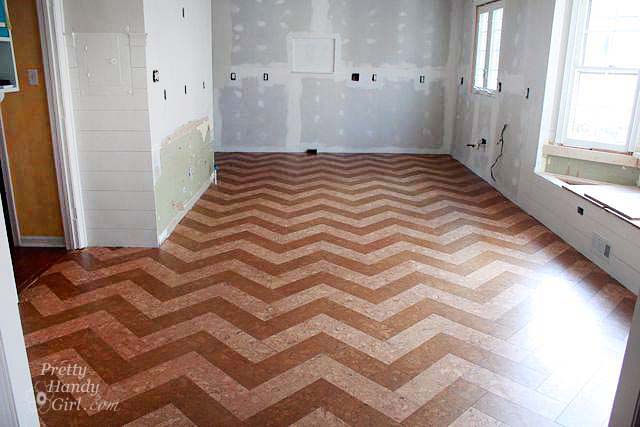
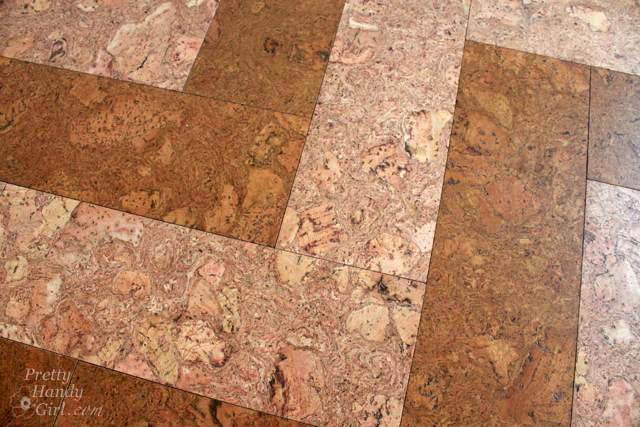
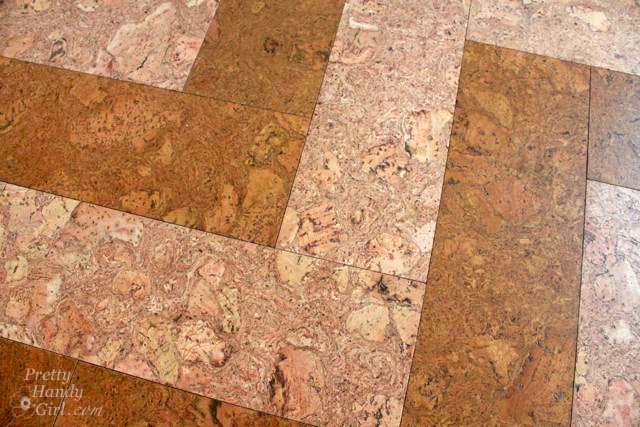
I am in love with the herringbone chevron pattern. I’ve already received loads of compliments from friends and subcontractors.
![]()
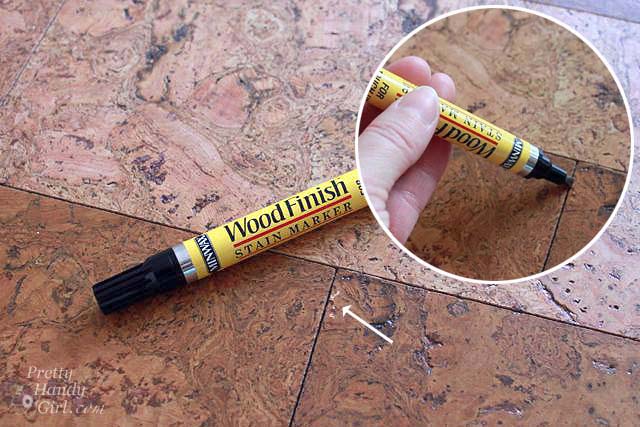
If you should get a nick in the tiles, you can touch them up with a Minwax wood finish stain marker (this only works on the natural and golden oak tiles.)
I cannot even begin to tell you how wonderful this floor is. It is so warm and comfortable under foot.
True Story: Minutes after I finished installing the flooring. I was cleaning up and dropped a whole bottle of red grenadine syrup on the floor.

The bottle didn’t break, but the cap split and out poured red sticky syrup! I screamed, I cussed, and I panicked! After several minutes of holding my breath while I frantically cleaned up the mess, this is what I was left with:
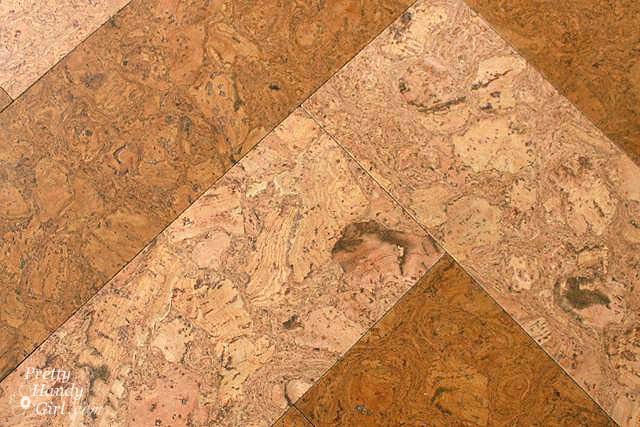
Nothing! Not a spot, not a stain. The little specks you see are the natural patterns in the cork. Which are beautiful because each tile is unique and they have so much movement and texture.
The next day we found few random red spots of syrup that I missed cleaning up. Would you believe after 24 hours they wiped up with a damp rag and left no stain? Enough said.
![]()
After the cabinets were installed I added the final sealer coat to finish the flooring (also provided by Globus.) We had to refrain from walking on it for 24 hours, and then walk barefoot for a few days as it cured.
Several people asked about pets and cork flooring. I can’t speak for everyone, but Buddy hasn’t seemed to want to dig them. He hasn’t scratched them, although I’m expecting some wear if I let his nails get too long and he decides to play chase with the boys. But, that’s the case with wood floors as well.

Dirt and dog hair are hardly noticeable on the floor. And clean up is easy with a damp mop and a gentle ph-balanced cleanser (water and a drop of dish soap.)
What do you think? Do you love the pattern I chose? Would you consider glue down cork tiles? If so, I can’t say enough about Globus Cork. They have great installation tips and slideshows. And best of all, they have excellent customer service!
UPDATE: We still have the cork floors, here’s the update on how they have performed over the past 5 years.

Disclosure: After lots of research, I selected Globus Cork because I liked their product selection, the product reviews and their customer service. I approached them about working with me on my kitchen renovation. They agreed to partner with me. I received complimentary products, but I was not told what to write or share. Please know that I am very selective about which companies and products I chose to work with. And I will always disclose partnerships and sponsored posts to you the reader.

I love the floor! I’ve been trying to decide what to do with the kitchen floor and I think I’ve just found it, thanks for sharing!
Where can I get cork tiles?
Aimee, go to http://www.corkfloor.com That’s where I ordered mine from. Great quality and great service!
I am in love with this floor…and your herringbone design. I have seen and heard of cork flooring on shows like HGTV, etc. This just reinforces my thoughts of doing away with my ugly vinyl tile flooring. I am surrounded in by a house full of men and boys. This would be perfect in my kitchen…and my bathroom. Thanks for the inspiration!
This floor looks amazing! We were considering vinyl wood looking planks for our kitchen but now, I don’t know, after seeing this maybe we’ll go with cork instead. Thankfully, I have a few other rooms to finish before we get to the kitchen so I’ve got time to decided (a few months at the rate I’m moving). I so love the pattern you chose too, can’t wait to see it progress and how everything looks together. 🙂
Your cork flooring looks great! I do flooring myself and it’s nice to see that cork flooring is becoming more popular because it really is a great choice.
Crazy Brittany! I was just deciding to do this with our kitchen floor and thinking a herringbone pattern. So good to this see and so timely!
Crystal, do it! You will love your floor. And please send me a picture or link to your pictures when you do! I’d love to see.
Cork flooring is the best choice for those with pets. They are resistant to scratches.
Gorgeous! Did you put a primer or some transparent finish to protect the floor? I’m remodeling an old cascina here in Italy and I would love to do this in the bedrooms hallway.
Sharon,
There is a finish that is put down after the installation. It is sold by Globus and gives it the extra layer of protection.
Did you take this step Brittany? Will it help “bridge” any gap at the seams? I have two Jadk Russell’s and live near the beach = pet hair and sand. I am worried about those things getting a caught in the seams or the sand abrading the surface. Ok, I’m just worried, but whenever I think of how hide cork would feel underfoot or see a stunner like YOUR install, I really want to resolve these issues and see if I can use this instead of tile. How is is hold up to all the construction detritus ?
Korlad, okay sand is the first thing that I would think might not go well with a cork floor. The reason is that there are lots of little pits in the cork material and sand would definitely stick on those. And the joints are not exactly bridged by the sealer. There are still many cracks and seams. ;-(. I wonder if the striata or traditional cork has less pits in it: http://globuscork.com/traditional-colors.html I would definitely send Globus an email to see if they can answer all your questions. I am by no means an expert ;-).
Hello Brittany and Korlad,
Regarding sand scratching cork flooring, it would be the same for any hardwood or resilient flooring. Sand can scratch (think sandpaper) so have a walk-off mat at your front door to catch sand and then vacuum regularly to pick up the sand. Our Traditional and Striata patterns actually have a smoother surface than the Nugget texture so there would be less opportunity to catch sand in the crevices. What you could also do is apply a second or third coat over the tiles on site after installation. This will smooth out the surface more and will also fill in the seams of the tiles. Cork floors are great for pets and they rarely cause a problem with scratching.
ooh, gorgeous! and excellent to know a place that does it near me [i am local to you] because i want to have a couple of rooms and a hallway done in the next few years. i’d much rather have a specialist than a company that happens to carry cork but isn’t terribly familiar with installing it
Did you find a local installer? I installed it myself and it wasn’t too bad.
i was planning to do it myself also actually. but i want to put my eyes and hands on the product to choose it
ummm this is pretty darn amazing! I can’t believe the grenadine spilt on your cork… I would have done a whole lot more than curse! So glad its not too visible! Great job again!
Katie, there were no stains left at all! I’m so excited about the cork. It’s really holding up to all the construction traffic right now (with the new restoration team here.)
OMG! Brittany, I think you have officially reached the insane level! this is gorgeous, but i can’t imagine the math it took for this. IT IS BEAUTIFUL! GORGEOUS! so impressed!
xo
kellie
Kellie, the math was only finding the perpendicular lines. Everything else was just keeping the tiles square with the carpenter square and triangle. Not so bad at all.
That looks like a cool idea to do in the front hallway of the office. I might get confused though.