How to Salvage Wood from Shipping Pallets

Pallet upcycling is all the rage today. But, if you’ve ever tried to actually remove wood planks from a pallet, you know that it is not an easy task. The nails that are used are typically spiral nails and are designed to really grip that wood. And if that’s not enough, they usually shoot 4-5 nails per joint. Sheesh, you’d think they were building a foundation for a 10 ton elephant. Okay, actually it is the foundation that has to hold tons of product as it is lifted by a fork lift. Which explains why harvesting pallet wood can be a labor intensive task.
I figured you’d appreciate it if I shared with you the quickest and easiest way I’ve found to salvage this beautifully rustic pallet wood.
Materials:
- Circular Saw (or jig saw)
- Pry bar
- Hammer
- Dremel Multi-Max (or hacksaw)
- Dremel Multi-Max metal/wood cutting blade
Instructions:
Lay the pallet on a flat surface.

Set your circular saw depth to about 1/4″ beyond the pallet wood.

Saw through the pallet board close to the joint. However, make sure that you are far enough away from any nails. (It is a good idea to look underneath before you begin to cut.)

Cut along the opposite side of the board where it meets the other side board. You should have two cuts now, but the board is still nailed in the middle.

This is a good time to break out the Dremel Multi-Max. (Side note: Dremel sent this tool for me to try — and I have to say — it was a huge help for cutting through all those excess pallet nails. I really liked the tool and it fit nice in my (small female) hand. I haven’t tried any of the other attachments yet, but will be using it to cut the baseboard trim in the bonus room soon.)
The Dremel Multi-Max comes with a few attachments, but you can buy other attachments as needed. Check out the Dremel accessory finder to figure out which bit or blade you need for your specific project.

To install the cutting blade, remove the collet nut on the Multi-max with an allen wrench (1). Loosen the nut until you can slip the wood & metal blade underneath.Line the pins up with the holes in the blade (2). Tighten the collet nut on the Multi-Max.

Insert the Multi-max blade flush with the bottom of the pallet wood. Let the blade saw through the nails. Don’t force or rock the Multi-Max. (I was able to cut through the outer nails, but couldn’t reach the inner ones.)

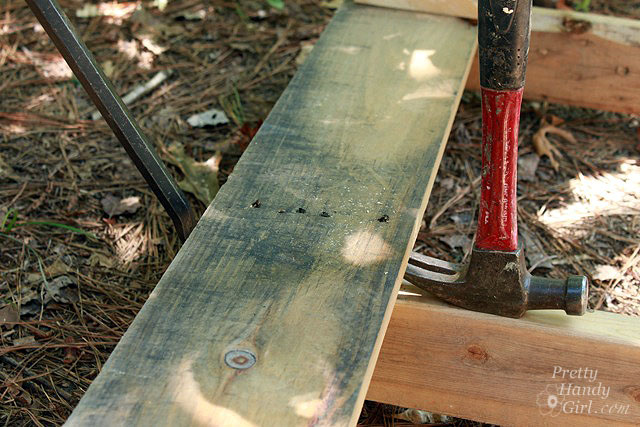
Hammer a pry bar under the edge of the loosened board. Pry up the edge a little.

Slip a hammer underneath the pried up side and slide the crow bar into the opposite side of the board. Gently rock the hammer and crow bar outward to lift the board free.
To remove nails still in the pallet board, turn the board upside down (1). Hammer the nail through the board (2). Flip the board right side up and use the claw on the hammer to pry up the nail (3).

After a few hours I had amassed quite a collection of pallet boards and scrap wood from the shop. I used ALL of it in this project.
 Stay tuned!
Read more tips on harvesting pallet wood on Instructables.

Disclosure: Dremel sent me the Multi-Max to try out in a product review. I was not compensated to write this post, nor was I told what to write or how to use the tool. All opinions and instructions are my own.


It is amazing what you can do with pallets this article gave me ideas to try some mouldings projects with this kind of wood>thank you for the great sharing.
I repair beds as a profession and the most effortless approach to get your boards with no prying required is with a recipricating saw with a long bI-metal cutting edge
Aw, this was an incredibly good post. Finding the time and actual effort to make a good article… but what can I say… I put
things off a lot and never manage to get nearly anything done.
I repair pallets for a living and the easiest way to get your planks with no prying needed is with a recipricating saw with a long bI-metal blade
A tip for those afraid of circular saw hitting nails: use a sawzall with a demo blade for cutting
both wood AND metal, get a nice long one and zip through this project. Then its a lot easier to trim out the boards and see any nails/metal left on a flat board. You can get a generic multitool instead of the dremel for less.
I have a Cargo Cycles pallet Dismantling Bar it has revolutionised how quickly I can strip a pallet without damaging any of the timbers. It really is as easy to use as shown in the video: http://www.youtube.com/watch?v=ipQLy-0Pfag
I would love to win a Dremel.. It would be great to help with our Reno projects.
I started following you on Pinterest.
I have several projects that the Dremel Multi-Max would be perfect for! First I would use it to build some chairs and a table for my cousin’s twin 2-year olds for Christmas. Then I would work on something for me.
I loved your collection on Joss and Main :)…… I too could use the Dremel for cutting pallet wood.
Thanks and blessings
Oh I would use it for jewelry, stamp making, and to try soldering for the first time.Thanks for the tut!
Thanks Brittany for all you wonderful ideas! You are a great role model!
I posted to Facebook. I am a pitiful typist. I really would love to win a Dremel, not a Drexel!
I started taking a pallet apart today…..want to piece the pallet together to make a sign for over the fireplace.
Thanks for this opportunity, Brittany. Hope you’re feeling better!
Barbara
I have been following you on Pinterest and subscribed to your blog for a good while.
I would use a Drexel to cut apart pallets, woke on our kitchen and bathroom cabinets, for working on my vintage sofa, and many more things. Give me a chance to use it. Thanks for the giveaway.
I have been looking at a drexel for ages drooling. I woul love to win one.
Brittany,
I would be using the “Dremel Multi-Max” to remove the old calk from my deck railing so I can re-paint. Then I’d bring it inside where I could cut that old pvc pipe under the sink and put a new one on that fits better. Then down the hall we’d go where I would remove the broken floor tiles and replace with new. Somewhere inbetween all of that I’d also like to make the bean toss game for the grandkids. Oh, also need to fix the door’s that stick and we haven’t even gone downstairs yet. I could really make good use of the multi-max…if you give me the chance 🙂
from one “almost” pretty handy girl….Thanks for the chance!
oh! I want a dremel so bad. ~sigh~
& oh my gosh – this would be a real boon
while helping to redo my mom’s kitchen cabinets!
..all those cabinets..
And this is my nice comment! 🙂
I follow you on FB! so excited for this giveaway!
I am a Pinterest follower!
I would so love a Dremel! They have so many uses, I would use it to have handy so I don’t have to run to the garage every time I need to cut a little extra off, say like a piece of trim or what not. Also would love to have one to help with removing old paint, instead of using a wire hand brush. We need to repaint and scrape our exterior trim next summer!
I just bought a Dremel Multimax tool this morning! That would be funny if I won another! I bookmarked your site. It looks awesome!
Also I already follow you on Facebook and now Pinterest as well. Thanks for all your help! I want to follow a lamp tutorial and needed to know how to soulder metal!! You are for about the tenth time, right on time with information i need. i feel like you can read all our minds to know just what we need to learn how to do!
I watched two videos on the Dremel Max site. I have tiles to replace that have been damaged. I also have some Closet Maid rcks, etc. for my closet that need shortening and customizing. This tool would be great for all that. My handman has one and I’ve been envious of what he can do with his his and I’ve thought many times that I needed one. I followed you on Pinterest and I love your blog so much. I look forward to seeing your posts. You are very talented and such a wonderfully nice person!
I found you on Pinterest and started following you on Pinterest and just subscribed to your blog. I haven’t looked through all your post yet but the ones that I have went through I have loved. I like the aging techniques. It is people like you who inspire me to get out of my comfort zone and to try something new. Thank you so much!!!!
I already follow you on pinterest and LOVE your tool tutorials! A whole new world of possibilities has opened up for me and a fantastic added bonus is that I’m sharing what I learn with my 20 year old daughter. Now she won’t have to wait until she’s in her fifties to feel empowered. Every time we try (and accomplish!) A new task we high five each other and say, “girl power”! We’re having a blast. Thank you so much for taking the time to write such detailed tutorials. There are so many tools we’d like to try but the dremel multi max will be like getting several tools in one, yee-haw!
Hello Brittany,
Just viewed your curated collection on Joss & Main…absolutely wonderful. Congratulations! I follow you on Pinterest and I have the Pretty Handy Girl tab pinned in Google Chrome. I would love the Dremel Multi-Max tool for the many DIY projects happening in our 1850s home.
Wow, I’ve been thinking all week “I need a dremel. It would make my life sooooo much easier!” I’m putting up a ceiling in my kitchen, one board at a time. I need an easy way to trim the ends to fit around the joist hangers that keep getting in my way.
My late husband had all kind of BIG TOOLS that he used around the house. Now I find myself needing
so many little jobs done that I can’t manage. The Dremel Multi-Max sounds like the exact thing I need to do the jobs myself. The pesky floor vents that don’t fit would be one of my first projects.
I love your site. By reading your blog daily and saving each one, I have learned to do many jobs.
This has helped my pocketbook and my self- esteem. Thanks so much for all your help.
Oh my gawd! i need this saw! I have some crazy irrational fear of large scale saws! and every time i try to imagine wielding a saw i have the worst halloweeny horror images pop up in my mind! This little dremel seems like i could manage it with out it escaping from my grasp and running over my fingers! thanks for the info…i wouldnt have looked to dremel for a saw! hooray!
I follow you on facebook 🙂
I am following you on pinterest 🙂
This is an awesome giveaway from an awesome blogger! Thanks for hosting. 😉
I’m a Facebook follower.
I follow you on Pinterest. 🙂
Oooh! I NEED one of these right now! I have a sliver of flooring around the perimeter of the bathroom floor that needs removed. This would be PERFECT!
I would use the Dremel MultiMax for many of the applications listed there, but the first thing would be to cut a new floor vent because we need to do that very soon!
Ohhhh Brittany…..why would I like to win the Dremel? Because a new tool is waaaaaaaaayyyyyy more exciting than a new outfit of clothing, dinner at a fine restaurant, and seeing the first evening star combined…..and because the smell of sawdust is better than a bouquet of roses.
Hi Brittany,
Thanks for your great blog. I check out what you are up to every day and am sorry to learn that you have been ill the last few days. I am retired, in my seventies, with time and desire to repair and improve many things that have come my way over the years. One of the main items I would use the Dremel tool for would be to repair and improve a child sized morris chair that I have and have wanted to update for quite some time. I also would use it in my composition doll repair activities. It would be great if I win it!
Hope you are feeling better now.
I could finally finish up projects around my house without asking to borrow tools. I love Dremel and hey, my email name is hardwaregirl2, so that shows I am learning to do things on my own. Thank you so much for offering this giveaway.
Winning a Dremel Multi-Max tool would be awesome! Most of all, because I would claim it as MINE!! Have many projects in mind where it would be helpful. Thanks for such a great giveaway.
I enjoy your blog and already follow you. I could really put this to good use. Hope I win. Thank You for the giveaway!
Please oh please let me win this!!!!
The projects I can make with a Dremel Multi Max.. my creativity is blowing my mind and with Christmas right around the corner. Pick me, Pick Me Pretty Please and thank you for inspiring me.
P.S. I follow you on Facebook, Twitter and Pinterest
Happy Crafting can’t wait to see what you do next
I somehow lost my original Dremel in my move – it’s sooooo useful for all my woodworking projects and would be awesome to win one! Thanks for hosting this giveaway and being an inspiration to fellow DIY women 🙂
Found you on pinterest! I think I was already following a couple of your boards – now I’m following them all 🙂
I watched a few of the videos on their site. I think I would most use the tool for wood sanding, but its amazing all the different things it can do!
Cool giveaway! Thanks for sharing!
Following you on Pinterest!
Oh how i could have used his tool in the last week! I would love to have one of these
after all it becoming the craft season of the year……with the holidays right around the corner.
I follow you on email and Pinterest!! You motivate me!
I’d love to win! I have lots of home projects in mind, and this tool would be a help.
Just found you and already lovin your blog! Following you on Pinterest & FB! Congrats on a successful site!! I’d feel so empowered to add the Dremel tool to my weak collection … I want to know more/do more with our family DIY projects. I’ve just mastered the drill – time to keep growing! Thanks for all your great insight!
OH yeah. and I follow ya on Pintesrest as well as Facebook. dont have twitter yet… kind of busy to figure that out right now.. oh and I do have your blog on my home page.. favorite!
The dremel would be awesome .. as I just started gather ing my own “tools” I borrow a lot of my husbands as I began multiple projects couple years back.. My boys are all in scouting so we work on their pinewood derby cars, just recently we did a raingutter regatta [whew that was different!] and we have a house out in the country and I “save” many odd ball items as well as pallet wood, cause i see something in em I want to make and it works out.. and even when it does not work out.. i go another direction with it and it still works out!
I love your blog and project ideas…..very empowering, helps me get up the courage to tackle some “fix ’em up” jobs that I might not have considered before.
Brittany
Just found your awesome site and immediately am following you on facebook and pinterest. We are building a new home and I know I will be incorporating some of your awesome ideas. Thanks for the chance to win. My toolbox needs more than just a hammer and screwdriver! 🙂
Already following you on Facebook, now on Twitter too!!
I’m following you……and I’m not a stalker 🙂 Gotcha on my Pinterest!!!!
I just found your site today and am really excited about it! I am now going to find you on Pinterest!
I would sooo love to win this!! I would use a Dremel Multi-Max to remove some vinyl tile in my kitchen and for a ceramic tile repair job in my bathroom and, I have no doubt, dozens of other uses as I fix up my house!!
also, i follow you on pinterest
http://pinterest.com/amidawn/
a dremel tool would make so many of the projects we tackle around the house just a little bit easier!
Since I love birds and I have many gourds perfect for it. I would love to make some gourd birdhouses to add to the ones I already have in my yard. This dremel would be perfect. My husband would also like it to for some of his wood projects.
I follow you on pinterest too…..http://pinterest.com/labellaluna/
What a fantastic giveaway. Best one I’ve seen in a long time.Thanks.
I already follow you on fb.
Brittany – praying you get better quickly. I can’t wait to see your bonus room makeover. I’d love to win the Dremel especially for when we are working on our Grand Prix cars(like Pinewood derby).
Hi,
I follow you on Pintrest and like you on FB. I have very few DIY tools that are not manual except for the electric drill and screwdriver and other small tools that I borrow from my husband . I’ve always been a crafter and refinisher but now wish to build some items and turn a small room into a real craft room. I pass pallets every day on my way to the beach and would love to be able to pick some up and actually be able to use them. Thanks for all your free projects.
Sincerely,
Alice G.
Hello, Brittany “Pretty Handy Girl” Bailey, Thank you for your encouragement and your SUPERB tutorials. I speak for many when I say, Thank you for having real, true tutorials, that don’t skip anything that is necessary, and that have clear, step-by-step photos. You really care! You really want to run a top-notch website! I speak in gratitude for all of us that you will never actually meet – but inspire? YES! delight? YES! teach? YES!
Sincerely,
Jayjie
If I had a Dremel MultiMax I would finish my kitchen and bathrooms “repair and update” much faster, with more confidence, and happily.
I am now following your Pretty Handy Tutorials board on Pinterest. I am just starting with that one. I look forward to seeing more!
I am now following all your boards. I recently got into DYI and I am obsessing over it. I wish I could just spend $1000 right off the bat to get everything I need. But no dice! I am a fine artist and graphic designer and I love designer furniture but I can;t afford them. I know I would be really great at making furniture if I just had some basic tools. My birthday is on September 28th, check my facebook I speak the truth. I would love to win this giveaway. Thanks for the consideration. I’ll continue to dream big!
I have never considered myself a DIY kinda gal, but in the last year or so, I’ve been irresistibly drawn to DIY sites featuring women, like this one. If I had this tool, I might actually be emboldened to try laying new tile in the guest bathroom instead of just thinking about it!
I just disassembled 26 pallets for a project without one – would love one for the next 26!
My husband is deployed so I’ve finally had to start learning to use power tools. Oh my! What fun! Still have a lot to learn though. I took apart pallets with a hack saw, what a pain..i would definitely start on more pallets if I had an amazing tool. I follow your blog and on pinterest, thanks for the inspiration to continue on this new, exciting journey.
I would start by carving pumpkins. Then it would be handy to pull up linoleum in two bathroom I am going to tile. It looks like it could cut door jams, which is tricky without the right saw. I have trashed so many pallets before, now I can collect them and attempt to make a desk from them.
Hi. Love your blog. We’ve gotten sooo much info. Thanks sooo much!
Hi Pretty:)
I love your Pintrest and FB posts! I also get great ideas from your blog. This post about the reclaimed pallet wood came at just the right time. I recently moved into my newly renovated (by my dad, uncle, and me) home and have left over wood and pallets to recycle. Can’t wait for more ideas. Thanks a bunch!!!
Following on Pinterest 🙂
I’m following you on twitter now
I now follow you on pinterest. Excited to browse through your boards
This would be perfect for the playroom/family room remodel. I’m currently in the planning stages and could use this on a number of projects I have on my list.
I’ve been lusting after this for a while. We just installed laminate flooring and used a Dremel 800 to undercut our molding and doorframes–not fun! If I got this I’d use it to make the bathroom and kitchen flooring projects go a lot faster.
I would luv to use pallets to make a long, distressed box for the dining room table using the dremel tool as you showed!!!
I really really need to get a new garden shed and just can’t see a pre-built on in my near future I could use that Dremel to re-cycle pallets to help make that shed
I’ve re-designed 4 large planter boxes and 2 window boxes on paper. I plan to re-use the current wood and having the Multi-Max would surely help in this endeavor…thanks so much for the opportunity to win!
Great tutorial – thanks for sharing!
I love reading your posts and being inspired by you!
I’m ur facebook fan too! 🙂 also on google+
I follow you on pinterest!!!! 🙂
I would use this to bring to life a creation for a ribbon rack I have in my head. My daddy was always my builder – I would come up with the ideas and creations and he would bring them to life. He is in heaven now and I would love to start bring life to my ideas in his honor 🙂
I follow you on Pintrest! I would use these for my collection of pallets sitting on the side of the house. Wow, very cool tool!
TheDremel Multi-Max would be a great addition to our woodworking area (garage!). I’ve been collecting projects this summer, waiting for the kids to go back to school so I could start on them!
Love your insights on getting the pallets apart. I just picked up about 5 of them off the side of the road the other day and haven’t had the time to pull them apart and work on them yet. This tool you mentioned would help me out immensely.
Thanks for the post and giveaway!
Melissa
I follow you on Pinterest. Having a tool like this would totally get me motivated to work on those pallets I am accumulating and hoping to use soon.
I would love to have one of these and would totally use it to help disassemble and salvage wood from shipping pallets!
Love the tips on salvaging pallet wood!
Pick me, pick me!!! I would love a Dremel for my many diy projects!
I would use my Dremel Multi-Max with my Dad to do DIY projects at home. I love working with him and this is one tool he would actually let me use!
Thanks for the giveaway!
xoxo
E
I love your site, I just found it today but I’m already hooked!
Thanks for the giveaway!!
xoxo
E
You have a great site. I’m sorry everyone has been having issues with content piracy. I hope it’s taken care of very soon.
I’ve done quite a few pallet projects (some you can see on my blog), and you’ve got the process nailed down. I’d love a dremel to help me out, too!
I follow you on Pinterest
I ‘Like’ you on FB.
I’m going to be redoing our shed and I could really use this to help get rid of the boards that are bad. What a great giveaway.
I follow you on Pinterest, Facebook, & your blog.
This would be perfect for all the wooden projects I’ve got that are calling out for me to get started on them!
I need to cut down some broken wood plant holders from my back deck. The multimax would be great!
I need one of these!
… “liked” you on Facebook – love the instagram shots! I had no idea you were more places than just your blog.
I just signed up to Follow All on your Pinterest page … can’twait to go thru them all!
Very creative!
The real question is “How wouldn’t I use it?” … what a handy tool and I’ve wanted one forever!!
Multi Max is my dream tool. Just went to use my regular dremel, it’s broken 🙁 Someone related to me by marriage) seems to have “done something” arrrggg.
And, I just “liked” you on Facebook 🙂
Well, of course ~ I would use the tool to salvage wood from shipping pallets! Thank you for the great tutorial!
I follow you on pinterest!
This tool would be perfect for my bathroom re-model!
Awesome Post ..I love old pallet wood & like you have found them to be a real challange to rip apart so your post was perfect…I’ve got all the tools mentioned except the Dremel Multi Max. So I would love to win this one. I could use it not only to rip apart pallets but in creating many of the Prim Gatherings I create..It would be a huge help since I just had hand surgery on my left hand & soon to have surgery on the right hand. Using tools is difficult unless they have a nice fat handle like the dremel.
I’m a faithful follower on your blog..I love all the how to’s you sahre with us. I know you have helped many a lady decide to take the challange to do things on there own thanks to your easy to understand & follow how to’s!
Thanks for sharing your wealth of knowledge with us!
Warm Blessings
Tonya
Wonderful tool. I would first of all remove the grout and then regrout tile in my foyer. I really love all the tips and DIY you give us through your blog. You are really a handy girl!
I recently removed an old built in oven from a floor to ceiling cabinet. I need to do some precision cutting to adapt the cabinet so I can add some much needed counter top space. I have been wishing I had one of these tools for the job. I have my fingers crossed !! : )
tHANKS for all the handy tips! I am following you on Facebook, Pinterest. I want to build a tool/garden shed out of pallet wood, and maybe a bed headbooard. Hopefully I’ll win the dremmel to help me. It also appears from their site that it would help me to work on gourds!
I been looking at these tools lately at the stores – they look very versitale.
I follow you on Pintrest!
I subscribe to you and always enjoy your blog. I messed up trying to link The Colleen Jacobsen fund and you helped me do it right. Talk about computer illiterate blogger. You know why I’m not in linky parties; can’t get it to work.
Janet
I follow you on facebook.
Janet
I follow you on pinterest. That lantern tutorial is great. What patience you have! I can see myself burning myself getting the glass out of the oven, lol.
Janet
Any of the DIY projects would be done at one time or another, the battery post cleaning was just done with much more difficulty that there would have been with this tool. I think the next might be the dead bolt strike plate, though it would be a toss-up depending on when I got the tool.
Janet
My husband and I are into harvesting pallets….it is a tuff job, could use tool on them. Also on some wooden boxes we make out of up cycled wood! Thanks for chance to win
I enjoy your blog……I’m a fan of yours. Thanks for the chance to win
Would love the Dremel Tool…..I know that I could find dozens of uses for it.
Read your blog daily. Great content!
I love your blog and would LOVE a new dremel tool!! We are new homeowners and have started on a million DIY projects. This tool would be a great addition to our ever growing toolbox!
Hi! I love my Dremel, I was so excited to see this new accessory! I have an oscillating tool as well, unfortunately I think a friend borrowed it and I may never see it again. I love your blog. I grew up using tools and working on our house with my dad and now I work on my own. I also started following you on Twitter and Pinterest. Have a wonderful day!
I love that I found your blog, especially the post on harvesting pallet wood. I had some pallets, but couldn’t get the darn things loose, so I gave up. Now I know what to do!
I would use a Dremel Multi-Max for SOOO many things! I’m refinishing my dining room chairs, and it would come in handy for sanding. I also need to install toe moulding all over the house, and a Dremel would make cutting so much faster.
I am following you on Pinterest!
I have a collecttion of pallets waiting for this tool! Thanks for all the information that you share with us!
And now I am following you on Pinterest also!
A few clicks and now I am following your blog.
This is a great giveaway! I just found your blog through Pinterest and will have to hit the subscribe button next because I am loving what I see. My old Dremel was kind of confiscated by my boyfriend and he uses it for everything so I would love to have one that is all mine! (like that would happen) Anyway, I will be checking back to see what new projects I just might want to tackle like the under the sink mess!
Here is your nice comment … this summer I watched your video on cutting with a circular saw. Because of you, I felt confident enough to take over our circular saw and jump right in to 2 different builds. I built an outdoor side table and a rustic letter A for our outside garage wall. They’re posted on my site above under “projects”. Thanks Brittany for showing us gals how to do cool stuff!
I’m also following you on Twitter!
I am following you on Pinterest Brittany!
I appreciate what you do for all the women DIY’ers out here in www and how you share your findings and how to’s. You are my ‘go-to girl’ for how to do anything and have been receiving your email updates to your blog for quite some time. You are appreciated – believe me! And now this fabulous give-a-way! WOW! What I’d give for THIS tool! Sanding wood, cutting pipe, etc., and the multi-flex attachment – just drooling over that one!!!
Hope I win!!!
Thanks again –
Barbara in TN
I would soooo love the MultiMax to cut an outlet in my drywall. Well, actually, not the drywall, but plank boards that I would like to install. One of the reasons I haven’t attempted the planks yet is because I am a little anxious about cutting out the openings for outlets and switches. This would really help me jump right in.
Following on Google+, Facebook, and Pinterest.
Following on Pinterest.
I need to replace a few tiles in my bathroom and this is the perfect tool for the job!
I would love a Dremel Multi Max! Thanks for the chance to win.
I just installed vinyl flooring in the master bath, the Dremel Multi-Max would have made the job much easier. It looks like a tool you can use in so many home/craft projects. Thanks for a great giveaway!
I’m fairly new to your blog and am really enjoying it. Following you o pintrest now too
Oh, I started following all your boards on Pinterest and liked you on FB, I never realized you were on both, you have great Pins!
I could use the dremel in countless ways, so often a larger tool is so much bulkier than the job demands. I would use this to refinish my dining table in the areas of detail (sanding) to cut off nails, to do so many tasks. I am always working on something!:0)
I love this site!!! I need this dremmel so bad I hope I win!!!
After viewing the Dremel multi max video – all I can say is what wouldn’t I use it for. I have had Dremel tools in the past but haven’t used it in a long time. I am going to have to go find where I put the old one I have.
Thanks,
Lisa K.
I am so thankful for your salvaging pallet wood tutorial!! I have been saving a few of them for a while and was just not sure how to start! Now I know what to do!!
Thanks,
Lisa K.
I follow all your boards on Pinterest!
I like Pretty Handy Girl on FB!
4. I enjoy your projects — they are always very do-able! Inspires me to be creative.
3. I’m following you on FB now (didn’t know you were there either).
2. I didn’t know you were on Pinterest — so now I’m following.
1. I had no idea you could use the Dremel for carving cool things on a pumpkin. News to me!
Bad caulk? Check. Stuck door? Check. Broken tile? Check. Pinterest follower? Check. E-mail? Check Sure could use that Dremel Multi-Max? Check
Last but definitely NOT LEAST is a nice comment to you!!
I know others have said it a million times, but I sure hope you truly – down in your bones, realize the wonderful positive impact you are having on todays’ women. There are a ton of websites out there in internet land with lots of tutorials, ideas, etc. but I have to say that yours is the one I really enjoy most. I’ve learned more from you than from watching years of programs like “This Old House”. THAT’s how important you are!! You not only pass on knowledge of doing things around the house, but you also offer opinions about what works for us smaller-handed females, give us tool reviews so we know what might work for us and on and on. I just happen to think you’re wonderful to be sharing all this with us and have recommended you to almost every woman I think would be interested. So, Thank-you so much.
Ihave also followed/liked you on Facebook – although admittedly don’t use it as much as many others do. Ah well.
I am a follower of yours on Pinterest too! Love what you have there and it’s a handy place to see your tutorials too!
Thanks so much for this great giveaway!
There are a ton of projects I could use the Multi-Max for. Things like removing and then new installation of vinyl flooring, crafts for fun such as sign making, cutouts for holiday decoration,etc. etc and of course easier removal of boards from pallets like you did. (Thanks for showing us how). One thing for sure is that I’d also purchase that Multi-Max Multi-Flex tool. OMG That would come in SO handy at times!
I lost my job recently, some health issues and have now quite a bit of time on my hands. When I can I like to work on antiquing furniture and looking for technique’s I found you and have been following you every since. I love your work and I found you inspire me to do the things that I love to do again! Thank you so much!
Like I’ve told you before…….love all the things you do and try most of them. The dremel is an awsome tool everyone should get one. Tell Santa!!!!! Kathy Nielsen
I have always wanted a Dremel. We are converting our well room into a pantry and this would be perfect to shorten the door mouldings so the tile would butt right up to the wall.
I’ve been enjoying your blog for a while now and recently discovered that you are also in the Raleigh area! I’d love to meet you in person one day. I admire your great work and ideas. (Also would love to have this dremel for the pallets. I know what nightmare that can be!)
I didn’t win your room makeover contest, but I’m making over my kitchen a little at a time.
“YOU INSPIRE ME TO DO WHAT I THOUGHT WAS IMPOSSIBLE!”
I have been following you on Pinterest for a while now!
I watched the video – I could do some major reno’s with that tool! I see miter cuts for crown moulding in my future!
I would use it to do all my little projects around the house.
I follow you on Pinterest (the_happy_wife/Danielle Garcia)
I like you on facebook (Danielle Parent Garcia)
Thanks so much for the awesome giveaway.
I would love to win this great Dremel giveaway. I would use it for the pallets to make some great signs!.Thanks for the chance!
I follow you on Facebook. I love this tool. I am doing a few projects but I’m doing a cabinet that we are putting trim on to be decorative. This cabinet is being made to look built in when it really isn’t since we rent. It should be finished in a month or two.
I liked you on facebook!
follow you on fb. You know I consider myself A pretty good DIYer but compared to you I am a novice. I do a lot, I tile ( floors and walls) I paint( alot) I have scraped off the cottage cheese in four rooms to make beautiful smooth ceilings, I craft, do decor projects but I have been afraid to do much wood working and you have inspired me to start that as well.(I got a nail gun for Christmas and haven’t even used it yet) PS I’m tired of waiting for my husband to catch up with my projects. I figure that if you can work the circular, reciprocating and miter saws , so can I . Thanks for the inspiration to tackle another challenge. Brittany you are awesome.
I follow you in email
I follow you on RSS feed
Wow, I think that is what I need to trim the tile around my outlets! And since I am collecting pallet wood that is a BONUS. Thanks for the chance to win that awesome tool.
Oh my gosh! I have wanted one of these! I would put that baby to good use in my polymer clay and jewelry crafting. Of course it would be used for work around the house.
Thank you for offering the giveaway!
I Love your blog!
I follow you on facebook.
I would use it for sanding and cutting, and well lots of things.
I followed you on Twitter. Thanks so much for the opportunity to win such a fabulous tool.
I liked you on FB – and I really love your blog!
I happily followed you on Pinterest. Thanks for the opportunity.
I would love to be able to cut thru boards easily (I want to make a Farmers Market sign), and make cut Egg Decorations for Easter. I’m sure there are so many things that I would use it for, I love crafting and DIY refinishing and learning new things. Thanks for the opportunity.
I was already following you on facebook.
I’m following all your boards on Pinterest now.
I would use the Dremel tool to etch all those Starbucks Mocha bottles that I hate to throw away because they are so cute!
What wouldn’t we use the Dremel for?? I am always tinkering with DIY projects & my husband is always building something. Love reading PHG, you are so talented!!!
I follow on pinterest.
Thanks for the great giveaway – would love to win.
I would use it to do the projects my husband says he will “get to”.
I have about 20 old classic cocacola shipping pallets I got my hands on!!! I’d def need a dremmel to take them apart for all the projects I’ll be starting (coffee table, wall signs, shelves etc!) the possibilities are endless! DIY is amazing! Your site teaches me so much!!!!!! And I love the colors you
Choose for your pieces… I’d never think that I’d like them… Than bam!!!!! Gorgeous! I am now following you on pinterest as well!!!! Keep the tips coming…. All my projects and crafts support my family when they are sold 🙂
I love your blog because it makes it all seem do-able. Thanks so much!!
I follow you on Pinterest! (or devil-rest as I call it) 🙂
I follow you on FB!
I’d use it to take apart wood pallets, like you did. 🙂
Nice Comment! Oh I think you mean more than that, heehee! Love your site, you have some great ideas and tutorials!
Following you on Google+
Following you on Pinterest!
The uses are unlimited! I love that it is small but mighty!
I have “liked” your page on Facebook and am now following you there
I am now following all of your boards on Pinterest
The directions for using the pallets are fantastic! With a ready supply from a close to me business I am already envisioning some new projects. Thanks for the push!
I looooooove you on FB!! Just recently found and started following you, but so glad I did! You are so creative :-)). I will check out the pinterest too!!
Oh, and I WANT that Dremel!! 😀
I would love to have a Multi-Max for creating my own frames for my artwork and for cutting pieces to use in my three dimensional wood sculpture pieces.
I would use this dremel tool to show my husband that I am woman hear me roar! LOL
I think your post on pallet salvage was awesome!! And I love that you are not afraid of the powertools!!
I follow you on facebook
I love following you on pinterest!
I love your blog! You inspire within me the desire to create/repurpose. Now I just have to make the time and start gathering tools & supplies.
Oh my! This would be so cool to carve pumpkins and it’s the perfect time for that!
I like you on Facebook.
I follow a bunch of your boards on Pinterest.
I follow you on Facebook
I follow you on Pinterest
Your projects are great and inspire me to try to be handy myself!
I follow your blog through Google.
I now follow you on pinterest.
It would be great for maintenance jobs around the house but I would really love to make the terra cotta luminaries.
I would have many uses for the Dremel Multi Max n the many projects I have going on in my 75 yr old house. Thanks
Liked you on facebook : )
I am following you on pinterest.
I would love to win the Dremel Multi Max. I have wanted to try some pallet wood projects, but my husband has discouraged me because they are so difficult to take apart.
I followed you on Facebook!
I’d use this on my 6 pallets I just found!! Also use to sand edges of some furniture pieces I am painting
Follow on FB too
Follow via Pinterest
Wow this looks like a great tool to add to the toolbox!
I found you through pinterest and now I follow your daily blog. Love it! I, too, am a repurposer and donate many of my items to charity auctions. I would use the Dremel Multi Max in so many different ways for many different projects. I just love the inspiration from your blog. I have a potting bench to repurpose and finish, and I would like to repurpose free pallets to make furniture for my patio area. I would love to send you some photos of my completed projects. Thank you for this opportunity.
I’ve also liked your facebook page. Have a great weekend 🙂
I started following you on Pinterest! Thanks for hosting this giveaway, it’s awesome!
MIGHT let my husband borrow it, if it comes to my toolbox 🙂 Thanks for the opportunity.
Thanks for the chance to win!
Love your Blog and all your DIY projects.
I now Follow you on Pinterest.
I Follow you on facebook.
I would use it for some pallet projects. I have a few laying around here that I am dying to take apart.
I follow you on Facebook and pinterest
I also would like to do some pallet projects this tool would be perfect.
Thanks so much for the opportunity! I had a similar no-name brand tool and I used it so much it died!
I follow on Pinterest!
I follow on facebook!
Oh my! we have a fixer upper home, so I could use this for so much, but i love the idea of using it to clip those nails on pallets, free lumber!
I’m following you on Facebook.
This is really helpful, thanks!
Thanks for the opportunity! I’m looking to upcycle some patio furniture, bet the Dremel Max would be a big help!
I follow you on Pinterest!!!!!
There are so many things I would use the Dremel for. To start I would use it to do some work on my boys beds.
I follow you on Pinterest!
Following you on Pinterest
I would use the MultiMax to help my husband remodel our barn and take apart a few of the pallets that we have here as well!
I’d proably use it to build trendy signs around the house for the wife.
Follow you on Facebook.
I would use it to build a basic bookshelf for my boy’s room.
Liked you on FB.
You have a lovely and informative blog.
Thanks for the change to add to my tools!
joined your facebook fans
following you on pinterest.
I have a bookshelf that needs a total remodel. Pretty sure the Multi Max could come in handy.
I would use the Dremel Multi Max to remove grout. The person who installed the tile in our laundry room did a lousy job (deep ruts) Sweeping the floor in there is truly a chore – what should only take a few minutes takes much longer since I have to sweep the kitty litter out of each and every groove cause it gets caught.
following you on pinterest as well.
following you on facebook
Fantastic Giveaway! This post about harvesting a pallet is interesting & will be very useful
This post is fantastic and SO helpful!!! Thank you 🙂
I follow you on Facebook!
You now have an icon on my smart phone. I’m new to pallet up-cycling and wondered how the heck to remove the nails…thanks so much for the tutorial. I keep up with you on Pinterest now but will follow you on Facebook after making this post. Genius…simply genius answers to DIY issues that always seem to pop out of nowhere (kinda like the “snake in a can” party trick…).
I would use this tool along with others I have collected over time to make the job of creating my kids a playhouse a much easier task! I read your blog all the time and Follow you as well!
I’d love a tool like that! And I would like to follow you on Pinterest.
Following on Pinterest as magpiedpiper
soluckyducky at gmail dot com
I liked you on FB as sarah lientte
soluckyducky at gmail dot com
Thank you for the lovely tutorial too!
soluckyducky at gmail dot com
I would use it to make Montessori shelves for my daughters.
soluckyducky at gmail dot com
4. I just found you yesterday somehow (don’t recall the source!) & I LOVE YOU! You are amazing. My best friend & I have just started refinishing/painting vintage & funky styled furniture. We are teaching ourselves. We want to be able to repair AND build furniture as well. YOU are an inspiration!!!
3. I already follow you on Facebook!
2. I just followed you on Pinterest!
1. I would definitely use it to do what you have just taught us to do! I have gotten several pallets from work & could never figure out how to take them apart! 🙂
I follow your rss feed on my google reader, love your projects
I follow on Pinterest
Buckets, do I need a Dremel! I’ve collect a bunch of sea glass and shells that need some spiffy holes drilled into them so I can make some jewelry and crafty home decor. These goodies need some repurposed love, instead of being cooped up in their plastic bags and jars! I just love your blog and follow you on facebook! I’m inspired by your great projects and ideas! I’m also a fan of reclaimed wood and I could turn out some great projects with a Dremel:) Ohhhhhhh, I hope I win!
I’ve also subscribed to your blog via email. Still hoping to win 🙂
I would like to say that I have only just recently “found” you – and I am so thankful. My husband and I have always been too quick to hire someone to do something for us — without even trying first ourselves. Already after just a couple of weeks of seeing your posts I am feeling more confident and most importantly, more interested in trying to tackle some home improvement projects. You are an inspiration! Thank you!
Robin
Cary, NC
I think I would make the gourd birdhouse with the Dremel Max.
I like you on Facebook!
I follow you on Pinterest!
I follow you on pinterest!
I follow you on facebook
I want to etch glass
Where could I NOT use it is the real question! It would work wonderfully with some of the furniture makeovers my husband and I are working on.
AWESOME!!! This is really good to know!
I’ve got the stack of pallets in my yard just waiting to be turned into something fabulous, so this would come in very handy!
I like you on facebook!
I follow you on Pinterest!
I would love to have a Dremel! It’s been on my wishlist for awhile, but since I am “building” my toolbox, it hasn’t been a necessity. But oh how I would love to have one!
I hope I win!
I follow you on Twitter
I follow you on Pinterest!
I’d use the Dremel for a bathroom project we are doing. I need to remove some baseboards and trim and that would make the job a bit easier!
GREAT idea on using the Dremel…we have one and I never would have thought of using it! You just saved me SO much time!
Wow, this Dremel would be awesome to own!!!
thanks so much for this giveaway. ive always wanted a dremel
i like you on facebook
i follow you on pinterest!
LOVE THIS POST! if i would i would make tons of pallate crafts. i LOVE them and always wondered how to do it. now i know. and if i had one of those the possabilities are endles!
I follow you on both fb and pinterest. Great stuff!
and I love your blog 🙂
I follow you on Pinterest and on FB.
Holy cow I’m in love with that saw max! I am totally afraid of the circular saw (I can use the table saw and miter saw no problem, but the circular saw scares me! I’m such a dork.)
Love your blog and talent. If I would have this tool, then I would be more apt to finally tackle taking apart pallets which I’ve totally avoided thus far.
And I like you on FB
I follow you on Pinterest
Awesome! This would be great for my tool collection!