How to Install a Lutron Maestro Occupancy Sensor on a 3-way Switch

Teaching kids to turn off the lights in a room they are no longer in is a tough job. No matter how many times I try to explain that leaving the lights on wastes electricity, it just doesn’t seem to sink in. In their defense, they are like little wind up tops flitting from room to room playing with trains in one; reading in another and barely stopping to use the toilet in the bathroom (putting the lid down is a whole other issue! Ugh.)
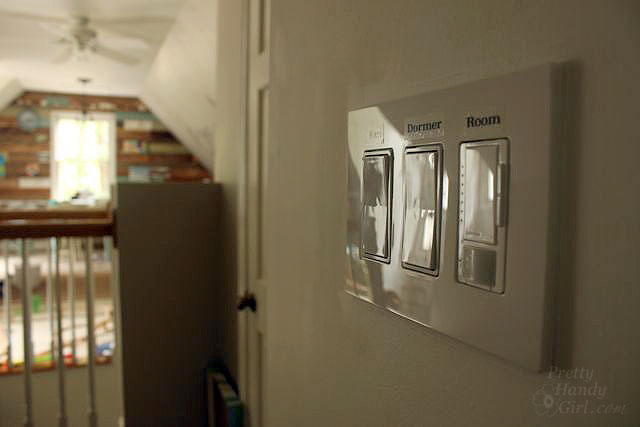
When Lutron approached me about giving my kids a helping hand with the lights, I was immediately intrigued. It turns out that Lutron has just introduced the Maestro occupancy sensor dimmer that can be easily installed in place of an existing light switch. (Single pole switches are easiest. Dual or Multi-location switches may require a little more wiring and programming to work properly.) After some thought, I decided to try the Maestro in our art & craft studio. This is the room that we least notice when the bulbs are burning (it is over the garage and is separated by our guest room from the rest of the house.)
Follow along to see how to install your own. Your attentive nature may be rewarded at the end. 😉
(I’ve included affiliate links for your convenience. I earn a small percentage from a purchase using these links. There is no additional cost to you. You can read more about affiliate links here.)
Install a Lutron Maestro Occupancy Sensor on a 3-way Switch Materials:
- Drill or screwdriver
- Needle-nosed pliers
- Electrician’s pliers
- Voltage tester
- X-acto knife
- Lutron Maestro Occupancy Sensor Dimmer
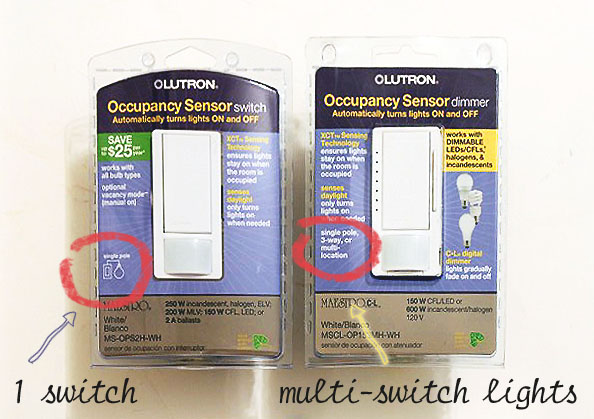
Make sure you purchase the switch specific for your location. If your light is only controlled by one switch, the single pole switch is used. If your light is controlled by two separate switches, chose the 3-way or multi-location switch. (It’s called a 3-way configuration even though there are only two switches. I know confusing.)
Here is a quick video tutorial for installing the Lutron Maestro Occupancy Sensor Dimmer in a 3-way configuration:
Photographic Tutorial:
1. Make sure you have the power turned off to the light AND any other switches that are in the same switch box. Test all the power (black and red) lines with a voltage tester before proceeding.
2. Remove the existing light switch from the junction box but do not remove the wires yet. You may wish to mark which wire was connected to which screw. Especially if this is one of two switches that controls the same light fixture.
3. This is where things can get tricky. The lighting in our art room is controlled by two separate switches (3-way switch configuration.) One switch at the top of the stairs and one at the bottom. I added the Maestro to the top switch since this is the one that will sense motion as the kids and I are playing in the room.
4. Wire the Maestro in the location that will view the activity in your room.
Always wire the ground (green or bare wires) first. This will ground the switch should someone accidentally turn the power back on. Also, the Lutron sensor must be grounded to work properly.
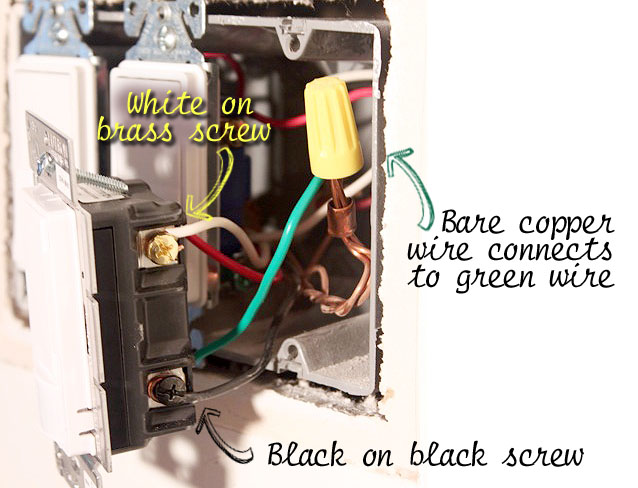
Then connect your house white or neutral wire to the brass screw. Attach the black wire to the black screw.
Finally, attach the red wire to the blue screw.
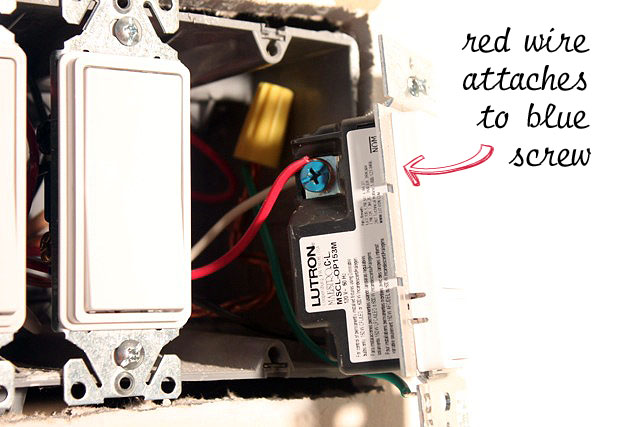
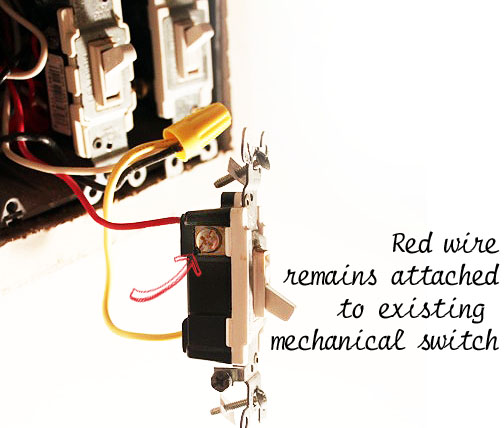
5. In order for the Maestro to maintain power, you must re-wire the other switch that controls your light fixture.
The red wire remains attached to the mechanical switch.
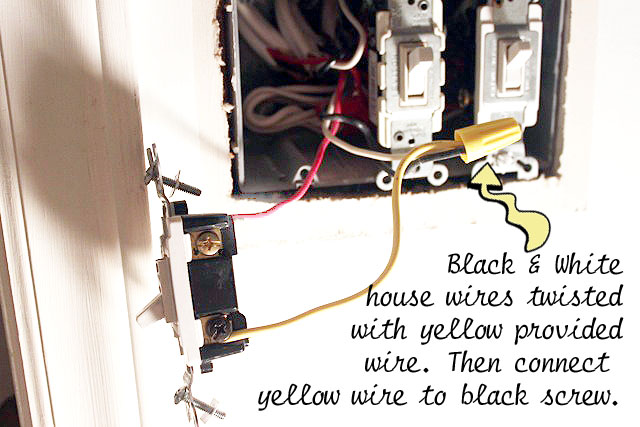
Remove the black and white wires from the switch. Twist them together along with the yellow jumper wire included with the Lutron Maestro. Connect the yellow wire to the black screw on the switch.
6. Screw the mechanical switch back into the junction box.
7. Screw the Lutron Maestro back into its junction box.

8. Turn the power back on and test both switches to your light fixture to insure that they work properly.
9. Attach the face plate and you’re done.
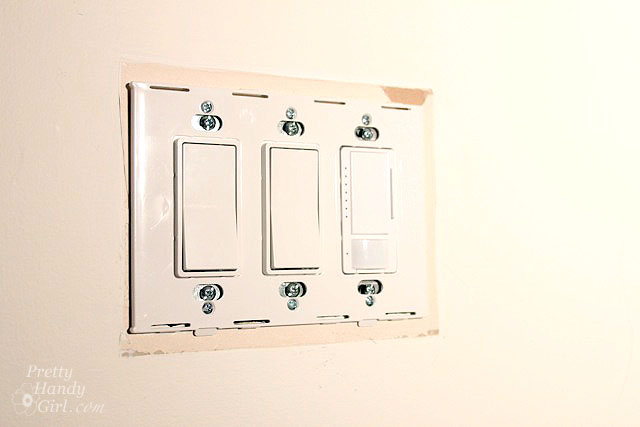
(Side note: If your switch is located in a box with other switches, you’ll have to replace the other switches with decorator switches to work with the new face plate.)
Hey, who left the lights on?

Nevermind…Maestro took care of it.
The Lutron Maestro Occupancy Sensor Dimmer is programmable if you wish to change the length of time the light remains on after it stops sensing activity; the sensitivity to motion and heat; and the light level. See additional video tutorials on installation and programming at Lutron.
Don’t be discouraged if your wiring doesn’t match my wire colors. I highly recommend calling Lutron’s 24/7 Tech Support! I called them when I had questions and they were super helpful. The Lutron Tech Support number is: 1-800-523-9466
![]()

![]()
Disclosure: This post is a sponsored post for Lutron. I was compensated for my time and project materials. All opinions and words are my own. Lutron is a company that I was happy to partner with because they make quality products that I have used for years. Rest assured that I will not partner with brands that I don’t value or respect.
If you liked this post, you may like more electrical tutorials:


Does that normal 3 way switch still turn the light on/off? If so, if you turn on the light using the normal 3 way switch, does the Maestro motion sensor turn the light off after the specified timer? Or do you have to turn it off again using the normal 3 way switch? Thanks!
No, the Lutron sensor will turn the light on any time anyone walks by it even when the light switch is turned off on the other switch.
Thank you for your wiring implementation. The diagram that comes with the switch is useless to determine which wire is desired and is different from most n-way switch behaviors. They also used less common terminology like “tagged” instead of “traveler x” Your wiring (slightly modified for my setup) worked, although it does take a moment to turn off with the mechanical 3-way. That may be a setting I have yet to tweak. Thank you.
An impressive share! I have just forwarded this onto a coworker who had been conducting a
little homework on this. And he in fact bought me dinner due to the fact that I found it for him…
lol. So let me reword this…. Thanks for the meal!! But yeah, thanks for spending time
to talk about this subject here on your blog.
Thanks for your informative video and article. I plan to install the motion switch in my hallway and bathroom.
Thanks
paula
What does it take to have occupancy sensors at both the top and bottom of stairs? Both Lutron and Leviton state you can only have one occupancy/vacancy sensor per multi-location circuit however the kids forget the lights both coming and going so just one won’t do. The circuit is currently wired as a regular 3-way with 6-40w florescent tubes in ceiling fixtures so I’m motivated to get this worked out.
Spencer, we only have the occupancy sensor at the top of the stairs in the room. The timer will automatically turn off when it no longer senses motion after a preset (can be changed) amount of time. So, you should be fine with just the single sensor.
I agree with Spencer..I also have a situation that I would like answered. Our laundry room from the garage to the house is L shaped. Door from the garage to laundry room and door from laundry room to the house. I would like the light to come on and off no matter what what door I came through.
Great job with your tutorial. Very clear and descriptive with nice balance of instructional text and video. Keep up the great work!
Thank you for this tutorial. After reading the instructions manual and being confused, I was finally able to do this right. I got stucked with the companion 3-way switch modification. The instructions were not clear, and since cables are different colors it is very difficult to know for sure. Your video and photos were perfect and I was able to fix my problem right away. Thanks!
Rey, yippee! I’m so glad this tutorial helped you out.
This would be perfect for our mudroom. We can’t reach the switch after we lock our door so we could have light as we walk out of the house at night. Sounds awesome!
Hannah, congrats, you were randomly selected as one of the winners of the Lutron Maestro! Please email me privately at PrettyHandyGirl (at) gmail.com with your name and mailing address!
Hi Brittany
Thanks so much for this tutorial. I’m not particularly handy with electrical installations (even simple ones as these), but the detailed pictures you included really made it a no-brainer. I’m actually tempted to look into an occupancy sensor myself. From what I heard the dimmer can help save a little on electricity bills – that alone is worth the $40 investment.
Thanks for the inspiration.
Need a single one and would use it in the bonus room over the garage
Awesome post. I would love to win this…and begin the transformation at home…yikes
i am constantly asking my kids to turn off the light on the stairs. I would love to try it out there.
First of all Thank You for the tutorial on installing the Lutron Maestro Occupancy Dimmer. I shy away from all things electrical because it seems kinda scary, but I’m pretty sure I can handle it with your instructions.
Secondly, I would l-o-v-e to win one! Single pole please!
Thanks again for the tutorial.
Love your blog! Been hanging around for a few months and I really enjoy your video tutorials. I learn better that way anyways.
Love the light switch idea, I could use it in my bedroom. Although when I have little ones, i’m sure the main bathroom and their bedrooms will benefit more.
Something like this would be great in either the kitchen (when you’re bringing in a load of groceries) or our laundry room (where you’re bringing in a load of laundry)!
A 3-way switch in the hallway would save my son from being haunted in his dreams by his mother telling him to turn the hallway light off once he gets to the bottom or top of the stairs. A single pole would eliminate those senior moments when I realize I have left the guest bathroom light on and unfortunately can’t haunt my son for that one.
Congratulations Asia! You are one of the randomly selected winners of the Lutron Maestro Occupancy Sensor. Please email me to claim your prize: [email protected]
I was so excited to see a tutorial yesterday show how to install a single pole unit, but wondered how it would work on a light controlled by two switches so thank you for answering my question! I just bought a condo and plan to use this in my entryway at the bottom of a staircase as I can see I will often forget to turn it off.
Thanks for the great tutorial!
I love that they can be programmable. I would love to try these in my house!
A single pole switch for our family room will keep me out of the dog house
I would love to install a Lutron Maestro in the bathroom. That light always seems to get left on.
We just moved into a new home and the garage entry/laundry room would definitely benefit from this. We need the single pole version. Thanks
I desperately need it for the living room! That light is constantly getting left on!
I could use this in my basement laundry room! That light is always getting left on!
Great job Brittany and love the video 🙂
I would love one for my daughter’s downstairs bedroom. It is one of those rooms that she can never remember to turn off the light. A sensor switch would save me lots of trips down the steps to turn the light out after she is has left the house.
I’d love a Maestro for the kitchen then it won’t matter if my hands are too full or too dirty to touch anything, the lights will magically go ON!!
I have been reading your tutorials for about a month now and I love all your ideas! Thanks for the opportunity! also if I don’t win i really am happy to finally tell you how great you are!
A single pole would be awesome for the rec room, the kids love to leave that light on!
I’d love it in my laundry room which also houses the entrance from the garage to the house. My sister has one in hers and I love it. I’d also love it in my girls’ rooms and our loft/playroom. Thanks for the tutorial. I have been thinking about switching a few out. The laundry is single but the other rooms have the multiple.
A single pole switch (or dimmer) for my bathroom would be nice!!!
Sometimes I come home on a dark evening, and am horrified to see STRAIGHT into my laundry/storage room from the driveway, because the light in there was left on. Eck.. What a view. A single pole switch would prevent my next anxiety attack over showing the neighbors my dungeon.
Wow – those are awesome! I am going to look into getting some. Thanks so much for letting us know about this company!
xoxo
A three way Lutron Maestro Occupancy Sensor is what I need for the kitchen. I often find that guests do not turn my kitchen lights off at night & it drives me a little nutty to only discover it in the morning. The name of it just sounds so cool & impressive!
Congratulations Colleen! You are one of the randomly selected winners of the Lutron Maestro Occupancy Sensor. Please email me to claim your prize: [email protected]
OMGosh if these control ceiling fans I need them for every room, but will settle for my bathrooms
The single switch would be great for my office. I sometimes get side tracked when I leave it to do other things at night in another part of the house. It’s not unusual for the lights to still be on an hour or more after I’ve left that room! Thanks for the chance to WIN!
We have a sensor one in our laundry room b/c the light switch was clear across the room and I love it!!!! Then we have a timer one on our stairway and on our outside lights. They are the best!!! My mom has one in her laundry room and one in her pantry and she loves them too.
The multi-switch Maestro would be perfect in our back hallway. The garage, kitchen, and laundry room all converge there, and an auto on/off light would make life so much easier! 🙂 Thank you for the great idea & tutorial
I’m glad to know about the 3-way sensor. It would be perfect in my laundry room which I pass through from my garage to kitchen, often with my hands too full to turn on the light. With your tutorial, I could install it myself.
Wow, a 3-way occupancy sensor is just what our basement storage area needs. We moved recently and it seems our hands are always too full from unpacking to turn the light off. Even better, with your installation instructions I don’t need an electrician to work this magic. I can always count on your blog to inspire me AND save me money!
I would love a one way in my son’s bedroom – he can never remember to shut the light off!
This would be great for my bathroom! Not only are we in and out of there all the time, but the laundry room is accessible only from the bathroom, so that triples the traffic in there and I usually have my hands full of laundry when I’m coming or going. Great giveaway!
Congratulations Jody! You are one of the randomly selected winners of the Lutron Maestro Occupancy Sensor. Please email me to claim your prize: [email protected]
What perfect timing! I was just looking at these last week and the single pole/3-way thing WAS confusing. Thank you for clearing that up.
I think I’m going to use the sensor in my guest bathroom (no one seems to remember to turn that off) but I also thought that having it in the hall and my entry way would be a good idea. Both spaces need light but having the lights go on when I enter them and off when I leave would be really helpful. Especially the front entry. Can you imagine how nice it would be to come in your front door (always have arms full) and have the light pop on? Come to think of it, that also might actually be a really good idea for my garage too.
Congratulations Laurie! You are one of the randomly selected winners of the Lutron Maestro Occupancy Sensor. Please email me to claim your prize: [email protected]
I’m pretty sure I’m not the only one who ALWAYS leaves the light on in the bathroom, right? Right?!? Cuz I do…..ALL…..THE…..TIME. And I live alone so I can’t even blame it on someone else.
I’ve been thinking about getting one of these to solve this problem so I’d love to win one!
I’m a new reader, but I’ve really enjoyed your tutorials. I just started moving into my very first house and would love to install one of these switches (single pole) in my Kitchen. I walk through there quite a lot, and sometimes forget to flip the switch when I leave. (My first choice would be the basement, however I would need to actually INSTALL some lights down there for it to work…One project at a time, I guess.)