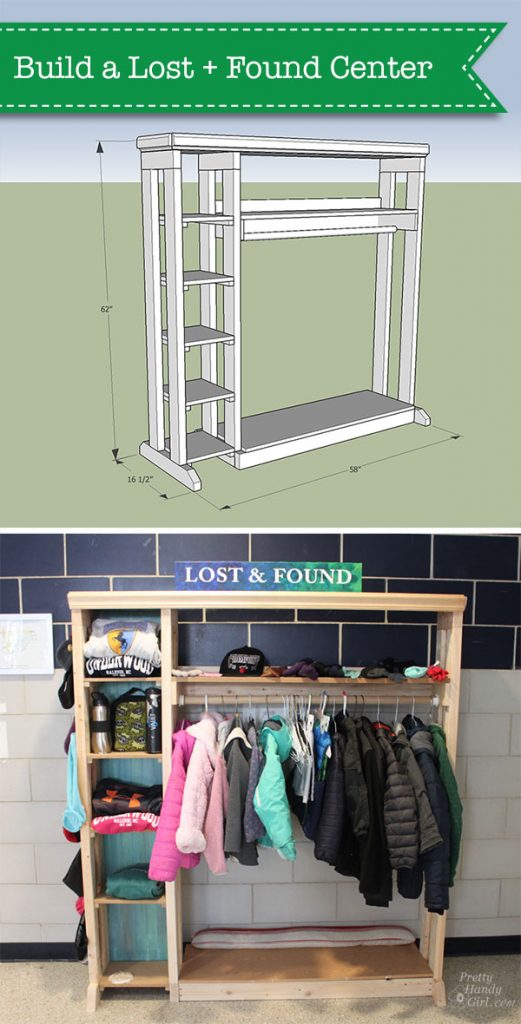
How to Build a Lost and Found Center
Lost & Found Centers are overlooked spots in schools. The “center” at my sons’ school used to be a folding table that was heaped with mounds of clothing hopelessly separated from their owners. I took on the task of organizing this “center” at my sons’ school once a week. I’d spend a good 20 minutes folding and laying the items out so that they could be seen and hopefully recognized. Unfortunately the children would start picking up items and soon the table would be a jumbled mess again. I knew there had to be a better way to organize the Lost & Found Center and make it easier for the kids to find their items. My dream was a spot that would organize itself.
With this in mind, I created a plan that would accommodate all the jackets, hats, gloves, scarves and other random items that made their way to the lost & found. The best part of my plan was I could use a variety of scrap wood I had laying around in my garage plus some long 1″ x 10″ boards reclaimed from my in-law’s old platform bed. (I’m the frequent recipient of “good wood” from old furniture and shelving.)
If you have ties to a school (especially an elementary school) and have a little time, consider making a Lost & Found center for them. You will be their hero . . . trust me! 😉
Let’s learn How to Build a Lost & Found Center, shall we?
Materials:
(I’ve included affiliate links for your convenience. I earn a small percentage from a purchase using these links. There is no additional cost to you. You can read more about affiliate links here.)
- Tape measure
- Saw (preferably a miter saw)
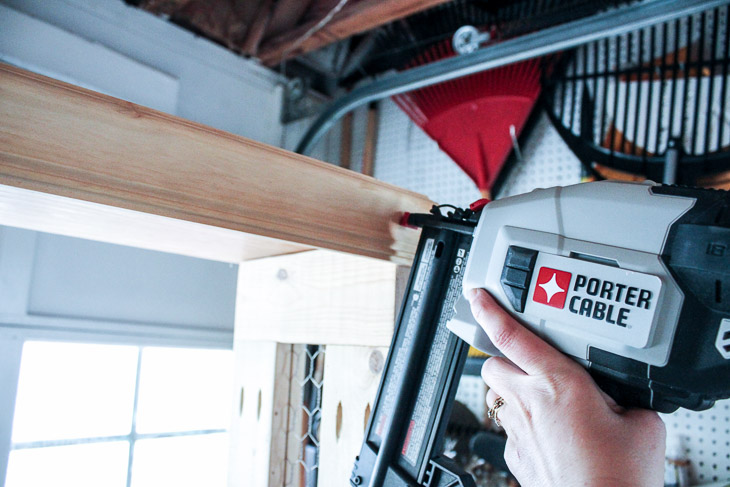
- Nailgun or hammer
- 1 ¼” finish nails
- 2″ wood screws
- 2 ½” pocket hole screws
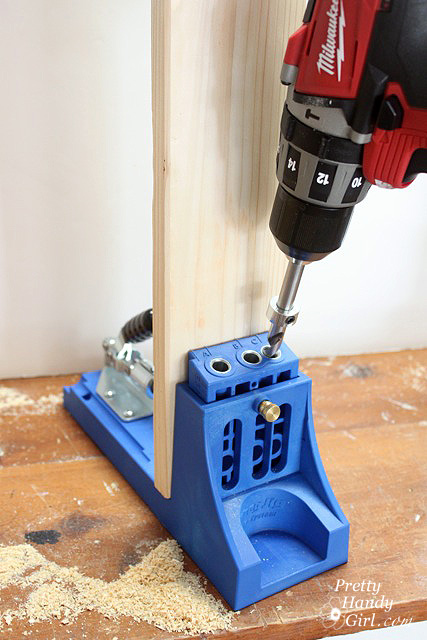
- Kreg Jig
- Drill
- Clamp
- Wood glue
- Closet rod
- Closet rod brackets
- 7 – 2″ x 4″ x 8′
- 2 – 1″ x 1″ x 8′ (or 10 linear feet)
- 2 – 1″ x 3″ x 8′
- 2 – 1″ x 12″ x 6′ plywood or shelving material
- 1 – 1″ x 13″ x 4′ plywood or shelf material
- 1 – 1/4″ x 12″ x 5′ piece of masonite, bead board or plywood
Optional:
- Chicken Wire
- Cabinet Knobs
- 8 linear feet of moulding
- Table saw
Cut List:
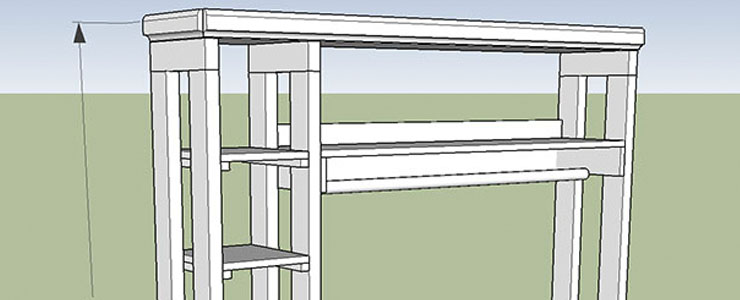
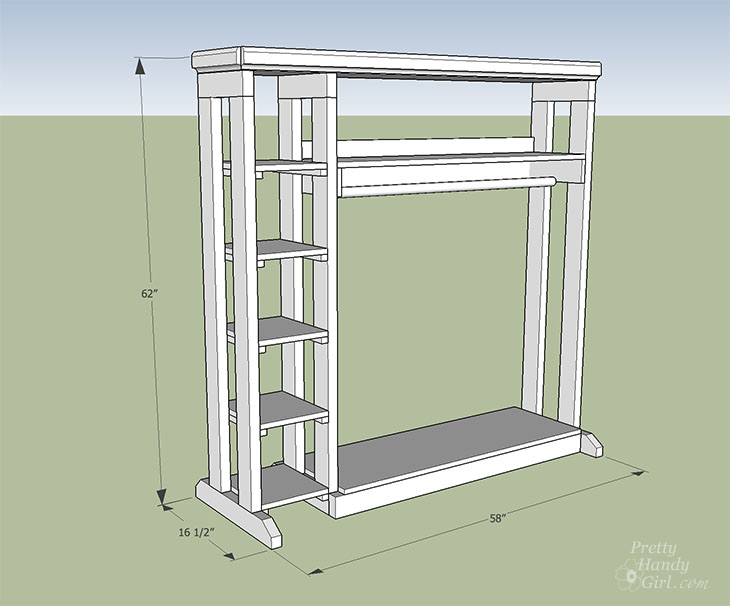
*Please note: I did my best to rebuild the Lost & Found center in Sketch Up. This center was built visually by measuring sides and shelves against each other. Therefore, I ask that you please double check your cuts and my math. I welcome any comments if you find errors. Thanks!
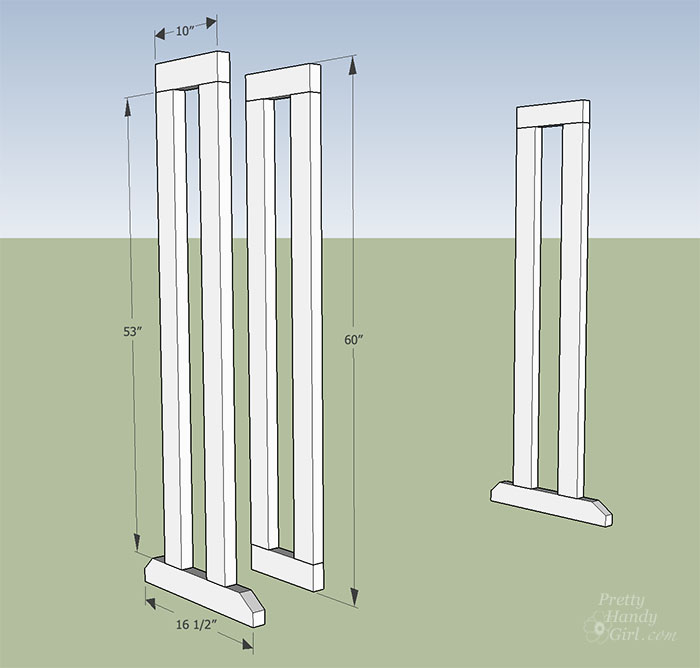
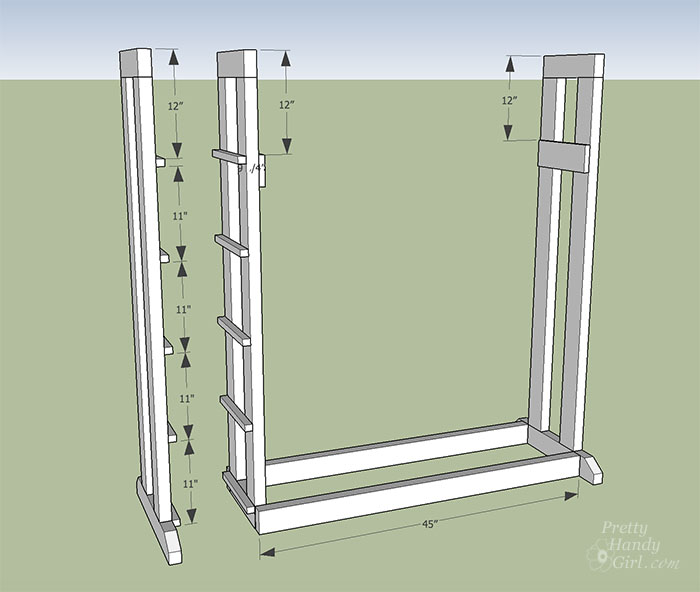
- 4 – 2″ x 4″ x 10″
- 2 – 2″ x 4″ x 16 ½” (cut a 45 degree angle off each end to taper the feet)
- 6 – 2″ x 4″ x 53″
- 2 – 2″ x 4″ x 45″
- 10 – 1″ x 1″ x 10″
- 2 – 1″ x 3″ x 9 ¾”
- 2 – 1″ x 3″ x 43 ½”
- 5 – 1″ x 10″ x 12″
- 1 – 1″ x 10″ x 43 ½”
- 1 – 1″ x 13″ x 43 ½”
- 1 – 1″ x 10″ x 58″
- 1 – 1/4″ x 12″ x 56 ½”
Instructions:
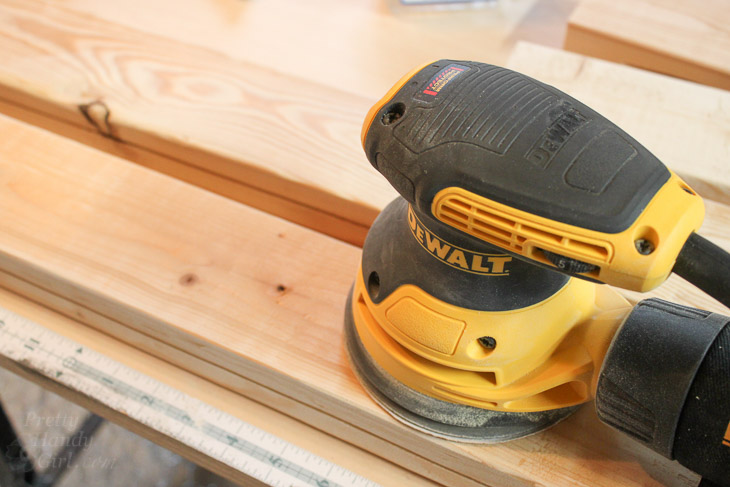
Cut all lumber according to cut list above. Sand all pieces to remove any rough spots or splinters.
Lay out the 2″ x 4″ pieces to created the vertical supports as shown below.
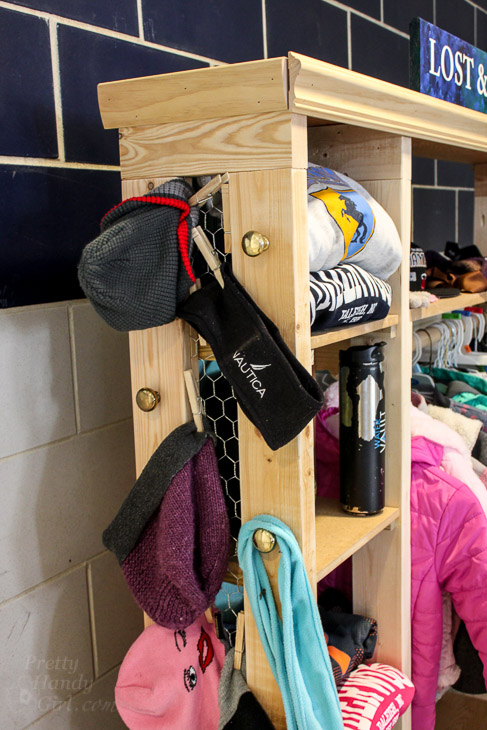
Chicken Wire Side Construction:
If you decide not to use chicken wire on your sides, skip to the next section. You don’t “need” the chicken wire, but it is nice for clipping small items to or to stuff mittens in the holes. Alternatively you can add hooks or clips to the sides for those smaller items.
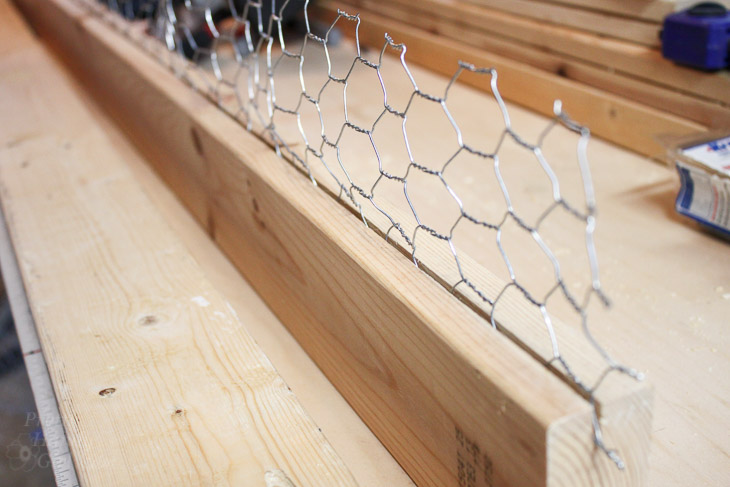
This is optional, but if you want to use chicken wire in the end pieces, use a table saw to rip a 1/2″ deep groove into one side of four of the 2″ x 4″ x 53″ boards and four of the 2″ x 4″ x 10″ boards.
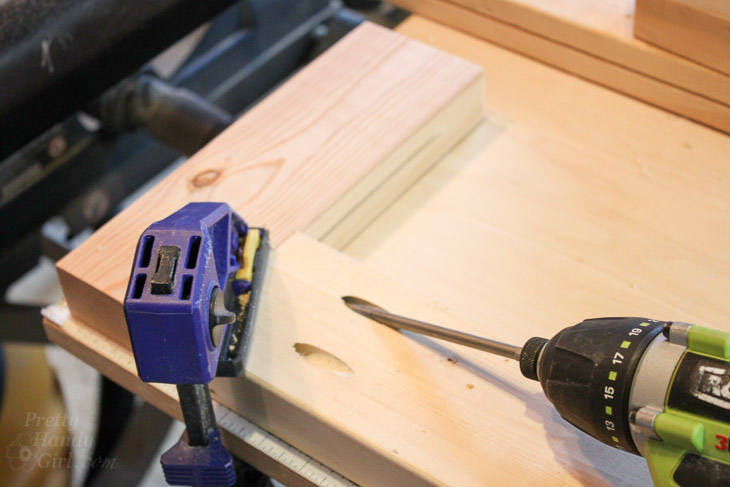
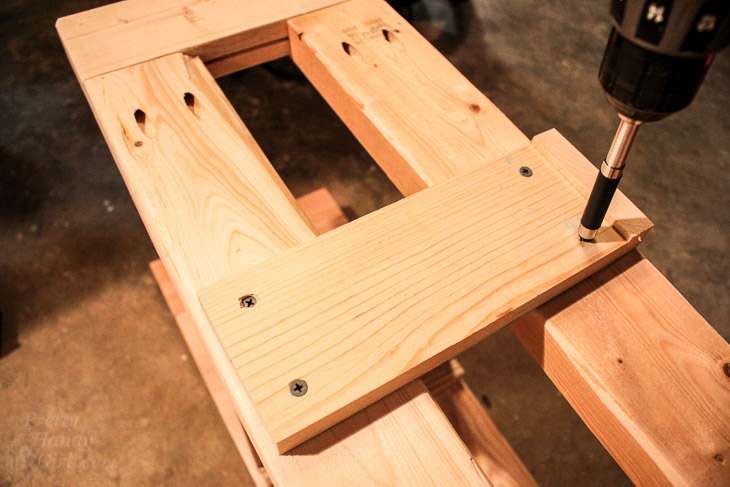
Then drill pocket holes, using a Kreg Jig, into both ends of your 2″ x 4″ x 53″ boards. Never used a Kreg Jig? Here’s a simple tutorial.
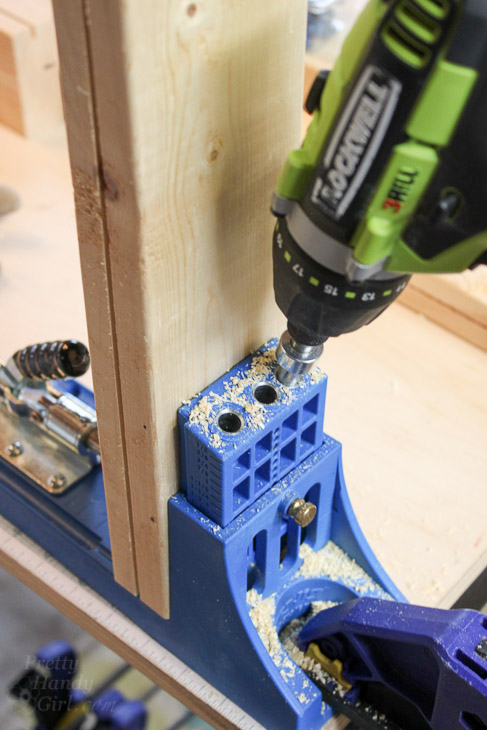
Attach one 2″ x 4″ x 16½” (bottom foot) to one 2″ x 4″ x 53″ (side) using 2½” pocket hole screws. Clamping the joint before you secure the screws will help keep the boards from shifting.
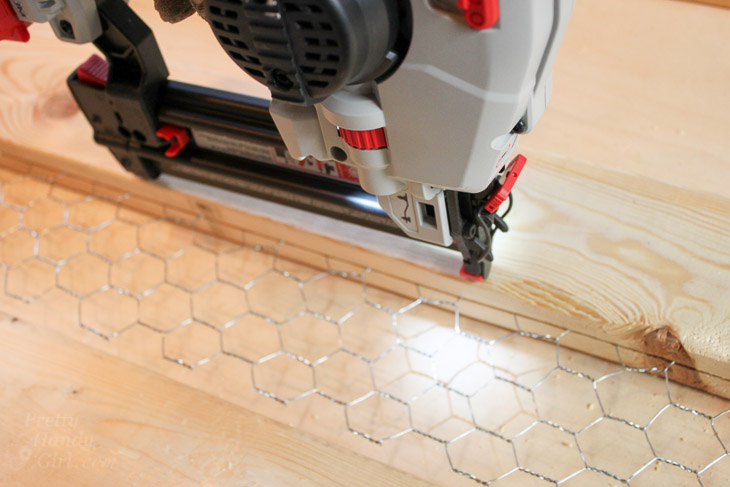
Cut chicken wire to fit into the vertical support frame (allow an extra 1/2 inch all the way around to recess into the grooves.) Fit chicken wire into the foot and side of the vertical support you assembled.
Attach the 2″ x 4″ x 10″ (top) using two more pocket hole screws.
Secure the chicken wire by driving 1 ¼” finish nails into the sides to prevent the chicken wire from sliding out of the groove.
Carefully feed the chicken wire into the grooves on the remaining 2″ x 4″ x 53″ side.
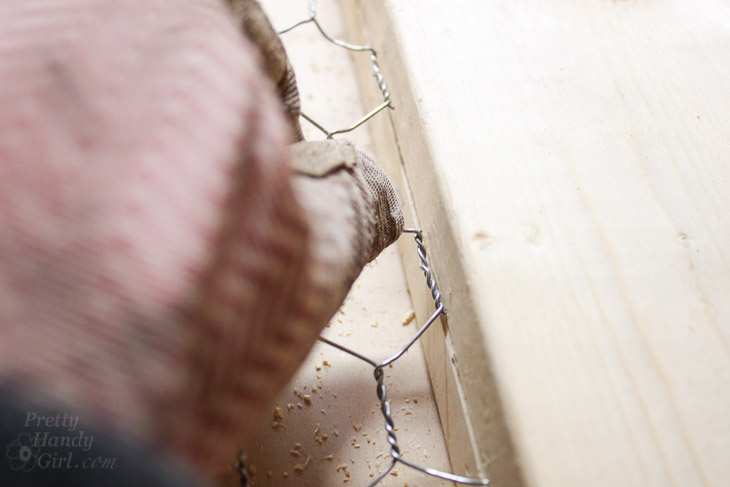
Secure the other side with pocket hole screws. Finish the vertical support by nailing more 1 ¼” finish nails through the chicken wire on the other side.
That completes one vertical end support. Repeat for the other side. The next step, you will only be assembling the center vertical support.
Assembling the Vertical Supports:
Attach two 2″ x 4″ x 53″ (sides) to one 2″ x 4″ x 16 ½” (foot) and one 2″ x 4″ x 10″ (top) with pocket hole screws as shown below.
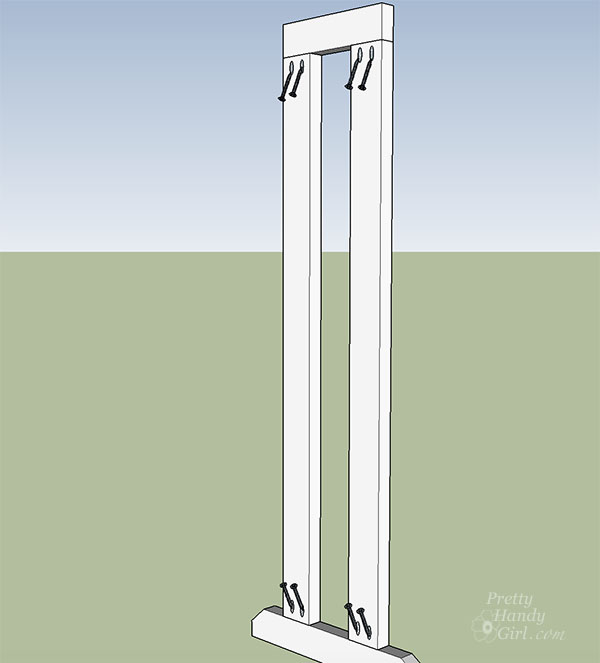
Assemble the other vertical support and assemble the center vertical support (which has two 2″ x 4″ x 10″ pieces for top and bottom and no angled foot piece.)
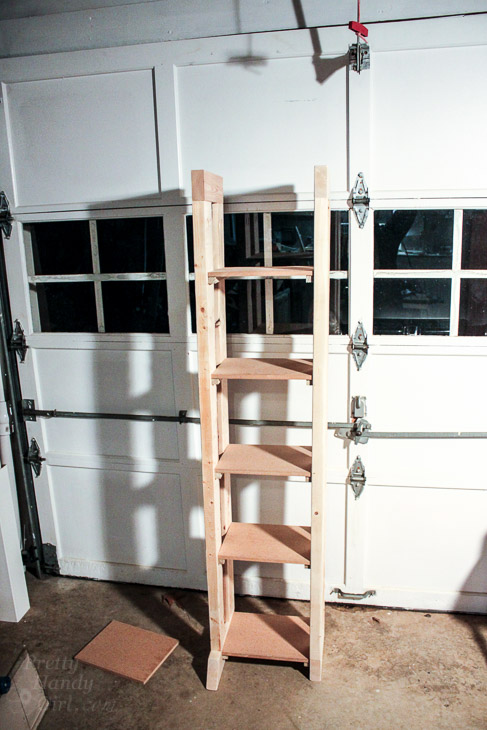
Shelf Tower Construction:
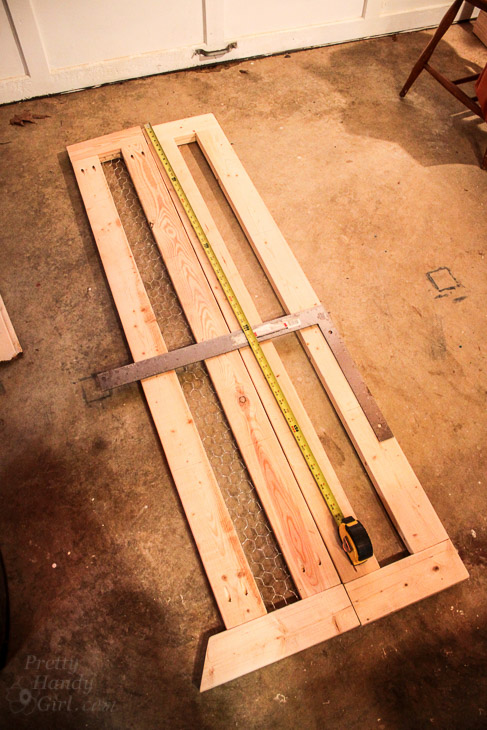
Lay the left vertical side support and the center vertical support side-by-side and mark the shelf locations as shown here:
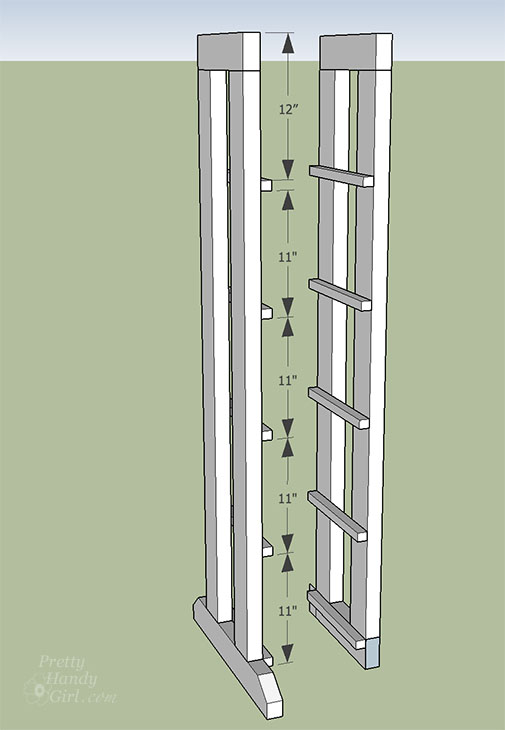
Note that the shelf supports are 11″ apart except for the top support which is located 12″ from the top. Transfer measurements onto both vertical supports as shown below:
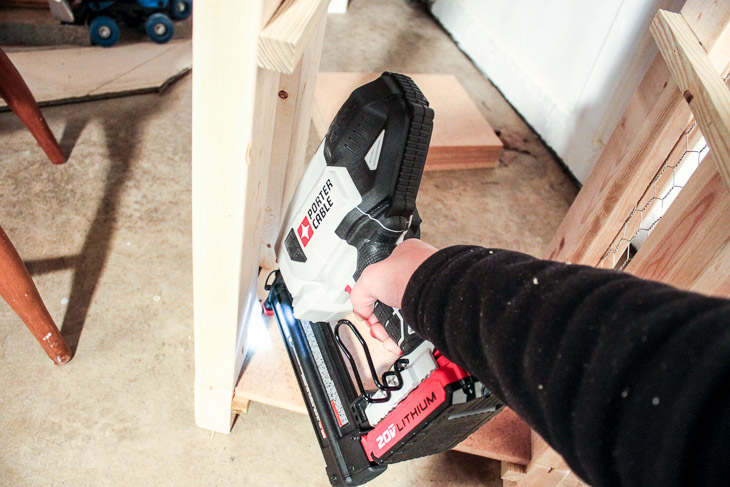
Attach 1″ x 1″ x 10″ supports with wood glue and . . .

. . . secure with finish nails.

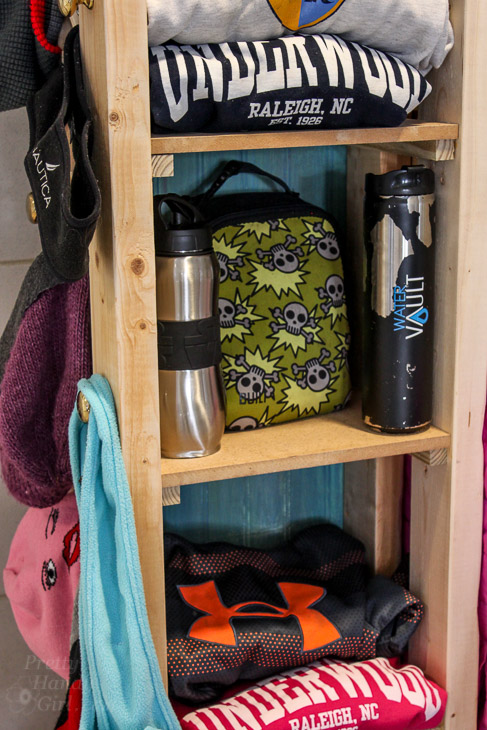
Starting from the bottom. Set each 1″ x 10″ x 12″ shelf on top of the supports and secure with more finish nails.
Work your way up the shelf tower adding one shelf at a time.
Assemble Closet Rod Supports:
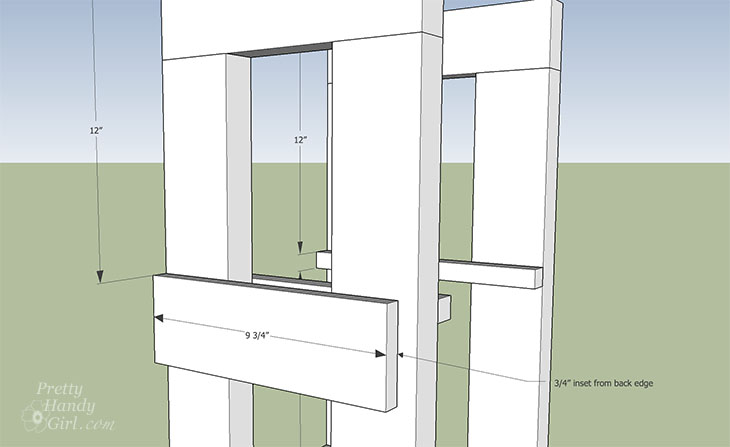
Attach the two 1″ x 3″ x 9 3/4″ blocks to the center support and remaining right side support using 2″ wood screws.
The blocks should be positioned 12″ from the top and inset 3/4″ from the back:
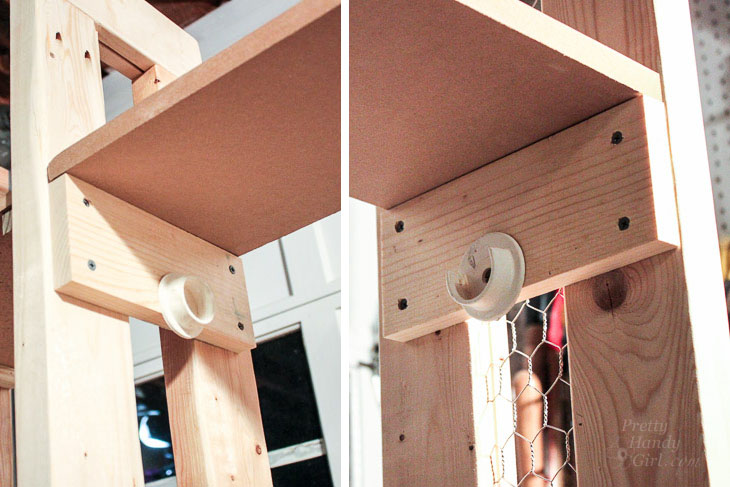
Attach the closet rod brackets to the lower center of the 1″ x 3″ x 9 3/4″ blocks (line them up toward the bottom edge to allow hangers enough room to be lifted and removed.)
Attaching the Two Sides Together:
Note: If you have to transport the Lost & Found Center, you may choose to complete these steps on location.
Drill pocket holes into one end of each of the 2″ x 4″ x 45″ boards.
The pocket hole side will secure to the inside foot of the right vertical side support. The other end can be secured to the outside bottom edges of the center support using 2″ wood screws.
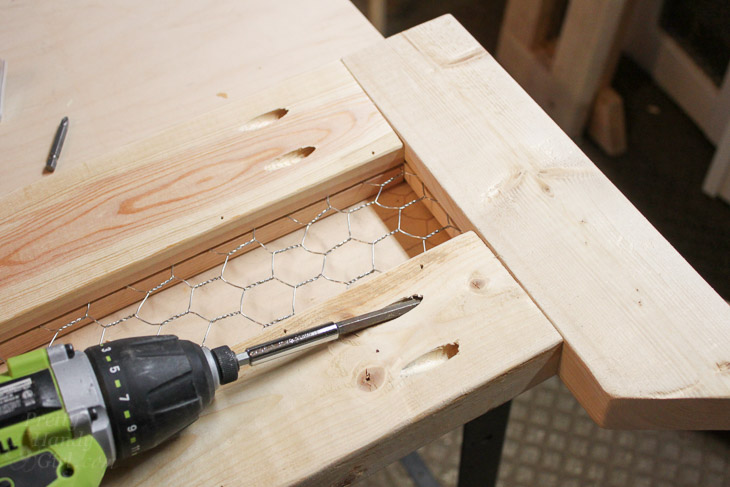
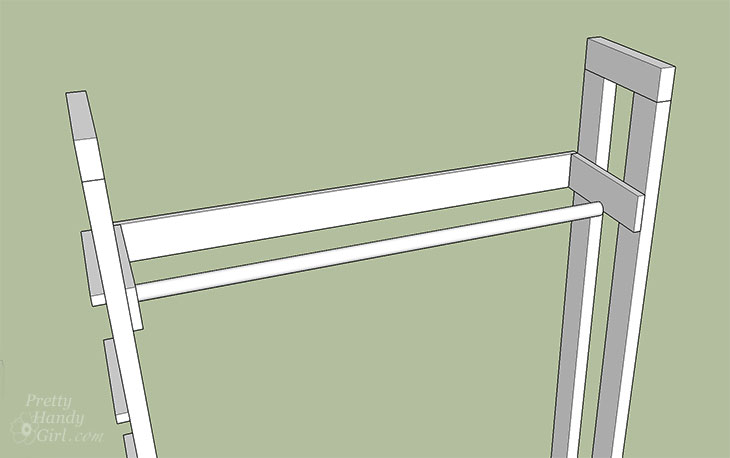
Attach one 1″ x 3″ x 43 ½” to the back of the two closet rod support boards. (This should fit nicely where it was inset 3/4″.) Use wood glue and finish nails or pre-drill holes and secure with 2″ wood screws.
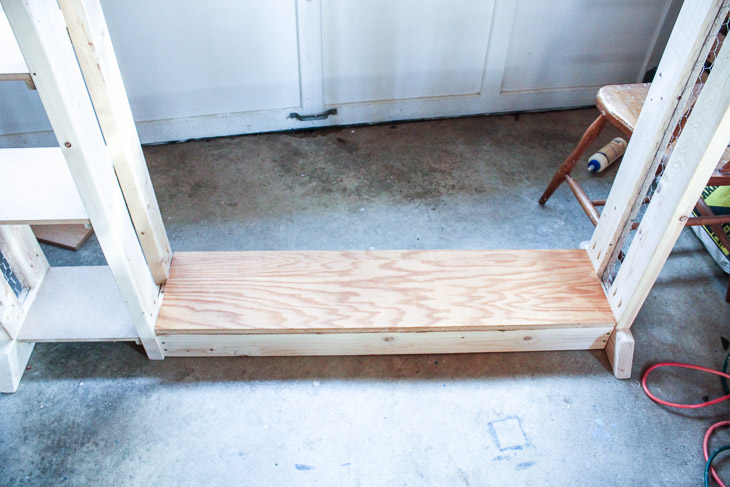
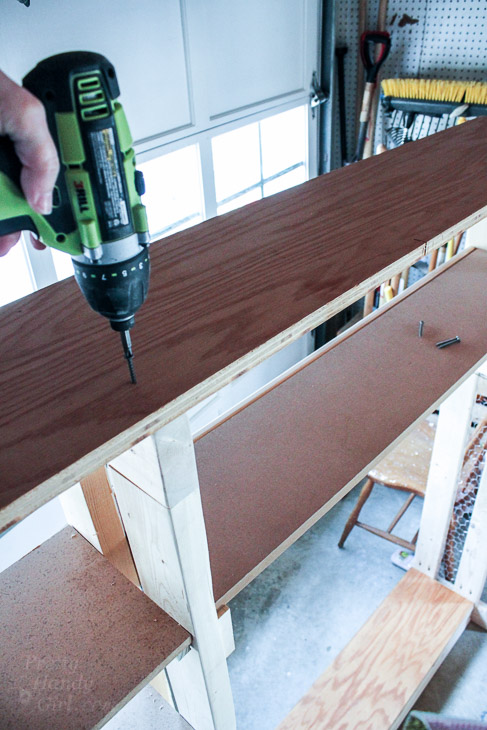
Add the 1″ x 13″ x 43 ½” shelf on top of the bottom supports. Secure with finish nails. (Ignore my bottom shelf construction. I changed it for this tutorial to save wood and simplify.)
Add the 1″ x 10″ x 43 ½” on top of the closet rod support boards. Secure with finish nails.

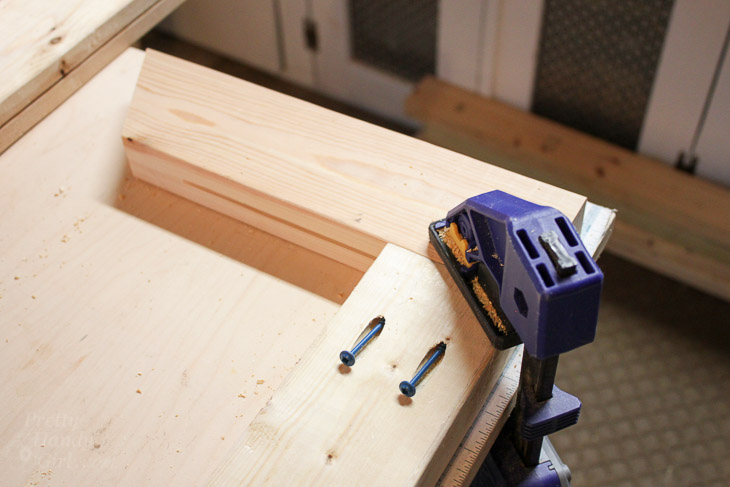
Drill pocket hole screws into the ends of the second 1″ x 3″ x 43 ½” board.
Rest this 1″ x 3″ x 43 ½” board on top of the top shelf. Secure it to the right vertical side support and the center vertical support using pocket screws. This is the view from the back of this shelf:
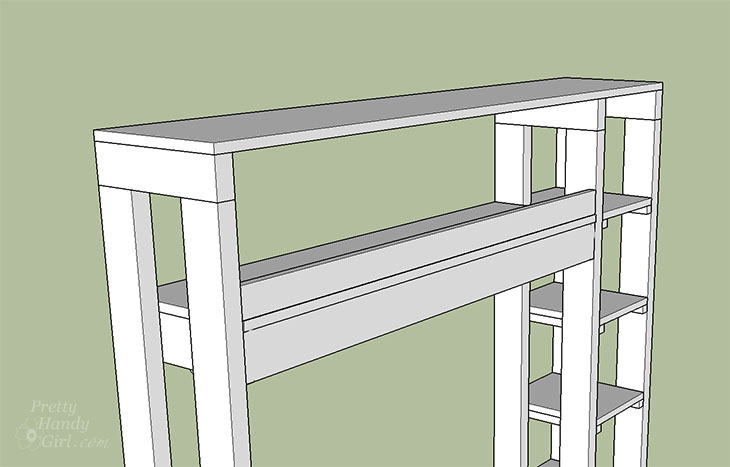
Attach the top 1″ x 10″ x 58″ to the vertical supports by driving several 2″ wood screws through the board and into the supports.
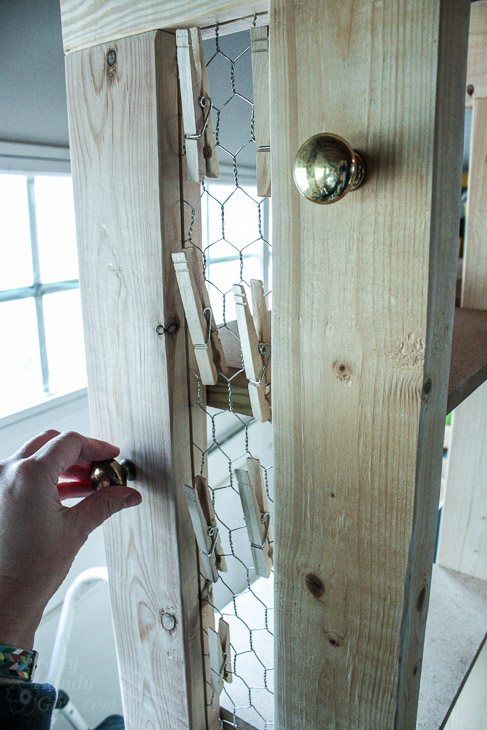
Add drawer knobs to the sides and clip a few clothespins to the chicken wire.
Secure the masonite to the back of the shelf tower using finish nails.
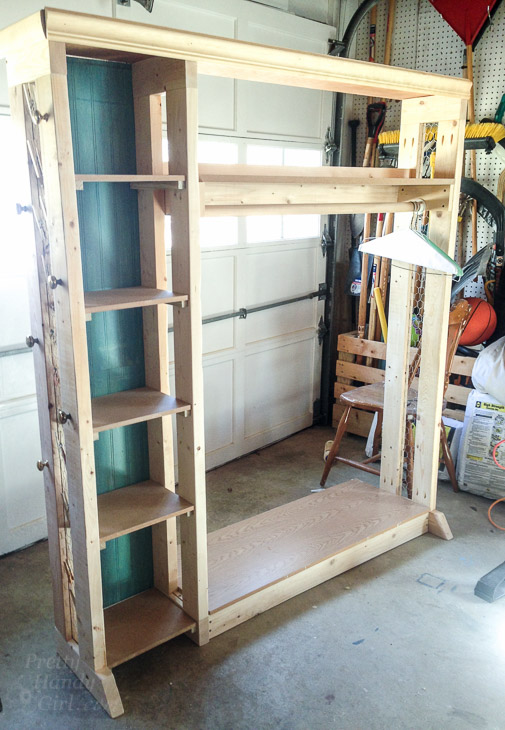
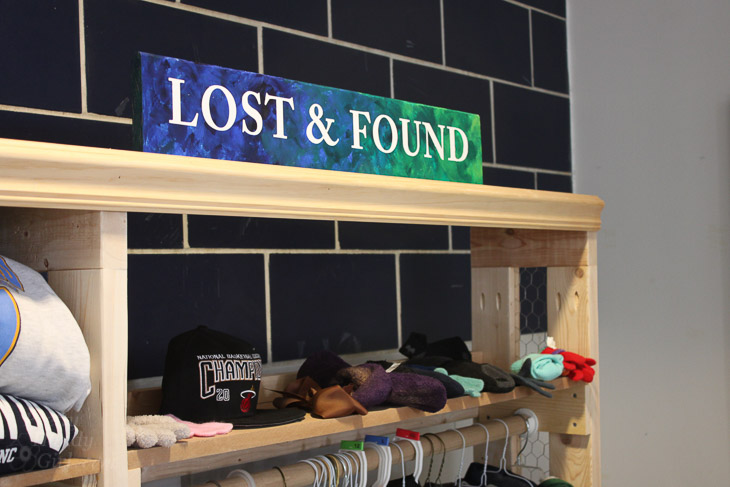
To finish off the top, you can nail a few pieces of moulding around the top board, but it’s not necessary.
Deliver the Lost & Found Center and load it up!
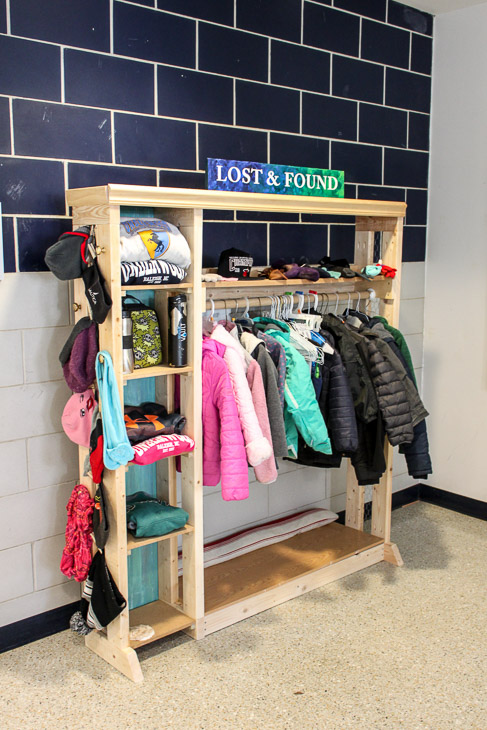
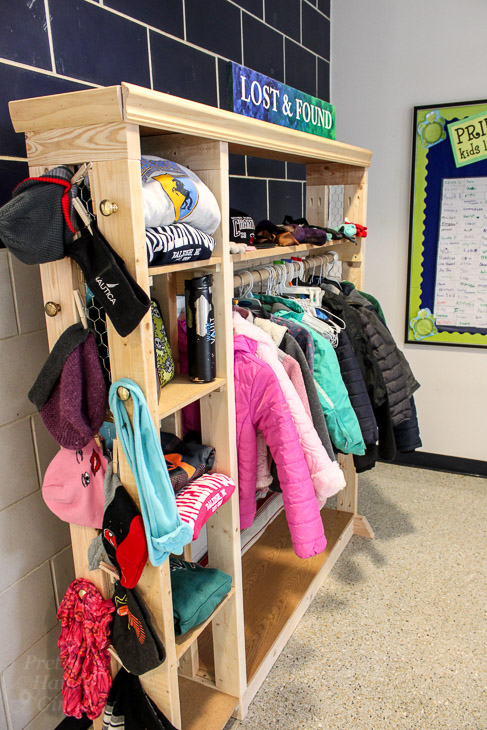
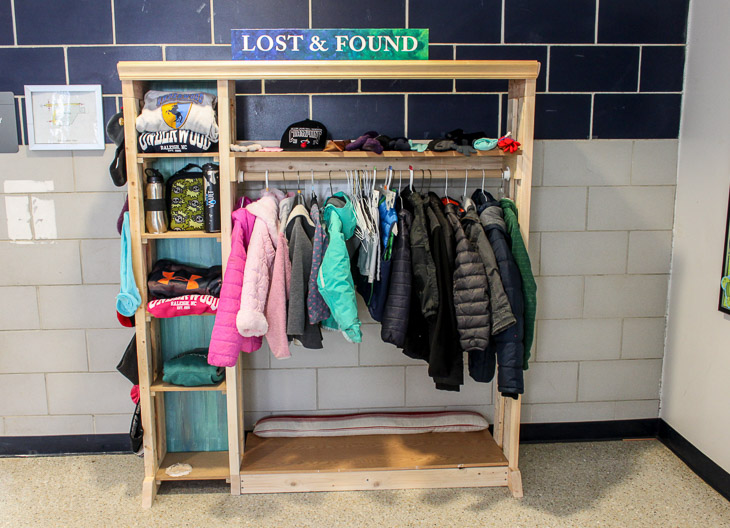
The kids were so excited to see the center. They exclaimed, “It’s so pretty, it looks like a store!”
The shelf tower is perfect for sweatshirts, lunch boxes and other items that don’t hang on hangers.
And the chicken wire sides and knobs work great for hanging hats, gloves and smaller articles of clothing.
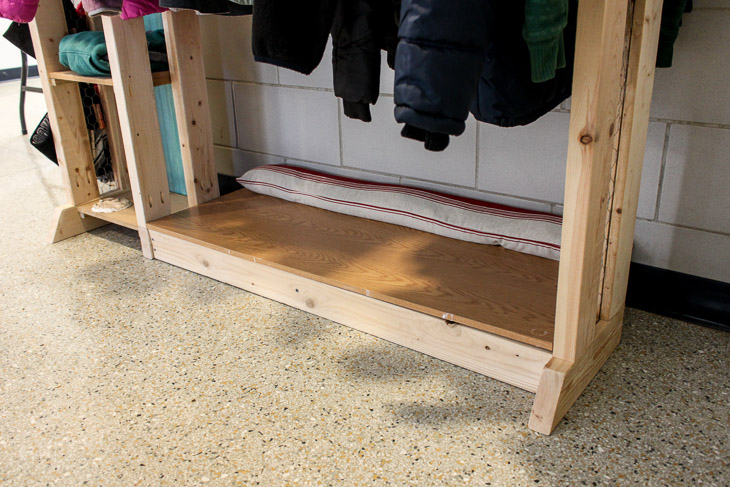
For safety, I added a sand filled bag to the back of the lower shelf. This keeps the center from accidentally tipping if a child pulls on a shelf or clothing. You could use a few bricks or cinderblocks instead. Or you can anchor the center to the wall.
What do you think? Could a school near you use a new Lost & Found Center?
I’d love to hear if you make one for a school or organization near you.
Want to see the School Library Transformation I completed that turned a corner of the library into the most popular spot in school?

![]()

Thank you so much for posting these plans! I made one for our school and they absolutely love it!
Awesome! Thanks for letting me know.
This is more like a store display to me and I love how you add shelves on the side, I’d probably make one! Thanks to your post! It’s very helpful and interesting!
Brittany — this is fantastic and the kids are correct about it looking like a store display! (I couldn’t help seeing those nice winter coats hanging there and thinking how pissed their parents are for them losing them! 😉