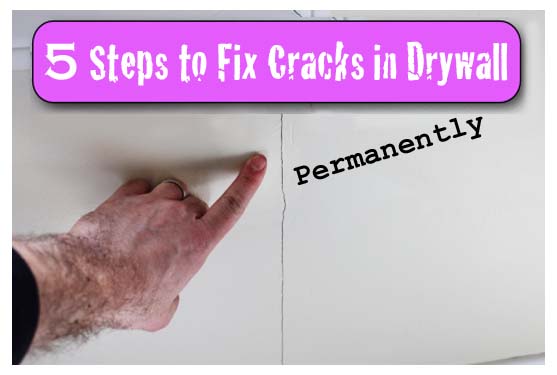
Cracks in Drywall: 5 Steps to a Permanent Fix with 3M Patch Plus Primer
Do you have a crack in your drywall that keeps coming back?
Today’s post will help you fix this annoying problem in 5 easy steps using 3M’s Patch Plus Primer.
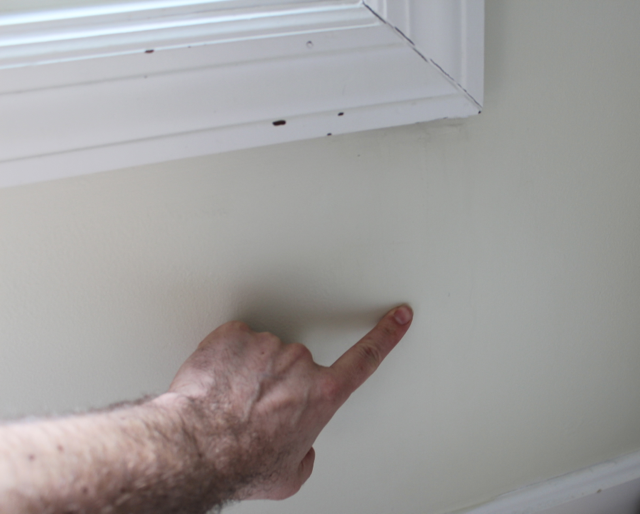
This weekend I was cleaning out the guinea pig cage that sits in our living room (did you know guinea pigs can live from 5 to 8 years, what the!!!) and noticed a crack in our wall under the window.
Apparently the previous homeowners tried to fix it since there was evidence of old joint compound around the crack.
Dealing with old rental homes has taught me a thing or two about drywall and plaster. After reading this post I guarantee you’ll be able to permanently fix any drywall crack in no time.
(I’ve included affiliate links for your convenience. I earn a small percentage from a purchase using these links. There is no additional cost to you. You can read more about affiliate links here.)
Materials:
- Fiberglass mesh drywall tape
- 3M Patch Plus Primer
- Putty knife
- 6 inch drywall knife
- Joint compound mud pan
- Sanding sponge
- Towel for your floor
- Your wall paint
- 2 to 3 episodes of Big Bang Theory
That’s not a bad supply list. My grocery list puts it to shame and is far more expensive (and that’s without buying Dogfish Head IPA beer).
Let’s get started and eliminate your cracked drywall 🙂
Instructions:
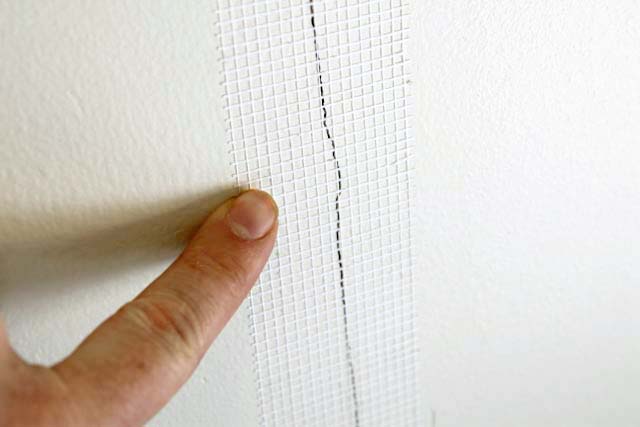
Step 1: Apply Fiberglass Mesh Tape to Your Drywall Crack
One of the biggest mistakes anyone can make is to just add joint compound or spackling to the drywall crack. Over time the crack will come back because the compound or spackling will never win the fight between it and your house settling. It’s like Pee Wee Herman challenging Mike Tyson.
Adding fiberglass mesh drywall tape to the crack is like giving Pee Wee anabolic steroids.

Center the tape on the crack. Since one side is sticky you can place it on the wall and get your Patch Plus Primer ready.
Step 2: Add a Thin Coat of Patch Plus Primer to the Drywall Tape
3M Patch Plus Primer is great for repairing cracks or holes in drywall because it doesn’t require a primer coat like traditional joint compound. So you save time and money 🙂
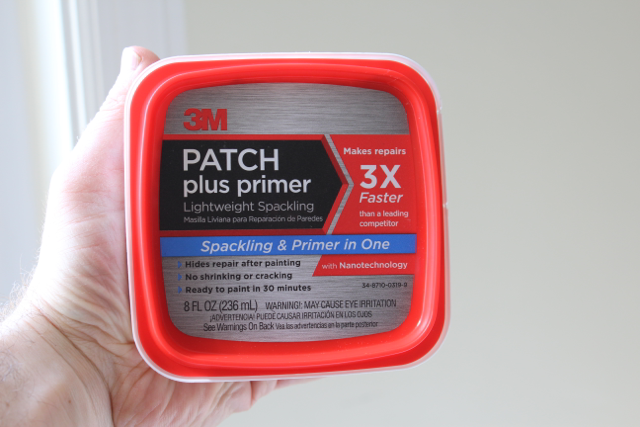
Big Tip: when you buy 3M Patch Plus Primer at the hardware store make sure it hasn’t been opened. Otherwise, it might be bad and unusable. The same principle applies to any product that comes in a container (including pre-mixed joint compound).
Apply a thin coat of Patch Plus Primer over your mesh tape. Just enough to fill the voids and make the tape adhere even more to the wall.

If your crack is long (say 2-5 feet) I recommend applying the patch plus primer to the tape with a 6 inch drywall knife. To do this, you’ll have to scoop some of the Patch Plus Primer into a mud pan to use the larger knife.
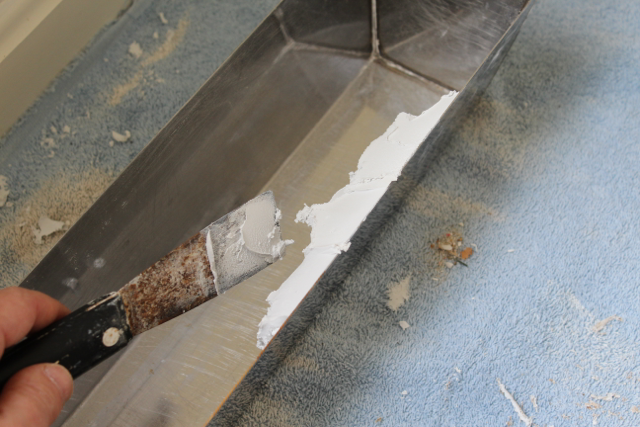
Add the spackling by starting in the middle of the tape. Spread the spackling on the tape in a downward motion from the center. Then go back and add the rest of the spackling moving upward from the center of the tape.
This stretches the tape along the crack and prevents it from wrinkling.
Allow this coat to dry for 30 minutes and watch 1 episode of Big Bang Theory.
Step 3: Add Your Second Coat of Patch Plus Primer
The reason for the light coat of 3M Patch Plus Primer in Step 1 is so you don’t have a big hump on your wall where the tape is located.
Use your 6 inch knife to put on a second coat of the Patch Plus Primer.
Make the width of the new coat be two inches to the right and 2 inches left of the center of the tape.
Then smooth out the spackling with your 6 inch drywall knife like you did in Step 2 (always starting in the center and moving toward the ends).
The key tip I have here is to apply slightly more pressure on the side of the knife that touches the drywall. This pressure change will feather the Patch Plus Primer and blend it into the existing drywall.
 Depending on your skill and how perfect you want the wall you may have to apply a 3rd coat.
Step 4: Lightly Sand the Patch Plus Primer
For small drywall repair jobs I like to use a fine grit sanding sponge to feather the edges of spackling or joint compound. Lightly move the sanding sponge in a circular motion over the patched area. Circular motions will help blend the patch into the drywall.
It will take a well trained eye to notice where you made your repair.
Step 5: Paint Your Wall
The best part about the 3M Patch Plus Primer is that you don’t have to prime it.
Patch Plus Primer can be painted over after 30 minutes. Use a good quality paint brush or roller. I’ve been using a Purdy 2 inch brush for 2 years now and while the handle is rusted, the bristles look fantastic. I always rinse my brush in warm water then wrap it in Glad Press N Seal. Brittany also has a great tutorial on keeping your paint brushes looking new.
The wall looks pretty darn good, wouldn’t you say?
I’m gonna go out on a limb here but I think even Dr. Evil would be pleased with this job.

Now you know the secret to permanently fixing a drywall crack. This entire project can be done in one afternoon or over the weekend without breaking a sweat.
Stick around for a while! We have a lot more home and auto fixes and repairs for you:


Jeff/Brittany,
I have a line in my garage ceiling drywall that is extending from 2/3 the way from front back of the building. Am I better to use architectural caulking or use the method described above with tape et al?
Thank you
Check that the drywall is tightly attached to the joists. You might need to add a few more screws on either side of the crack to secure the drywall and prevent future movement. Then I’d proceed with joint compound or patch.
how do you use this in an area with textured drywall?
You’ll need to apply a similar texture after patching.
I know this is an old post, but does this work for a curved section of drywall? I have a curved staircase that cracks persistently no matter what we or our painter does. Advice?!
It should.
How to fix a corner crack.?????
This post was so simple to understand that I thought a woman wrote it! Shared on Pinterest! Thank you Jeff!! 😉 No more cracks for me!!
We have a pantry and next to it a6=8 inch width of drywall. We keep getting a repeat crack at top and the 3m sound good wondering what your thought are. It has been taped and muded and continues to come back as a big eyesore in center of kitchen. We have never used the 3m
Diane, I suspect you might have some movement in your walls that may not be fixed cosmetically. Have you had anyone look at your foundation or floor joists? It seems that the mudding and taping should have solved your issue otherwise.
Hi,
When my house was built none of the sheetrock joints were taped. Instead they were filled with mud and painted over. Now all the seams are cracked. My question is do I need to remove the paint and mud then tape or can I just tape over the paint.
Thanks
Fixing drywall cracks is not an easy to DIY, but your wonderful post made it look like one, thank you!
We are novices when it comes to patching and painting. We have a rounded corner in our house where the drywall tape is coming up next to the corner and on the corner itself there are several chips and you can see whatever is under the corner (metal?) I am assuming I would use this method to fix the tape line but what is best for the chips on the corner?
Can I do the same process to the ceiling crack drywall tape that has knockdown.
Great information, thank you! I have a question ou may be able to help with…. My house has gone through a fair amount of settling and it is time to do some cosmetic repairs. Family room ceiling has several seams that are showing as bulges or actual cracks along the seams. How would you repair these? Textured ceiling as well… Any tips would be greatly appreciated.
Hi Jeff, how did that crack hold up? I’ve never been ever to fix one that looks so good. Amateur here 🙂 This next one I’m attempting is much larger.
my problem is I did use fiberglass tape and the walls looked awesome but in less than a year they are cracking just as it the fiberglass tape wasnt there
We have repaired cracks in the walls over the years, using mesh and the next time the weather changes, the house shifts causing crack to reappear what can I do to fix this, many houses in my area have the same problem…help
Dianne, sounds like you might have some foundation issues. Check to make sure that your drainage is good around and under your home.
Some cracks are never really “fixed” they are just covered up, which is fine because you are only trying to cosmetically fix it. But the crack is still under there, so if it is caused by dissimilar materials like drywall to plaster or a wall that was extended and there is a structural reason that the 2 different panels are moving, then I think with the fiberglass tape the crack can keep coming back because you only have little threads of the mesh spanning the crack. Also the drywall compound is not flexible, it dries hard so it is brittle. For these 2 reasons, I think it is better to use paper tape and an elastomeric compound. The paper tape results in a continuous membrane that spans the crack. If the crack is caused by movement (expansion/contraction, or other structural movement) the membrane of paper tape and flexible compound will flex and keep the crack from transmitting thru.
WE HAD OUR BATHROOM REMODELED 1 1/2 YEARS AGO, NOW ON EVERY SEAM IN THE DRYWALL WE HAVE SMALL CRACKS FROM FLOOR TO CEILING. ABOVE THE SHOWER THE DRYWALL TAPE IS PULLING AWAY FROM THE CEILING . DRYWALL SCREWS ARE BEGINNING TO SHOW AROUND THE
SHOWER/TUB SURROUND. WE RUN OUR EXHAUST FAN DURING ALL SHOWERS AND BATHS AND FOR 10 MINUTES AFTER. WHAT IS CAUSING THIS AND HOW CAN I FIX IT?
Karen, my initial though is that the drywall finisher didn’t use enough joint compound under the tape or the compound wasn’t wet enough to absorb into the tape. Unfortunately you might have to have it redone.
Hi, I bought a 1995/1997 house 2 yrs ago. I’ve noticed many areas on the ceilings along the joints and coming down the walls along the joints there are cracks appearing. Do I need to replace the drywall or just repair it. There are also some areas where patch work was done to prior cracks and it looks bad. There is also a portion of the ceiling and wall where I was told a wall was taken down to make the room bigger, but the repair looks tough. There are very thick lines visible along the wall and ceiling where there used to be a wall. Can this all be fixed with joint compound/spackling or replace the drywall?
Have a 2006 manuf mobile double home in a 12x 12 foot room the ceiling is cracked from one end to the other. The thing is the 4×16 sheet of wall board is cracked right down the middle there is nothing to nail it to how can I fix this without taking the whole ceiling panel down.
Thanks Bob
Can you help with corners? Every ceiling to wall junction is separating ALOT…don’t think the guys actually used ANYTHING under the tape. Some seams in the walls have appeared which didn’t even have tape.
I can fix those now because of your advice…but what about ceiling to wall junctures….
I have thin cracks appearing at drywall joints on the wall and ceiling. My ceiling is vaulted and that crack is in the joint at the top of the vault. It is starting at the wall and moving across the ceiling and a joint crack is also starting to go down the wall at the same starting point. Will fixing these cracks now stop any further progression of these cracks?
Marsha, depending on why your cracks are appearing, if you prep and repair the cracks as shown, they should stay away. But, if you have foundation or moisture issues, no amount of patching will solve the problem.
good post. our wall will look much better in a few hours!
Hi there,
I have three quick questions:
The corner metal bead is coming loose in a few places at my house. How can I fix that? Would I have to remove it and start over or can I repair it?
Also, how would I handle popped nail heads? I have several in my bedroom ceiling.
One last thing . . . you mentioned knock down texture in one response. Is there a way to get that same texture without having to buy a texture blower and blow it on? My kitchen and second bath both have very outdated paper that needs to be replaced.
I would love to do this myself and save money.
Thanks.
I have vaulted ceilings and I have had two place fixed many times and they still keep cracking. I know for a fact that they used fiberglass mesh tape. What does the 3M patch plus primer have in it that is so special? The last time they were fixed again was maybe 4months ago and they are already cracking. I have had this work done by a professional as I am not good on a ladder.
Thanks so much Pam
Hi – just wanted to comment that the instructions for fixing cracks in the house was very well written. Made easy to understand.
Thanks Jeff and I enjoyed the big bang idea – good show~
Joanie
Drywall seams “should” run along studs or ceiling rafters/trusses. What hasn’t been said is that if a contractor failed to meet the edge of your drywall with a stud or rafter (or failed to properly stagger seams)…then you may be facing more cracks that can keep coming back. I would recommend using a stud finder to make sure the stud (rafter / truss) runs along the seam (where the crack is forming). If it does: I would ADD drywall screws on either side of the crack every 4 inches along the crack – making sure they are going into the stud (rafter / truss) -make sure you know where your utility lines are in your wall/ceiling so you don’t hit them! Some contractors get lazy and screw too far apart on seams which can cause those cracks. A second problem comes from when the drywall seams don’t meet at a stud (rafter/truss). You could probably gently push on the wall to see if the area flexes (has no resistance behind the drywall. In this instance…. If it were my home… I would then pull the section between the studs, run some 1x strips or sister some 2×4’s in the area to properly secure the drywall seams to “something” rather than have a seam “floating.” For those who are scared of buying LARGE sections of drywall and opt for small sections for a higher price….ANY DIY center (Home Depot/Lowes/Etc) will cut the drywall into pieces that will fit your project, and will even cut the remaining sections into pieces you can take for future use…. Do it right the first time!
I would like to make my garage more of a show room for my restored vintage car. That means cleaning up the drywall joints originally done with paper tape. All the joints have flaked apart since they were never painted. The garage is not heated. The ceiling is the worst since its attic above and the ceiling flexes a bit when I go up there likely contributing to the failing of the joints. What’s the best way to close up these drywall joints?
What would be the ideal time of year to do a project like this – in winter before cracks disappear or narrow again with summer heat and humidity, or in summer when they are smaller?
Amy, cracks will appear when things expand and contract. But, winter does seem to be the time when more cracks appear. I wouldn’t wait, just fix them when you have time ;-).
I have cracks from settling on the second floor where the ceiling meets the wall in 3 different areas. how would you fix that?
John, if the crack is along the top of the wall and runs with the ceiling, you probably need to run a new line of caulk up there. Caulk will flex with the movement of the two independent surfaces.
Hi Jeff,
I have a seasonal crack over an exterior sliding door that is about 2 feet long. It is at a drywall joint. In the winter, the crack widens on both sides of the tape (compared to the summer when the cracks are narrower).
I have dug this out before (in the summer) and replaced the tape using fiberglass tape and proper technique, but after about a year, it recurred. Is there any hope to permanently repair the crack. It’s the only thing I see when I walk in my house.
Thanks,
Scott
Does this technique work for corner cracks?
You could try this method Steven and if it doesn’t work then you could use the mesh tape. Definitely get a sealant that is paintable. Keep us posted on your progress 😀
I have a similar issue like Steven has (1/30/2015) with the vaulted corner of my house (master bathroom) that has cracks around the paper sheetrock tape even though we’ve re-done it twice. I think it’s both a combination of heating and cooling expansion because its exposed to the ceiling attic above it and the steam from showers, etc. I don’t think it’s settling because we have tile floors in the bathroom and nothing is showing signs of cracking, etc. either in the tile grout seams on the floor or the walls which have a lot of tiling on them.
I’m concerned that just using the mesh tape won’t be enough with the expansion/contraction and am interested in the elastomeric sealant treatment possibly. I was thinking of doing the sealant treatment with a waterproof, paintable application into the underlying crack to get some flex in the space (and eliminate water penetration in the future) but would I use that with a mesh tape over it or just the sealant by itself?
I am assuming I need to pull down the old tape which is separating along its edges from the ceiling, applying the sealant and then using the mesh tape and compound over the sealant as the replacement tape and finished surface? Not sure 1) this is overkill and 2) the mesh tape and compound will adhere to the sealant?
Any help is much appreciated.
We have also a similar situation. We are in the upper Midwest the change in weather extremes seems to made for us more cracks than I want to count! I was told by a painting professional that for recurrent cracks the answer it a non silicone elastomeric sealant gun put into the cracks that is paintable. then compound over it then sanded and painted. Have you heard of using that type of material it is squirted in or squeezed in like done in a bathroom seal but paintable. We have also a horizontal crack to deal with the first time ever this year like the commenter above mentioned.
Thanks.
I have had a crack in my hallway wall for several years. it bulged out. I don’t know if this is a butted seam. There is paneling under the sheetrock so it may have just popped out. I tried to cover the crack by putting spackling over the crack but it didn’t cover it. I would like to use the above method but was wondering if I needed to completely sand the spackling off first?
Shirley, you probably will need to sand the spackle down to get the wall smooth. Depending on the bulging you might need to add some extra screws to pull the sheetrock back flush against the wall. Or just live with the bulge. It’s hard for me to tell what’s going on without a picture.
Hi Brittany, thanks so much for your response. Just another quick question, if the cracks are only showing up in the winter, do you think that is still from the house settling. The house is about 45 years old, we have only been in it for 5 years. If I want someone to come look at the cracks and tell me for sure why they are showing up would I contact a home inspector?
Hello, I have a question. We keep getting expansion cracks within the last few years. The cracks seem to be showing on corners of inside walls in the house. The cracks show where the wall meets the ceiling. Do you have any suggestions on how to get this fixed? Is there anything we can do in the attic to prevent the cracks from coming back?
Taylor, do you have a crawlspace or poor drainage around your home? I’m thinking the cracks may be more from settling than an attic issue. There should be drywall tape that is folded in the corner where the ceiling meets the wall. If you have a newer home I wonder if that wasn’t done. I’d probably put a thin line of caulk in the corner (assuming your ceiling is white and you use white caulk.) The caulk with flex a little with any movement. But, in the meantime, make sure you don’t have any grading or drainage issues.
Hey recently remodeled and the contractor said that where the new sheetrock ceiling meets the old plaster ceiling that he would be able to make the look perfect………….. well…………. it has a crack… go figure. right!
SO has anyone dealt with trying to connect sheetrock to plaster? THoughts on solution?
I am confused where the spackling is coming from as it isn’t in the “grocery list” -add the spackling by starting in the middle of the tape…. are you still referring to the patch plus primer? So, in reality you have three coats?
Suzanne, yes, the Patch Plus Primer is like the name brand. It is a type of spackling. So, he used the term interchangeably ;-).
Very helpful. One question. When you say “start in the center [of the tape] and move toward the ends” do you mean from the center toward the edges of the tape as you apply the mud or do you mean from the bottom to the top of the crack/tape? All new to me. Thank you.
Wilson, start at the center of the tape (from top to bottom) work your way down toward the ground first and then up toward the ceiling. Hope that helps.
I have a drywall patching question – can you use a steel and mesh patch for a hole in drywall from where a new light fixture was installed? I just wasn’t sure if the steel part was ok, or if I need all fiberglass. The hole is big enough to need a patch, rather than just tape. Thanks!
Karen, your light fixture should be encased in a junction box. And hopefully the electrician (or installer) attached the wire nuts securely and wrapped them with electrical tape for good measure. But, as long as the mesh is outside the junction box, you should be fine. If you are concerned, you could put some dryway tape around the edge that is near the junction box.
Hi Marchia,
Thanks for your question, what is wallpaper sizing? Is it the paper portion or is it some other material?
The wallpaper I’m used to has a vinyl top portion and paper bottom. I try to remove all the paper with a steamer (costs about $50) and scrape all the glue off the wall.
If there’s any unevenness on the drywall or plaster I like to use setting type joint compound to smooth it out. I use a 6 inch joint compound knife for small repairs and a 10 inch knife if the entire wall is in bad shape.
Please let me know if this helps or if you’ve got more questions 😉
Jeff,
This is not about repairing cracks, but I need to paint my walls. The only problem is that there is wallpaper sizing on the walls that has been overlapped when it was applied. Will I need to skim coat the walls or will two coats of latex enamel cover up the overlaps? All the glue has been removed. Can I sandpaper the overlaps to remove them?
Need your advice!!
Marchia, I think your best course is to sand down the sizing to get it even. If you have any imperfections remaining, then you need to patch it with the 3M Patch Plus Primer. Then I would definitely 100% prime your walls before you paint. You don’t want the sizing to prevent your paint from sticking or to change the sheen.
Hello,
I can really use some advice here. I started noticing several cracks in my dry walled basement ceiling and more and more keep popping out every day. It is because the guy who hung the drywall was in experienced come to find out and did not stagger the seams. The finish guy did the best that he could do at the time and when it was finished painted it looks horrible.
I am stuck now because many people are saying that I cannot fix these cracks because they will just keep coming back! i want to possibly cover the whole thing up with a knockdown textured ceiling but i am afraid that I will be wasting my money because it will all come back again.
Another suggestion i got was to re-drywall over the existing and finish the correct way!
Another option would be to go drop ceiling and leave existing cracked drywall that had been painted where it is. Go drop ceiling over the drywall ceiling to cover up.
All seem pretty pricey..Any Ideas Please?
Mike
Sorry to hear about your ceiling Mike. That stinks.
If I were you I’d drywall over the existing ceiling or tear it down. Whatever you choose make sure to find the joists and use 3 inch long coarse drywall screws. That way your screws will definitely keep the drywall tight with the joist and eliminate movement.
Use setting-type joint compound because it’s stronger than the pre-mixed. And embed drywall tape along all the seams. If you just popcorn over it you’ll see the same cracks.
Let us know if you have more questions, we’re here to help 🙂
Hey Jeff
Tried your method for repairing a crack in drywall and the crack returned in 14 months. I used mesh and joint compound the crack is 20lf
I agree with Jeff. But, I also wanted to suggest an alternative (not exactly cheap, but might save some work. Have you thought about planking your ceiling? You could buy the regular tongue and groove, or try using the same process I did here (but on your ceiling.) https://prettyhandygirl.com/2013/05/how-to-plank-walls-kitchen-renovation-progress.html
Thanks so much for the idea! We’ll give it a shot and let you know how it goes. 😉
Our house was built in 1997. We first noticed a very large horizontal crack in the wall around 2005. The builder thought it was just a bad piece of drywall, so he replaced it. The crack returned soon after and has slowly grown through the years. It expands during the winter months and closes during the warmer months. It begins in the corner and now covers approximately 8-10 feet. There is also a significant gaping crack on the adjoining wall, but it starts about a foot lower and covers about 3 feet. I’m not sure if this is important information for you to have, but we have 12′ walls with a vaulted ceiling. I’m afraid if we try your idea above that it’ll just happen again. Any other ideas for coverage?? Soffit? Racetrack? We appreciate your time. Thanks!
Good questions Jenny.
I’d use a different method to fix your cracks. It involves adding fiberglass mesh tape to the crack and applying 2 to 3 coats of setting-type joint compound. Setting-type joint compound is way harder than pre-mixed and the mesh tape can help prevent cracks that appear do to expansion and contraction of your house.
Add the mesh tape and a thin layer of joint compound for your first coat. Make the next 2 coats be successively wider, 6 inches then 10 inches and if need be 12 to 14 inches. This will help you feather the tape and smooth out the look.
Sand in between each coating of joint compound. Try to feather the edges of your joint compound so that you don’t need to sand a ton and make sure your sanding motion is circular to help with the feathering effect.
Please let me know if you have any questions, I’d be happy to help 🙂
I ended up using the fibatape and then using elastromeric custom patch that I got from homedepot. The guy said it’s a flexible joint compound and supposed to be the strongest one they sell. It only took 1 coat of this compound compared to 3 of the other that would just crack.
I’ll attempt to paint it tomorrow but definetely a full day project. I do have some before and after pictures if you want to see (let me know where to send them) just how bad this was and if you want to post it you can.
I’m hoping this might work. We have a crack in our basement wall that’s due to tree roots pushing against the house. We tried the traditional joint compound but it didn’t hold and the crack became visible again. The crack is diagional and about 4 feet long.
For a crack of that size you might want to use joint compound Megan. Apply the mesh tape over your crack then apply at least 3 coats of joint compound. I prefer lightweight setting-type compound (45 minute) because it sets up strong, can be sanded easily, and dries in 45-50 minutes.
Thus, you can be done with this project in one day. You’ll have to prime it then paint it. Let me know if you have any questions along the way 😉
Hi Dan,
Good question about texture.
I’ve had to do this myself and found it’s best to practice your texture technique on a scrap piece of drywall. You can buy an entire 4 foot by 8 foot sheet for less than $10 and cut it into 4 sections so that it’ll fit into your car if you don’t have a truck.
And you can buy either pre-mixed joint compound or powdered compound that you can mix up to different consistencies. I recommend setting-type compound (90) because it dries hard and gives you 90 minutes to texture it. You can use a number of different tools, but I like a 6 inch taping knife for skip coats and knocking down textures.
Let me know if you have a more specific question, I’d be happy to help 🙂
Any tips for textured walls? I have this exact problem, but dare not make the area very wide, because the texture will clearly not match the smooth repair… Help!
Hey Jon,
Yep, those cracks can be repaired as well.
Jeff
I noticed this works on vertical cracks but what about the diagonal ones coming from the corners of entry ways?
Jon,
It should work on those as well. ;-).
Wow, Jeff… one of the best and most needed tutorials I have ever seen….
Perfect detailed explanations that anyone could follow. Great Job!.
Jim, thanks for your question. You could use this example on ceilings, too. If your crack is longer than a few feet then it might be better if you use standard joint compound. If you decide to go this route I highly recommend using the fiberglass mesh tape with setting-type compound (the kind that comes in a bag and is mixed with water) because it dries hard yet can be sanded smooth.
You’ll probably need at least two-three coats of joint compound. Make each successive application two inches wider than the last and feather your coats at the edges. If you feel the expansion and contraction caused the cracks then insulation before the fix will definitely help. It must get pretty darn cold where you are!!
Let us know if you have any other questions.
Regarding your example to fix cracks in drywall using the “3M patch plus primer” product after first applying fiberglass mesh drywall tape, may I assume your example is also applicable to drywall ceiling joints? I have an 18 yr old drywall-finished garage attached to the house but because the garage attic was never insulated, the seasonal temperature extremes caused the expansion/contraction of all the drywall panels on the ceiling. The wall are ok but the ceiling needs repair. Should I install some attic insulation before the ceiling repair?
wonderful, organized, clear post. Thank-you so much!
Thanks Jaxi, glad to help any time 🙂
I take it this technique could also be used to cover a crack in a traditional plaster wall. Any differences in the technique?
Cath, the technique would be the same for plaster. I use mesh tape because it’s stronger than paper and sticks to almost any surface. You might have to apply more coats of the spackling but the crack shouldn’t come back.
I have a burning drywall question actually! I need to move my light fixtures above a bathroom sink: how large of an opening can you fix with a drywall patch kit before you have to actually put in a piece of drywall?
Laura,
If you use the metal and mesh tape patches, I don’t think they come any bigger than 5″ square. That would probably be the max I’d recommend. But, using a scrap of drywall to patch isn’t too difficult. I know Lowe’s sells 2′ square sections. You can read my drywall posts here: https://prettyhandygirl.com/2013/03/drywall-installation-tips-and-kitchen-progress-update.html and https://prettyhandygirl.com/2013/04/how-to-finish-drywall-spackling-or-mudding-sheetrock-joints.html
I had no idea they sold smaller sizes of drywall…I was picturing a huge sheet and me using a few inches. Thanks!
Great information! I have multiple drywall issues. The water heater is in the attic and sprung a leak. The drywall tape in the room downstairs came up due to the water. We had the drywall repaired, but it cracked again. In a fit of irritation, I pulled out the drywall tape in the corner. Can I use this same method described above to replace the tape and fix the wall? It’s an inside corner. We also have some areas on the ceiling where the tape has come loose. Will this method work for the ceiling, as well? Thank you!
Alathia, you can use either paper or fiberglass mesh tape. If you have a lot of repairing to do I highly recommend using standard drywall joint compound. My preference is lightweight setting-type joint compound because it dries a bit harder than pre-mixed compounds. Here’s a link to the product I use (which can be found in any hardware store)
http://www.usg.com/sheetrock-easy-sand-lightweight-setting-type-joint-compound.html
I didn’t think I was ever going to win the battle over wall cracks in my 1840’s house. Now I know what I’ve been doing wrong the last few years! Thank you. Now when I take on my next project, I will know how to do it correctly – tape first, then fill. So simple. Duh.
Wow Darlene, 1840’s!! Your house must be so cool and have a ton of character. Glad to hear this will help you 🙂