• Home
  • About
  • My Home
  • Project Gallery
    • Decorating
    • Painting & Antiquing Techniques
    • Arts & Crafts
    • Build It
    • Electrical
    • Plumbing
    • Gift Ideas
    • Sewing
    • Tool Tutorials
    • Home & Auto Maintenance
    • Landscaping & Gardening
    • Photography
    • Recipes
    • PHG TV
  • My Toolbox
  • Contributors

Pretty Handy Girl

A DIY Blog Empowering You to Complete Your Own Project. Build it, Fix it and Do it yourself. Home project tutorials.

  • Contact
  • Advertise
  • Home
  • About
  • My Home
  • Project Gallery
    • Decorating
    • Painting & Antiquing Techniques
    • Arts & Crafts
    • Build It
    • Electrical
    • Plumbing
    • Gift Ideas
    • Sewing
    • Tool Tutorials
    • Home & Auto Maintenance
    • Landscaping & Gardening
    • Photography
    • Recipes
    • PHG TV
  • My Toolbox
  • Contributors
Home » Build It » DIY Stacking Storage Cubbies

DIY Stacking Storage Cubbies

October 28, 2015 Addicted 2 DIY 9 Comments

869shares
  • Facebook
  • Twitter

These DIY Stacking Cubbies are a great storage solution for stuffed animals, shoes, and more! The plans and tutorial make it easy to build as many as you like!

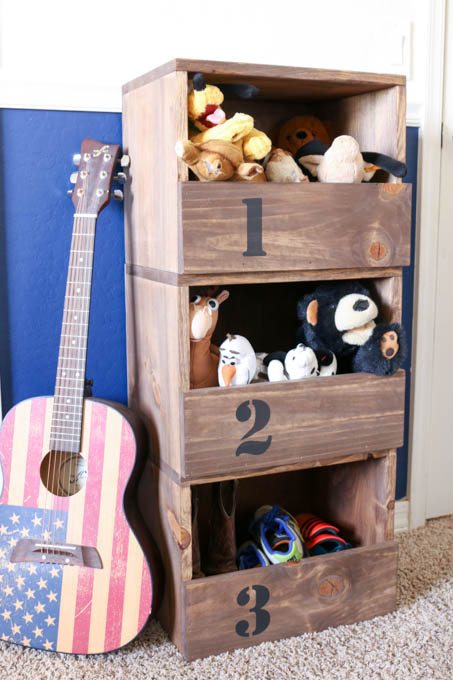
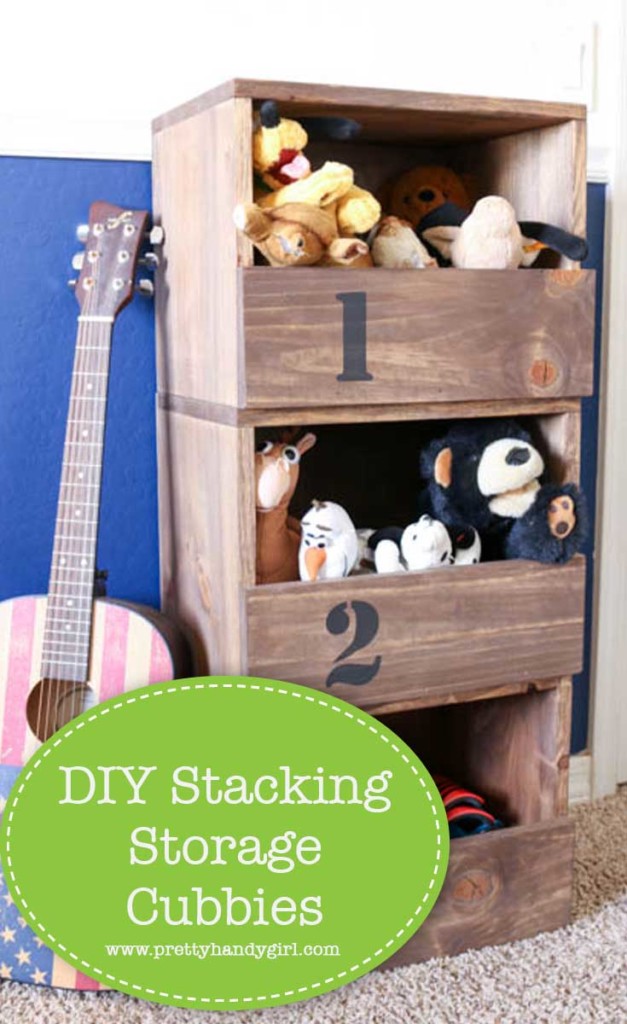
Hey everyone!  It’s Katie again from Addicted 2 DIY.  Today I’ve got a project to help keep things organized around the house.  These stacking storage cubbies are perfect for stashing away those growing stuffed animal collections, shoes, toys, books, etc.  They were so simple to build and they are easy to customize to fit your needs.  I’ve got the step-by-step tutorial for you below, and you can also stop by my site to download the printable plans.

Materials:
(contains affiliate links)

  • 2 – 1″ x 12″ x 8′ pine boards
  • 1 – 1″ x 6″ x 8′ pine board
  • 2′ x 4′ sheet of 1/4″ plywood (I used some that I already had on hand)
  • Kreg Jig
  • Brad Nailer
  • 1 1/4″ pocket screws
  • 1 1/4″ brad nails
  • 5/8″ brad nails
  • Kreg Rip-Cut
  • wood glue
  • orbital sander
  • 220 grit sandpaper

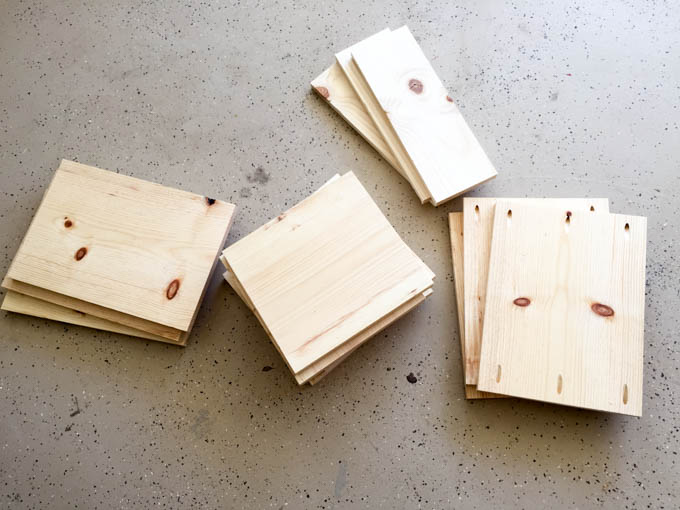
Cut list (for each storage cubby):

  • 2 – 1″ x 12″ @ 12″ (sides)
  • 1 – 1″ x 12″ @ 15″ (bottom)
  • 1 – 1″ x 12″ @ 16 1/2″ (top)
  • 1 – 1″ x 6″ @ 16 1/2″ (front)
  • 1 – 1/4″ plywood @ 12 3/4″ x 16 1/2″ (back)

Instructions:

Start by cutting all of your pieces for the cubbies.  Drill 3/4″ pocket holes into the bottom 1×12 pieces.

These DIY Stacking Cubbies are a great storage solution for stuffed animals, shoes, and more! The plans and tutorial make it easy to build as many as you like!

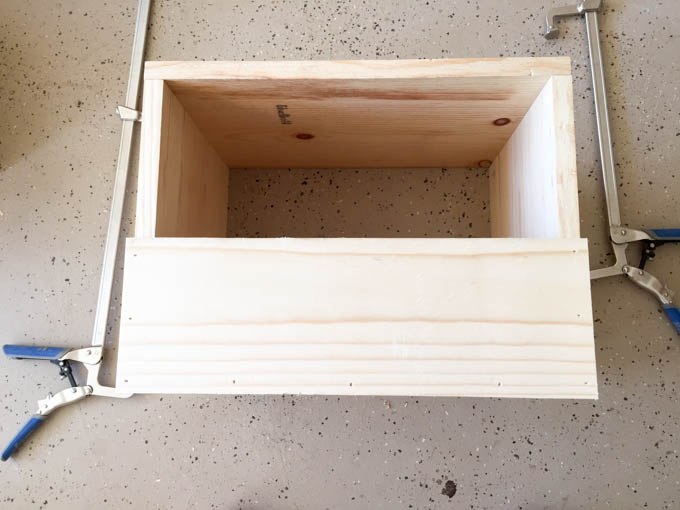
Attach the sides to the bottom using wood glue and 1 1/4″ pocket screws.

These DIY Stacking Cubbies are a great storage solution for stuffed animals, shoes, and more! The plans and tutorial make it easy to build as many as you like!

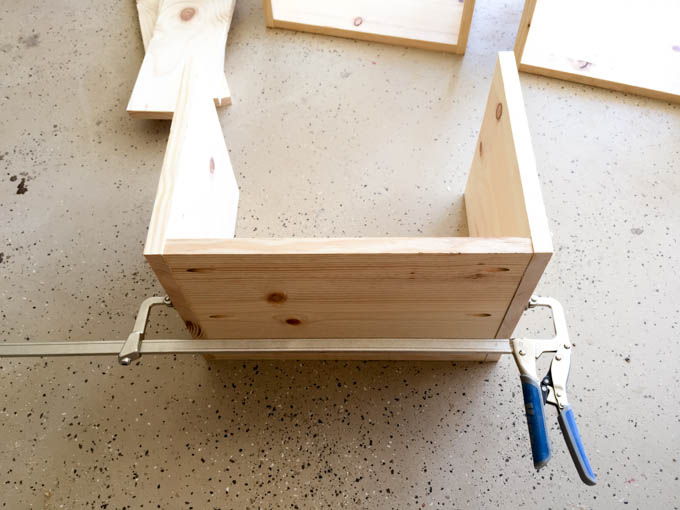
Glue the top down and then clamp it.  Nail it to the sides using 1 1/4″ brad nails.

These DIY Stacking Cubbies are a great storage solution for stuffed animals, shoes, and more! The plans and tutorial make it easy to build as many as you like!

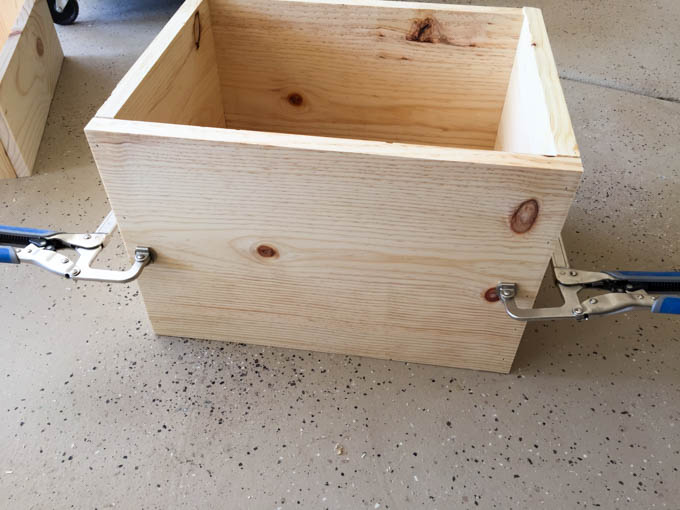
Attach the front flush with the bottom using wood glue and 1 1/4″ brad nails.

These DIY Stacking Cubbies are a great storage solution for stuffed animals, shoes, and more! The plans and tutorial make it easy to build as many as you like!

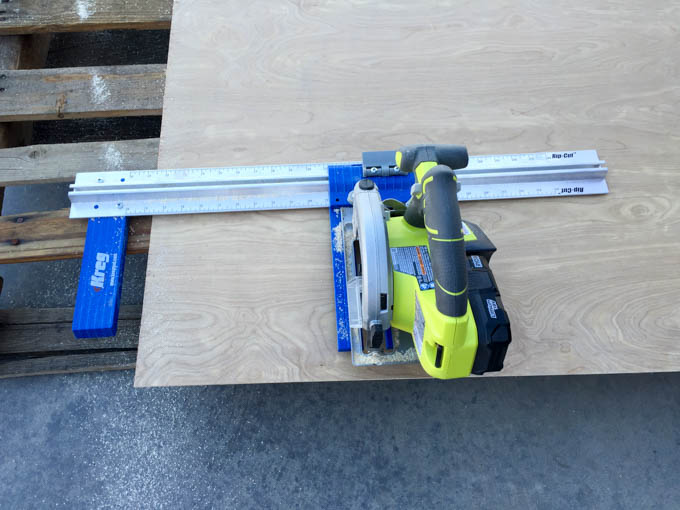
Using the Rip-Cut, rip your plywood pieces down to size.

These DIY Stacking Cubbies are a great storage solution for stuffed animals, shoes, and more! The plans and tutorial make it easy to build as many as you like!

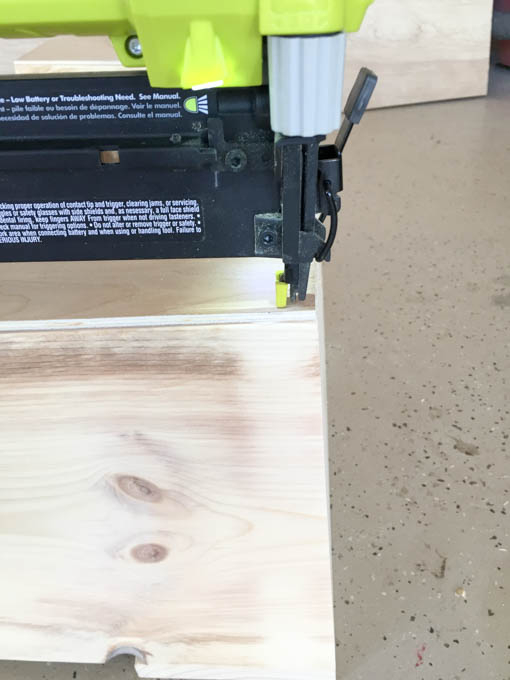
Attach the back with wood glue and 5/8″ brad nails.

These DIY Stacking Cubbies are a great storage solution for stuffed animals, shoes, and more! The plans and tutorial make it easy to build as many as you like!

Sand the cubbies with an orbital sander and 220 grit sandpaper.  Paint or stain them in the color of your choice.  I used Minwax stain in Special Walnut and stenciled numbers on the fronts using black chalky paint.

These DIY Stacking Cubbies are a great storage solution for stuffed animals, shoes, and more! The plans and tutorial make it easy to build as many as you like!

You can choose to stack the cubbies any way you like.  If you plan on stacking the three on top of each other, I’d recommend purchasing flat mending plates (affiliate link) to keep the cubbies secured together.  If you have little ones, I highly recommend also securing them to the wall.

These DIY Stacking Cubbies are a great storage solution for stuffed animals, shoes, and more! The plans and tutorial make it easy to build as many as you like!

These DIY Stacking Cubbies are a great storage solution for stuffed animals, shoes, and more! The plans and tutorial make it easy to build as many as you like!

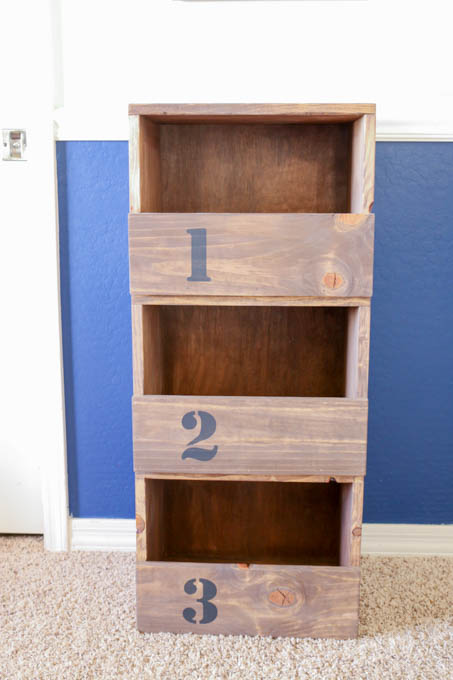
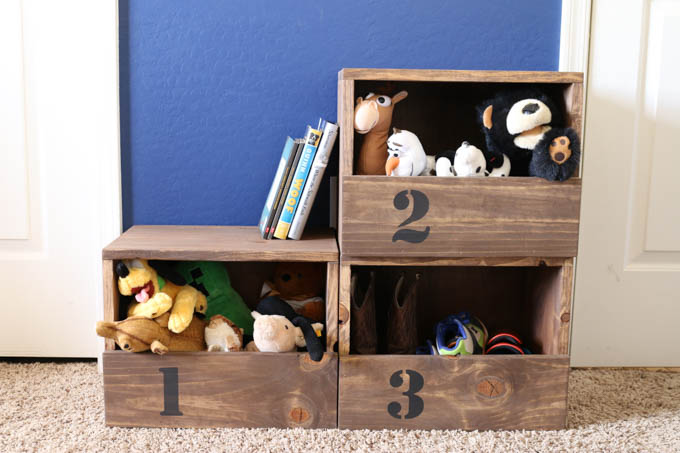
I had an idea of what these would look like, but they turned out even better than I’d imagined!  Stacked side by side, they actually fit perfectly between my son’s bedroom and bathroom doors.  He didn’t throw his normal fit when he saw them in his room after school, so I’ll take that as a good sign.  Like I said, you can build as many or as few of these as you like!  They can be put in the closet, but they look good enough to be out for everyone to see!  I just love it when things can be both functional and stylish.  Happy building!

Katies-sign

Read more about Katie


Pin for later!

storage cubbies

869shares
  • Facebook
  • Twitter

You might also like:

Build It, Contributor, DIY, Do It Yourself, organizational tips, Uncategorized

Comments

  1. Alice V-DIYerfy says

    January 9, 2020 at 10:23 am

    I like the step stacking the best but I can totally see my kids climbing on them and jumping off. They do that with their doll house when we’re not looking. Thanks for this DIY, I’m going to add this to my list of things to make.

    Reply
  2. Lisa Tobias Kitchen Designs says

    November 17, 2015 at 5:38 am

    Thanks for sharing this “how to” guide Katie, I love the walnut stain and numbers of these boxes.gives it a nice rustic look for a kids bedroom. Now if I can just get them to put the toys away themselves.

    Reply
  3. Bridget says

    November 10, 2015 at 1:02 pm

    Can’t wait to make these for my son’s room!! But bow I also want to make them for pantry storage

    Reply
  4. Ana White Admin says

    November 7, 2015 at 12:27 pm

    Love, love, love these! Featured on Ana-White.com today, thanks for sharing with the rest of us!

    “Ana White and Team”

    Reply
  5. Beth @ Sawdust and Embryos says

    October 28, 2015 at 1:56 pm

    I looooooooove this! There are so many rooms in my house that could use these cubbies! Even the pantry for potatoes, onions, etc. PINNING!

    Reply
    • Addicted 2 DIY says

      October 28, 2015 at 1:59 pm

      Thanks Beth! I had that same thought, too! It would make great storage for root vegetables, etc.

      Reply

Leave a Reply Cancel reply

This site uses Akismet to reduce spam. Learn how your comment data is processed.

Hi, I'm Brittany aka Pretty Handy Girl. I like the smell of coffee and sawdust in the morning. I live to break stereotypes and empower you to take on your own DIY project.

  • Email
  • Facebook
  • Instagram
  • Pinterest
  • Twitter
  • YouTube

Saving Etta - Follow the Adventure to Flip a Historic House

  • Email
  • Facebook
  • Google+
  • Instagram
  • Pinterest
  • Twitter

Privacy Policy

Affiliate Link Disclosure:

Pretty Handy Girl is a participant in the Amazon Services LLC Associates Program, an affiliate advertising program designed to provide a means for sites to earn advertising fees by advertising and linking to Amazon.com.

Copyrighted Content Permission

All images and tutorials on this blog are copyrighted material. Please contact me if you would like to borrow any media (photos, video or audio files), tutorials, or ideas from this blog. 99% of the time I would be happy to allow you to use one photo with appropriate credit and link back to PrettyHandyGirl.com (preferably to the same post it was borrowed from.) I can be contacted via email: PrettyHandyGirl (at) gmail.com.

© 2021 · Pretty Handy Girl ·

We use cookies to ensure that we give you the best experience on our website. If you continue to use this site we will assume that you are happy with it.Ok