DIY Scrap Wood Shelf Tutorial
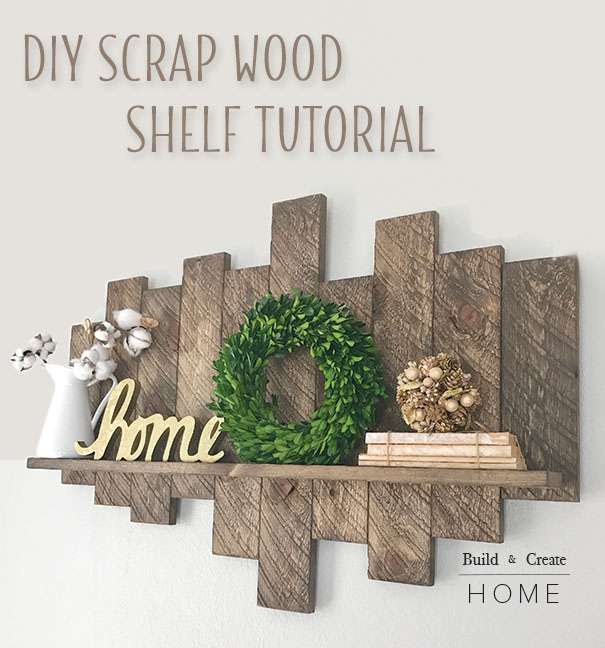 DIY Scrap Wood Shelf Tutorial
Aloha, Pretty Handy Girl friends! I’m Charlee from Build and Create Home, and today I have a great beginner woodworking project for you!
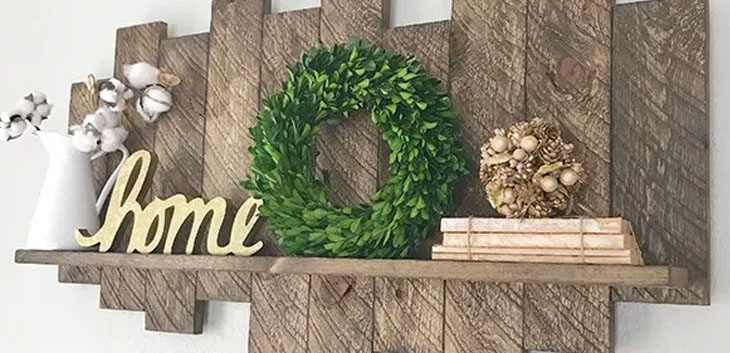
This scrap wood shelf is a great way to fill up a wall space and also display some of your smaller decor and trinkets. Not to mention use up some of your wood scraps!
Materials:
(I’ve included affiliate links for your convenience. I earn a small percentage from a purchase using these links. There is no additional cost to you. You can read more about affiliate links here.)
- Saw (can even be a hand saw and miter box, or a power saw!)
- Drill
- Brad Nailer (see instructions for alternative if you don’t have a brad nailer)
- Measuring tape
- Clamps
- 1 ¼” screws (about 15)
- 3/4″ screws (about 20)
- D-ring hooks
- Sandpaper
- (2) 1 x 4 x 8′ * boards
- (1) 3/8″ x 1 ½” piece of lattice moulding
Optional: Stain if desired
* If you don’t have any scrap wood, you can use the Ghostwood lumber purchased from Home Depot. It comes pre-aged like barn wood and has a textured front. I didn’t have to stain mine at all. Use what you have on hand if you like, or buy your own.
Instructions:
Step 1 – Cut your Lumber
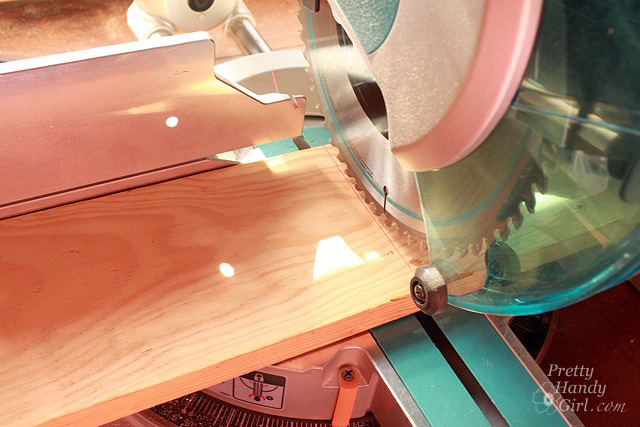
Cut all your pieces according to the sketch below. Sand any rough edges or sides.
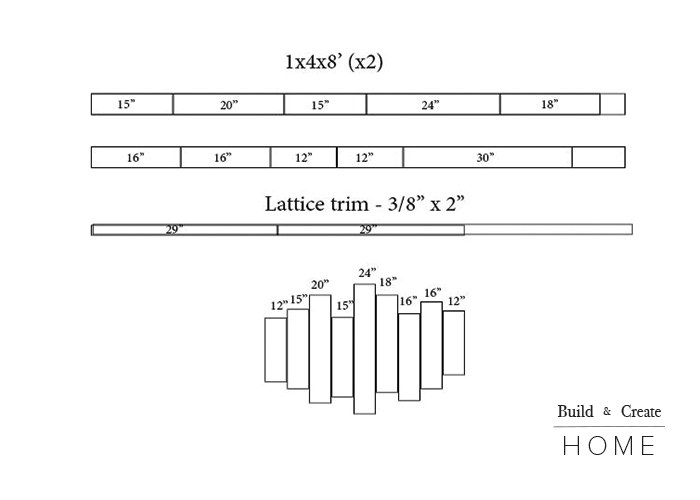
Next lay out your pattern. See the sketch above to see how I laid out my wood slats. You don’t have to follow this pattern, feel free to make your’s different. However, it is nice having some variation in heights, as opposed to all the same or symmetrical patterns.
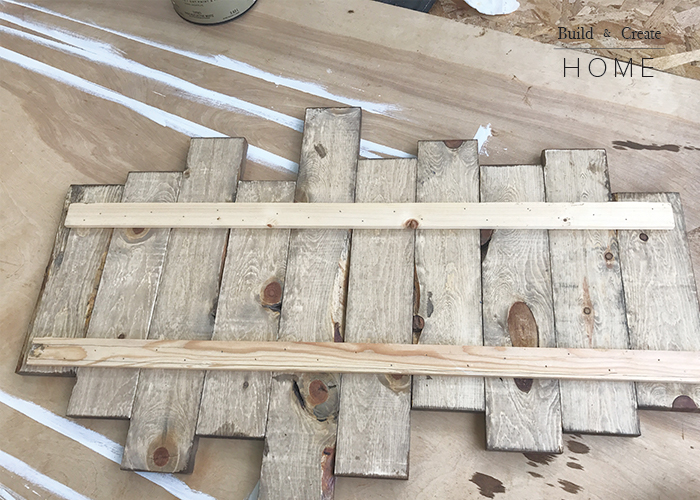
Step 2 – Attach Lattice
Once you have your pattern decided, you will need to flip the slats over with the back side facing up. Be sure to reverse your pattern completely and not just flip each piece over in the same place, or your pattern will be backwards!
Lay the two lattice pieces across the back of your slats. Use wood glue and a brad nailer to attach the lattice to the backs of the slats. (If you don’t have a brad nailer, use a drill and screws to attach.) If using screws, be sure to drill pilot holes first. This will keep the lattice from splitting since it’s so thin. Drill at least one hole per board, but I’d recommend adding two on a few of your boards to keep them from shifting.
Finally, drive the 3/4″ screws through the holes you drilled.
Step 3 – Attach the Shelf
Now that your slat design is complete, it’s time to attach the shelf! Work on a table or workbench for this next step.
Decide how high you want your shelf to sit on the slats. Measure and mark how far up from the bottom your shelf will rest. (Repeat on several slats.)
Flip over the slats to the backside. Using the measurements you just took, draw a line across the back. (This will make it easier for you to drill your holes and actually catch the shelf.)
Clamp the shelf to the front. It’s much easier to hang your piece over the edge of the table or workbench while attaching the shelf.
Drill pilot holes through the slats on the line you drew as a guide. Drive the 1 ¼” screws through the pilot holes. This should secure your shelf to the slat pattern. Repeat with as many screws as necessary to create a sturdy shelf.
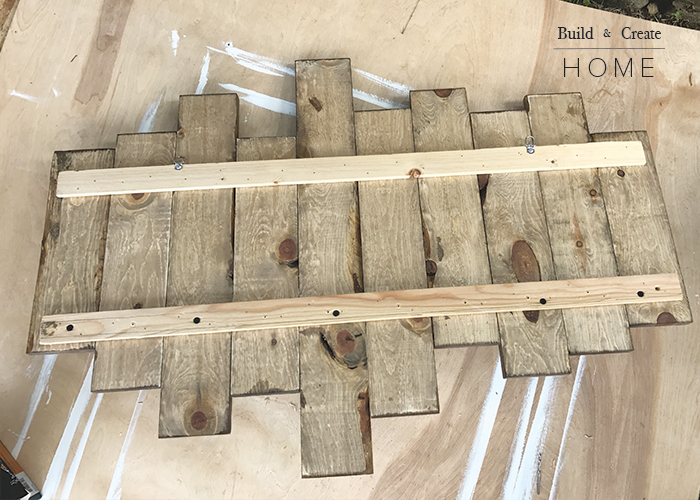
Step 4 – Add Hanging Hardware
Attach your D-rings to the back of your slat shelf. It’s easiest to attach to the lattice, assuming you secured it level with your slats.
You are done! Step back and admire the DIY Scrap Wood Shelf you made! It was a simple build using only a few tools, right?!

I also made a fun version of this shelf using pipes as towel bar/ coffee mug rack. You can see it on my Instagram account!
Aloha,
![]()
~ See More of Charlee’s Tutorials ~
![]()

Aloha! My name is Charlee, and I’m a woodworker and DIY’er, currently living on the island of Oahu.
I started my blog Attempting Aloha in 2010 when we purchased our home here in Hawaii. It started as just a craft blog, but with our home renovations, I learned a lot about woodworking and fell in love with power tools and building things.
We moved to Italy for a few years in 2013, and my focus switched to learning a new language and helping my kids as they trudged through public Italian school. Consequently, I took a short hiatus from blogging.
Now we’re back in Hawaii and I decided to start a fresh blog, which is how Build and Create Home was born. If it’s a home project, I’ve done it! Everything from small beginner woodworking projects to laying 1400 square feet of tile. Or designing and building my butler’s pantry from the ground up! I’m a firm believer that woodworking only takes a few tools and a little bit of confidence. Anyone can do it, and I’m happy to help you get started. I’m most active on Instagram, but you can also catch me on Facebook, too.

Love it!