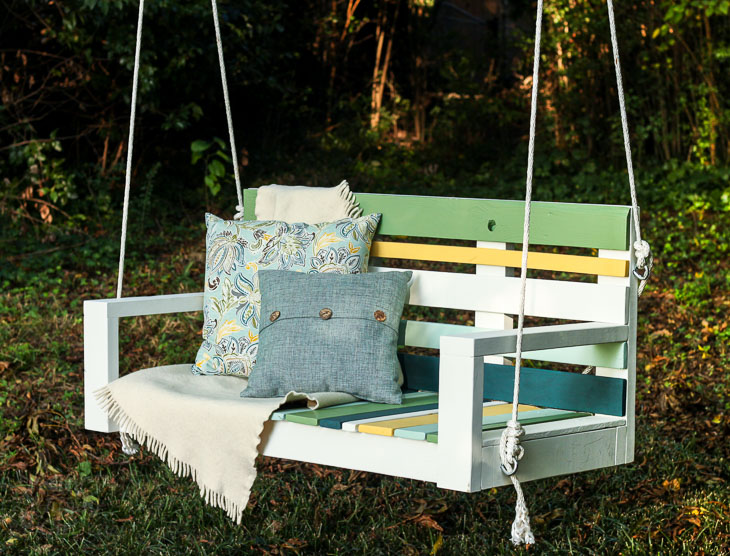
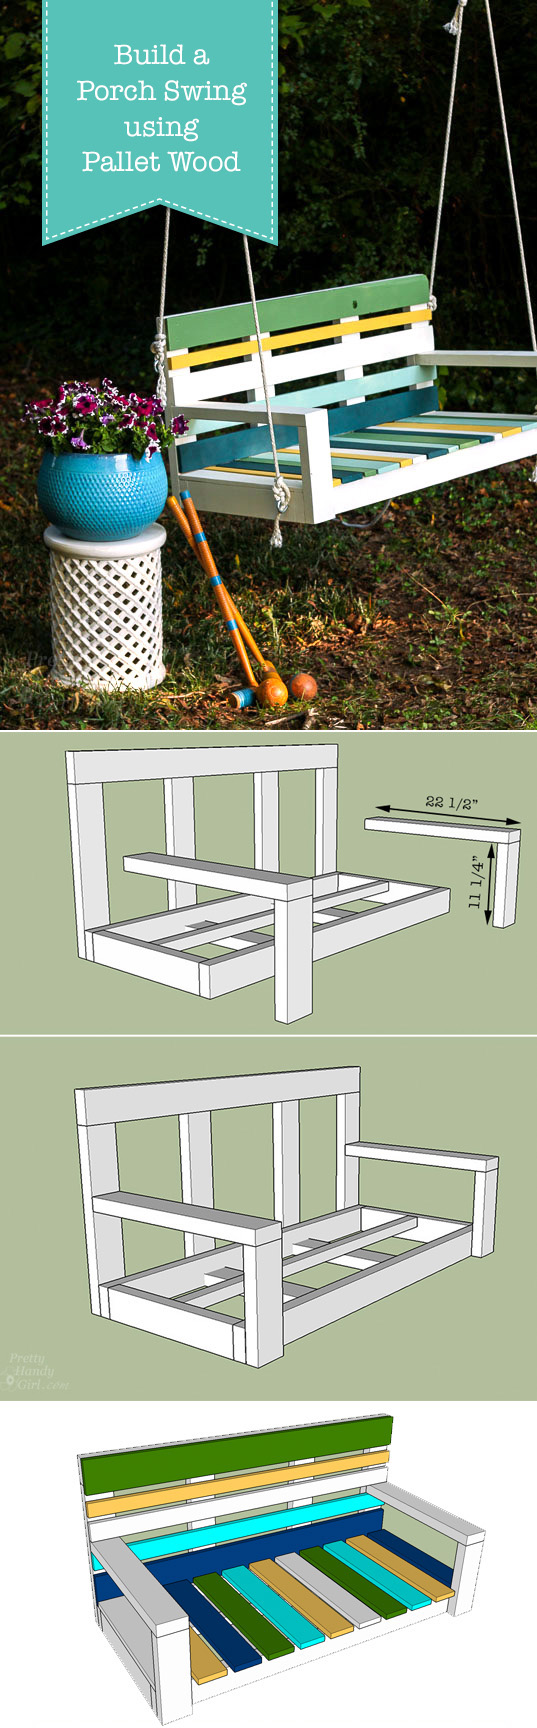
Building a Striped Porch Swing using Pallet Wood
Building a Striped Porch Swing using Pallet Wood
When I first laid eyes on the backyard of my investment house, I pictured a porch swing hanging from the giant tree in the back yard. That image never left my mind, and I knew I’d have to build a porch swing soon so I could enjoy sitting on the swing in between copious amounts of demolition labor. Being on a tight budget, I didn’t want to buy a new swing. I challenged myself to use as much free wood as I could get my hands on. Then Krazy Glue, who is sponsoring this post, threw on an additional challenge. They dared me to give up my conventional nail fasteners and use Krazy Glue to secure all the slats to the swing frame. Apparently Krazy Glue is one fast-drying glue that creates an instant bond when applied and can hold up to 2,000 pounds. Big claims meant I was anxious to put Krazy Glue to the test!
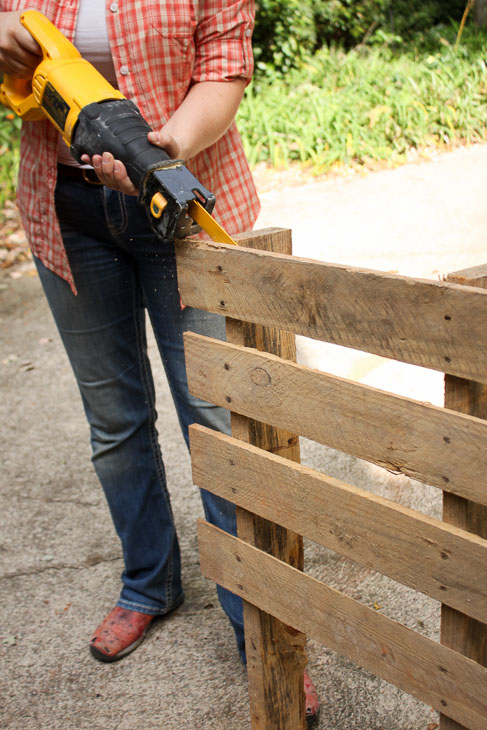
To start, I harvested the slats off of three pallets. (There are several ways to harvest pallet wood, a few of which I explain in this post.)
When all was said and done I had enough pallet wood to create all the slats on the swing. (And luckily I had a few scrap 2 x 4’s to build the swing frame, so my lumber costs were minimal.) I developed a plan to utilize and feature the varying widths of pallet wood, but used Ana White’s basic porch swing plan for inspiration and overall dimensions.
Ready to learn how to Build your own Striped Porch Swing using Pallet Wood? Let’s do this before the weather gets too cold to enjoy it.
Lumber:
- 5 – 2″ x 4″ x 8′
- 3 – 1″ x 4″ x 8′ (or use salvaged pallet wood)
- 1 – 2″ x 2″ x 4′
Cut List:
- 3 – 2″ x 4″ x 4′
- 4 – 2″ x 4″ x 18″
- 1 – 2″ x 2″ x 45
- 4 – 2″ x 4″ x 19 ¾”
- 2 – 2″ x 4″ x 11 ¼”
- 2 – 2″ x 4″ x 22 ½”
- 2 – 1″ x 4″ x 21″ (if using pallet slats, use the widths you have, but cut to 21″ long)
- 10 – 1″ x 4″ x 22″ (if using pallet slats, use the widths you have, but cut to 22″ long)
- 4 – 1″ x 4″ x 48″ (if using pallet slats, use the widths you have, but cut to 48″ long)
Materials:
(I’ve included affiliate links for your convenience. I earn a small percentage from a purchase using these links. There is no additional cost to you. You can read more about affiliate links here.)
- Miter saw
- Krazy Glue (I used 7 bottles of Maximum Bond Krazy Glue)
- Pencil
- Speed Square
- Tape Measure
- Drill
- 1/16″ drill bit
- 3/8″ drill bit
- 2 ½” wood screws
- 3″ wood screws
- Kreg Jig
- 2 ½” pocket hole screws
- Level
- Wood putty
- Putty knife
- Sander
- Primer
- Paint
- Paint Brush
- Painter’s Tape
- Varnish
- Clamps
- 2 – 3/8″ x 4″ eye bolts with 1 washer and 1 nut for each
- 2 – 3/8″ x 6″ eye bolts with 1 washer and 1 nut for each
- Weather resistant rope (solid braid synthetic 3/16″ rope)
- 2 – 5/16″ Quick Link carabiners
Instructions:
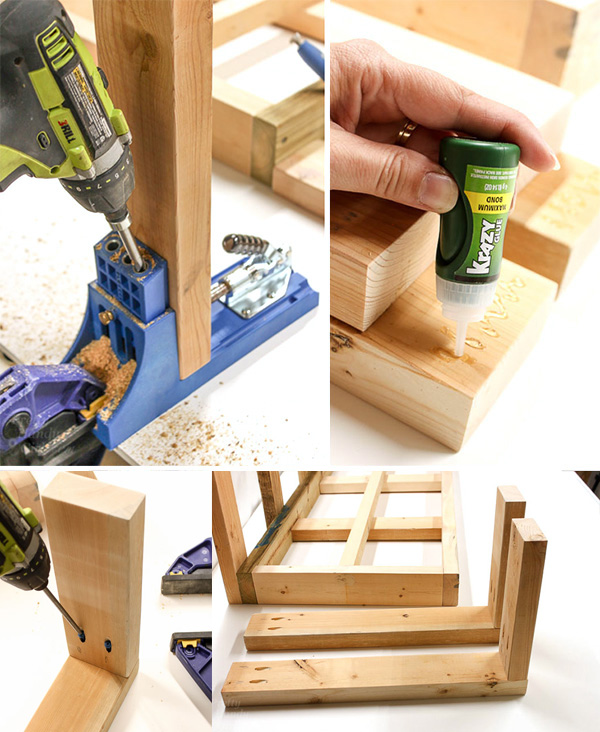
After you have harvested your pallet wood and removed any nails. Cut your lumber to size using the cut list above.
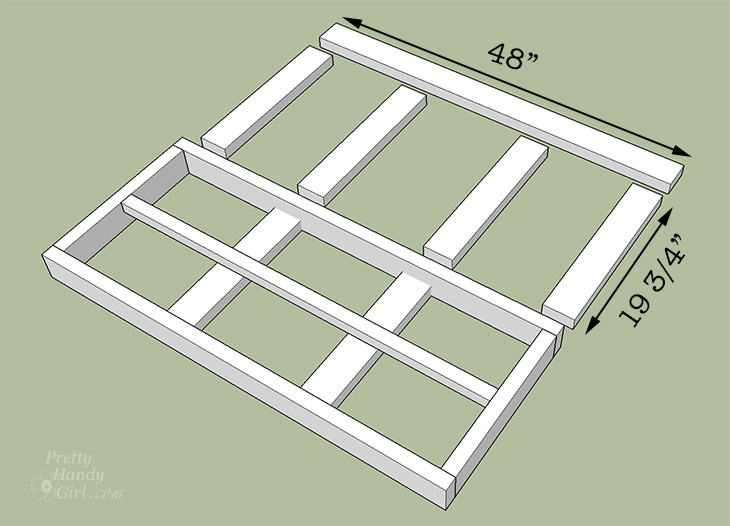
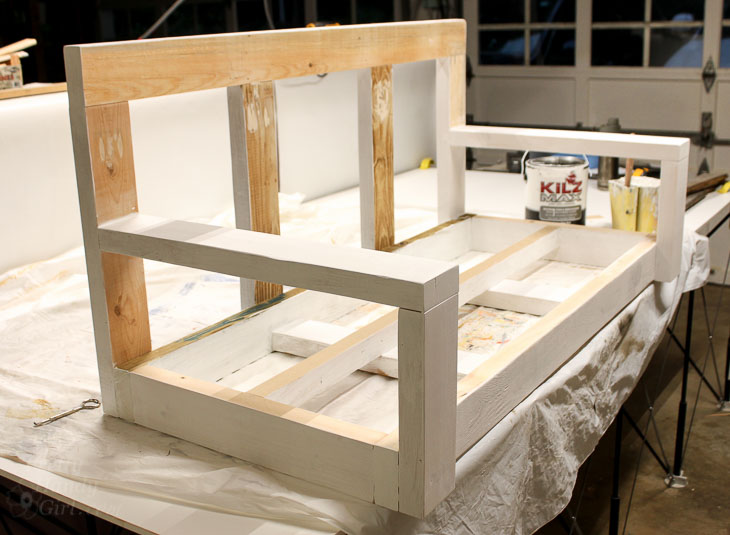
Assemble the Seat Frame:
To assemble the seat frame, layout the 2×4’s as shown below. Turn the two middle boards on their sides.
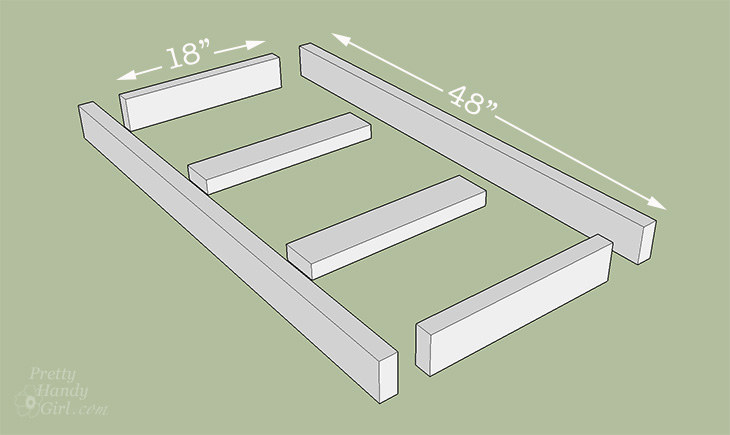
Assemble the seat as shown.
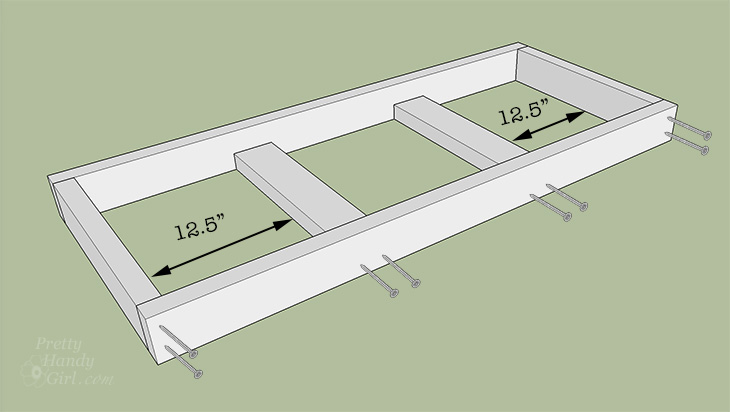
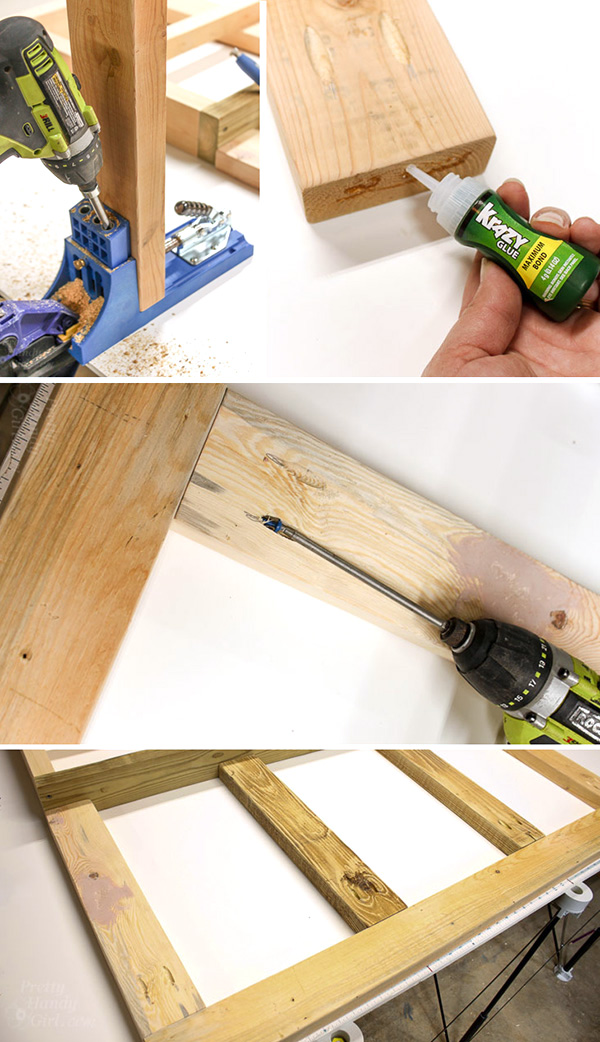
Secure the seat frame by gluing each end of the 18″ boards with Krazy Glue. Then pre-drill and drive 3″ wood screws through the front and back 48″ boards into the 18″ sides and support boards. Use the carpenter’s square to keep your corners square.
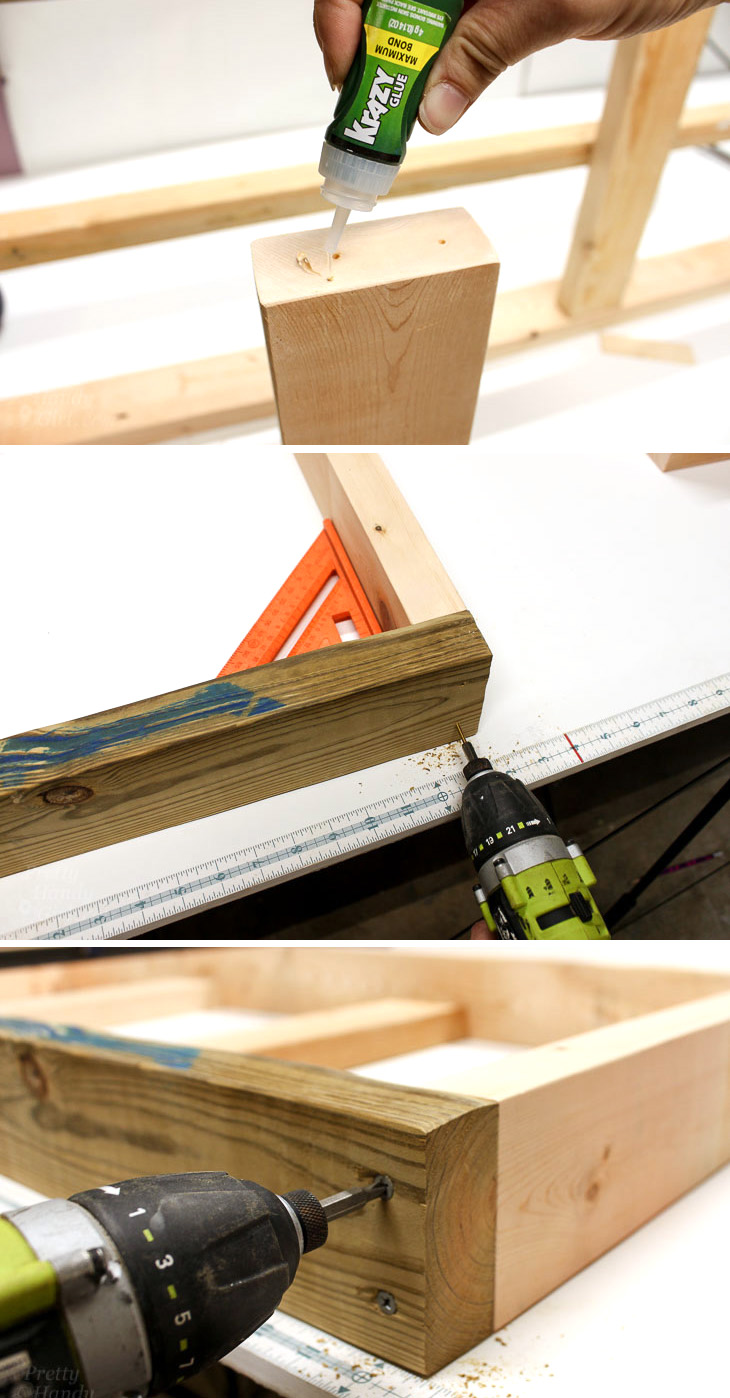
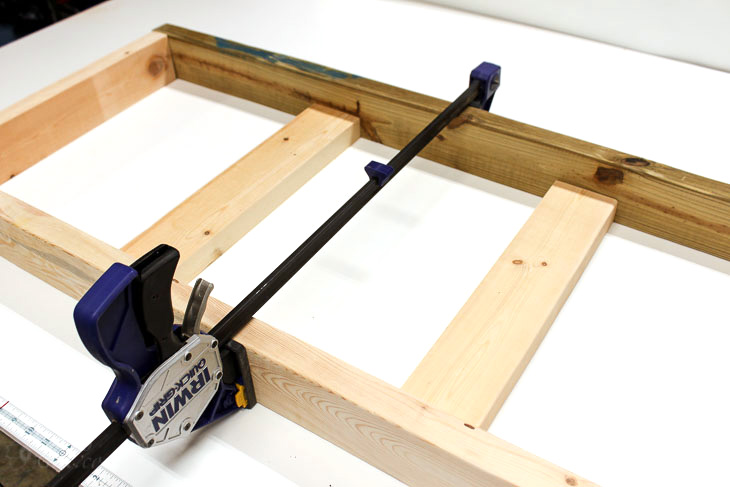
You may find it easier to clamp the frame together while drilling and driving screws.
Center your 2″ x 2″ x 45″ board on top of the center supports in the seat frame.

Apply Krazy Glue to each end. Then pre-drill and secure the center support with one 2 ½” wood screw on each end.

Assemble the Back Support:
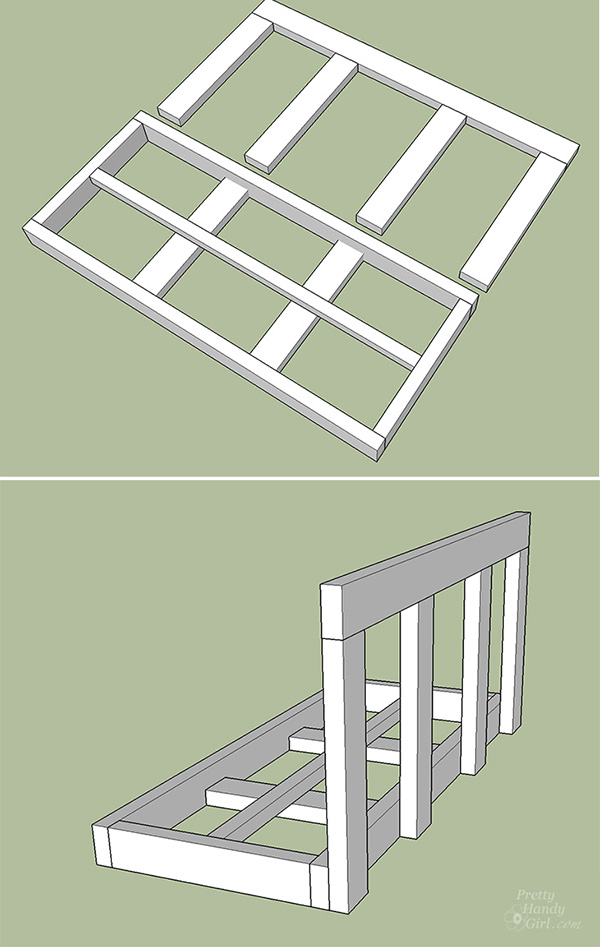
Layout the seat back assembly as shown below. Line up the 19 3/4″ boards with the two center supports on the seat frame assembly.
Drill two pocket holes into one end of each 2″ x 4″ x 19 ¾” board. Add Krazy Glue to the ends of the 19 ¾” boards. Drive 2 ½” pocket screws into the pocket holes to attach the upright supports to the 48″ board.
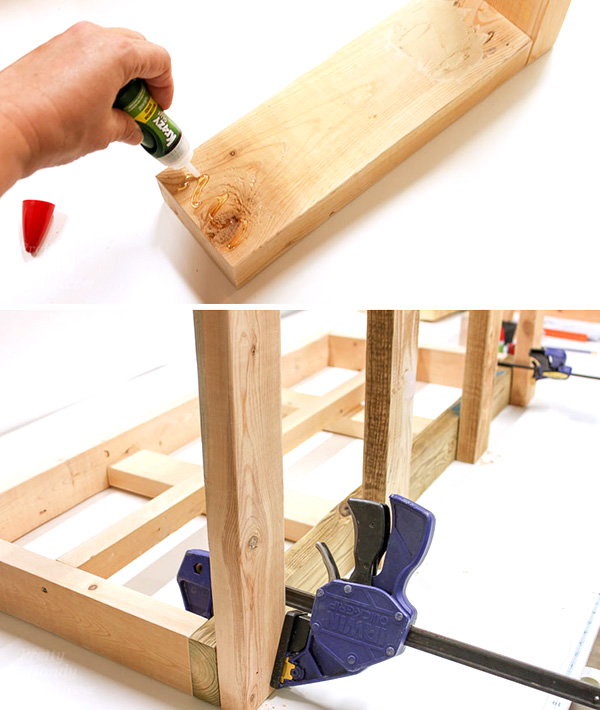
Lift the back assembly and clamp to the seat frame. Check that the back assembly lines up with each side of the seat. Then remove the clamp.
Squeeze Krazy Glue onto the inside edge of the upright supports. Clamp in place and pre-drill holes through the uprights into the seat frame. Then secure with 2 ½” wood screws.
Assembling the Porch Swing Arms:
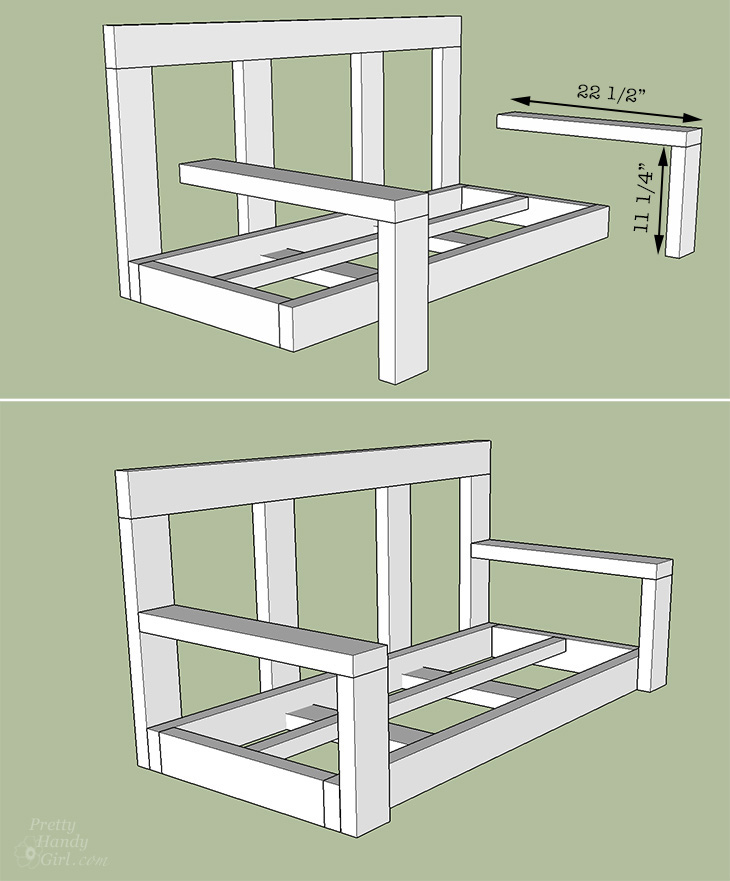
Drill pocket holes into one end of each 2″ x 4″ x 22 ½” and the 2″ x 4″ x 11 ¼” boards. Apply Krazy Glue into the elbow joint where the arm pieces overlap each other.
To attach the arm rests, start by making sure the porch swing seat is level. Set the arm in place and level the arm rest. Clamp the arm rest to the frame and secure the arm rest to the back assembly using 2 ½” pocket screws.
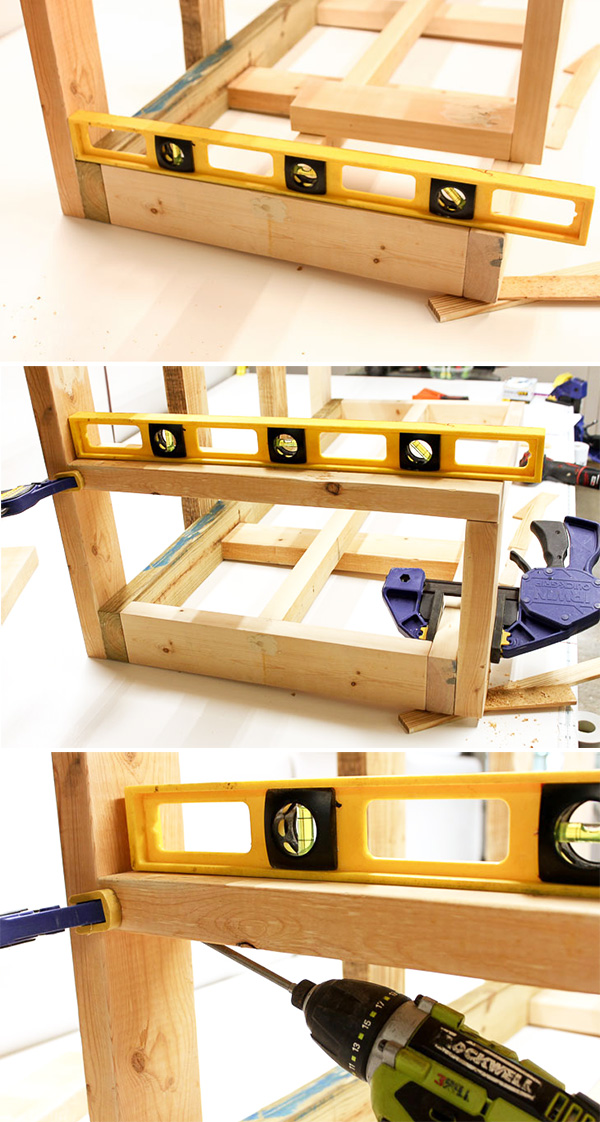
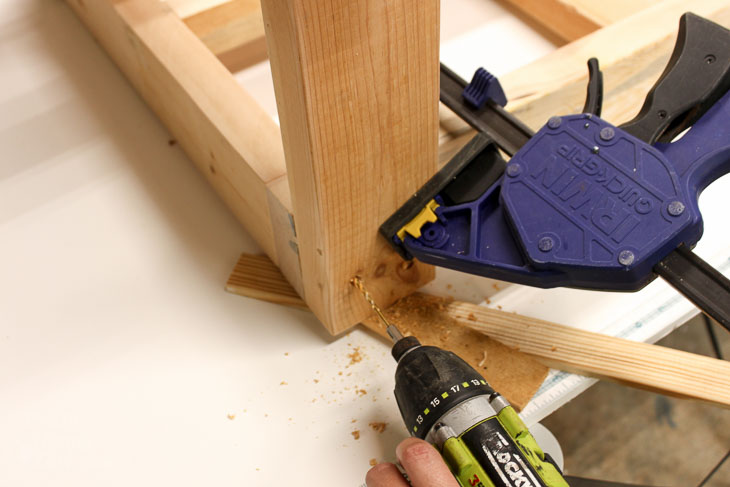
Then pre-drill and secure the front of the arm rest to the seat frame with 2 ½” wood screws (taking care to avoid the screws holding the seat frame together.)
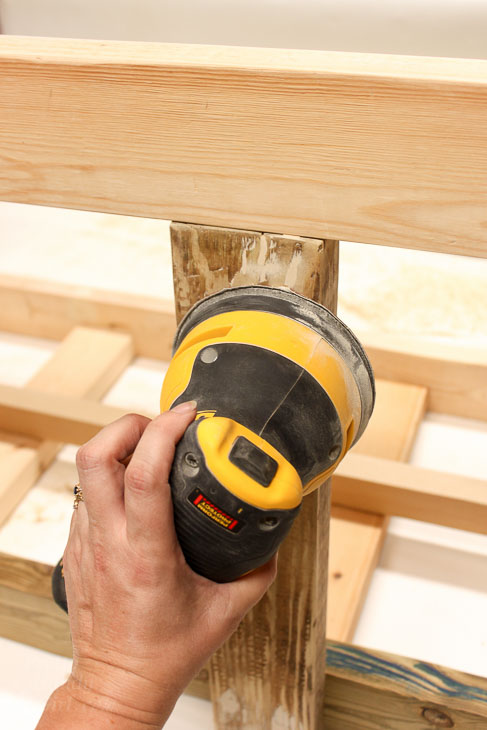
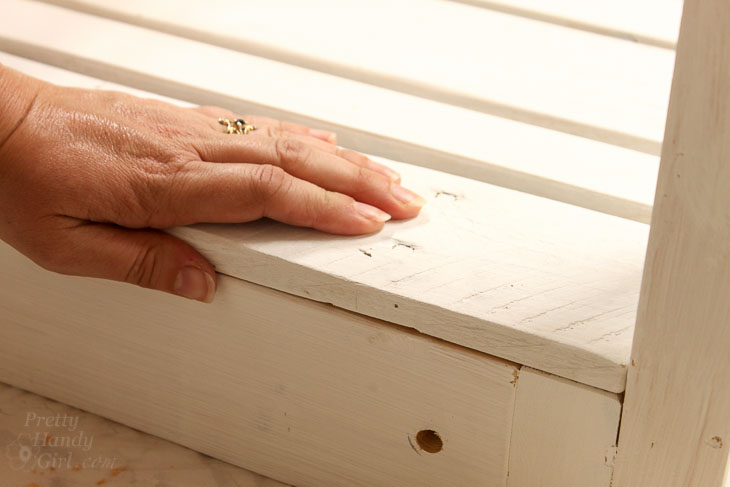
Now is the perfect time to fill all the holes with wood putty.

Allow the putty to dry and sand smooth.
Wipe off the porch swing with a damp rag to remove any sawdust.
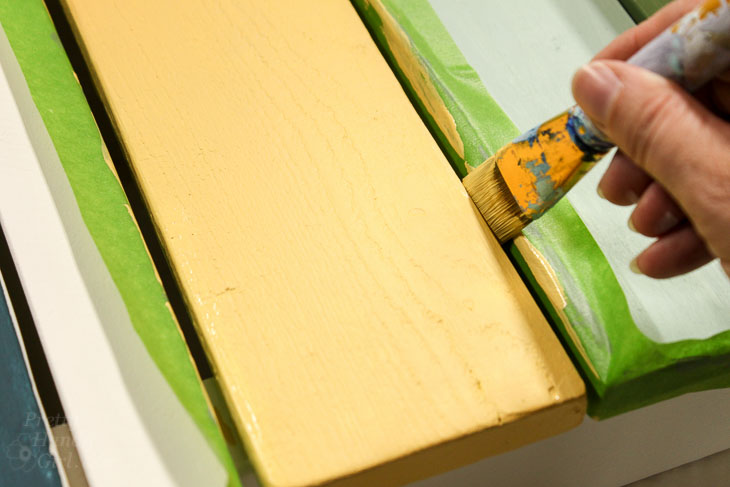
You may choose to prime and paint your swing before adding the slats. If you are using Krazy Glue to adhere the slats, do not prime or paint the back of the slats or the frame pieces that will be glued. The Krazy Glue must bond with raw wood.
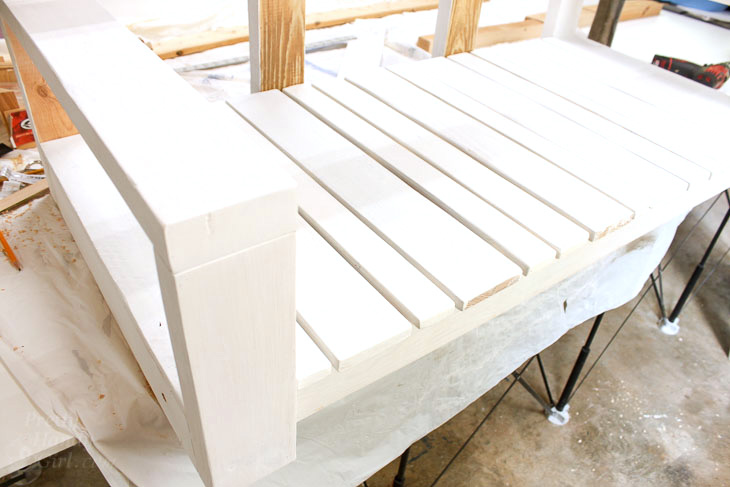
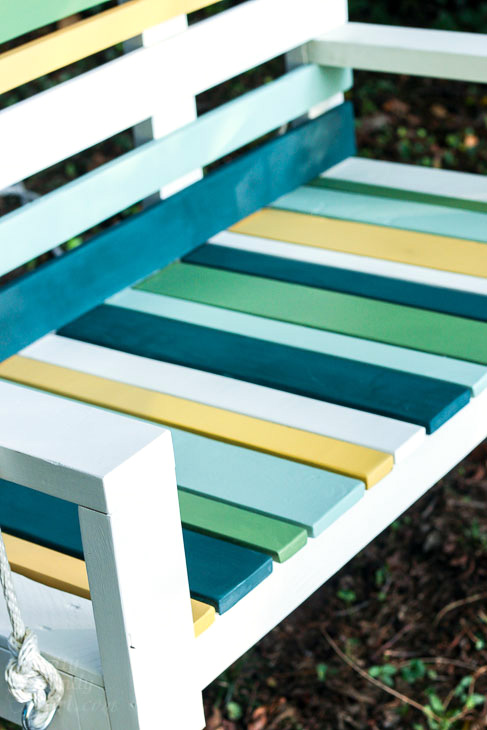
Adding Seat and Back Slats:
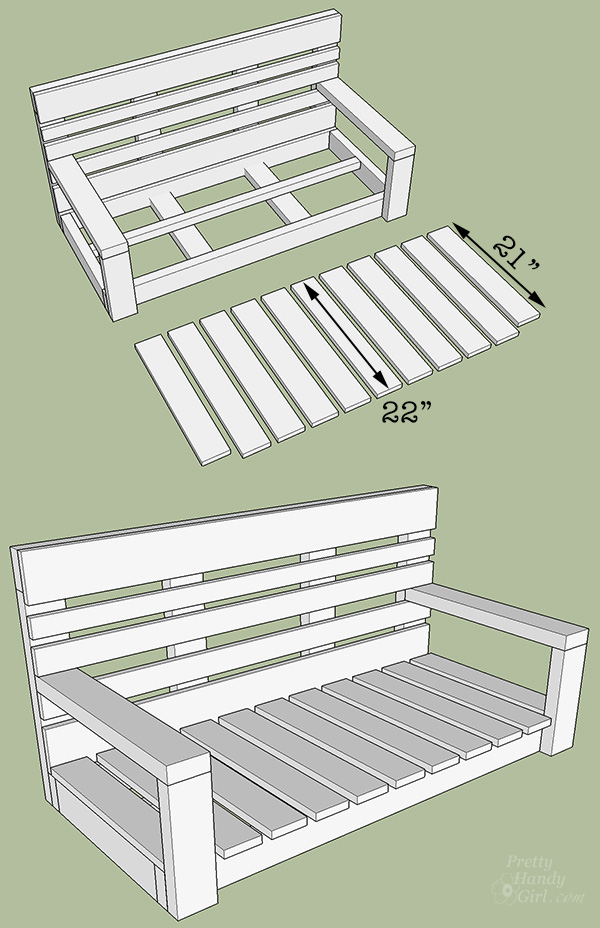
Cut your slats (or pallet wood) to the lengths in the cut list. Arrange the slats on the seat and back of your swing.
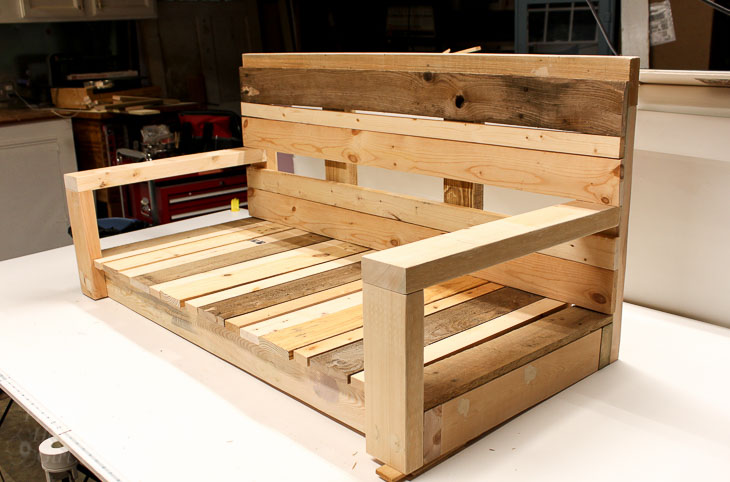
For ease of installation, I created a spacer with two shims. You’ll need to play with your slats to make sure they are evenly spaced. Ideally you’ll want about 1/2″ between slats.
![]()
Krazy Glue the Porch Swing Slats:
Time to put the Krazy Glue to the test! I made a quick video to show you how I used the Krazy Glue to adhere the slats and to test the strength of the bond:
Add a small bead of Krazy Glue to the seat frame assembly underneath each slat (or to the underside of the slats.)
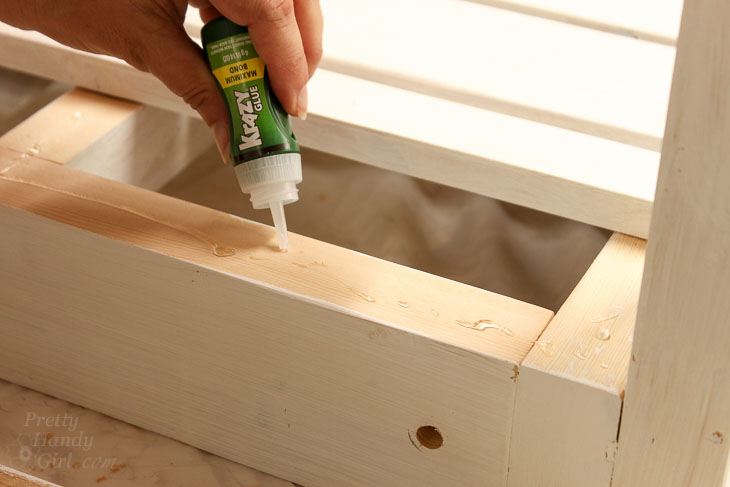
Press the slat in place and hold for about 30 seconds. If the slat does not sit flat (if it rocks slightly) you may use a small nail to secure the slat.
Repeat with the remaining slats, being sure to space them evenly. Allow at least 10 minutes for the Krazy Glue to set before moving your swing.
To attach the hanging hardware, drill a 3/8″ hole through the outer upright supports of the back. Insert the 6″ screw eye through the hole, thread a washer and nut onto the end.
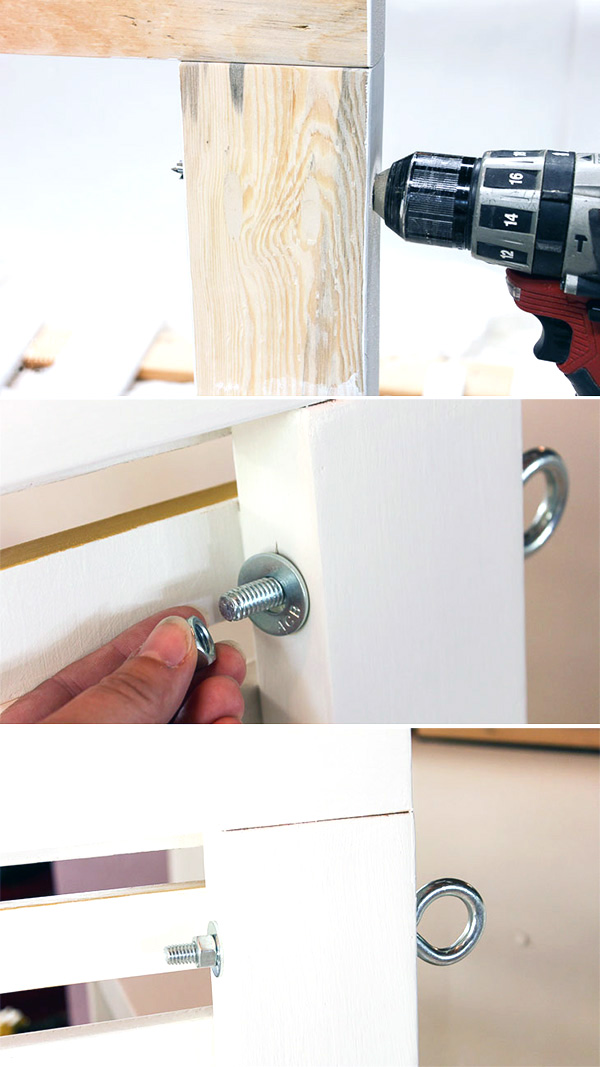
Repeat the process, drilling into the front edge of the side supports. You can see the location of the hanging hardware below:
Finish priming your porch swing.

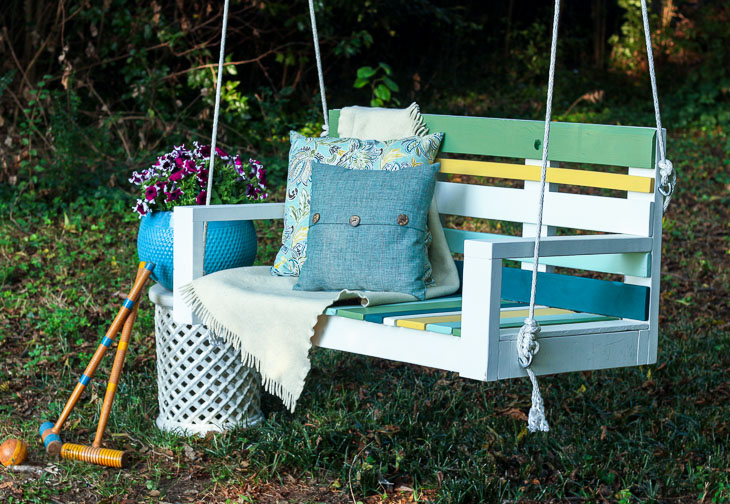
Paint your porch swing any color you like. (The paint I used is Magnolia Home Interior Paint by Kilz: Shiplap, Texas Summer, Amber, Water Garden, and Magnolia Green.) It helps to cover the slats on either side of the one you are painting with painter’s tape (if you are using multiple colors).
Seal your porch swing with a varnish for added weather protection.
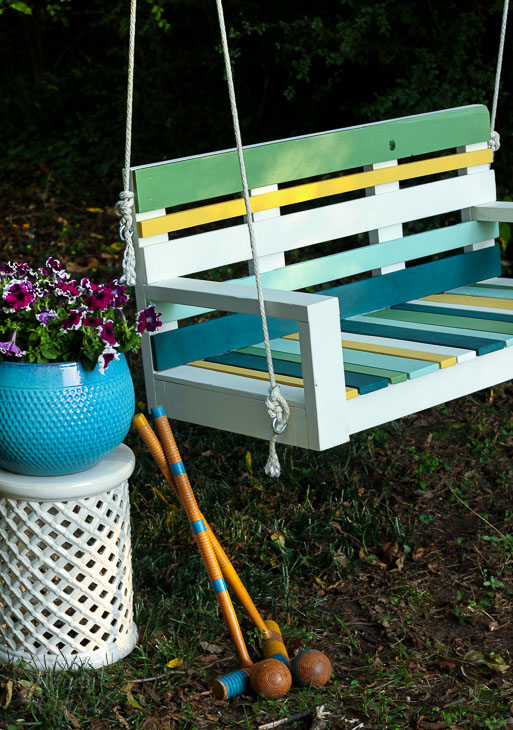
Hang your porch swing from a ceiling joist, large tree, or pergola.
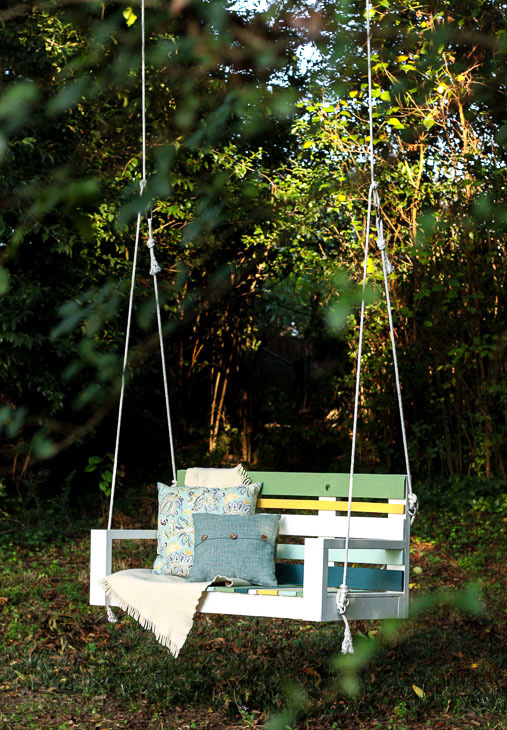
Enjoy a beautiful new spot to sit and swing in your yard!
Notes: The Krazy Glue bond was super strong when the slat was flat against the frame. However, there were two slats that had some twist to them, so the bond could not form properly. Those two slats did receive nails for additional hold. My swing is exposed to the elements, but for best results hang your swing under protective cover. If the wood rots around the glued joints, there is the potential for the parts to separate.
Please pin this image to share it with the world, because everyone deserves a beautiful spot to sit!
![]()
Disclosure: This is a sponsored post for Krazy Glue. I was not told what to write. All opinions are my own. I was compensated for my time and efforts to create this tutorial. I am very particular about the brands I represent. Because I value your trust, you will always be notified when you are reading a sponsored post on PrettyHandyGirl.com.
If you liked this tutorial, you may also like:
DIY Indoor/Outdoor Bench for $25
Make This Bench from a Bed Frame


The detailed plans are incredible. Thank you soooooo much for your time spent for us.
I love swings and this one is so colorful and pretty! Thanks for sharing all the details and inspiration.
Thanks Mary Beth! You are very welcome.
Wow! I love this swing. I had no idea you could use Krazy glue this way!
Thank you Jacque! It was fun trying something new. I was definitely impressed with the strength.
I can’t believe you did all that with Krazy Glue. That is so cool Britt. I was in the glue aisle the other day and saw all the Krazy Glue products and I. Was like whoa! It has come a long way since I glued my fingers together for fun in elementary school. Haha! I always love your USe for color too
Thanks Beckie. I am also in the glue fingers together club. Do it once and you won’t try it again ;-D.
I love this! Especially the colors. I want one for the unused space under my back deck. What program are you using to show the layout and dimensions of the project? I definitely need to check that out. Keep up the good work!
Hey Grier, thanks for your compliment. I use Google Sketch Up to draw the plans. It’s a program that takes some getting used to, but there are loads of tutorials on YouTube!
Oh how I love the swing…I have always wanted one I will have to give this a try!!! I will need to find some pallets Thank you
Norma, thanks for your comment. Pallets are usually easy to find. Ask your local home improvement or hardware store ;-).
Pretty swing, and great tutorial! You make each step very clear, making it look pretty simple to make. I would love to have a porch swing, but don’t have a large enough porch for a swing. But I do have a tree that would work for a swing the way the branch curves over. Pinning to my pallet wood projects for later. Thanks!
Thanks Linda! I hope you take the opportunity to make one in the future. You can always add a swing to a pergola: https://prettyhandygirl.com/building-a-pergola-trellis-screens/