Best Fit Face Mask – Time Savers and Sizes to Fit Everyone
Two months have passed since I designed the Best Fit Face Mask. By popular demand, I’m putting out three new sizes (child, small, and x-large) to fit everyone! I’ve also developed some time-saving tips to help you sew masks faster.
Best Fit Face Mask – Time Savers and Sizes to Fit Everyone
Before I get started with today’s post, I have to thank you all. I received thousands of comments from people saying how much they loved the Best Fit Face Mask design. If you haven’t seen that video, you can see the video here.
For those of you that have watched that, I have to say you blew me away, because there were over 4 million people who watch the video. I hope that has translated into each and everyone of them making at least one mask if not multiples to protect everyone around the world from the coronavirus! Thank you to those that sent me pictures of your masks. This makes me happy to see so many different people and different masks!
Video on Best Fit Face Mask Time Savers + Updates and New Sizes:
I’ve covered the majority of today’s post in this video. I know it goes fast, so feel free to watch and/or read the rest of this post.
New Sizes – Child, Small, and X-Large Mask Patterns:
Today I’m back because so many people had asked for different sizes and I can appreciate that there are many different size faces. I appreciate your patience with me as I finally developed a child size, a small size, and an extra-large size (in addition to the previous medium and large sizes.) Patterns for all five sizes can be downloaded here (look under Face Mask Template subheading).
Although I had to stop resizing at some point, I decided to show you an easy way to resize your pattern!
How to Resize Your Face Mask Pattern:
Just a quick note before you rush to resize your pattern. Make sure to pre-shrink your fabric. You’ll also want to wash the mask after sewing because oftentimes the mask will shrink a little more.
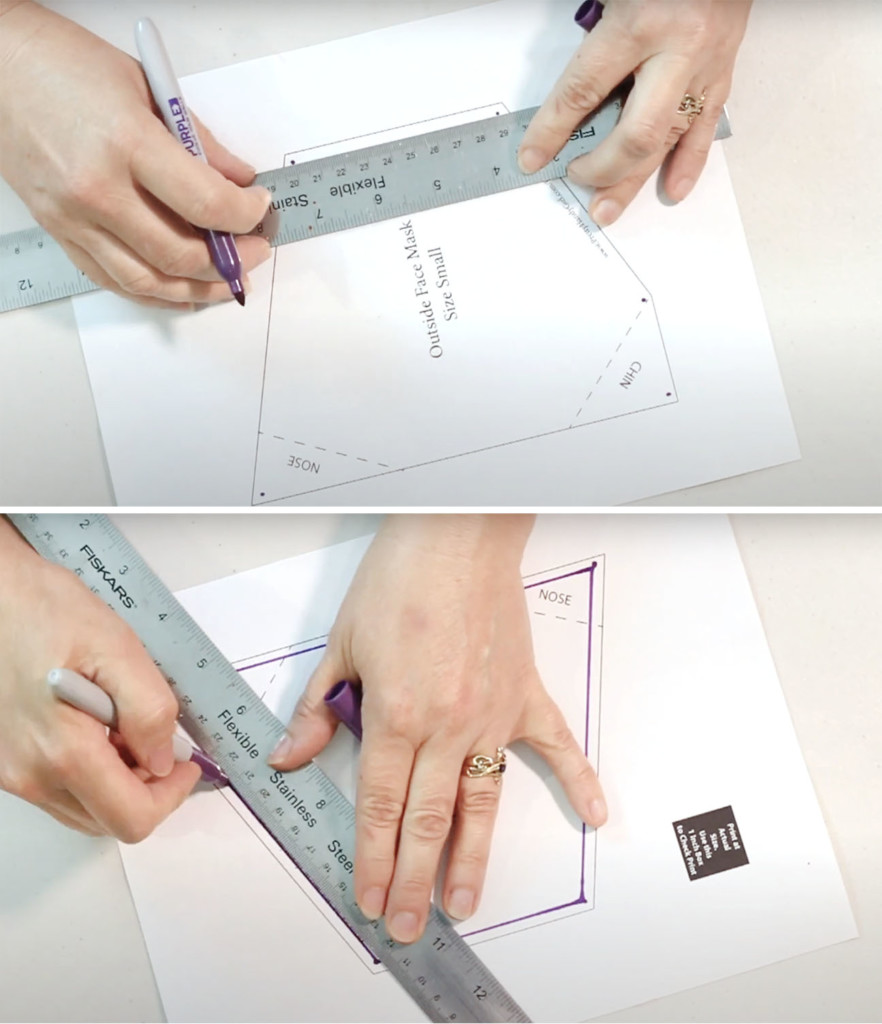
To resize your pattern, simply print out the size closest to what you need. To reduce, use a ruler to mark points inside the template at each corner. I suggest reducing by ¼” increments. Then use the ruler as a straight edge to connect the dots. To enlarge, repeat, but add your points outside the template. Simple, right?!
More Alternate Ear Strap Materials:
(I’ve included affiliate links for your convenience. I earn a small percentage from a purchase using these links. There is no additional cost to you. You can read more about affiliate links here.)
Over the past two months I’ve learned a lot by testing several different strap materials. In the first mask, I used elastic paracord. Although this worked great, it was hard to find and hard to thread the bead through. Here are some alternatives to the elastic paracord.
- Old T-Shirts
- Regular 550 Paracord (non-elastic)
- Elastic Shoelaces
The old t-shirts, are so comfortable and soft (and most likely FREE! Especially if you have stained shirts or ones your kids have outgrown.) Cut them into one-inch strips and pull them to make them curl. These should feed through the craft beads easily.
Regular paracord (non- elastic) works well too. This is like hiking boot laces. I found the 550 series (7 strand core) is the perfect size to still fit through the craft beads.
Elastic shoelaces are a great alternative to the flat elastic most people want for face masks. In full disclosure, Xpand sent me some elastic shoelaces to try out. I’m happy to say they work great. They are stretchy and you can feed a craft bead onto it.
Slip Knot instead of Craft Beads (or Cord Locks)
No Craft Beads, No Problem! Many people have struggled with the craft beads. Sometimes the strap material doesn’t feed through easily. For this reason, I have the solution if you are ready to ditch the bead! It’s simple, tie a slip knot!
How to Make a Slip Knot:
A slip knot is a knot that slides up and down along one strand. It’s perfect for adjusting the length of the ear straps, yet still holding it in position.
Watch my video (already forwarded to the slip knot tutorial section) to see how to make a slip knot. It’s easy and a great knot with many uses.
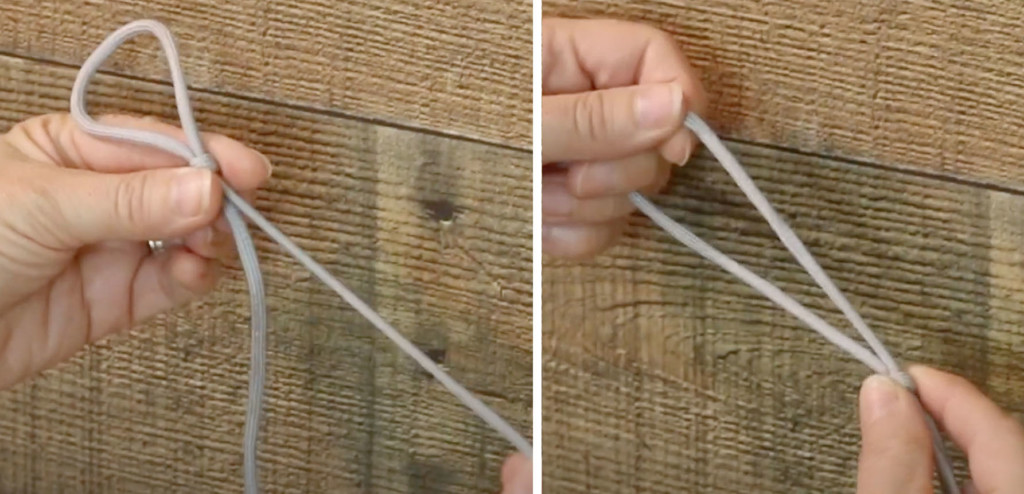
Cut your straps about 12 – 15 inches long. (You can trim the excess afterward.) Fold the strap in half. I’ve knotted one end to help clarify this demonstration.) Position the knotted end on the bottom. Take the knot and wrap it over the other end one time. Now reach your fingers through the loop you made and grasp the non-knotted end and pull it through the loop while holding the other two ends. Tighten the knot and now test to see if you can slide the knot up and down your strap. Easy, right?!
Nose Clip Update – Answer to the Question: Do they hold up in the wash?
First, there many people who said they like using pipe cleaners. Frankly, I’ve never been a fan of these because they just don’t have the hold or the memory to do great as a nose clip. Plus, several people have been reporting that pipe cleaners are rusting in the wash and breaking.
There were a lot of people who were concerned about the coffee tabs and how they hold up in the wash and dryer! My own original mask has been washed probably fifteen times now. There is no rust showing. The coffee tabs are coated in plastic, so I don’t think this will be an issue. Some have asked about drying the masks on a lower heat setting in the dryer. I’ve dried mine on high heat, but have switched to a medium heat just to prolong the life of the coffee tab. The beads have been fine in the high heat, but again, why not play it safe?
Time Savers when Sewing the Best Fit Face Mask:
If you’re like me, you likely make a few masks at a time. Typically I like to knock out a dozen when I have time. They usually take a few hours to make, but when you break it down, the masks take me about 15-20 minutes each. To get the full tutorial for the Best Fit Face Mask, download the instructions and templates from my Best Fit Face Mask tutorial post.
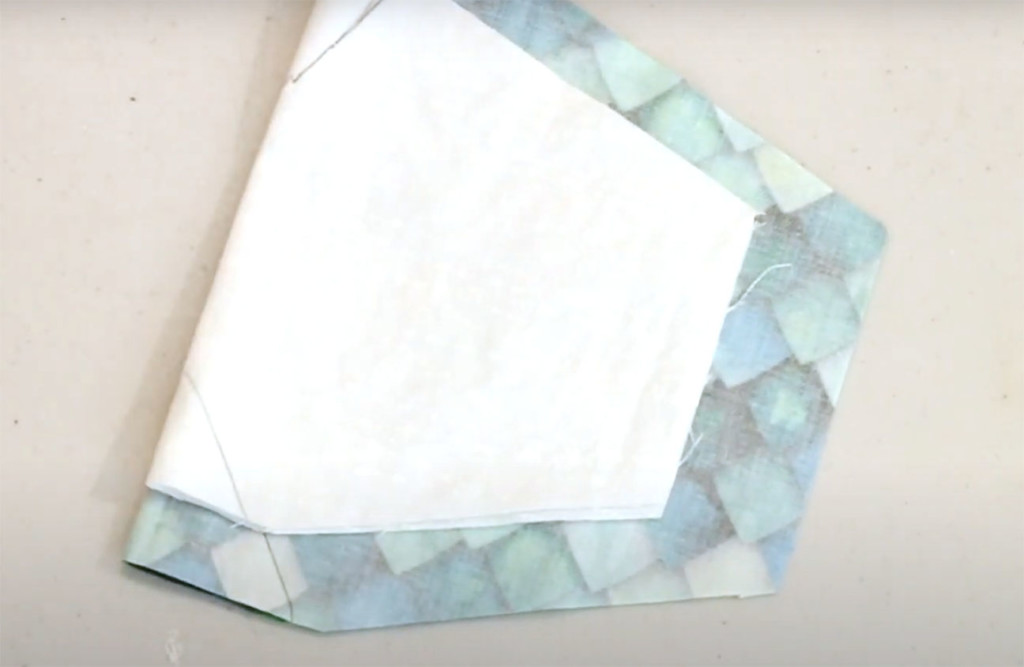
After you’ve cut out your fabric, fold the fabric so the printed sides are facing in. Mark the locations for your nose and chin folds. Now, position the liner on top of the outside mask fabric. Line up the nose and chin stitching marks.
Stitch through both pieces of fabric along the fold lines.
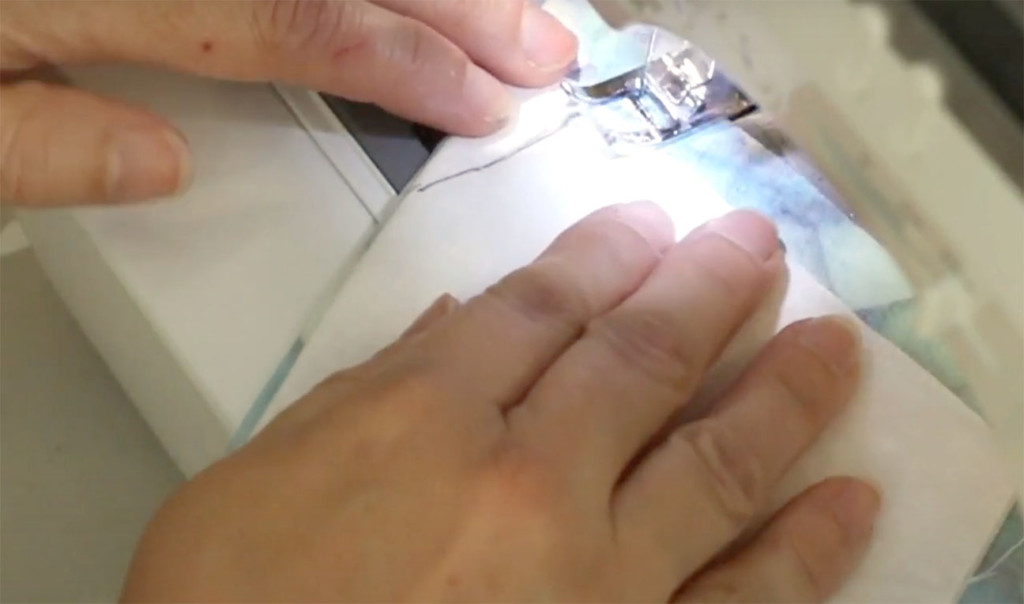
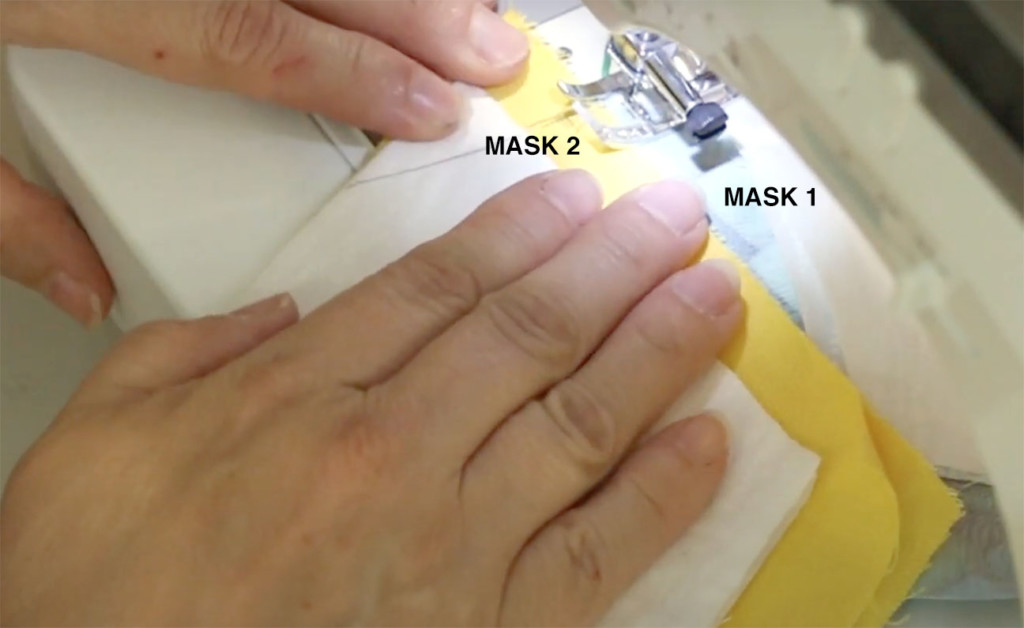
To save time while sewing multiple masks, chain stitch all the masks one after the other. Below you can see after sewing through the chin seam on Mask 1, I have Mask 2 lined up to sew through the nose seam.
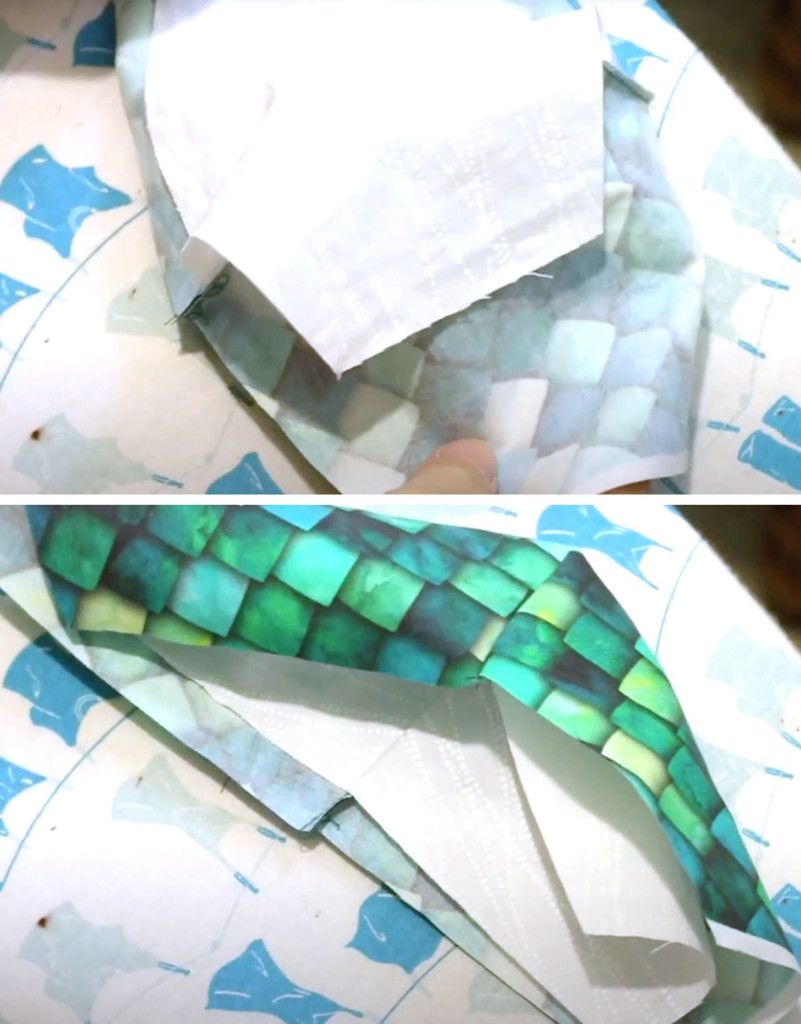
After sewing and cutting the excess material off your masks, you simply open the masks so the outside fabric is on the outside and the liner is right sides facing out.
As you stitch the sides, you can continue to save time by chain stitching all the nose hems together. Then rotate your chain of masks and stitch the chin hems (effectively chain stitching multiple masks together. After separating and folding the side ear strap folds, you can chain stitch all the sides of the masks. Here’s a funny picture of me with six chain-stitched masks.

How to Simplify Threading the Craft Bead Through the Straps:
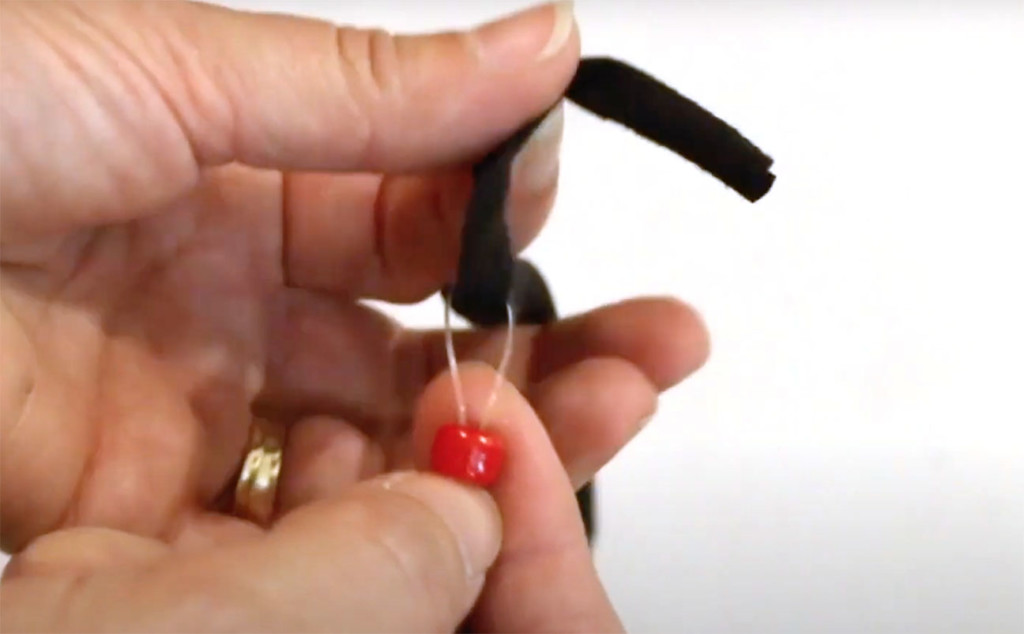
Time to show you how I feed my straps through the bead. This is a tip my father-in-law showed me and I’m eternally grateful for his idea! I’ve forwarded the video to show this process below:
Grab a length of fishing line and fold it in half. Stick the loop end through the bead. Feed half your strap through the fishing line loop. Then pull the fishing line and strap back through the bead.
That’s all the time-savers I have for you today. I am working on one new addition to the Best Fit Face Mask, so be sure you are subscribed to my email newsletter. You’ll also get access to my Free Mini Course: 6 Simple Steps to DIY Anything!


I used two different items. For the nose bridge I used Stainless Steel Safety wire, .051″. My thickest. It survives the washing machine and doesn’t bend in the washing machine. For rope I used the thickest small engine starter rope, like size 5.5mm or 6mm. I tie the melted ends into a figure 8 knot and then using my thinest safety wire. I wire around the knot to keep it together. I made 5 masks and we wash them once a week and they are all perfect. I thank you for such a wonderful design. Others were for faces without noses. I plan to make more masks tomorrow.
For the many of us who dont sew, where can we purchase these?
Database of sellers is linked on the page with the tutorial: https://prettyhandygirl.com/best-fit-facemask
Great pattern. I use a skinny crochet hook to pull the elastic through the bead – so easy. It might work to pull it through the casing too – depending on how wide your elastic is.
I’ve made almost 8 dozen of these masks for my family and friends. My daughters all work in lower elementary school classes, my son a police officer, and my husband with mass transit. They all needed multiple masks as MN is now a mask mandated state. I love the ease of making so many! The pattern is easy to follow, and quick to make. I used the electrical tape and craft wire in the noses. Works wonderfully! It was also easier for me to “thread” the T-shirt material through after they were sewn. I didn’t have to worry about catching it when sewing the seam. Thanks for your pattern.
After spending hours watching tutorials online, I landed on your site and love the practical approach and the easy pattern that saves fabric and let’s me get the most out of what I have on hand (although once I started making them, I couldn’t resist picking up some cute coordinating fabrics ;-)). I use t-shirt material for the ear pieces and have made several with a ‘continuous’ strap and one bead to go around the head (I place the bead on the top of the the strap, rather than the lower part that goes around my neck, if that makes sense.) I personally like wearing my mask like this because I can pull it down and let it hang around my neck when I’m in the car or walking around outside and then pull it up over my face when needed to go in the store. I have had so many people ask me to make them masks when they see mine and they love the fit! I had a conversation with a lovely woman in a fabric store just yesterday and I told her about your site. She was going to go right home and make some! Thank you so much for posting and sharing this pattern and all your handy tips on making it faster to sew. I’m about to sit down and make more that friends have asked me to make and I am definitely using some of these shortcuts! Keep up the great work! I thought I got into the mask making craze kind of late in the game (started late June when I finally received my new sewing machine), but as it turns out, people still want/need them since the virus isn’t gone yet and they realize it’s important to keep up the mask wearing trend. I will use mine from now on during cold and flu season and during spring allergy season. I don’t care if people look at me funny – I’ve got a cute mask that is comfortable and I’m proud to wear it! 🙂
Christine, thanks for your email. You’ll probably love seeing this small change to the straps in what I’m calling the Most Comfortable Best Fit Face Mask: https://prettyhandygirl.com/most-comfortable-best-fit-face-mask/
I’ve made a bunch of these masks for my family and everyone loves them. When I started making them a few months ago I searched my house for nose piece materials and found that my husband had a spool of solid 4 wire 24 awg ribbon cable – It’s 4 wires covered in plastic tubing and stuck together flat (very bad description). It molds well to our faces and is comfortable. Some of my family prefers the paracord and some prefer elastic, and I love using the beads so the straps can be adjusted as needed, especially for family that is not here to fit properly. Thank goodness my grandson made me a pony bead necklace in February since I’ve had to use those beads for the masks! I really appreciate your patterns and the tips are great too.
The child size patter prints at a larger size than the medium adult size. I printed it a 100% and the square was 1″ I lowered the percentage but it still is too big, any suggestions? Thanks I really like your pattern and the people I’ve made masks for really like the fit. Anita Rhynes
The mask came out great. My problem however is that i made it for my husband and it fits me. Was i supposed to turn over a total of 1 inch on top and 1 inch on bottom? If so, i think that may be why the mask came out too small. It just barely covers my chin.
When I printed the small size face mask template it was larger than the medium. I measured the 1″ square and it measured correctly. What do I do now? Thanks Love your masks.Anita Rhynes
Brittany, Thank you so much for the new sizes. I have been making masks for our family and now I’m making them for my son’s church. Everyone I have shared these with love them and say they are the most comfortable to wear. Thank you for being a blessing.
Beckie Bower
I found your pattern while trying to find the “best” and easiest to sew. I began making for friends who then wanted more. I heard that the Cleveland Food Bank needed masks, so I got my 14 year old granddaughter to make the ties and the nose pieces ( I use wire I had and wrapped it in painters tape, rolling it about 3 to 4 times to cover). Quite by accident, I made a small version by using the lining pattern for the outside and then created a smaller lining. This works for children. I have been sharing your pattern with friends who sew and they all agree it’s the best.
Today my granddaughter and I are going to deliver our masks to the Cleveland Food Bank. I am going to have her watch your new video and let her start sewing. On her own she has learned how to make bucket hats for friends. At this time service is the key to happiness. And I’m getting to know my granddaughter better.
Thank you for sharing your inspiration!
Thank you for the updates and short cuts. I have made close to 50 masks and they’re a good fit. It will be much faster to continue making more masks with the short cuts. I am donating many of them. I have been using thin electrical wire covered in electrical tape for the nose clips and they’ve been holding up well.
Wow, your face masks are great. I wish I knew how to sew, because I would be pumping them out for my families and friends and others, But, In spite your wonderful step by step instructions, I still don’t think I can make these. ) 🙂 This does not mean I am giving up.
Thank you, Brittany! The additional sizes, the trick to making our own adjustments and the tips are invaluable. If students go back to school with mask requirements, I’ll be ready! I made a couple for each of my family and some friends using the original pattern, the wire/electrical tape nose and beads. They’ve been great!! Thank you again!!
this is great – thanks. How can I share this article by email? I got it via an email – seems I should be able to send it via email?
You can forward your email to a friend. Or copy the website URL address and paste it in your email.