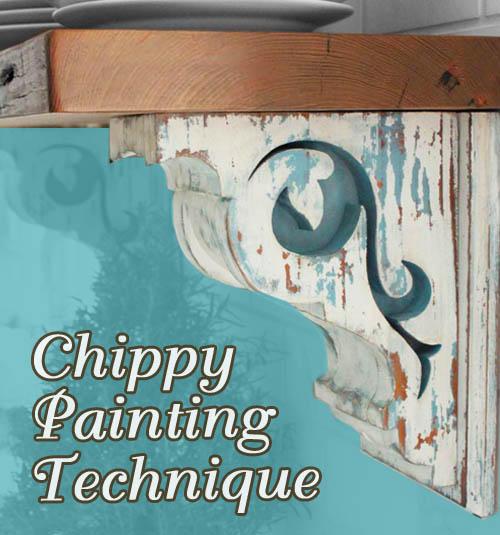
DIY Aged Chippy Paint Technique
This is another one of those tutorials that I’ve been dying to share with you! Like sitting on my hands and anxiously waiting to type it out. But after taking 2 weeks off from blogging, I’m back and ready to give you this fabulous tutorial for achieving the aged chippy paint look on your next project.
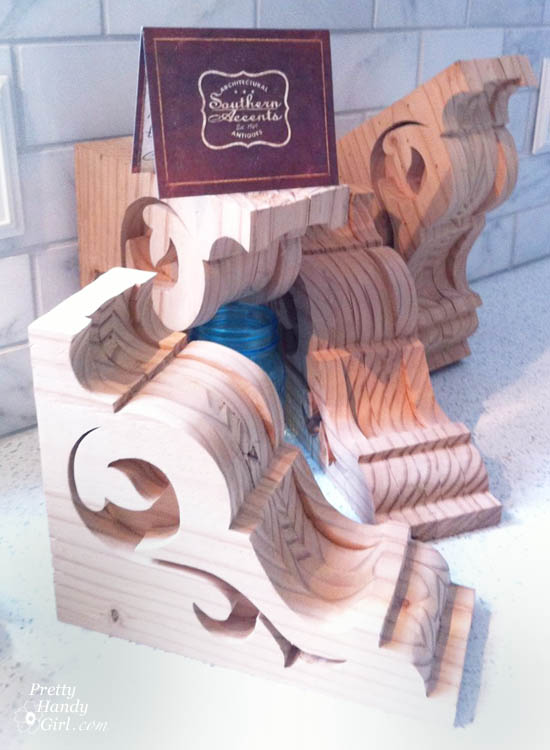
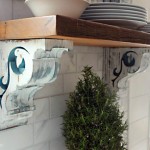
Before I give you the chippy gritty, I want to give you the background story on those gorgeous corbels.
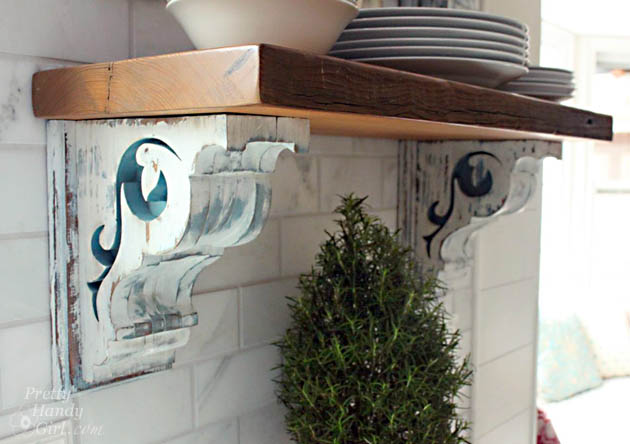
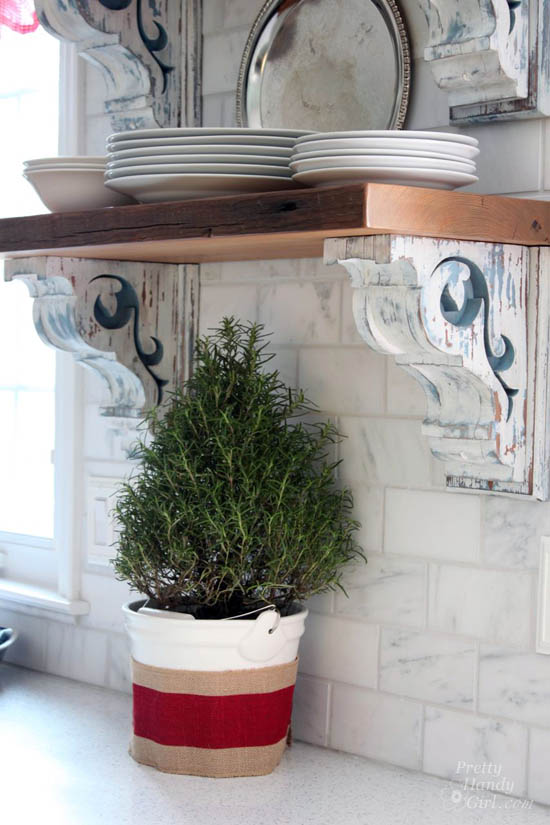
If you’ve been following along, I finally completed my 13 month kitchen renovation. The last task was installing two open shelves on the full tile wall. Finding the perfect corbels to use as shelf brackets was not an easy task. I scoured eBay, Craig’s List and salvage shops. I was really getting discouraged. That was when I met Garlan from Southern Accents Architectural Antiques at Haven. We talked for a few minutes and he showed me some of the corbels he had in his store. There were some wonderful old ones, but I felt a bit like Goldilocks. One was too tall. The other not big enough, but the biggest problem was that I needed four of them. Garlan showed me some new corbels that he had. He told me he has a guy that can duplicate any corbel design and can customize them to meet any size requirements. It was as if the heavens parted and angels sang! I was elated and couldn’t wait to find an image of a design I liked. But, again, the Goldilocks in me couldn’t find the “perfect” corbels. So, I opened up Adobe Illustrator and started to design my own unique corbels.
Chippy Paint Technique
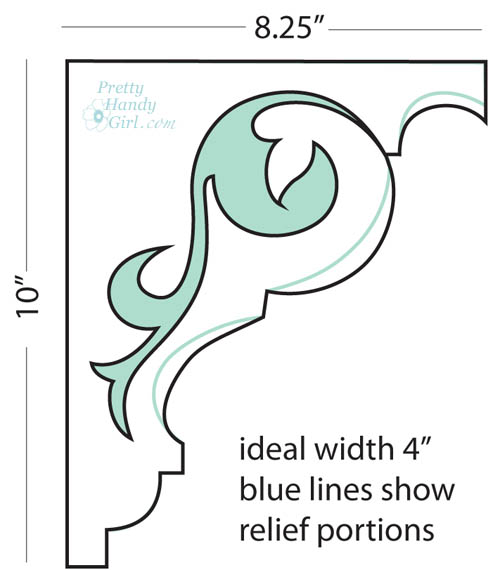
I designed a scroll pattern based off of one corbel I saw, but also added some relief portions inside the corbel. I sent the image to Garlan and a week later he sent me a picture of one of the corbels. It was love at first sight! I quickly approved the initial one and waited anxiously for the corbels to arrive. When I opened the box, they were beautiful and exactly as I had pictured them in my head.
I set forth to give them an appropriate aged chippy paint look to fool people into thinking they were actually antique salvage. Here’s how I did it.
Chippy Paint Technique Materials:
(I’ve included affiliate links for your convenience. I earn a small percentage from a purchase using these links. There is no additional cost to you. You can read more about affiliate links here.)
- Stain (Early American by Minwax)
- Milk paint
- Chalk paint
- Petroleum jelly (vaseline)
- Paint brushes
- Paint scraper
- Sand paper
- Putty knife
- Sponge
- Rag
- Cup of water
- My Secret Rustic Glaze Formula
- Frayed brush
Chippy Paint Technique Instructions:
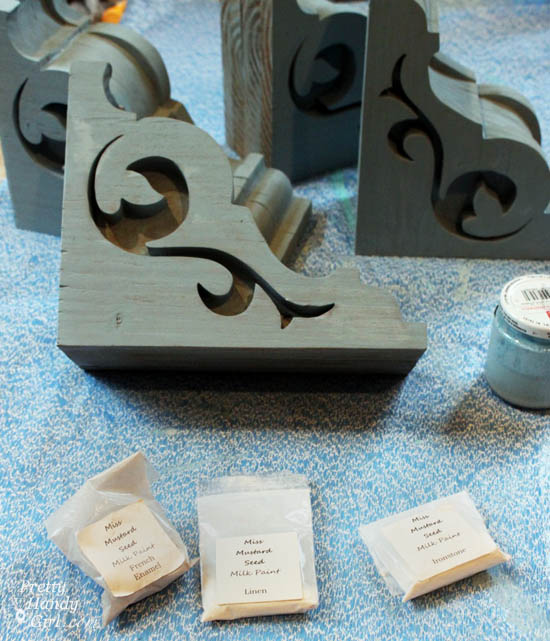
First stain the wood using Early American by Minwax. Once the stain has thoroughly dried (overnight), mix your milk paint. (I mixed several of Miss Mustard Seed’s milk paint colors together (French Enamel, Linen and Ironstone) to achieve the color blue I wanted.)
Paint three coats of the milk paint mixture, using a smaller brush to paint inside the scroll cut out.
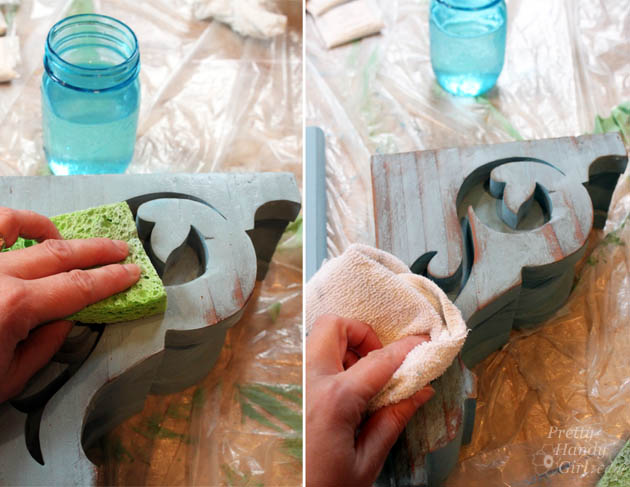
Once the paint has dried, it’s time to start distressing. Wet a sponge and lightly wring it out. Lay the wet sponge onto the wood where you want to distress. After the water has time to soak into the paint a little, take a dry rag and rub at the wet area to remove some of the paint.
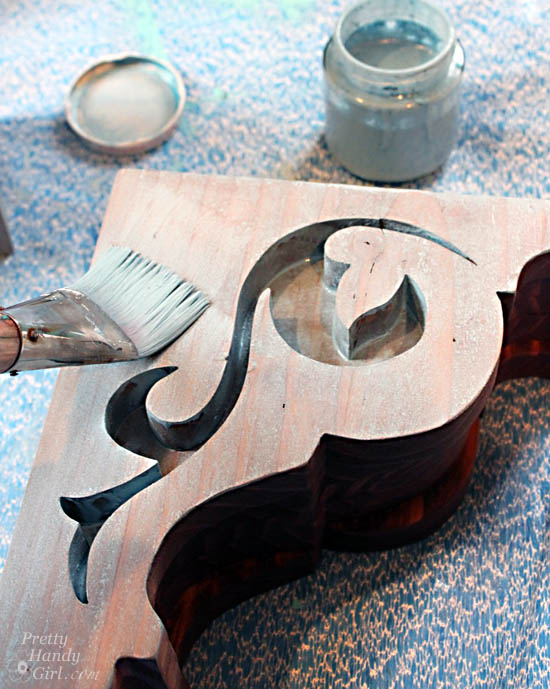
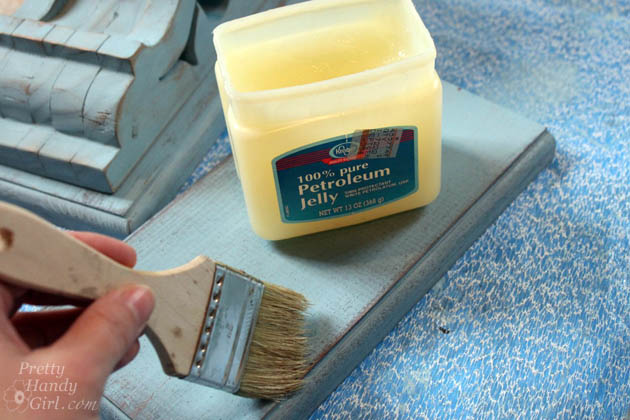
Next wipe some petroleum jelly on a few areas of the wood that you want to resist paint.
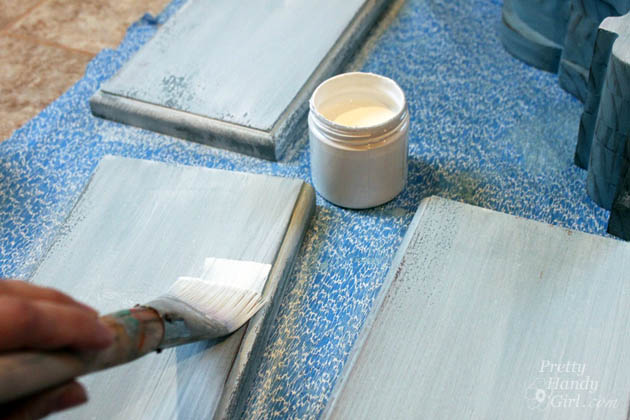
Paint white chalk paint over the entire piece (I didn’t paint inside the scroll design.) You can add a second coat if you desire a whiter finish.
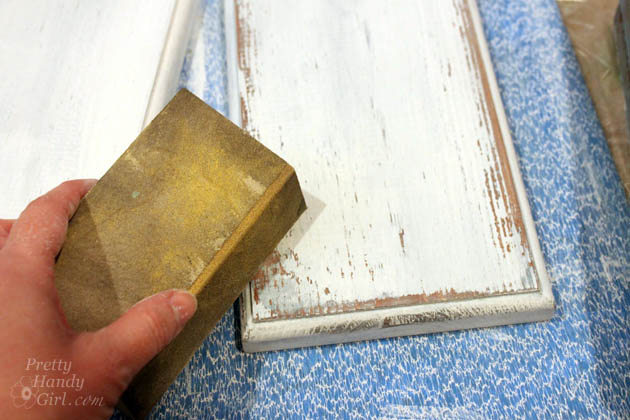
After the chalk paint has dried, rub the putty knife over the paint. Areas where the vaseline is should lift up easily and create some chipping.

Lightly sand to remove more paint and distress further.
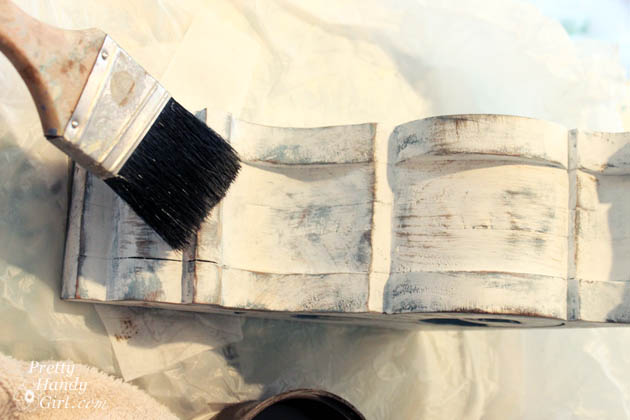
To truly achieve the antique look, you need to “dirty” the wood now. Use the frayed brush to lightly dry brush My Secret Rustic Glaze Formula onto several areas on the wood. Less is definitely more when it comes to glazing. For more tips on glazing you might want to read my tutorial on how to use asphaltum glaze.
When you’re done, you should have a beautifully aged and chippy show stopper!

Tell the truth, did you know these were new corbels when you first saw them?
Stay tuned for the tutorial to hang shelves on a tile wall using corbel brackets.
![]()
Disclosure: Southern Accents Architectural Antiques provided the corbels for my kitchen in exchange for a mention in my post. As always, I choose the companies and brands I wish to work with. If I don’t like a product, service, etc. I don’t mention them on the blog. For more information about SAAA, or to order your own custom corbels check out their website.

Love how you described this technique. I”m going to try this on a table tonight. I’m sharing this on my FB page Eclectic Beauty Studio.
Will you be releasing the PDF file for your cornel pattern?
I have been doing more DIY projects lately, and I have been inspired by blogs and youtube videos – but I have to say that I have never been so inspired and motivated to try even more than I thought I ever could. Thank you for sharing your gifts and talents and I cannot wait to dig in and try some new projects (even with power tools…..gasp.)
I am going to use this technique to distress a dresser. Just trying to decide how much Milk paint to order. Do you think a sample size of each of the 3 colors will be enough after mixing?
Kylie, I used a small sample pack of milk paint to paint an entire pie cupboard. I think you’ll have plenty.
Years later, and you still have new viewers coming to admire your work, amazing and so beautiful. I really like how you list your work step by step to help someone new to really fallow your tip and get the result you expect them to have !! You make great teacher!! Thank you =)
Just WOW!!! This is the first I’ve heard about “mill paint! ” what’s the benefits of milk paint of i may ask? I’ve made a few comments today and have mentioned that I’m I’m self learner, but every YouTube video I’ve watched, it’s always suggesting chalk paint.
Hello,
My wife and I are in the process of buying a home and there’s quite a bit of unfinished wood paneling on the walls. I’d like to use some of your distressing techniques on the panels, including those in your chipping tutorial. Do you think milk and chalk paint is durable enough to be used on wood paneling and does it require any sealant? Thanks!
Chuck, you might need to do a test area. I used this technique on our corbels (unfinished wood) and it is still in the same condition as when I painted it two years ago.
Is there an alternative to Milk paint that I might be able to obtain in South Africa as I really would like to try your technique? It is really beautiful
Awesome tutorial, you designed some stunning corbels and distressed them beautifully as well! Thank you for sharing!
These are really beautiful! I live near Huntsville and love going to Cullman to peruse Southern Architecture, my favorite store!
AMAZINGLY BEAUTIFUL!!!!!
I’ve tried the vaseline trick before but it always ends…well….um…not a great as yours lets say.
But I’m gonna give another try. Candle wax just doesn’t look as good as yours.
When I saw Southern Accents I freaked……surely not my favorite place to wonder and drool BUT i clicked it and sure enough it was. OK now off to paint something……THANK YOU SO MUCH FOR THE INSPIRATION!!!!! i sure needed it!!
why did you use milk paint for the bee and then switch to chalk paint for the paint to be chipped?
why did you use milk paint for the base and then switch to chalk paint for the paint to be chipped?
Tom, mostly because those were the colors I had on hand. But, the milk paint has a tendency to be more chippy, which is what I wanted for the corbels.
stunning corbels love your design!
Thanks Brittany for the shout out! We LOVE, LOVE, LOVE what you did with the corbels. They look amazing! Great tutorial…hope you don’t mind if we share!
Share away! I’d be honored Lisa. Thank you.
OMGosh! I love them so much! I’m actually completely head over heels for your kitchen!
New fan/follower,
Christine
Thanks Christine. It was truly a labor of love. I can’t think of another reason I would slave for 13 months on one room.
Hi Britt, you did;t mention anything about the your wood shelves, what kind of wood is that and did you finish that too, and how? Thank you!
It was reclaimed pine (I think.) I just sanded and added a matte varnish. You can see more about the shelves here; https://prettyhandygirl.com/install-shelving-corbel-brackets-tile-wall/
This turned out great. I love the look. Thanks for the tips.
Your welcome and thanks for your comment Vanessa!
Love the chippy corbels. I frequent SAAA at least once a month, Garlan really has some gorgeous things. I love the bulky decor.
Those corbels are GORGEOUS! I’m off to look around since I need some for my “new vintage” French Farmhouse. I usually use oil or wax when I want “chippy goodness” vaseline is a BRILLIANT choice! xo
The corbels are beautifully designed and enhanced by the paint treatment. I just purchased my first home and am finally getting to put your tutorials to use. I already have the corbels but can’t find thick wood for the shelf. The chain home repair stores don’t carry thick pieces. Could you sugggest where I might find some wood for shelving? Thank you in advance
I am a friend of Leldon Maxcy who cut these for Southern Accents. I have known him through scroll sawing and woodworking for nearly 20 years now. His work is amazing! I just wanted to say that I think you did a FABULOUS job finishing these beautiful corbels! I just finished a re-purposing project myself and the response was tremendous from people looking to add worn finishes like this. I think it is a strong trend right now. Thank you for sharing the tutorial on how you achieved this awesome look! It is really beautiful! 🙂 Sheila
Sheila, Leldon did a fantastic job creating the corbels! I love his workmanship and will love these corbels forever. In fact, if we move they might have to come with me!
I love the contrast of the painted wood and the natural wood tones of the shelf! Just gorgeous. I am often looking for the perfect corbel for client’s designs so this is a great resource to have to know that I could have a custom designed corbel. Nicely done!
Caitlin, you should definitely hit up SAAA. They have a large amount of salvage as well.
The corbel design is so beautiful and I absolutely love how you painted and distressed them. And the wood shelves look so good on the corbels. I am sure you are absolutely thrilled with how they turned out. Gorgeous, gorgeous, gorgeous!
Sharon,
Thanks for the compliment! I love them too.
I love how they turned out, thanks for the great tutorial!
Those are really gorg. We go to Southern Accents Architectural Antiques every now and then… I love that place!
Lynn, I’m soooo jealous! I wish I lived closer to SAAA. I have yet to step foot in their store, but hope to one day soon.
I love the chunky corbels and your painting effect is just perfect!
Thanks Julie!!!
thank you for this idea. I’ve done something similar using wax but this time I’m going to use petroleum jelly as you suggested. can’t wait to try it.