Changing Out a Light Fixture (Bye-Bye Hollywood Strip Light)

Have you had it with those ugly Hollywood light fixtures? The ones where the bulbs are lined up in a straight line staring you in the face? Did you know that you don’t have to live with them? Even if you live in an apartment, you can switch light fixtures out fairly easily. (Be sure to keep the old fixture and all the parts so you can re-install it before you move out.)
Light fixtures range in price from $20 to well over $200. Sometimes you can luck out and find some nice light fixtures on Craig’s List or eBay for less.
I hope you can benefit from this tutorial. I think you’ll agree, it is neither difficult nor challenging changing out a light fixture.
Instructions:
Before beginning the installation you MUST turn off the power to your fixture.

Required Safety Instruction:
Turn off the power to the light fixture you are working on. I highly recommend turning on the light you will be working on, then shut off the circuit at your circuit breaker and check to see that the light has gone out. Also note that just because the light fixture power is turned off, it doesn’t necessarily mean that other outlets or lights in the same room are on the same circuit. Always check for the presence of power before you work on it.
Tools:
(I’ve included affiliate links for your convenience. I earn a small percentage from a purchase using these links. There is no additional cost to you. You can read more about affiliate links here.)
- Light Fixture
- Needle-nosed pliers
- Wire cutters and stripper
- Flat head screwdriver
- Phillips head screwdriver
- Optional: electrical tape
Unpack your new (or slightly used) light fixture. Read through the directions as some steps may vary from this installation tutorial.
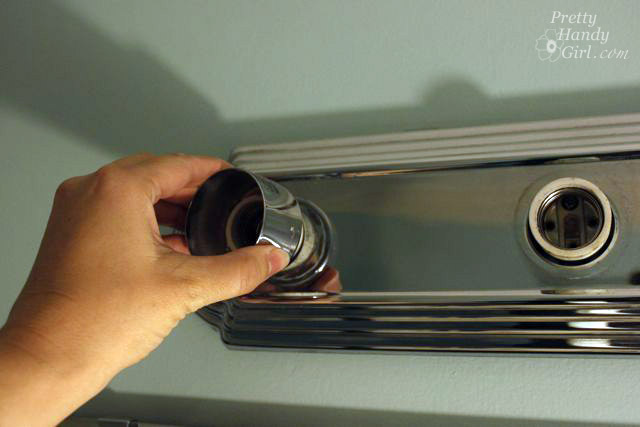
Begin by unscrewing the light bulbs and then remove the collars around the light bulb sockets.
Locate any other screws that might be holding the fixture in place. This fixture simply popped off.

Untwist the wire nuts holding the wires together.

Once all the wires are disconnected, unscrew the two screws holding the mounting bracket.

Remove the mounting bracket…

…and now you should be able to remove the light fixture. Laugh at any hidden colors and wallpaper beneath the fixture. (Toile! Ah, not so bad.)

You should be left with just the junction box and three wires protruding from the box. The bare or green wire is your ground wire. The white is your neutral wire and the black is your hot wire.

If you were eagle eyed, you might have noticed a small nick in the insulation of the neutral wire. This could cause a short, so I wrapped some electrical tape around the nick.

Install the new mounting bracket that came with your fixture (if you bought a used one, you may have to use the old mounting bracket from the Hollywood Strip). Attach the screws through the bracket and into the junction box.

The mounting bracket that came with my fixture has a rotating bar that can swing 180 degrees. Position this bar so the fixture will hang level.)

Test fit your fixture and adjust the depth of the mounting screws (the “no head” screws on the mounting bracket) and the angle of the swinging bracket arm. Once the bracket is level and fits snugly with only a small portion of the headless screws poking through; remove the light fixture and tighten the screw in the middle of the mounting bracket to secure the rotating bar.

Wrap the ground wire from the junction box around the green or bare screw on the mounting bracket.
Connect the ground wire from the light fixture to the ground wire from the junction box. Twist them together and secure them with a wire nut.

Twist the black wires from the junction box and the light fixture together.

Twist a wire nut on to secure them.

Repeat the same process to connect the white wires.

Gently fold and tuck the wires back into the junction box. Try to position the white wires on the opposite side as the black wires.

Place your light fixture onto the headless screws and secure the fixture by screwing on the small ball caps.

Remove the shade ring from the light bulb sockets.

Slip the glass shades onto the socket and then screw the collar back on to hold the glass light shades.

Repeat for the remaining light sockets.

Many vanity light fixtures are reversible.

I decided to rehang my fixture facing up for less direct light and to avoid bumping into the mirror frame.

What do you think? Do you like the new look? Do you think you will try it yourself? I hope so, it was easy!

I have a horrid Hollywood light fixture, but the fixtures I want to hang are 2 individual sconces (double sink, so I have 2 oval mirrors and I want a light over each of them). So I’ll have 2 sets of wires. I assume I’ll need 2 junction boxes? Can I put a junction box in myself or is that something a professional should do?
Tara, since you are adding electrical, it’s better to have an electrician handle it.
Our huge 72” Hollywood Globe light fixture was adhered (either glue or adhesive tape) on top of a whole-wall sized mirror. How can I remove the light fixture without breaking the mirror, which we want to keep?
Try using a razor blade to carefully score under the fixture.
Think I have the same question. After removing my Hollywood lights strip fixture it leaves an extremely large cut out in the wall. How do replace this large triangular hole that in the wall? Do you have a link or video?
You need to have a junction box installed. You can use old work junction box like this one: https://amzn.to/2w20csz
Yikes. Your picture of the stranded hot around the solid hot is concerning. You’ve started the stranded wire way too far back. When the wire nut is screwed on, the stranded will push back even further creating a situation that could cause arcing and fire. Giving advice about electrical work is sketchy unless you have a lot of qualified experience or are in the trade.