Tool Tutorial Friday – How to Use a Caulk Gun
You know the old saying, “No question is a dumb question.” Well, I have to say that about this tutorial, “No tutorial is a dumb tutorial.”
I realize that a caulk gun isn’t a big scary power tool, and yet I still think learning how to use a caulk gun is a very valuable skill for any handy person.
So, let’s get right down to some Caulk Talk.
How to Use a Caulk Gun
A caulk gun is a necessary tool for any homeowner. Sealing gaps in siding, replacing the seal around the tub and shower surround when the old caulk gets dry and brittle is a must. Caulking around the trim around windows and doors will improve your homes energy efficiency and get rid of unsightly gaps. You can also use it for spreading construction adhesive and any other substrate that is sold in tube form. A caulk gun saves your hands from cramping, especially if you have a lot of caulking to do.
A basic caulk gun costs about $10 – $20, but you could buy a power version which run up to $200! Sheesh!
Starting a tube of caulk:
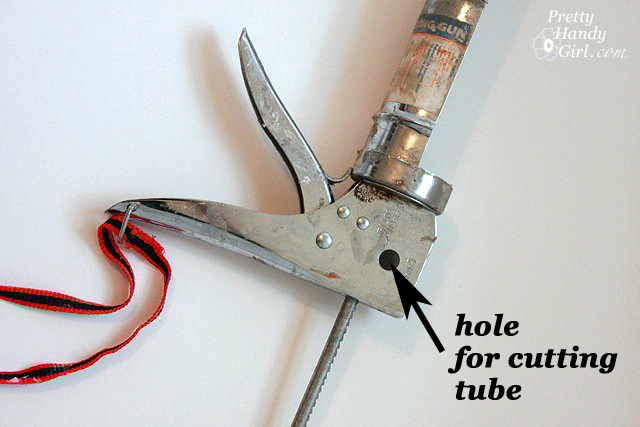
Cut off the tip of your tube by inserting it into the hole at an angle.
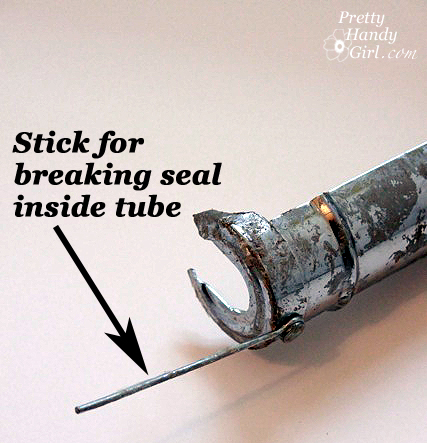
Poke the stick attached to the gun into the tube to puncture the seal.
Loading a caulk gun:
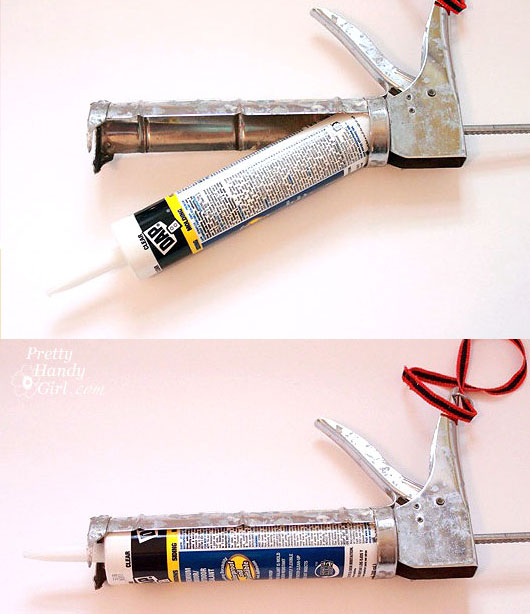
Pull the hooked rod all the way back. Insert your tube base first. Then tilt the nozzle end into the top of the gun.
Rotate the hook so it is facing up and the teeth are facing down.
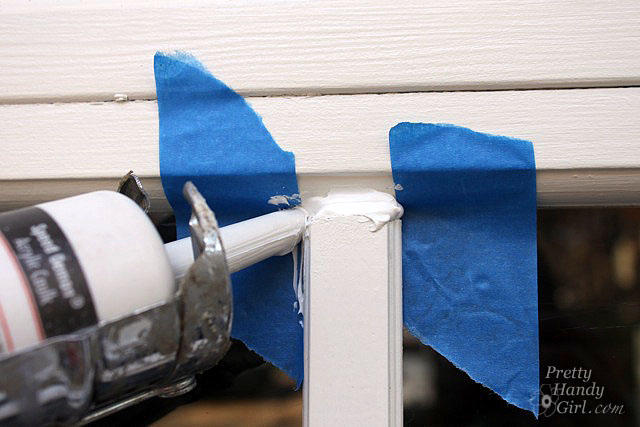
Pull the trigger and you’re good to go!
Be prepared to pull the hook rod back when you finish or the caulk will continue to flow out of the nozzle.
Watch these videos for more details on using a caulk gun (also called a caulking gun) and why it is important to fill any cracks or seams in your siding!
*Thanks to The Real Tim Jones for sharing the secret about how to cut and start your caulk tube! Tim is sooo right, I never knew about this until I saw his video!
And, if you want to find out how to keep your caulk from drying out in between uses, my friend Sandra at Sawdust and Paper Scraps has this tip.
Happy Caulking!


Put a wood dowel in the opening of the gun. Go to your craft store and buy a short variety dowel pack and stick the right size in to put the hole and seal it completely. Then put the whole thing in a big ziplock bag and push out all the excess air. Leave it for 2 years longer if it’s in a dealer cool place. 🤗
I have the same problem with my clear silicone waterproof adhesive. I have to stick an ice pick into it everytime and wiggle it around, and then it starts to flow out for a moment. Have to do it again once it stops because the gun itself doesn’t really push it out when I pull the handle and I’m pretty strong. This is my first time using these things so wondered if I was doing something wrong, but from what I’m reading, I’m not.
Thank you! You were the first caulk gun description that I found on the web that said how to line up the plunger, with the teeth down. I viewed 6-8 videos and tutorials before yours. I will automatically search your site first when I need help with a tool. You are the BEST!
Thanks for the post. I was caulking today for the first time. I was using silicone caulk and I had a really hard time squeezing the handle to get some caulk out. It looked pretty dense and hardly came out. Date on the tube says 2019 so you’d think it’s not too old. but since it’s my first time I can’t compare to anything. I couldn’t find a way to make this easier. Made the whole bigger, poked some more around… I feel like I need a pneumatic caulk gun – my grip is simply not so strong. Is there a caulk gun for not too strong women?
Hmm, that is odd. Was the tube stored in a cold location? I’d guess it was a bad tube of caulk, but you can find good caulk guns at your local paint store (Sherwin Williams has one that is really heavy duty.) Good luck.
ok. I got the starting part just fine. Now how do I get the blasted caulking tube OUT of the gun? Thank you!
Pull the hook rod all the way back. Then tip the caulk gun upright (caulk tip up). You should be able to remove the tube now.
thank yooooooooooooou.its good site
thank yoooooooooooooooooooooooou
This may be a super dumb question/problem. I’ve got a tube of adhesive for some cove base I need to repair in my office. I know how to use the caulk gun in theory – I cut off the tip, and then I tried to puncture the seal with the wire and I can’t get through it… I’ve been pressing like really really hard and no dice. I even tried using a screwdriver and driving it in there with a hammer and that didn’t work either. Any ideas on what I can try?
Thank you SO much for showing the little metal stick/wire on the side of the gun for puncturing the seal!! I figured everything else out myself, but all the instructions I found just said “puncture seal”, not HOW to puncture the seal! My gun has the little stick, but I never would have noticed it without your tip, and even after reading the text, I still didn’t get it until I looked at the photo. Great tutorial! 🙂
Eileen, it took me years to realize what that was for ;-).
That person who made an issue probably calls a caulk gun a caulk gun but in truth its Not used only for caulk so should we start calling it what it is/ a hand held multi material extrusion machine?
To settle the argument its a slotted screw driver. (Sold in stores under that title) Reason being it isnt the driver being referred to in its use its the screw. some slotted screws aren’t flat, but the screw would have a slot, (Slotted screw driver). The term flat head is meant to imply the head of the driver is flat thus fitting a slotted screw. the term flat head screw driver is used to identify the shape as the driver doesn’t have a slot the screw does. Most older (Time relevant) screws had slots. new screw designs now have flat edge holes and you wouldn’t say give me a flat edge hole screwdriver would you. So to end this slyness the author is correct in saying flat head.
Pretty sure I couldn’t get through a video of caulking without making some serious cock related jokes.
Props to you! “Have to fill the gap with caulk-” …that’s what she said. Right? Or is it just me?!
Great info as always. Have to do this in my bathroom, the tips will come in handy.