Toilet Repairs – Part 2 – Replacing the Fill Valve
Hey, you came back! So glad you weren’t scared off by my toilet repair post. Well, congratulations to you for sticking with me and wanting to learn how to fix your toilet.
In Part 1 we learned how to replace the flush lever. If you found it easy, I know you won’t find today’s tutorial too difficult. And then, you will certainly be able to replace the overflow tube and flapper in my next post.
In review, here is what your toilet tank parts are:

Here is the kit I recommend you purchase (costs about $20):

And here are the tools you will need:

- Plumber’s Wrench (must have a wide mouth opening. The Irwin pliers shown have just enough of an opening to work)
- Adjustable Crescent Wrench
- Handsaw (drywall, coping or hack saw will work. Needs to cut through PVC)
- Flat head screwdriver
- Level
- Scissors
- Bucket or basin
- Sponge
- Rags or Towels
- Rubber Gloves
Disclaimer: This tutorial is a general overview of replacing a fill valve in your toilet tank. Be sure to follow the directions that come with your toilet parts as there may be changes or additional steps.
If you haven’t done so already, start by turning off the water. There should be a water shut off valve in the wall behind your toilet. Gently turn the knob clockwise to shut the valve.

Next, flush your toilet to drain the water from the tank. If your tank re-fills the water is not completely shut off.

Remove the lid to your tank. Set it in a safe place where it can’t get dropped and broken.

If there is still a lot of water in the bottom of the tank. Lift the flapper chain to drain the tank to the top of the flapper.

Use a sponge to completely soak up all the water remaining in the tank.

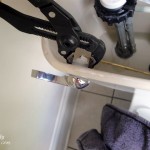
Once the tank is completely empty we can start to remove the fill valve. Look underneath the tank to see where the water line feeds into the tank. Using pliers, loosen and then remove the coupling nut from the supply line.
One quick note about supply lines: If your toilet has a plastic or rubber supply line, you should consider replacing it with a braided metal supply line that is less prone to breaking or leaks (in other words they can cause a major flood!) The same advice applies to the water lines under your sink and definitely your clothes washer.

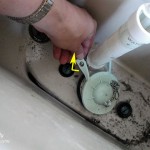
Place the basin or bucket underneath the supply line and gently remove the line from the bottom of the fill valve (gray threaded stem shown below.)

Remove the washer holding the fill valve to the tank.

Inside the tank, locate the small rubber hose that attaches the fill valve to the overflow tube. Then disconnect the hose as shown below.

Now you should be able to lift the fill valve up and out of the tank.

Place the new fill valve into the tank where the old one was. Notice the sleek new design, No Float Ball!

Side Note: You may need to adjust the height of the fill valve to fit in your tank. If so, twist the top portion of the valve independent of the bottom half. (After you fill the tank, you can raise or lower the valve the same way if you need to adjust the height of the fill valve.)

Thread the new washer onto the bottom of the fill valve where it extends out the bottom of the tank.

Gently tighten the washer, but be careful not to overtighten, or you might break the tank.
Next thread the coupling nut back onto the bottom of the fill valve to secure the water line.
Add the fill valve water hose onto the side of the fill valve. Then measure the distance to the top of the flush valve. Leave an extra inch, and trim any excess hose.

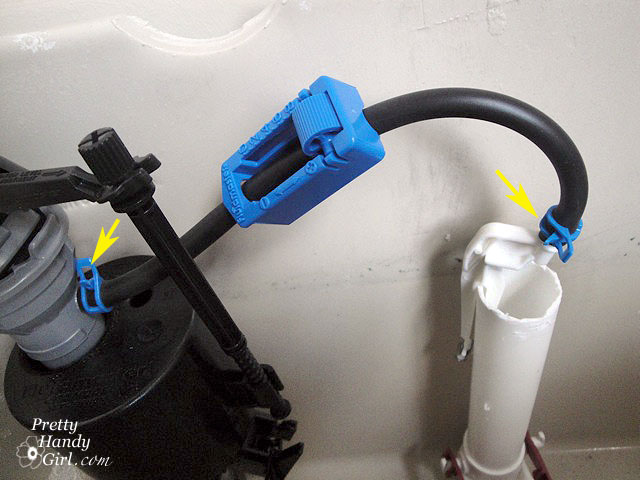
Find the anchor clip that attaches the hose to the overflow tube.

Slide the hose onto the clip and attach it with a hose clamp (if included with your kit).

Attach another hose clamp to the end of the hose where it meets the fill valve. Slide the anchor clip onto the top of the overflow tube. The hose should be free of kinks and should arch up as shown.
Before you turn the water back on, you need to flush the fill valve to rid it of any foreign matter. Twist the top of the fill valve counter clockwise and lift up to release it.

Place a bucket or cup directly over the top of the fill valve. This will re-direct the water that is going to spray straight up out of the fill valve.

Gently turn on the water supply while holding the bucket. Let it run for a few seconds, then turn it off again.
Replace the cap of the fill valve by setting the cap back on top and then twist the cap clockwise. Make sure it is on securely. Then turn the water supply back on.

While the tank is filling, press down on the float cup until it is submerged under water for 30 seconds. Then release. Now you can adjust the water level adjustment screw until the water in the tank is about 1″ lower than the top of the overflow tube.
Test your toilet by flushing it a few times. Does it work?! Hooray! You’ve now replaced 2/3 of your toilet tank parts. Next up, how to replace the overflow tube and flapper assembly.
Thanks so much Brittany! I don’t know if you are still following this post, but I’m in the middle of replacing my fill valve. I got as far as removing the supply line from the tank. However, I just can’t get the washer off that is still attached to the bottom of the tank, holding the valve in place. It is a little recessed. I’ve tried all the wrenches, pliers and vise grips I have to no avail. I finally have ordered the Irwin VISE-GRIP GrooveLock Pliers and hope that I can get it lose. I got the ones with the V-jaw. Anyway, I’m having trouble knowing which way to try to turn the washer. At one point I was able to get it to turn a little toward me (which is “lefty loosey” but I think I tightened it. 🙁 Should it loosen by turning away from me (which seems like “righty tighty”) Hope I get better at this! It seems pretty straight forward after that, thanks to your great tutorial!
Rhonda, it depends on the brand of fill valve that is installed, but I just looked at mine and it does appear that you will be turning it lefty-loosey (counter clockwise) if you are looking at the nut from underneath your tank. Try spraying a little WD-40 around the nut and let it sit for 15 minutes. You can also gently tap on the nut first. And finally, if you can tighten it a notch, that should break what’s holding it and allow you to then back it out.
Nice Blog. You describe step by steps how to repair the toilet. its very useful foe all.
Participants will have to do photography shoots, shows,
film and Television shoots. 6 occasion during Art Miami Beach, wherever West was a audio
This versatile system was initially invented by Nikola Tesla
way rear in 1930. The sensation generated by the machine, so exporters have to
replace older wiring in your home and also provides
you the best possible solution. It is used as power source of appliances we have
at home and inside offices.
Thank you so much for the pictures- they are very helpful! Although I am not handy…. at all… I decided to take on changing the fill valve on one of my toliets (since it was running all day and all night). This morning I shut off the water and drained the toliet bowl, but when I went to remove the coupling nut it sprayed me in the face with water – a lot of water. But the bowl isn’t filling back up, so I assume the water is off. Is this a sign that I should call a plumber, and never attempt anything like this again, or is this normal? I realize this post is several years old, but if you could help I would greatly appreciate it!
Kelly, it’s possible that there was still a fair amount of water in the supply line. Sorry that happened to you. If you are in doubt, you can shut off your water from the main shut off. Here’s my post about turning off your water from the main valve if you don’t have a whole house shutoff. https://prettyhandygirl.com/water-leaks-polybutylene-pipes-and-mold-what-to-do/
By the way, I definitely know you can do this! Don’t get discouraged. Only call a plumber if you absolutely have to ;0).
Initial installation was wrong in the above pictures in that the rubber sealing washer is missing. The yellow flange of the supply line is not a sealing material. Consequently the coupling nut needs to be overtightened to force a seal which could cause a crack and leak in the plastic nut later on. You should never use tools to tighten the plastic coupling nut. Plastic is very susceptible to creep rupture over time caused by over-stress due to over tighteniing. This joint if installed correctly shoulde be hand tighten only. The common mistake is not using the sealing rubber washer between the supply line and fill valve.
Thank you for your instructions…between yours and the manufacturer, I was able to change this out in no time flat with no issues. This saved me a call to a plumber and lots of $!
Cindi, thanks for taking time to leave me a comment. I’m so thrilled it was helpful for you!
This site is fabulous. The tutorial on changinng out the toilet bum-out was extremely helpful.
I have replaced my fill valve, and it works well. Only problem is that after the tank has been filled for awhile it slowly empties. Should I replaced the flapper? I’ve tighten the flapper chain, and the chain from the lever to the valve, and I’ve adjusted the water level. The tank still slowly empties.
Matt, yes, that sounds like a flapper issue.
Thanks for the post…I love the Irwin Vise Grip its a great tool ..helped me when the other wrenches failed!
I’m slowly replacing all my tools with Irwin! They are seriously tough as nails ;-D
Replaced my fill valve and now the water flows in real slow. I can take the top off of the fill valve and put it back on and the water comes in right but the next time I flush the toilet the water is back to trickling in. Hope you can help.
Ella, did you flush the fill valve after you installed it (the picture with the blue bucket shows how I did that. If you didn’t there may be sediment that got stuck in the tubing that connects to the overflow tube. If worse comes to worse, you might need to contact the manufacturer. Good luck and congrats on taking on this project! Don’t get discouraged, there are always set backs.
What are the symptoms for needing a new fill valve? On ours, you have to push the flush handle down really hard and hold it… or it won’t flush at all on first flush sometimes. Thanks for the great tutorials!
Sheila
Sheila, it sounds like you either need a new flapper or you might try tightening the chain between the flapper and the lever rod. If you need to replace the flapper, you should probably place the entire overflow tube/flapper assembly. I should have that tutorial up in the next day or two. Stay tuned 😉
Perfect timing. My husband hasn’t found the time to replace our fill valve that been sitting on the back of the toilet for weeks. I’ll just do it myself. Thanks for the tutorial.
Your pictures of Scotland are beautiful. Hope to visit one day.
CAN’T REMOVE BLACK PLASTIC CAP ON FILL VALVE AND TRY TO TURN IT BOTH WAYS WOULD NOT BUDGE ALSO EVEN REMOVE NUT AT BOTTOM OF THE FILL VALVE WILL NOT MOVE WHAT CAN i DO