Stenciled Drop Cloth Table Runner

I love a functional gift that will last beyond the holidays! These stenciled table runners are just the ticket for anybody who likes to host parties or just make their table look festive.

You can purchase almost all of the supplies at your local Lowe’s Home Improvement store. The cloth is cut from a canvas drop cloth that was folded into fourths and cut into pieces 27″ x 6′ long. To make them look and feel more like french grain sack material, the drop cloths are washed 2-3 times in the washer with bleach added to the cycle. The result is a lighter and softer canvas that mimics linen.

With four runners from that one drop cloth, you may decide to try a different color on each one. 😉


I used some leftover latex paint for two of my runners. Plus, I bought a sample of Valspar paint in “Bright Red” for the red one.

Each sample jar holds enough paint to print two runners.
Materials:
(I’ve included affiliate links for your convenience. I earn a small percentage from a purchase using these links. There is no additional cost to you. You can read more about affiliate links here.)

- Blue Hawk 9-ft x 6-ft 8 Oz. Canvas Drop Cloth
– pre-washed and cut into four 27″ x 6′ strips
- Valspar 8 oz Paint Sample
- WHIZZ 4-in Cabinet/Door Foam Roller
- Paint tray
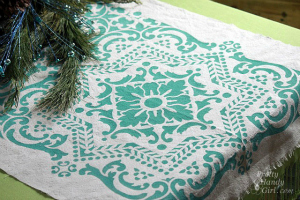
- Royal Studio Design Stencil – Lisboa
- Painter’s Tape
- Wet wipes
Instructions:
Fray the edges of the canvas runners. Trim any long threads.

Fold the canvas runner in half length-wise and iron the fold. Open up the runner, fold it in half width-wise and iron the fold. This will give you a center mark to line your stencil up with.

Line up the stencil on the center creases. Put a piece of painter’s tape on each corner to hold the stencil in place.

Roll the foam roller into the paint and roll off any excess. Run the roller over the entire stencil being sure to get equal coverage and not to run over the edge of the stencil.

Carefully lift the stencil up and off the runner.

Line the stencil up next to the first print. Make sure the stencil overlaps correctly.

Roll paint over the entire stencil again.

Repeat on the other side of the first stencil print. Three Lisboa stencil prints should fit perfectly on the runner.

After the paint has dried you may wash the runner again to soften the paint. The edges will fray a little more, but I tend to like that look. If you don’t want the runner to fray you could turn the edges under and sew a seam.

Now all you need is some food to have yourself a New Year’s Eve bash!

I’m in love with these runners. So much so that I’m hesitant to give them as gifts. Although, in 15 minutes I could print another one for myself.
I just need to decide which color I like best…hmmmmm, blue?

…or red?

I think Santa would prefer to have his muffin and milk served on the red one.

Which color do you like best?
Update: Several commenters mentioned that the cost of the stencil was getting in the way of their idea of a frugal gift idea. Feel free to use whatever you have on hand. Or you could make your own stencil with a monogram or use painter’s tape to create stripes or a different design. Open your mind to other options if you don’t want to purchase a stencil (although I have to say I’ve used this stencil for two projects now and soon to be three.
![]()
![]()
Disclosure: I have partnered with Lowe’s as a Lowe’s Creative Influencer. I was provided with a Lowe’s gift card to complete my project. The tutorial, photos and opinions expressed in this post are my own. I was not told what to write. #LowesCreator


Your project looks beautiful! How does the valspar paint wash? Did you add a textile medium to it? Thanks,
Beth
I’ve washed it multiple times and the paint stays on fine. It also gets a little softer each time I wash it.
“Price of stencil getting in the way of doing the project you say?” Yikes, I’ll say!!
Hi…your table runners are just beautiful!! I was wondering if you could tell me where you got your stencils from? I have been looking for stencils that big and I am having a very hard time finding them. Thank you! AGAIN…JUST GEORGEOUS!!!
Shirley, I get most of my stencils from Royal Design Studio. The one I ordered is this one: http://www.royaldesignstudio.com/collections/tile-stencils/products/lisboa-tile-stencil