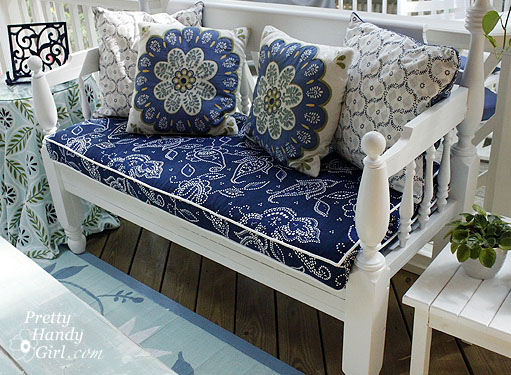
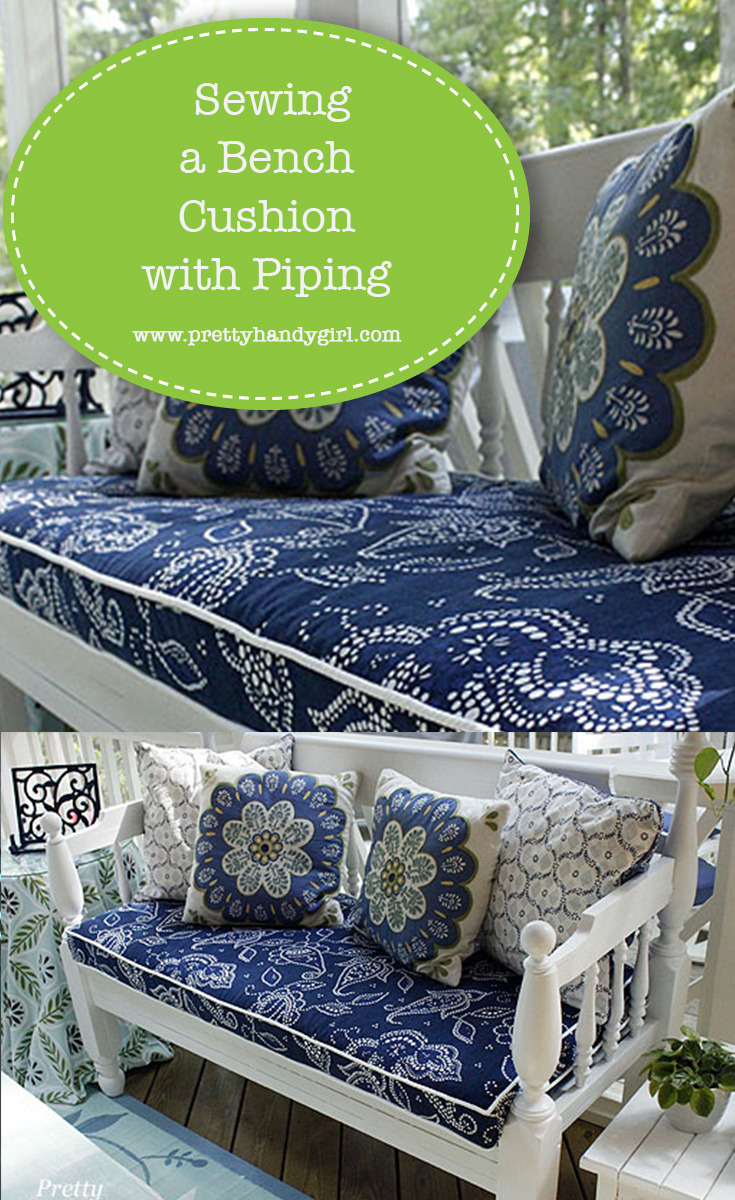
Sewing a Bench Cushion with Piping
Yes, you can sew your custom bench cushions and add cute piping trim to it. It’s not hard and I’ll show you how easy Sewing a Bench Cushion with Piping can be.
Sewing a Bench Cushion with Piping
Before you run screaming, “I can’t sew to save my life!”, let me tell you I thought sewing a bench cushion was going to be difficult. But, I thought sewing a bench cushion with piping would be next to impossible. Little did I know, once I figured out an easy way to create the box, it was actually very easy!
My Secret Fabric Source:
Before we get started I wanted to let you in on a little secret: The bench cushion and side table fabrics you see below are shower curtains!
You read that right. Shower curtains are not only inexpensive, but they are durable and can stand up to moisture. This makes them perfect for outdoor use. I bought both of these at fabric shower curtains at Target for under $20 each!
 Materials:
(I’ve included affiliate links for your convenience. I earn a small percentage from a purchase using these links. There is no additional cost to you. You can read more about affiliate links here.)

- 3″ foam cushion
- Batting to cover foam
- Thread to match cushion
- Fabric to cover all six sides of your cushion (or inexpensive shower curtain)
- Sew-in velcro strips
- Sharpie marker
- Pins
- Piping trim (tutorial for making your own less expensive piping)
- Sewing machine with zipper foot
- Iron
- Scissors
- Batting (if you are cutting your own foam)
Okay, let’s get started!
Preparing the Foam Cushion
Lay your foam on top of the bench. Mark a line where you need to trim.

Use an electric carving knife to cut through the foam.

Wrap batting around your foam. Then trim the edges down to size. I had enough to put two layers on top of the foam and one layer on the bottom. This will make for a cushier and less “squared” cushion.

Cutting out the pieces
1. Lay out your fabric (err, I mean, shower curtain) folded in half. Place your cushion on top. Trace around the cushion about 3/4″ wider on all sides.

Cut through the two layers. This will give you the top and bottom panels for your cover.

2. Next cut out four strips of fabric for the sides. Cut your lengths 2″ longer than your cushion.

If your foam is 3″ and you use 1-2 layers of batting, you can use these measurements for your strips:
- Front: 4.25″ wide by length + 2″
- Sides (left and right): 4.25″ wide by length + 2″
- *Back: 5.5″ wide by length + 2″
- *Back Fold Over Flap: 3.5″ wide by length + 2″
*The back is wider and has two strips because we need to sew an overlapping flap and velcro to make the cover removable.

Assembling the sides
1. Wrap the 4 strips around your cushion right sides facing in. (Reserve the back fold over piece for later.) Pin the edges where they meet at your cushion corners. The back strip should line up with the sides on the one edge. But, the other edge will extend 1.25″ taller than the rest.

2. Remove the sides and stitch where the pins are. When you get to the back strip, fold over the excess so it matches the same height as the rest of the strips.

Then stitch along the back strip’s folded over fabric to secure it.

Set your sides aside for now. It is time to pin the piping to your cushion top.
Adding the Piping
(Tutorial for Making Your Own Piping Here)
1. Lay the top panel right side up on top of the cushion. Pin the piping on top of the fabric. Line up the piping with the edges of the cushion. Be sure the raw edge of your piping is facing the raw edge of the fabric.

When you reach a corner, snip into the raw edge of the piping all the way (but not through) the rope piping. Then turn your piping at a clean 90 degree angle and continue pinning.

When you reach the beginning of your pinned piping, simply overlap the two about 2″ and cut off the excess.

Your top should look like this:

2. Set the top panel on your sewing machine and sew the piping into place. Your needle will be very close to the piping, but it shouldn’t stitch into the rope. This is where your zipper foot really helps!

Carefully sew and backstitch over the place where your piping overlaps.

Connecting the top and sides
1. Lay your top panel onto the cushion. Pick up your sides and begin pinning them to the top of the cushion. The hem on the back side should be facing up and away from the piping. Position your pins close to the piping but not on top of it. Try to line up the corners of your sides with the 90 degree corners of your piping.

2. Stitch the sides onto the top piece. Again, your needle will be very close to the piping but not over it. This is a little trickier because you can’t see the piping, but you can feel it. Just use your fingers to guide you. (Piping shown by the red arrowed line below.)

Turn your top cover right sides out and test the fit on your cushion.

Repeat the steps above for “adding the piping” for your bottom cover.

Adding the back flap
1. NOW, pick up that back fold over strip that has been sitting all by its lonesome. Fold the edges over twice on three sides (2 short and 1 long) to hem your flap. Press the hem with an iron.

Go ahead and stitch along the folded hem to secure it.

2. Center and pin the flap along the back edge of the bottom panel (right sides together) as shown. The raw edges should be facing out.

3. Stitch the back flap onto the bottom panel next to the piping. About an inch or so of the panel will extend on both ends. Leave it loose so it can tuck inside the cushion.

3. Turn your top panel and sides wrong sides out and put your cushion inside it. Then lay your bottom panel on top as shown.

Pin the bottom panel to the sides just like you did for the top panel. This time leave the back side unpinned (where your two flaps overlap.)

4. Now is a good time to trim any excess from your previously stitched seams. (There will be a lot of fabric on the sewing machine, and this is just one less piece that could get caught while stitching.)

Trim off the corners at an angle.

Ever so carefully, peel the pinned cover off the cushion.

5. Stitch along the two sides and front of your cover. Leave the back length of the cover open. Remember, use your fingers to feel for the piping.
6. Turn the cover right side out and slide the cushion into the cover.

Check the fit and make sure you don’t have any stray fabric that might have gotten caught while sewing.

You should have an opening in the back like this.

Adding the velcro closure
1. Take out your coordinating velcro tape.

Pin the hook and loop velcro tape onto the backside and the back fold over flap. I used 4 strips of 3″ velcro evenly spaced along the length of the opening.

2. Stitch the velcro onto the cushion. You can use a zig-zag stitch for extra strength (if you have destructive little boys like I do!)

Check the fit of the velcro.

3. If everything looks good, you can turn the cover inside out and trim off any excess raw edges. Then turn the cover right side out and insert your cushion.

And that’s it! You are done and you have a professional-looking, washable, piped slipcovered cushion! Phew, say that 10 times fast. Now you know how easy Sewing a Bench Cushion with Piping can be!


Want to see the rest of my screen porch makeover? I spent less than $125, that’s what I call an extreme budget!
I’d also love to have you join me for some more easy sewing tutorials!
On a personal note: This week will be a busy one, I have several projects to start; several to finish; I need to pull a permit and I REALLY need to order a refrigerator. If you have one you absolutely love, I’m open to your suggestions. Currently, we have an 18 year old side by side. I’m thinking a 25 cu ft or larger french door fridge might be better suited to a growing family of boys.

Pin for later!

Never thought of using shower curtains – ingenious!! And thank you for the detailed tutorial. We just moved into a new place with a screened-in back porch and I want to give it a little more “cohesive” look instead of the hodgepodge it is now. Seeing your porch has given me a starting point!
Is the batting cut the exact size of the cushion? In one picture, it looks like it is bigger than the cushion? I guess I’m being a perfectionist. Thank you. Candy
These are so pretty. I wish I had as much patience as you!
Great tutorial, I just found wish I had seen it sooner when that pattern shower curtain would still be available. But again, you made the tutorial look so easy and I will find another striking blue and crisp white pattern to use. Thank you!
I know this is almost five years after your post, but so nice. Someone else that uses shower curtains/drapes for projects. Such a fantastic piece of fabric (and so cost conscious). I also scope out thrift stores as they receive “last years models” at times with beautiful fabrics.
I need to remake a foam cover I put together last year in a rush. We’re currently remodeling our basement (my work area) so I can’t work on this yet.
Thanks – Katherine
I have never sewn anything in my life….but I want to make one of these for a bench that I restored. I am wondering if this will be too advanced for me…or should I give it a try?
Peggy, I think you should go for it, but be okay with making a few mistakes. This is not a super easy project, but you’ll learn tons on this one!
Exact what I was looking for.
I love how u clearly show ea & every step. Thank u!
Any chance u’d be willing to show how to go about adding a zipper instead of velcro?
I tutorial on a hinged cushion would be great.
Cheers!!
Sorry Carolina, I don’t have a tutorial for adding a zipper. Try googling a tutorial for adding a zipper to a box cushion.
Do you remember what the brands names were for these curtains?
I don’t. They were from Target. I haven’t seen them for sale there for a while.