Scraping Your Own Popcorn Ceilings – It’s a Messy Job, but Someone’s Gotta Do It!

Many of you guessed correctly that I would be scraping my own popcorn ceilings.

It wasn’t hard to do, but it also isn’t for the bad neck or bad back sufferers. Normally I hire out this job — but because our laundry room is so small — it seemed silly to pay someone else to do the work. Now that it is done, I’m really glad I decided to tackle this project. The sense of accomplishment and the resulting smooth ceiling is HUGE!
IMPORTANT NOTE: If you live in a house that was built around 1978, take several small samples of your ceiling and test it for asbestos before you begin. Even though the cutoff date for asbestos in popcorn texture was 1978, the inventory could still be bought from store shelves well into the 1980’s. Do yourself and your family a favor, If you have asbestos popcorn contact a professional who is trained in asbestos removal to handle the job. If you want to learn more, you can read more about our experience with asbestos remediation.
Materials:

- Thin disposable drop cloths
- Painter’s tape
- Garden style sprayer (much better than a squirt bottle)
- Full goggle eye protection
- Dust mask
- Spackle knife
- Joint compound (or spackle)
- Big sponge (car wash sponge is a good size)
- Sandpaper (180 grit or higher)
- Hand sanding block
- optional: floor scraper
(I’ve included affiliate links for your convenience. I earn a small percentage from a purchase using these links. There is no additional cost to you. You can read more about affiliate links here.)
Difficulty: Medium Hard
The scraping is relatively easy if you have a popcorn ceiling that hasn’t been painted numerous times. The hard part is looking up for an hour and also finessing the joint compound to look smooth. But, if you can ice a cake, you can do this!
Preparation:
Remove any light fixtures (Be sure to turn off the power to any light fixture before removing it.) Put the wire nuts back on the exposed wires and cover the fixture box with a plastic and tape.

You must — I repeat — you MUST tarp off the entire room. This project is messy and in the end it will be so much easier to roll up the tarp and throw away the removed popcorn.

Tape the plastic at the very top of the walls. Tape any seams in the overlapping sheets of plastic.
Removing the Popcorn:
Fill the garden sprayer with water. Put on your dust mask and eye goggles. Spray the entire ceiling. Throughly wet every square inch.

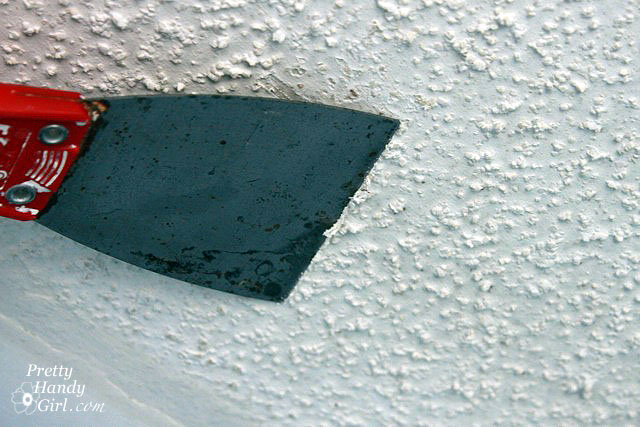
Allow the water to soak into the popcorn. After 15 minutes, spray the entire ceiling again. Wait a few minutes and then test an area to see if the popcorn will come off. When it’s ready, that stuff will just slide right off as you push the spackle knife along the ceiling.

I bought this floor scraper because my friend Sandra (Sawdust Girl) mentioned that it might make the job easier.

Once I tested the corner with the spackle knife, I got so excited by how easy it was coming off that I never used the scraper. If I were to scrape a larger room, I would definitely use the floor scraper next time.

All the popcorn will fall into your plastic tarping. Talk about seeing the fruits of your labor:

Once all the popcorn has been sloughed off, take a damp sponge and wipe off any remaining pieces and the film that is left. Be careful not to get the drywall paper too wet or it will rip.

Inspect the ceiling for any gouges, holes, or imperfections. Use spackle to fill any of them.

Spreading joint compound (or spackle) over large areas that need smoothing:

- Dip spackle knife into joint compound.
- Spread the compound over imperfections in the drywall.
- Continue spreading the joint compound over the drywall in the same direction until the entire “line” has been covered.
- Wipe off excess joint compound back into the bucket. Gently drag the spackling knife along the joint compound perpendicular to the direction that it was applied. Resist dragging the knife over a 2nd time. It is okay if you have some raised sections, they will sand down. Holes and dents in the joint compound are no good and you will need to spread more onto the ceiling.
Allow the spackle to dry and sand it smooth with the sandpaper.

Wipe off the ceiling with a damp sponge.

Prime and Paint the Ceiling:

Using a paint roller on an extendable handle, roll primer onto the entire ceiling.

Allow the primer to dry.
Lightly sand the ceiling to knock down any imperfections.

Wipe off any sanding dust with a damp sponge.

Paint the ceiling with two coats of a flat paint in your color choice. If you want a more thorough tutorial on painting ceilings, read this post.

Personally, I like using an ultra bright flat paint like Valspar. It has the best light reflection ability.
After all your hard work, pat yourself on the back and then carefully roll up the tarps and take out the trash. That will be one heavy bag!
Coming up next week: Installing the FlowWall System and a giveaway! You don’t want to miss it.
 P.s. Thank you for all your prayers and kind words while my son was sick. He is finally feeling better and went back to school yesterday after three weeks. We are fairly certain that he had norovirus and it just sent his system into a tailspin. Thank goodness for hospitals and modern medicine!
We cleaned the ducts yesterday.
My husband wore a mask and goggles. It’s hard to find good help in poor small towns. We’ve lived here 3 years.
Thank you so much for your kind comment!
My husband 71 yrs old, sanded the popcorn off the shower ceiling. He had a sheet down but dust is everywhere. In the cupboards and drawers and floor vents. I cleaned the cupboards but what about the vents? Is it dangerous?
Did you have it tested for asbestos? Regardless, it’s not good to breathe any dust from demolition or scraping. He should have kept it wet. You may want to at least change your filters, but you can also hire someone to clean your ducts.
I purchased a power drywall sander from my local home store for just over $100. It sanded off my popcorn quickly while vacuuming the resulting dust into my shop vac for easy disposal. I saw them do this on the DIY channel and decided to give it a try. Not only was there very little mess, the ceiling was ready for paint when I was done. No spackle or additional sanding needed. It as an adjustable handle, so I didn’t need a ladder either. When I first went looking for the power sander like the one I had seen on the TV show, it was about $1500. The one I bought at the home store looked just like it and worked perfectly for $1400 less! I couldn’t be happier with my decision to sand instead of wetting and scraping.
How to do popcorn ceiling removal, in what time does it take.
How long did this take to complete?
Sarah, about a few hours of spraying and scraping. Then a day to let any joint compound dry (you have to use for smoothing scrapes and gouges.)
I agree with you Doreen. The blog gives great knowledge regarding popcorn ceilings removal. Even I was looking for a blog like this!!
I am so happy I stopped and read your post about this sort of project. I am helping my mom with projects in her 1973 home w/popcorn ceilings in every room; Thank you for pointing out it is not good for bad backs and joints….lol. I will be hiring this portion of the job out now.
We are getting ready to tackle removing popcorn ceiling in our entire home prior to moving in. It is about 2550 sq foot. The ceilings have been painted before, and we have heard that makes it harder to remove. I know there are many variables that factor in time, but how many sq feet was your room and how long did it take you? Thanks!! Enjoyed your post!
EXACTLY WHAT I WANTED TO DO!!! Thank you so much! Glad I found you! What If I had already painted the ceiling with a product called “KILZ”? How do you think that may come off? Where can I have my ceiling checked for asbestos? I am grateful! Jeff
It may give you some grief since you sealed it with Kilz, but once you get the moisture under the texture, it should hopefully release for you. Regarding Asbestos testing labs, do a google search for one in your area. Or there are plenty that you can mail samples to.
Very curious if anyone has scraped a popcorn ceiling that had radiant heat?? We had individual thermostats in each room for this radiant heat. It has long been disconnected. Now I want smooth ceilings. Can this be done via scraping??? Any suggestions??
I haven’t. I’m not sure I’ve seen radiant heat strips in a ceiling. Maybe test a corner?
Just saw this video. Do you think this would work? I have several rooms I want to do.
http://www.littlethings.com/popcorn-ceiling-vcom/?utm_source=kras&utm_medium=Facebook&utm_campaign=hacks
Looks like a clever idea. I’d say try it! Then let me know how it worked for you ;-).
Nice Blog. You exactly describe how to scrap a popcorn ceiling with nice and needful images. The blog content is useful for all.
This is an excellent article on removing these nasty ceilings! We actually just launched a new tool that eliminates the mess of a popcorn ceiling removal. Check it out! Below is a link to our website as well as a link to our product demo video!
https://www.youtube.com/watch?v=KTqzxltNako
http://www.pcrbucket.com
We have a contract on a house that will need the ceilings in the entire house scraped. One YouTube video showed the guy using his paint sprayer to wet the ceilings very quickly although I wonder that may be too much water.
We are concerned about the quality of the sheet rock preparation under the popcorn and have debated simply running a blade across the popcorn to flatten it and then paint it. Our next door neighbor had this done and it doesn’t look too bad.
Assuming the inspection and contract go through we should be attacking the ceilings in early April.
I guess that depends on how fine a spray you have going through the paint sprayer. It could work well, especially in small sections. Best of luck to you.
Thanks for this post! In the last 8 months or so I’ve taken down the popcorn ceiling in 2 bedrooms and I just did our guest bath. With the first room I was redoing EVERYTHING so I didn’t bother with the plastic on the walls. I did with the second bedroom and had a bit of an issue with the tape falling down. But today when I did the bathroom, the second I sprayed the plastic came falling down. I used the expensive 3m tape AND some duct tape on a few spots that the 3m wasn’t sticking. I ended up so mad I just scraped it and made a huge mess in the bathroom.
What tape do you use that stays on when getting damp? I plan on doing our master bedroom next and really don’t want to worry about it.
Hey PHG! I am a pretty handy senior and I just scraped 3 rooms of popcorn, oh, how I hate that stuff! I sprayed the ceiling using a small spray bottle, so that I didn’t over- soak the ceiling and scraped with a flexible putty knife. I held the lid of a large garbage pail in my left hand to catch the popcorn instead of letting it fall to the floor. That insured that I didn’t tackle too big of an area at one time and made my clean up much easier as I wasn’t tracking the stuff all over with my feet, bonus was, I could protect my hair and eyes from the falling popcorn!
Hi there,
How do I test the samples for asbestos? Is there a kit to buy or do I have to send it somewhere?
First you need to find your local lab: http://www.asbestostestinglabs.com/ Then check with them how they want you to collect the samples.
We have scraped both bathrooms and a bedroom in our houses. Water bottle and scrapper. Fixed the gouges and nail holes. Primed and let dry 24 hrs. bubbled and peeled in spots. Sanded again, mudded, sanded, primed. Bubbled and peeled again. One more time…. this time primer seemed to do fine. let dry 24 hrs and painted. BUBBLED and Peeled in spots. What is going on here. Our home improvement store even thought we had bad primer and paint, so they gave us 2 gallons each. Valspar, did the same thing. Someone said when the house was built in the 90s that maybe the sheetrock got wet from rain and the builders used it anyway. Any suggestions. We are at the breaking point here
I should mention, I scraped it dry and wiped remainder with wet rags after. This part takes forever, but you could try to shop vac it wet.
When I removed my popcorn ceiling, I taped a wide putty knife to my shop vac and scraped away. Hardly any mess!
Hey Lisa, that’s a great idea! I’ll have to try that next time ;-).
we have gross popcorn. wish I had the patience to do this myself. I would probably scrape off a bit then get tired of doing it and leave. :/ hahaha. who wants to depopcorn my house? lol
My husband too thinks you have to texture the whole ceiling he is doing it right now. I took the popcorn off our small bathroom today, trial run and man did I need a trial run. My tape and plastic started falling off the wall after I wet it down! Can you help??? What did I do wrong I used med heavy plastic and frog tape. Help, I am afraid to do any other rooms now!
thank you for this great diy of yours, i’m living for the first time in such a house with those stupid ceilings-S
It’s still white, but one day i must ad a new layer of paint;-D
it’s not tooo big those popcorns like the ceilings of my mum, but… i didn’t liked it when i saw that the housecooperation had done this.
So t hank you for the sharing to come ritt off those ceilings;XD
I wish I had found this sooner, before I was over half finished with my ceiling.
After I read about the vinegar/HOT water/Dawn mixture mentioned above, I mixed some up and went to work on the rest of my ceiling. It is working, even after being painted.
Spray the mixture on the ceiling and wait about 10 to 15 minutes, be patient!
Then scrap. I also agree with a rounded edge scraper as I noticed I was gouging the sheetrock.
Now I have the bedrooms to do and I will have removed all the popcorn from my home.
Pretty Handy Girl-I am planning to take down two small bathrm popcorn ceilings. Home was built in 1983 but tested (negative) for asbestos. I have two concerns not addressed in your wonderful tutorial. 1-tape is coming loose. Are there newer ways to tape the wall at the ceiling other than paper tape, mud, sponge & sand?? 2-There is a trianglar piece of sheet rock in one corner of shower. Apparently it was just taped over and when I removed wall paper, it revealed the “GAP.” The triangaular shaped gap is about 6″ long by 1″ at the widest part. Can it be patched in some way without replacing the entire section of dry wall? Thanks for emailing your reply.
Pam, some of the tape on our ceiling was coming loose too. But, only small 1″ and 2″ edges. I cut out the pieces and then mudded over the area to smooth it. It sounds like you will need to cut a piece of drywall to fit that triangle, but if there is nothing to screw it into, you’ll probably need to cut a larger square, or follow this tutorial: http://www.5min.com/Video/How-to-Repair-a-Large-Drywall-Hole-80715859
I’ll warn you, it is a little tricky and it will be hard to get it “perfect.” So, don’t beat yourself up if you need to hire a professional just to get that corner perfect.
I think that there should be a larger disclaimer here about preliminary asbestos testing of the acoustical ceiling plaster (“popcorn ceiling”) as it is extremely hazardous and can cause mesothelioma and/or lung cancer. There is a large latency period between exposure and sickness, but exposure in any amount is not deemed okay. Because I have personally seen the aftermath of occupants doing their own removal only to contaminate their whole house, or if containment is set up, just their lungs. I cannot stress enough the time, energy, money, and heartache that can be avoided by simply collecting a few samples. According to the EPA, for surfacing material (which “popcorn ceiling” is) there is a minimum of 3 samples that need to be taken (up to 7 if there is a large amount of the material. The number of samples is dependent on the square footage of the material) It is highly recommended that you contact a professional to collect the samples though as the collection of samples involved releasing potentially hazardous fibers into the air. The small mask you show in the photo is not enough to protect lungs from asbestos fibers which are extremely small.
And they where allowed to use the back stock of asbestos until it was all gone which means you could still have it in your house well into the 1980’s.
Thank you both for the comments. There is a notice in the top about testing for asbestos, but I’m going to edit the article to include your point Christy and put it in big bold letters ;-). Thanks gals.
We did this in our home as well after knocking some walls down. It is impossible to match old popcorn texture. If you have thick paint you can make a mixture of 1 parts vinegar to 5 parts HOT water and 5 tbsps of dawn dish detergent. Spray the ceiling thoroughly and let it soak and and scrape. Voila! The nice thing about the thick paint was that it held the popcorn together as it fell off! Lol!
Great information! My brother did our kitchen ceiling and since it had been painted he was up all night scraping, then mudding all the gouges caused by the scraping. Our heating/ac vents are on the ceilings, so you can imagine what that looks like. Oh and we also have a radiant heating system in the ceilings which is probably why they painted since it caused brown streaks (we think that’s what they’re from anyway.) I might try that citrisolv that Karen mentioned and see if that solves the non-dissolving issue. Well, since I’m the one with the bad neck and back it won’t be ME trying it, but someone around here will….
Hi Sharon, I have radiant heating too. Any tips? Can it still be done? I am worried it won’t be as easy and I will have created an even worse eye sore.
thanks for the great info!!!
I will be moving into my childhood home and the living room has popcorn ceiling.. ugh!
I removed the gold-fleck popcorn ceilings in our 1950’s home. One tip that I found helpful is to tie a neck pillow around your neck to reduce the stress.
I am stuck now with small clumps of popcorn coating on the ceiling and some holes. I just haven’t gotten around to finishing the ceilings.
Jeitinho brasileiro: nao retirar o chapisco (popcorn), aplicar sobre o chapisco massa de gesso de estuque e alisar, depois aplicar a massa corrida e depois lixar. No final pintar. Talvez seja menos trabalhoso. Parabens pelo bonito resultado. Congratulations. Vi
Just this month I decided to remove the popcorn from our dining room ceiling. We tried spraying with water. Nothing. Then we heard about adding fabric softener to the water. Nothing. We tried vinegar and water. Nothing. Off to the paint store where the boys were sold an expensive and very caustic product. Nothing. I went to Lowe’s and picked up a bottle of citrisolv stripper. We spread it on, let it sit 30 minutes and the angels sang. It scraped off easily. We did have to apply a skim coat of mud and sand but it is beautiful now. I figure that it must have been painted with oil base paint but was not old enough to have asbestos in it. It was only about 10 years old.
Thanks for that one!! We have a room with painted ceilings.
Brittany, thanks for this tutorial. We have a living room to do and your tips will be very helpful. Like the idea of using the floor scraper.
One question…How many hours did you wait between after the popcorn was removed and the ceiling was cleaned of dust before you began repairing the ceiling?
Thanks!
There really is no need to wait as long as your ceiling isn’t still wet. Mine dried fairly fast. I hope that helps ;-).
I did the whole house because I couldn’t stand popcorn ceilings. I found it helpful to round the edges of the putty knife so it didn’t leave gouges in the ceiling. It is a messy job but looks absolutely beautiful in the end.
Klara, excellent tip! I’ll have to try that next time. Did you use a metal file to round the edges?
Woohoo. Glad to see it gone. I hate popcorn…on ceilings. 😀
You are more than welcome to come visit and help me remove the rest of them ;-D
Had an uncle in the construction business years ago. He said popcorn ceilings were quick, cheap and easy and a way for contractors to save a bit of money.
In this part of the country, “knock down” or “orange peel” finishes are all the rage for walls and ceilings in new houses. We built a new ‘old’ house five years ago and I ‘pissed off’ our plaster contractor because I insisted on smooth walls and ceilings. He didn’t like it because they take so much longer to do. Oh, well…
I think your uncle is right. Cheap and easy. To me it is ugly, dust catching, light trapping, and makes the ceilings feel lower. Only 2 more rooms to do and 2 hallways and a bath!
I have one more room and then I have one room the previous owner decided to swirl the ceiling with texture. I am dreading that one! Good call on the floor scraper. Love your info! Mostly, because it is confirming a lot of what I do! Good to know I am doing a good job…LOL! Thanks!
Hats off to you girl. I bet you are so glad it is done! The finished ceiling looks great too, glad to see it was pretty easy 🙂
Awesome job! Question for you. Do you think that this same method would work for a ceiling that is textured but not popcorned? I have some tape problems on the ceiling in the garage that I’m closing and I know that at the very least I will have to retape it, but I hate working around the texture. I wouldn’t mind the work if I could get it off. Always liked a smooth ceiling anyway.
Lori, thanks for your comment. Hmm, I’m not sure. I guess you could try a test area. It really depends on what was used for the texture. Try asking around to some of the neighbors too. They may have tried it.
It won’t. You are going to have to some how sand it…that is my next project. Good luck!
Great job!! Our living room needs to be done, but I admit the tasks seems daunting due to the size of the room. I probably would have just gone at it dry, so the wetting it down tip was good.
Carole, if you do the living room, definitely look for one of those floor scrapers in the linoleum and tile section of your home improvement store. I found mine at Home Depot.
Good luck! 😉
My husband and I are scraping the ceilings throughout the whole house. We have tried wetting it down and doing it dry, and dry is the way to go. If you wet it down it doesn’t make it any easier to remove and it makes a larger mess.
So glad the little guy is on the mend. Thank goodness.
Now as for popcorn ceilings – who ever thought that they were a good design decision?? It looks great now 🙂
Jane, actually I heard from the builder of our house that joint compound has improved a lot over the years. Before it was easier to texture the ceilings to hide the joints and tape. However, I don’t know if I agree with that “excuse”. It seems that they have been taping and mudding wall seams for years ;-D
Glad to hear your son is doing better! After painting all our oak trim white, the popcorn ceilings are next on my hit list! Thank you so much for this tutorial! I am hoping I can convince the hubby we need to do this. He thinks that you have to retexture the entire ceiling after you scrape it off. This might be my answer to him!
LOL! Uh oh, I think I might be on your hubby’s “hit list” after you show him this. 😉 Thanks for your comment.