Removing Wallpaper Borders
Last week I started to give my boys’ bathroom a facelift. The room was…well…a little fishy.

Complete with fishy wallpaper border…

And a fishy toilet seat!

The room was cute and I didn’t mind it so much. But, the border had started to peel. And the toilet seat was rusting. DO NOT, I repeat, DO NOT buy any cheap toilet seats that have metal hinges. They may look cool, but the nature of moisture collecting around the toilet makes them rust in no time. This was our third seat to do this. Why I didn’t learn after the second? I’m optimistic by nature I guess.
Anyway, I had wanted to help this bathroom grow up a little. And I’d been anxious to try another moulding project after doing my son’s closet last year.
Before delving into the wonderful world of mouldings, I had to remove that wallpaper border. When wallpaper starts to peel, you think, “Oh cool! That means it will be easy to remove.” So you start picking and tearing at it. Well, resist the urge, it is just a funny joke wallpaper likes to play. You really need to be well stocked and prepared with the appropriate supplies for stripping wallpaper.
Removing Wallpaper Borders Materials:

Wallpaper stripper (DIF or a cheaper alternative is to use 1:1 concentration of cheap pink fabric softener and water)
- Scoring tool (aka Paper Tiger)
- Scraper or spackle knife
- Spray bottle
- Lots and lots of rags
- Sponge
- Bucket of water
Removing Wallpaper Borders Instructions:
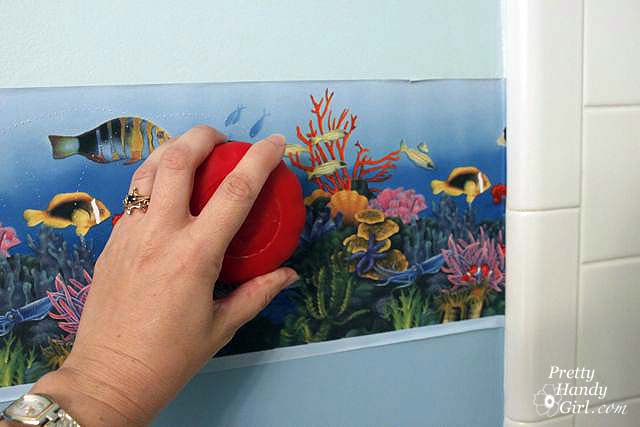
Start by using the scoring tool. Make lots and lots of holes until you just can’t lift your arm anymore.
The more holes the easier it will be for the stripper to soak into the wallpaper glue.

Spray on the wallpaper stripper and let it sit for 15 minutes.

Repeat spraying the wallpaper (really soak it), and then gently try to slide your scraper behind the edge of the wallpaper.

If you can remove the whole strip easily, go for it. In true stubborn form, my border was hanging onto the walls with a death grip. So, I sprayed more stripper behind the border and let it sit for about 5-10 minutes. (Please ignore the giant gaping hole in the drywall! I patched it later.)

Hopefully by now, it has loosened it’s grip.

Gently pull the strip off while using the knife to help separate the border from the wall.

Remove any pieces that are left behind.

Spray down the walls again with the stripper.

Wipe it off with water and a sponge or rag.

This should get rid of all the wallpaper glue residue. But, it is still a good idea to use a primer on walls that previously had wallpaper on them. This will protect your paint job from doing something alien like bubbling up, flaking or who knows what!
![]() If you follow me on Facebook, you were privy to my post over at Parentables. I gave them a special all accesses pass to my brain on a recent trip to the Habitat for Humanity ReStore on THIS day.
If you follow me on Facebook, you were privy to my post over at Parentables. I gave them a special all accesses pass to my brain on a recent trip to the Habitat for Humanity ReStore on THIS day.

You can view this and more transformations over there! Be sure to leave me a comment. It seems those Parentables readers are a bit more shy than y’all!
And, one last note. I finally delivered my promised Pretty Handy Girl in a box to Cheri (pronounced like Sherry), who writes Dragonfliez Creationz. She is such a sweet person and she didn’t even complain that it took me a month to deliver her box. Cheri and I like the same burritos from Tijuana Flats (thanks to Courtney for introducing me to this Raleigh gem.) But, unlike me, Cheri has a tough side too (luckily I didn’t get to see it.) She’s giving me assertiveness training because I’m too nice.

That’s all for today. See you next week with some more bathroom updates.

Thank you so much for posting this! I am a victim of the peeling wallpaper… wish I had read this before I let my son start tearing at the pink butterfly borders in his new room! Looks like we are off to the store today!
Ugh!!! Man, ok, well maybe I will try the DIF another day 🙂 Your blog/website is just fantastic!!! You are extremely creative and I just love the things that you do, like the little book nook. What a great idea!!!! Thanks again for the advice 😀
Amber, you are inflating my head a little ;-). Good luck with your project.
Ops, forgot to mention, that my spatula is a tough plastic one. 🙂
Just happened upon your site today, in search of an easy way to remove a wallpaper border in my dining room. I took Cheryl’s advice and went with water, because I didn’t have the supplies you listed and I figured if it didn’t work, it shouldn’t ruin the walls. I can say that in fact it absolutely works!! I got one of my pans that I boil water in for spaghetti noodles, and went to the sink to get super hot water. Grabbed my sponge, and started wiping. It took about 3 minutes for the water to soak into the paper, and I was able to peel off the top layer, and all that was left was the adhesive. So I wiped again with super hot water and got a spatula out of my drawer, and the adhesive started sliding off the wall with ease. No pushing hard, no scrubbing. Really, really, really easy. Now, the one question I do have however, is that the previous owners of our home, in of the bedrooms, painted OVER the wallpaper, instead of removing it. I know the water trick will not work here. I mean how lazy can some people get?! So, how do I remove the wallpaper border that was painted over? Thank you in advance!!!
Amber, ugh. Yes, we have two rooms in our house that have wallpaper painted over. I wish that was the case for you as I just glued down the seams better and then spackled over the seams. I guess you could try that, but you might need to use the DIF and paper tiger to get underneath the border. That is great that the boiling water worked so well for you on the other border! Thanks for sharing.
Along with border removal tips I have to pass along this one: If you/your children put those glow in the dark stickers on the ceiling, and it’s time to remove them . . . . Get out your ladder, a hair dryer and use an extension cord so you can reach your ceiling with the dryer. Aim the hot air on the sticker for about 20 seconds or so and then use a plastic, NOT metal, scraper to loosen and remove the sticker.
When we moved into an antique row house outfitted with the WORST wallpaper, we learned a trick or two as well. We originally went with the “score, DIF, steam, peel” route which got us up to the third floor in two weeks. Then my aunt told me to try this “sponge wet, wait, peel”… no steam, no chemicals, no anything. We would wet down one sheet, move to the next and wet it, then go back to the first sheet and peel it off in one intact piece. It took less than an hour to finihs off the third floor. This worked perfectly for our wall paper borders as well, except for the last corner in the one room which was stuck on with elmers glue.
Cheryl,
Wow, that is a great tip! I will have to try that next time. Although, we are all out of wallpapered rooms now (hooray!)
I feel your pain. I’ve stripped paper before. Tide soap mixed with water works also. But the stripper is great too. I’m building up the courage to remove a girlie border from my office. It was once my nursery. You’ve inspired, so I better dig deep.
Wow! I cant wait to see what you do in here!
Nice tutorial! I have that dreaded job in my main bathroom and with a whole wall of wallpaper in the kitchen, and in two bedrooms. The previous owners never met a wall covering they didn’t like. Ugh.
My friend purchased a house last year which had borders in almost all the rooms except the sunroom and the kitchen is wallpapered. The borders were the worse and came off in pieces. So glad you didn’t have such a tough time removing wallpaper. Great tute here and on Parentables as usual. 🙂
What great timing on the post about removing wallpaper borders! My daughter is begging me to remove the horses border in her bedroom. I can’t remember if there’s a Disney Princess border underneath because we were lazy and just put the horses border over it! Guess we’ll find out the hard way. 🙂
Awww. Look there I am with you! I had such a fun time talking with you. Definitely need to do it again.
Can’t wait to see what you do to that fishy bathroom. This is why I refuse to put up wallpaper!
I would get frustrated and just rip it off or gouge the sheetrock!
Wallpaper borders. They look so cute and then they become ugly when you try to take them down. Lots of stripper and elbow grease needed. Looking forward to your updated bathroom. PS- I just bought a new toilet set because of those ugly metal rusted hinges.
Whoever invented metal hinged toilet seats was an IDIOT!!! Sorry, had to get that out of my system.
I needed this for this weekend! I have a ton of border to remove and the last room I did was really hard. You make it look so much easier with your method! Thanks so much for the tute!
Paulette,
I do hope it goes easy for you. The key is to keep the paper wet, sopping wet! Now if the border was glued directly to drywall with no primer or paint below, all bets are off.
Can’t wait to see what you do with the bathroom. Would you believe we have the same shower curtain?? AND border?? But we *also* have various vinyl sea creatures plastered over the walls!
Hee, hee. I bet it looks really cute. I think that shower curtain print has been around for over 15 years because my little brother’s had the same curtain. LOL!