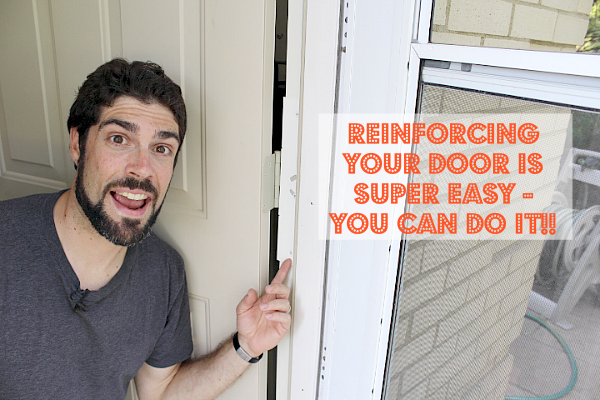
How to Reinforce an Entry Door and Make it Burglar Proof
Burglar proofing your home is easy. Especially f you have a gazillion dollars to hire security guards, attack dogs and a web of lasers. Ahh, to dream a dream. But, for those of us who actually have a budget there’s a quick solution. And it’ll help you sleep a lot easier at night.
Having a home invasion is nerve wracking to say the least (yes, I’ve experienced this), I understand the fear many homeowners face:
A passionate desire to keep our family safe from all the badness in the world.
Think about this, in many instances the only things stopping a robber from kicking open your front door are 1/2 inch screws, some thin metal (in the form of hinges and strike plates), and at best a wimpy 1 inch piece of wood called your door jamb. Um, I think my 74 year old dad could kick open most people’s doors.
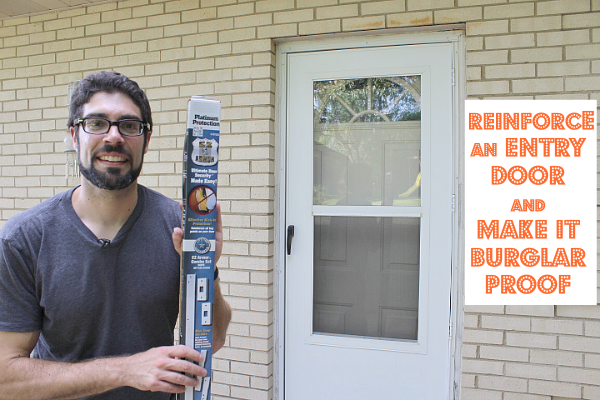
Today I’ll walk you through the installation of EZ Armor (affiliate link). And How to Reinforce an Entry Door and Make it Burglar Proof!
EZ Armor is a door reinforcement kit you can buy for $69. You need limited tools and 15 minutes.
Here’s a supply list to help you get started:
(I’ve included affiliate links for your convenience. I earn a small percentage from a purchase using these links. There is no additional cost to you. You can read more about affiliate links here.)
- Drill or impact driver
- 11/64 inch drill bit (if you choose the drill)
- Phillips head bit for said drill or driver
- Work gloves
- Safety glasses
I promise you’ll boost your home’s safety by leaps and bounds by using EZ Armor. It only take a few minutes to understand why.
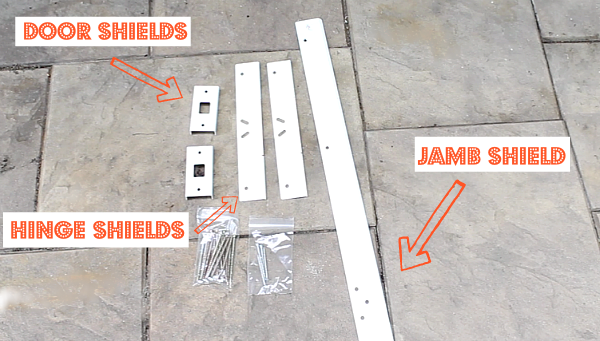
The EZ Armor kit I bought came with the following accessories:
- Jamb shield (1)
- Hinge shields (2)
- Door shields (2)
- 2 1/2 inch screws (4)
- 3 1/2 inch screws (17)
Okay, if you’re an excitable DIYer like me you might dive right into the installation. You can watch the video or read the photo tutorial below:
Before you do anything make sure to unpack the hinge shield and place it between your door & jamb.
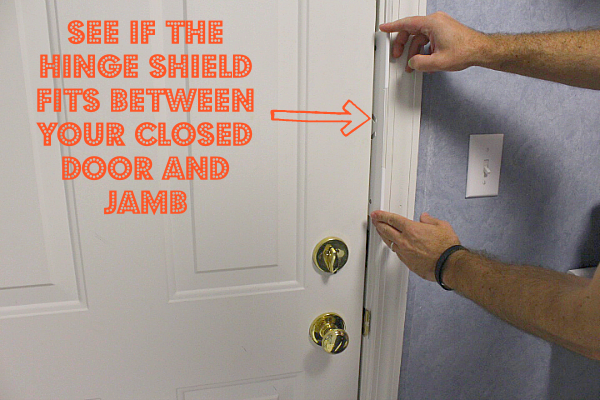
Do this for both the hinge and door handle side of the door. You’re checking to see if the installation of the shields are feasible. Our door had a good 1/8 gap between the door and jamb. This was plenty of room to accommodate the shields. You could also measure the gap but I think “dry fitting” the shield is a better option.
Step 1-Door Shields
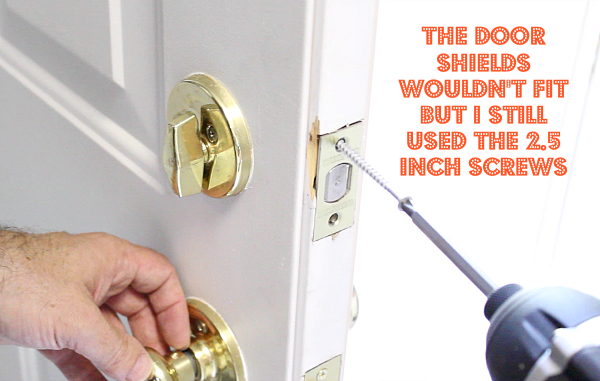
The first step in the EZ Armor instructions is to install the Door Shields by removing the wimpy 1/2 inch screws that hold your latch and deadbolt in place. Slide the Door Shields directly over the deadbolt and latch. Then use the 2 1/2 inch screws provided with the EZ Armor kit to secure the Door Shields.

I my case, there wasn’t enough space between the door and jamb to accommodate both the Door Shields and Jamb Shield. So, I opted to just replace the screws in the locksets with the 2 1/2 inch ones provided with the kit.
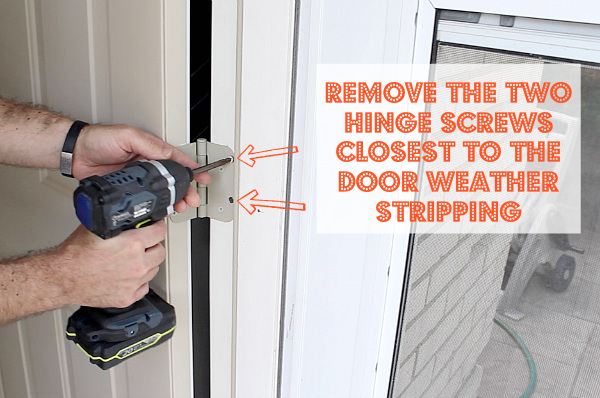
Step 2-Hinge Shields
Your door is probably already open but if not go ahead and do so. If you have three hinges we’ll be working with the middle one first. If you have two hinges we’ll be working on the top one first.
Spot the two screws that are closest to the door stop (and weather stripping if you have some.) Remove them with your drill or driver.
Drill a 3 inch pilot hole with an 11/64 inch drill bit in the holes where the hinge screws were. If you have an impact driver skip the drilling and drive a 3 1/2 screw into one of the holes. Make sure the screw head is flush with the hinge.
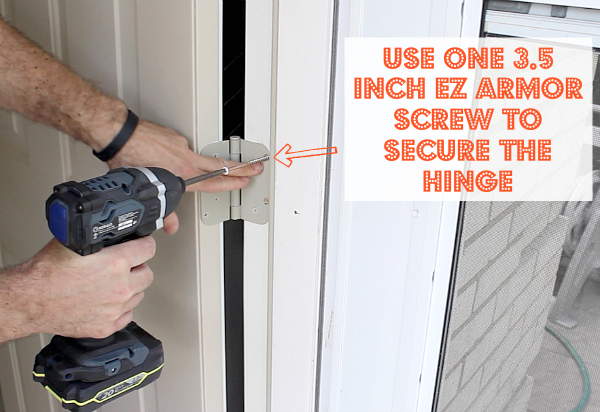
Place a Hinge Shield over the hinge so that the hole with the removed screw lines up with one of the holes near the center of the Hinge Shield. Drive a second 3 1/2 inch screw through the hole on the Hinge Shield until its head is flush against the Hinge Shield body.
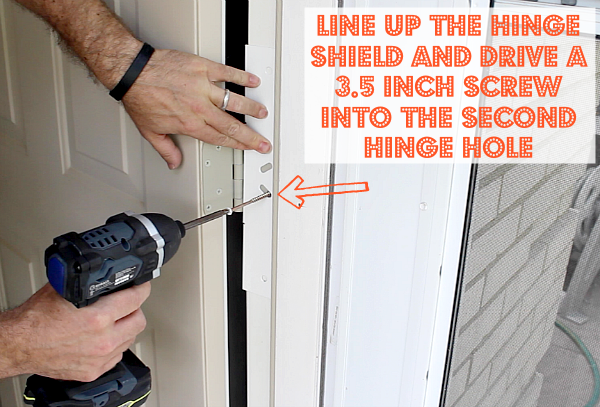
Each Hinge Shield has a top and bottom hole for two additional 3 1/2 inch screws. Pre-drill these holes with an 11/64 inch drill bit then drive in the screws. Again, make sure their heads are flush with the Hinge Shield.

Repeat these exact steps for the bottom hinge with the second Hinge Shield.
At this point, close your door to see if it works correctly. It should but if you run into problems the first thing to do is check that all the screw heads are flush with the Hinge Shields.
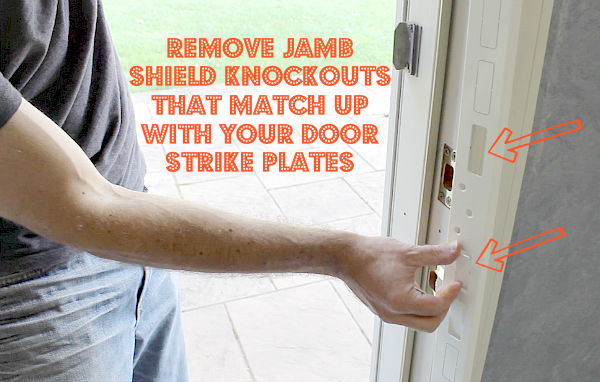
Step 3-Jamb Shield
There are several knockout holes in the Jamb Shield. This allows you to line up the Jamb Shield with the strike plate and deadbolt holes in your jamb. You won’t have to remove the existing strike plates if they sit flush with your jamb. If they sit on top of the jamb you may have to remove them because they will cause the Jamb Shield to be raised.
You can use your thumb or finger to twist off the knockouts.
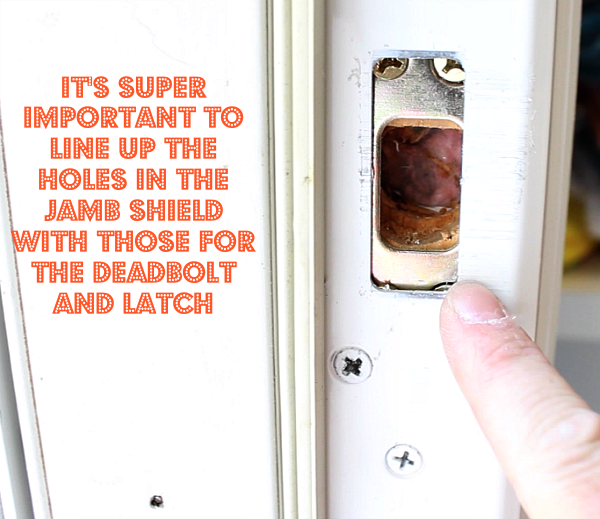
Push the long leg of the Jamb Shield behind your door’s weather stripping. The curved edge should point toward the interior of your house.
It’s SUPER IMPORTANT that the holes in the jamb shield line up with those for the deadbolt and latch. Otherwise, your door won’t lock properly and you’ll be cursing me for ever introducing you to this project.
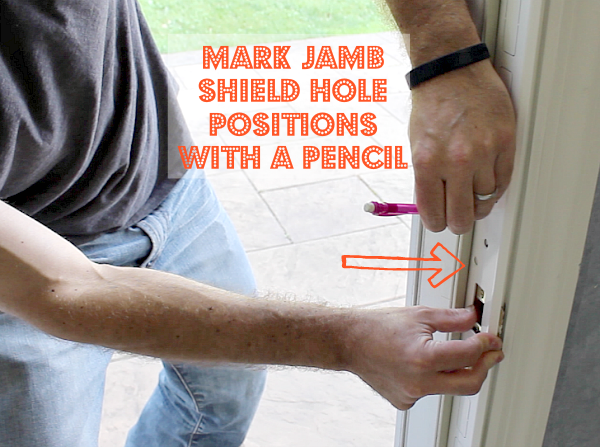
Once everything is aligned, hold the Jamb Shield in place and use a pencil to mark the three screw hole positions in the center.
Again, either pre-drill with an 11/64 inch drill bit or use your impact driver to drive in three 3 1/2 inch screws. If you pre-drill, make a hole that’s about 3 inches long so that the 3 1/2 inch screws will easily embed into the jamb and rough framing.
Before you do any more hole drilling DOUBLE CHECK the Jamb Shield’s holes are lined up with the old strike plates. I can’t emphasize this enough.
If everything looks good, use 4 more 3 1/2 inch screws to attach the Jamb Shield at the 4 screw hole positions (there are two at the bottom and two at the top).

Make sure the screw heads are flush with the Shield. Close your door and see if the locks function correctly. If you get a little bit of rubbing from the deadbolt or door handle striker you can use a small file to remove some of the Jamb Shield’s holes.
You should be able to sleep like a bear now that you have a Reinforced Entry Door that is Burglar Proof. The 3 1/2 inch long screws you used secure the Shields to the rough framing, which is WAY better than 1/2 inch screws that are only attached to the rinky dink jamb. Plus, if any hoodlum tries to kick open your door the Shields will distribute the force a lot better than your hinges or 2 1/4 inch strike plates.
Do you use something else to burglar-proof your house? Let me know in the comment section.
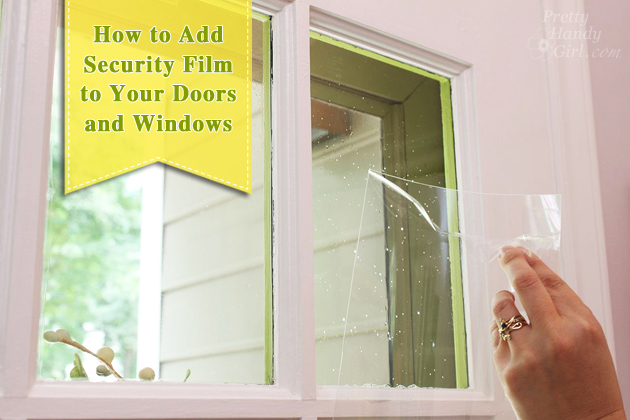
Did you find this helpful? If so, you’ll definitely appreciate how to burglar proof your glass doors and windows now!
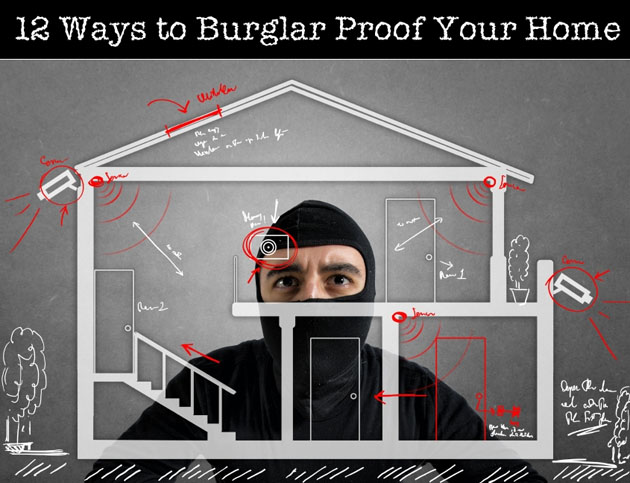
And be sure to read 12 Ways to Burglar Proof Your Home!


Thank you Jeff. This was excellent. Much better to follow than EZ Armor’s videos and PDF.
I like the reinforcement of the frame, however, without doing something to strengthen the door itself, the door will simply split open and the locks will twist out. Your end result, stopping short of reinforcing the door is only slightly more secure than where you started (it might take 2 kicks instead of one to get in). Longer screws in the plates for the lock and knob will do nothing of use.
For strengthening the door at the lock set location you need some sort of clamping device to prevent splitting, the door and “rolling out” of the lock set. Have a look at the “Bolt Buddy” product, which will accomplish this nicely. One could accomplish something similar using a couple of aluminum plates and a pair of carriage bolts. It might not be as tidy, but would work nicely on a garage man-door for example.
Note that the Bolt Buddy comes with a pair of these clamps, one for the door, and one for the frame. However the one for the frame does not really work all that well unless your frame has a large pillar (such as a side-lite door has). On a standard frame which is merely 1″ clear pine, there isn’t enough material to utilize that part of the bolt buddy properly.
On my back door with a standard frame I ended using a HEAVY 10″ x 12″ aluminum plate surface mounted on the drywall (with 3″ #10 steel screws through the drywall into two sets of studs) with the door side edge of the plate over-laying the frame. I just had to relieve the back side of the door casing to accommodate the plate.
Yes, it is visible on the wall inside, but security is paramount. After getting my door kicked in by some knuckle-dragger once, I don’t want a repeat.
I also recommend:
1) good lighting around doors and windows (although most break ins do occur during the day when folks are at work). I can do electrical work so installing small 4″ pot lights in the eaves with LED bulbs was a cheap and practical option. LEDs are important both to reduce energy consumption to virtually nil. and to prevent ice-damming over the light locations. Install a timer switch on the circuit and you will be good to go.
2) decent quality security cameras. I got a set of high resolution Q-See cameras from Costo. Lots of brands/options available, and they don’t have to break the bank. Remember to set it up with your PVR with your surveillance footage stored where the bad guys can’t just find and steal the unit along with the footage.
3) bars on basement windows which are the 2nd most common entry point in my area, and probably yours too.
4) wooden blocker-bars in the tracks of sliding windows.
Nothing on this list is too outrageously expensive, and by looking after all of those items, you can have some level of assurance that the crooks will find someone else’s house an easier target than yours.
Hey, thanks for putting both the video and the photo tutorial. I usually prefer videos but tonight was listening to music and didn’t want to interrupt that to watch the video. The photo tutorial allowed me to enjoy both–and is an easy quick reference. Good job!
Thanks Todd, glad to help any time.
You’re welcome Casey and if you have any questions just ask away. We’re here to help 🙂
Thank you for this, it looks so straightforward.
I am a recently single Mama so it’s down to me to keep my babies safe now. I am definitely going to give this a try so that I can rest assured that they are safe.
Thank you so much!
Casey 🙂
I wish I knew this existed before the door got kicked in at my rental property 3 weeks after I opened it up to my very first tenant! Understandably to say she moved out shortly after. I’m going to give this a try!
Hi Andrew, sorry to hear about your experience. That stinks. I had the same thing happen to one of my tenants but the burglars broke a window and opened the door lock. Since that day I install double keyed locks on side doors that have windows. The crazy part is that those tenants have lived in the house for over 4 years with no other incident. We suspect someone saw them moving in and thought to see what was in the house. And what was even crazier was that nothing was stolen — go figure!!!
Thanks for sharing this tutorial! When I first moved into my new home, I was constantly paranoid that someone was going to break into my home, I wasn’t familiar with the neighborhood and didn’t feel like the deadbolt on my front door was enough. This will help me sleep better at night for sure!
Awesome Kathy, anything that helps you get better sleep is well worth it, right? Let me know if you have any questions. I’d be happy to lend a hand.
Great how-to blog and video! You make it seem pretty easy. Somehow I doubt mine turns out as perfectly. Thanks for sharing.
Hey Brian, you can totally do this project and it will likely turn out even better. Go for it buddy!!
I remember when I was younger a neighbor had their house broken into through their side door. My dad reinforced ours with two-by-fours and some metal brackets. It seems to do the trick. Yours looks better though!
Well that sounds pretty darn secure Mike!!! I bet nobody broke through that door.
Such valuable information! Thank you Jeff!
You’re super welcome Colleen 🙂
Thank you, thank you for this info! I will put this on my list of things to do! You are awesome BTW! LOVE!
Thanks Jenny, so glad that this post helped you out. You’re AWESOME, too 🙂
That seems simple enough to do myself and would make myself feel better when sleeping at night.
You an totally do this yourself Mike. It’s pretty darn easy and makes me feel a lot better.
Just read your post. good information. I see you have a single cylinder dead bolt. My husband was a locksmith years ago in the SF area. a few things to know. Always install a double cylinder dead blot. Leave the key in the door when you are home in case of fire. (locked) And the reason for double cylinder is that when you are gone if your home is broken into the thieves cannot remove much with a locked door. This is assuming they broke in a window. they can’t haul much out through a window. And they can’t unlock the door from the inside.. Also if you install your deadbolt upside down you can’t pick that lock.
Thanks Elizabeth, that’s great advice. I’ve added double cylinder deadbolts at some of my rentals. Especially when the door has windows. We learned this the hard way when someone broke in and unlocked the single cylinder deadbolt.