Painting Decorative Graphics on a Wall
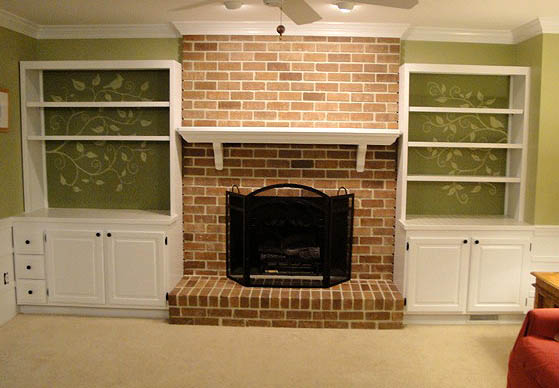
On Monday I showed you my fireplace painting from white paint back to brick. This was only one step in our major living room renovation. I hope you will hop back again this week to see some of the other transformations we made to this room:
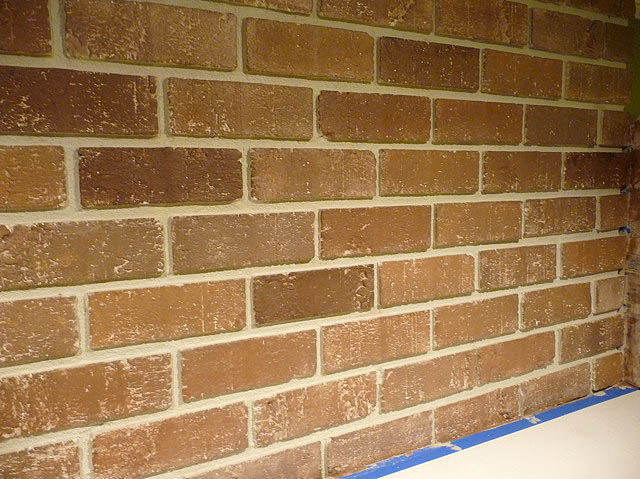
1. Faux painting brick over a previously painted white brick fireplace
2. Lightening up a room in 5 steps
3. Painting decorative graphics on a wall (this post)
4. Preparing to Install Antique Heart Pine Floors (and living to tell about it!)
5. Installing Heart Pine Floors and the Final Reveal
Step 1 was a magical transformation of white painted brick to brownstone brick using paint!
Step 2 was actually a 5 step program to lightening up the room, we dubbed the dark cave.
 |
| Before |
And as promised, we’ve arrived to Step 3 in our Living Room renovation.
So, I admit it, I’m gaga for those silhouetted wall graphics. Some of my favorites are from Leen the Graphics Queen.
Because I have a background in illustration, I didn’t think twice about customizing the wall behind our bookcase with a design. If you have a super shaky hand, definitely stop here and head over to Leen’s!
If you are up for a challenge, keep reading. After clearing my built-in bookshelves, I started by lightly outlining where the bookshelves met the wall with pencil or chalk. Then I took out the bookshelves.
Next I used chalk to draw the outlines of my design. I was careful to avoid having a bird where the shelves would meet the wall.

don’t try to sell anything you put the image on.
Now get your good brushes out. Make sure you have at least a small round brush with a good tip. And a flat brush will help too. A good brush really makes all the difference.
I used my Benjamin Moore Aura wasabi powder paint leftover from this project and over my chalk outlines.
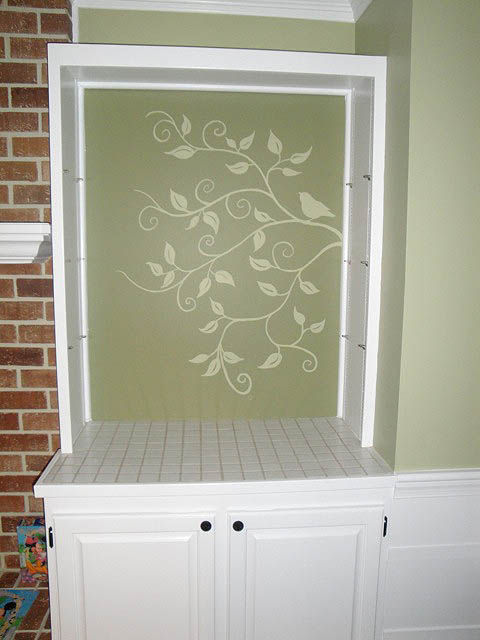
So, here is something I didn’t tell you yesterday. I actually left the dark pine green behind my bookshelves in the living room. So, when I used the lighter wasabi powder green it showed up lighter on the pine green. It is an optical illusion that the graphics are lighter than the rest of the room’s color.

After the paint dried I used a damp rag to remove the pencil and/or chalk marks. Then put the shelves back in.


See, no birdies were harmed during the creation of this wall treatment. By tracing the shelves from the start, I was able to ensure that the birds were not covered up by the shelves.

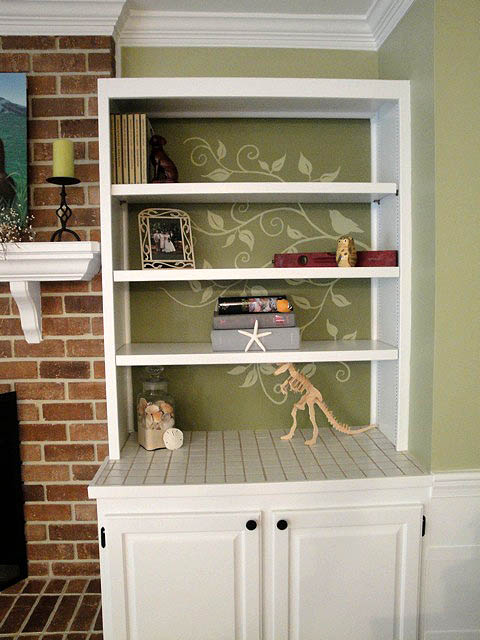
And that was it! The cost was next to nothing since I used the same gallon of paint for the walls in the room (from yesterday.)
I hope you will stop by for my next post on preparing the floor for hardwood flooring. And installing BEAUTIFUL antique reclaimed heart pine flooring. I am so excited to show you this!
Trackbacks & Pingbacks
-
Painting Brick Fireplace – From White to Beautiful Brownstone says:
September 22, 2012 at 11:25 pm
« Older Comments[…] over a previously painted white brick fireplace (this post) 2. Lightening up a room in 5 steps 3. Painting decorative graphics on a wall 4. Preparing to Install Antique Heart Pine Floors (and living to tell about it!) 5. Installing […]
Leave a Reply
Want to join the discussion?Feel free to contribute!