Painting Brick Fireplace – From White to Beautiful Brownstone

This is the first in a five part series on renovating our living room:
1. Faux painting brick over a previously painted white brick fireplace (this post)
2. Lightening up a room in 5 steps
3. Painting decorative graphics on a wall
4. Preparing to Install Antique Heart Pine Floors (and living to tell about it!)
5. Installing Heart Pine Floors and the Final Reveal
I know the trend lately is to paint fireplace brick white. Especially if the brick is an ugly bright red or some other ugly color. I’m pretty sure that is why our fireplace was painted in the first place.
Painting Brick Fireplace
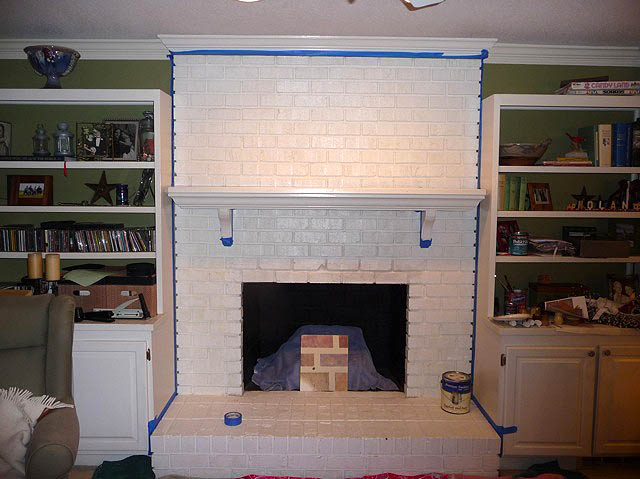
But, the fact that our fireplace, mantle and the built-in bookshelves on both sides of our fireplace are white, made for an overwhelming amount of white on that one wall. I thought about painting the mantle, but only briefly. I really wanted the warmth and contrast of bricks to set off all the white in our living room.
I stumbled across a few websites showing painted brick here and here. Then I thought, “If someone can do it, then there is a 95% chance that I can do it too!”
I wasn’t sure how it would turn out, but in the end I am amazed by how real it looks. And, how easy it was to do! The true test came when I fooled the builder of our house (he has lived on our street for over 30 years) into thinking I had stripped the paint off the bricks! Sweet success.
This is a relatively easy project. It took several hours, but can be done in sections.
Painting Brick Fireplace Materials Needed:
TSP cleaner
Scrub brush for use with TSP cleaner
Drop cloth
Newspapers
Painters Tape
Paint Roller and Tray
Stiff 2″ paint brush
Car wash sponge or large 6″ x 3″ sized sponge
Spray bottle with water
7 paper plates
Rags for clean Up
Acrylic Paint (see below for colors)
Before you do anything, buy some TSP (tri-sodium phosphate) cleaner at the hardware store and follow the directions to clean your brick. Be forewarned that you may actually like the color of your bricks once they are clean and dry! If you still hate the color, proceed…
After working up a test board by playing with several color combinations, I chose a warm brown brick color. I also tweaked my mortar color before painting it on my fireplace.

I covered the mantle and bookcases by taping newspapers to them. Then, covered the floor with a drop cloth.
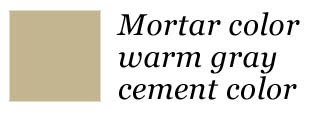
I mixed up a small container of my mortar color. I used some leftover latex satin taupe paint from our other house and added some black and a little dark brown to achieve the perfect mortar color.
My color looks like this warm gray cement color:
I painted all the mortar areas between the bricks with a 2″ paint brush.

As the mortar color dried, I mixed up a bucket of my base color for the bricks. Then poured it into a paint tray.

Then, I laid out my seven paper plates and filled the first one with a deep chocolate oops paint (Valspar Latex Eggshell Chestnut).
And poured a half dollar size of the following colors onto the other plates (one color per plate).

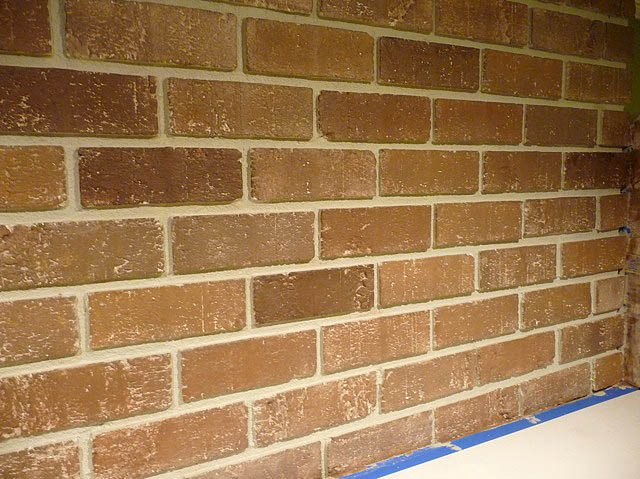
I used a paint roller to roll the base color onto small 3′ x 3′ sections of my fireplace. (Don’t worry if the paint doesn’t soak into all the grooves. Some of the white showing through made my bricks look old and rustic.)
While the base color was still wet, I covered my sponge with the Chestnut color. Then dipped the sponge into one or two of the brick tint colors. I sponged one brick at a time using the same color tints sporadically around the wall. Keeping the brick colors varied and random make them look real!
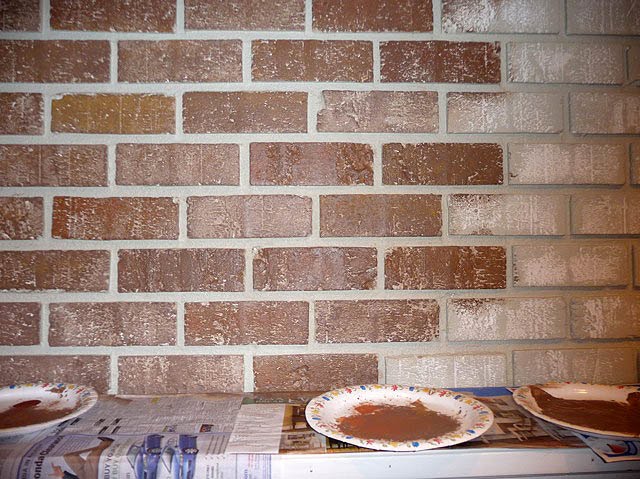
When the sponge needed to be reloaded with paint, I began with the chestnut color first, then added one or two new color tints to the sponge. You will have to refill the paper plates as you use up the paint.
I kept working in small sections, to be able to work while the base color was still wet (use the spray bottle of water to lightly wet the bricks if it dries too quick).

The best part was that if I didn’t like a color, I could go back over it and try a different tint. Notice how I randomly dispersed the darker brown bricks. This is key to having a realistic look.
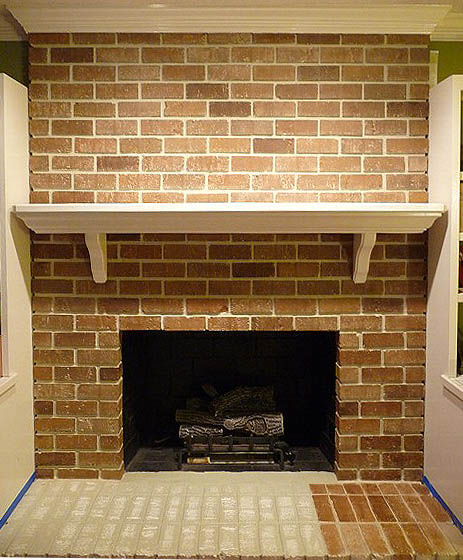
On the hearth I had to press more gently with the sponge since the mortar lines on our hearth were almost level with the bricks. I kept a wet rag near by to wipe up any wandering brick paint.

Notice how the white specks showing through really make the bricks
look like they are re-claimed and rustic.


And for those wondering how long this took. Including the prep work (cleaning, taping, mixing colors) it took about 5 hours total. Not too bad since I’m a night owl and could watch DIY network while painting!
Next up in the series: 5 Ways to Lighten up a Dark Room.
Followed by: Painting Decorative Graphics on Your Wall.
And I saved the best for last (coming soon): Installing Antique Reclaimed Heart Pine Flooring
I just came across your blog when I saw this featured somewhere! I am so impressed with how this turned out! You definitely have a new follower!
You're a very talented faux painter, although I much prefer the white. Red/brown fireplaces from floor to ceiling seems so 1970's to me, just needs dark wood paneling and shag carpet. I'm glad to see you do this, though, nice to know you can go the opposite way from a solid color fireplace if you don't like what you've got.
I totally agree. The white is clean and and you can do so much more as far as decorating. the brick is drab and so 70’s!
Love this! You make me want a brick fireplace! 🙂
That turned out awesome. Great job. Love your blog.
This is seriously amazing! Wow! Stunning!
I have never seen this done and I can say…it looks outstanding!!! Hop over and enter my GIVEAWAY…I think you will like it!
Blessings,
Linda
SUPER! Don't you hate it when people paint brick or stone fireplaces?! I always wondered what I would do if stuck with that situation… Great job!
Awesome – that warmed up your fireplace so much
http://moemade.blogspot.com/
Wow! Fantastic job on those bricks! I never would have attempted such a project…but yours is stunning! Thank you for visiting me on my blog!
WOW!!!! What a totally amazing transformation. It looks beautiful.
That looks so beautiful and natural. Your work paid off.