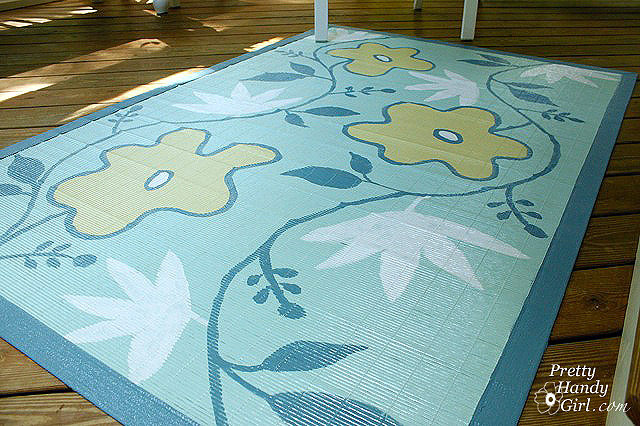
Painting a Bamboo Rug

Back story and my ramblings:
Sleeping outside on the screen porch was nice until I woke up with a sore neck. So, I won’t be doing that again for a while. But, I won’t complain because we are lucky to have a screened porch and I am really loving it after the recent makeover.
The makeover was spurred on by this Pier One bamboo rug that I scored for $25 while thrifting!

It’s nice isn’t it? Especially with the splashed paint on it. Yes, I was the sloppy culprit who dripped paint while repainting my garden bench. But, no big deal, I had bigger plans for that rug.
So I sat down at my computer and spent a few minutes hours on Pinterest to research some patterns for my rug – seriously addictive site! But, it is also proving to be a huge organizational tool for my blog. I can pin ideas I want to create. Or I pin other bloggers projects that I want to make sure I give credit to when I steal borrow their ideas.

Once I narrowed down the designs I liked, I used my photoshop skills to change color palettes and design to create a sketch for my painted rug.

Then I ran over to Ace Hardware to purchase some paint. I ran into my good buddy, Mr. Paint Dept Guru – and guess what he did! He told me he had just finished going through the mistinted cans and hadn’t even priced them so he let me have my pick of some cans for….FREE! That is why I love my Ace Hardware. They are a small neighborhood store and all the employees know my face. The cashier and I even have a running joke. She couldn’t remember my name once (how can she, there are only 300 customers in there a day), so I told her that I’d give her a hint. I told her that I share the same name with a famous pop singer. She laughed and said, well, I keep thinking Beyoncé but I know that isn’t your name. So, now she calls me Beyoncé everytime I walk in.
Tutorial:
If you just came here to find out how I painted the rug, I’m sorry about my story-telling. Anyway, here is the tutorial, you found it!
Materials:

- Kilz Clean Start Primer
- Stir stick
- Drop cloth
- ScotchBlue Painter’s Tape
- Gloves
- Paint brushes (thin and thick)
- Paint roller
- Butcher paper
- Chalk
- Scissors
- Latex paint colors
- Minwax Polyurethane
MaskYeah! No need to wear a mask with the new KILZ clean start primer!
The good people over at KILZ recently sent me a gallon of their new eco-friendly primer* (yeah, I thought that was an oximoron too.) I’ve used KILZ 2 latex primer for years and have been very happy with the product, so I had serious doubts that some “green” primer could perform the same. Well, I stand corrected! Love this stuff!!! No face mask necessary, no need to worry about off gassing. The primer had no smell that I could determine.
And it sticks like glue to the surface that needs to be primed. It worked just as well as the regular “stinky” primer. I even scouted out my local Home Depot to see if they stock it (for when I run out) and they do! (My local Lowe’s hasn’t received a shipment yet.)

Just in case you didn’t see this: Zero VOCs!!! I like that!

Sorry, I get side tracked easily.
Start by laying down a drop cloth and putting on rubber gloves.
Stir your primer well. Roll on the primer onto the bamboo rug.

Then smooth the primer in the direction of the slats with a brush.

Tape off the inside edge of the canvas border using your painter’s tape.

Roll on the border color. Yup, that pretty blue gray paint was a mistint and therefore FREE!

After the border color dries, remove the painter’s tape and then put tape on top of the border.

Roll on the base color for your rug. Then use a brush to drag the paint between the slats. You may need to apply a second coat of paint.

Using the chalk and butcher block paper, draw out your rug design.

And lay the design on top of the rug.

Cut out the largest shapes first. And trace inside the cut outs onto the rug.

Paint inside the chalk lines with the flower color.

Next draw the vines and branches onto the rug using chalk. Chalk can easily be wiped off if you wish to work with the design a little bit.
Continue tracing flowers, vines and leaves and fill them in with paint.

When your rug is completely painted and dry, wipe it off with a damp rag. Then roll on at least 2 coats of water based polyurethane. I prefer Minwax, but use what works for you.

One word of advice when painting on bamboo slats. Don’t try to be a perfectionist. Just relax and have fun. The inconsistencies will make your rug look more authentically hand-painted!

I love my new porch rug! Even better, I love the price!
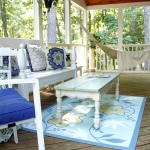
It looks fabulous with my beachy coffee table I made last year.

I promise – a photo tour of our screen porch will be coming soon.

* Disclaimer: I was sent a gallon of Kilz Clean Start Primer for my honest review. I was not paid or compensated for the review other than with a gallon of primer. My thoughts and opinions are authentic and my own. In other words, I respect you and will not lead you astray with false product information.
Sharing this project with:
![]()
Just gorgeous! I love how this turned out! Thank you for being such an inspiration.
Did you imagine how this would look when we found it Caitlin?
I love your rug. And the paint was free…. I am amazed at your end results. If that was purchased in a store it would cost big bucks. I’m going to share this with my daughter for her inspiration for the perfect rug for their screened porch. Thanks for the tutorial.
I hope your daughter finds a good rug to paint ;-).
What a GREAT Idea. Not sure if I have enough talent to make something like that but I just might give it a try! Love the colors too, so relaxing.
If the design makes you nervous you can always do stripes or chevrons 😉
I love it, it’s gorgeous! You always do the best tutorials, very easy to follow.
I like our local Ace too, even though they’ve never given me free paint, I may have to work at that.
Can’t wait to see you Friday 🙂
This was the first time they gave me paint, but hopefully not the last. Looking forward to seeing you tomorrow!
Ah Ha! I guess I get your email feed a day later. Love the rug. The design is darling! As are the colors.
Am so excited about Kilz! Can’t wait to try it.
Nah – you didn’t need poppies. Yours is just perfect!
You’re an artist! Love the design you chose for your rug, it’s a perfect porch design – makes me smile. Thanks for sharing!
Mary, actually, yes, I am an artist. Little known fact, I went to a 4 yr. University for illustration ;0)
very pretty! super tute, you make it look so easy!
gail
Amazing!
What a transformation! Your rug is similar to a floorcloth except the base is canvas. Beautiful. Did you put more than one coat of poly on the rug?
Monique, yes, I used two. I would put that much or more if I were you.
Okay, now THIS is a great project that I may not be scared to tackle! It’s beautiful, Brittany! I’m going on the hunt for a bamboo rug…
Good luck and it isn’t difficult. The hardest thing is figuring out a design. But, you can always do stripes.
The rug looks amazing! You did a fantastic job!! I can’t wait until you show us the finished porch. Lesa
Lesa, thank you. My porch reveal is up now ;0)
I saw all your pinterest rugs and was thinking you were up to something! It’s really beautiful! I’m so impressed!!
Becky B.
http://www.organizingmadefun.com
Organizing Made Fun
Damn, y’all are on to me. I have to be more secretive when I pin. LOL!
That’s tremendous! It looks fabulous.
I absolutely LOVE IT! This is perfect for a porch and I can’t believe you hand painted the design. Huge talent. 🙂
Heather, well I have a little secret. I went to art school for 4 yrs. But, I still think you can do it too.
Oh that is FABULOUS. Thanks for the inspiration! And now I’m going to go pin all those rugs in your pinboard and try to resist buying them. Or, painting them now that you’ve showed me how!
Carrie, yes, you need to paint one. Save the $$$.