
Make Your Own Terrarium and Save Hundreds of Dollars

Terrariums are making a comeback in home décor. Gone are the octagonal mirrored terrariums. They have been replaced by sleak apothecary jars, tall cylinders and lidded glass vessels (to name just a few shapes.)
Twig Terrariums has an amazing array of beautiful ready made terrariums or DIY kits for sale! Some of them have stunning details, right down to a little miniature person inside the lush world. The terrarium below sells for $200.

If you want to create your own version that is a little more budget friendly, it isn’t hard to do. In fact you can get some plants from a local nursery or as close as your own backyard!
Materials:
- Glass container (with or without a lid)
- Small decorative pebbles or pea gravel
- Potting soil
- Live Moss
- Terrarium plants (small shade loving plants)
- Potting shovel
- Water
1. Clean your glass container with soap and water and dry it.
2. Add a layer of gravel or decorative pebbles to the bottom of your glass container.

3. Add a layer of potting soil. No need to level it.

4. Collect your plants and think through the plant placement in your head.

5. Gently remove a plant from the pot.

If it is root bound (all the roots are wound tightly around the bottom) gently tease some of the roots free and break apart the roots at the bottom of the plant.

6. Insert your plants into the soil.

Put taller plants at the back and the shorter ones in the front so you can see all the plants.

7. Cover the soil with moss. You can cut or tear pieces to fit flush with the edge of the terrarium.
8. Fill your terrarium and let the water soak in. The water should reach the top of the rocks. Check the water level a few times a week and be sure to refill when the water gets low. If your terrarium has a lid you won’t have to water as often as a lidless variety.

9. Add any decorative embellishments like these faux mushrooms (tutorial HERE)…

…or my sons’ favorite, a little plastic dinosaur!

Terrariums make the perfect year round accessory. I have them prominently featured in my living room along with some other natural elements.


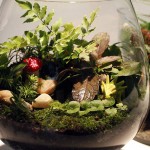
This version was made entirely with plants that I have growing in my shade bed. Small ferns, arugula and creeping ground covers. Plus, I added a few round pebbles for visual interest.

I might pick up a tiny person or two at a hobby shop next time I’m near one. Anyone seen any that look like the characters in “Land of the Lost” heh, heh, heh!

In the meantime, I’m loving my cost effective terrarium. Yes, terrarium singular, because the cylinder terrarium was a gift for our friends who dog sat for us.

I almost wouldn’t be surprised to see a fairy take up residence in one.
I’ve been busy working on some more projects to show you, so hang tight and check back soon! 😉 In the meantime, I hope you have a fabulous weekend and are enjoying Fall!


This is such a well written and beautifully photographed article. Gets my creative juices flowing so bad- I want to make another now! I love the selection of plant, plant matters, and rock you have in your terrariums! I have recently made a terrarium with some different ideas that can be made for under 5 bucks which you can check out here
What a joy to read, thanks much 🙂
I love these, I’m hoping to make some as christmas gifts for people. Do you not find the compost sinks down amongst the pebble layer when it’s watered?
Oh EM GEE!!! I am soooo making a terrarium!! I just scored a great lidded apothecary at a garage sale for $3 bucks and know now what to put in it! OH… and I am most DEF adorning it with these AhhhDorable little mushrooms!! You are AWWEESOOOOME!! (insert high pitched singing here) 😉
woo woo!
Thanks Kristy. Lucky you on scoring the apothecary jar. Would love to see pictures of your terrarium when you make it!
I love this idea Brittany. What a great way to bring the outdoors in, especially through the winter months. I never thought of doing this, but I love how yours turned out.
~Jenna
Your terrarium turned out adorable! I think I will have to try and make one…with a lid, so that my cat’s furry little paws can’t get into trouble! Ha!
LOL! Or panty hose to keep kitty at bay ;-).
Great tutorial! I love the glass you made the first terrrrarium out of. I by no means have a green thumb but hopefully I can tackle this project.
Oh my goodness! Back in the 70’s I had one of those 5 gallon drinking water bottles as a terrarium. With time it had its own echo (sp.?) system. It was a great focal point in my apartment. I saved the bottle but don’t know if I would go that big again. I think I’ll try one like yours as they look so good. Thanks for sparking a fond memory for me.
These are lovely, Brittany! What a pretty (and contained) way to have a little green in the house. I wonder if I could kill one… I mean grow one! lol.
(the dinosaur is my favorite little touch!)
I’ve tried terrariums before and I always ended up with mold because I watered it too much. So love your idea of putting a layer of rocks down first. Very pretty collections. I’m going to have to give it a try again.
Love this! I’m definitely going to have to try it soon!
these r amazingggggg………
Love the terrarium! I am definitely wanting to do this before winter comes and takes away all of the colorful plants outside!
I’ve been thinking of making a terrarium too – and kicking myself because I used to have one back in the day and I didn’t keep the huge beautiful bottle I made it in. Yours are lovely.
My advice for newbies – try to choose plants which are naturally rather small because pruning in a terrarium is a pain, and if your container has a lid do not put it in direct sun (remember what happens in your car in the summer!).
I remember making terrariums back in the 70s. Once grabbed a teeny, tiny mushroom from the woods and the next day it was up to the lid of the terrarium! I have Creeping Jenny and ferns in my backyard too….may have to make one. Yours look better than the $200 one!