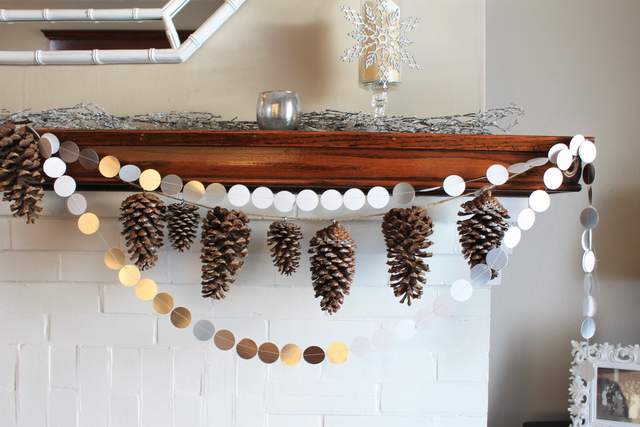
How to Make Pine Cone Garland

Happy December! The holidays are such a wonderful time of year and an opportunity to get creative with entertaining, cooking and decorating. Mostly, I love to make things simple and today’s lesson on how to make a pine cone garland will be just that. An easy, quick, not to mention very inexpensive craft you can do to decorate your home this season. And it can be done in about 30 minutes {minus an adventurous walk in the woods to get pine cones}, here is how.
Supplies:

- Pine cones – These can be found simply going outside and looking around the pine trees. Depending on where you live, you’ll find all kinds of sizes. If you collect pine cones from outdoors, be sure to ‘de-bug’ them by baking them for 30 minutes on a low temperature. You can also get pine cones at craft stores, thrift stores, flea markets and such. Or maybe in a friend’s attic? Put those old holiday decorations to a new use.
- Just twine or ribbon – This is to hang the cones. You can use anything you might like, or what matches your style.
- Screw Eyes – Find these in the hardware section at the home improvement store. A small box will only cost a few dollars.
- Optional supplies include a drill with a small bit and glue
Instructions
1. First, grab a pine cone and screw the screw eye into the top flat part. This will be easiest if you insert the screw in between the overlapping scales. Some of these I could do by hand, but for others I opted to use a drill.

You can use the smallest drill bit to pre-drill holes into the cones, to make the screw eye go in easier. (Because, let’s face it, us DIY-ers can never pass up the chance to get our hands on a power tool!) But as a note, I could get the screw eyes in without a pre-drilled hole too, so this can absolutely be done without one.

2. To make the screw eyes secure in the cones, dip them in an adhesive first. Any glue will work. Then you won’t risk them falling off the garland after you’ve done all this work to make it look beautiful.
I had about 10 cones for this garland, but I bet it would look even better if you could fill up the twine with lots of them. It will only take you about 15 minutes, depending on how many cones you have.

3. Then you simply string them onto your twine or ribbon. You can cut the twine longer than the mantel or wherever you might hang it, to get a swag effect.
You can secure the garland with small finishing nails, cup hooks or non-permanent command hooks would work also.

The garland now decorates my foyer along with a metallic paper circle garland I made from a craft fail. It is just thick silver paper punched out and sewn together. This is what the pine cone garland looks like without the added bling and with, which I think gives it a nice holiday touch. I used it in my holiday decorations last year. Or maybe you could add your own bows or festive ribbon to add some color?

As you’ll see some of the pine cones have a little bling of their own. This time of year I can’t help but add glitter to almost everything {much to my husband’s dismay}. Here is how to make glitter pine cones. I mean, if we are decorating for the holidays, we might as well go glitter!
Didn’t I tell you this was an easy craft project? Plus I think it can be used from September through February since it’s nice and wintery, not so holiday themed. The pine cones actually stayed on the twine without slipping, but a small piece of clear tape will keep them in place for good too.

If you have all of these supplies, then you just make a totally free holiday garland! Let me know what kind of pine cones you find or where you hang it. I’d love to see it over a doorway, over a window, or maybe on a bookshelf too.
Come see my holiday home tour this week at Decor Adventures and Happy Holidays!


Hi Colleen,
I hope you got some new pine cones to use for new projects!
Oh my goodness! This is cute! Definitely makes me want to make one!
I love to use pine cones and snowflakes or snowmen in my decor at Christmas. When our Christmas tree is gone along with the holly and Mistletoe, I do not feel as though our home becomes naked. It is Great for Winter dashes of nature bringing the outside in, with out the Cold!!!
So pretty! Love it!
Great ideas but it makes me remember my huge box of pine cones from Colorado that I collected for years & years for ongoing projects, which happened to be stolen from the idiot movers in Denver…among other things! I’ve gotten over it but have always been curious what they did with the pine cones, sadly & most likely ended in the trash. Thanks Brittany!
Hi Laurie,
Actually I did not put little knots on the twine only because I didn’t know how spaced out the pine cones would be. And they stayed anyway. But I was going to do that, then you can plan out where they go. It’s easy!
Love it! I might have to forage the pine cones out of the backyard and try this. I assume you put little knots in the twine to space the pine cones across the garland?
Hi Julie,
Three-foot pine cones would make quite the holiday garland! Glad you have helpers to collect your supplies 🙂 I’m sure it will come out great!
Hmmm, I think we might have a project for after our snow-search this weekend! My boys adore picking up every single dang pinecone they see, from huge, 3-foot sugar-pine cones, to teensy little balsam cones. Should be interesting!