Laundry Room Reveal using Flow Wall
TGIF! Our spring break is officially here. Sadly I’m not going to Cancun to party it up like a bunch of MTV teenagers (As if!). But, I am hanging with two guys! My two little guys that is. I’m looking forward to crafting a little bit with them and maybe catch up on some sewing. My boys both like to sew. They also like to build with hammers. That’s my parenting mission at work. I vow to teach them to do everything that I know how to do no matter which gender that talent is associated with.
But, enough about me, what you are really here to see is the laundry room reveal! Before I give you the whole 5′ x 8′ tour, I want to show you how the Flow Wall cabinets and shelving are installed. Because you aren’t going to believe how easy it was. Before installing the cabinets, I installed the slat wall in no time!

The cabinets were shipped flat and need to be assembled, but there are detailed directions included. And if you’ve ever put together any flat packed furniture, this will be a breeze.
Each cabinet comes with four metal brackets that tilt into the Flow Wall. I inserted the hangers into the Flow Wall panel and gave them a skeptical glance.

Having just installed cabinets in my garage using a french cleat system, I wasn’t ready to trust those little metal brackets. I lifted the first cabinet (and was very relieved that I could lift them myself without assistance) and lined up the metal bar spanning the back of the cabinet over the brackets. The photo below shows the cabinet seated in the brackets and after I installed one shelf (which is hung after the cabinet is installed.)

Then I gently let the cabinet slide down until it was seated into the brackets. I might have yelled out “Suhweet!” Because — honestly — that was the easiest cabinet installation I had ever attempted. Plus, they seem solid and held up to my test of pulling on them!
I saved the best part, they are totally repositionable! Slide them side-to-side. Or remove them and move the brackets. No screws, no nails, they are easily reconfigured.

By sliding the one cabinet flush against the wall, I had room to install a twin next to the first.
The doors are attached with a hidden hinge. The white coated doors are hard and glossy, which means they should be a snap to wipe clean!

After the doors were installed, I simply added the two handles. Again, everything was super easy and the directions were easy to follow.

And the shelves? Easy peasy! Simply slip the top of the mounting bracket in and then lower the shelf until it snaps into the bottom ridge.

The wire shelves can be removed and re-installed infinite number of times. This allows for customizable storage on the fly.

Like the shelving, these translucent storage bins simply slip into the grooves to hold supplies you reach for on a regular basis.
![]()
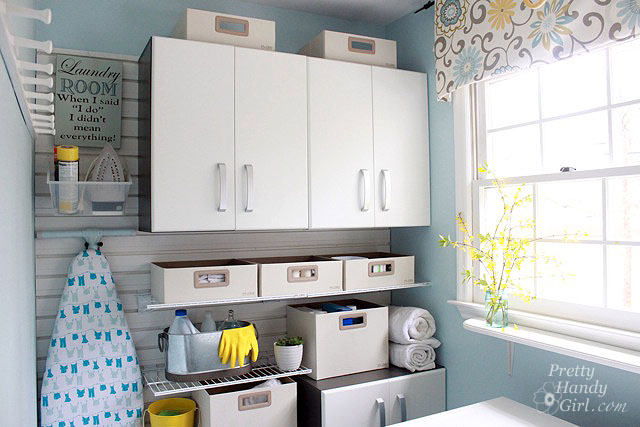
Here is my laundry room Flow Wall in all its nakedness. Shhh, don’t tell Flow Wall that I shared naked photos of their products online.

You can look back, I’m sorry you had to avert your eyes. Here they are loaded up with my somewhat excessive collection of vases.

The other cabinet has room for all our beach towels and workout “stuff”.

There is enough open storage for everything I need to grab while doing laundry. And yet, it is conveniently hidden in the Flow Wall décor bins.

Speaking of the décor bins, check out this cute little storage cube that turns the bins into drawers.

The bins also come in a jumbo size which is perfect for hiding all my DIY Laundry Detergent supplies!

The Flow Wall shelves are coated so they make an excellent drying rack for rags waiting to be laundered.

More storage than you can shake a stick at.

I really love that the smart tile adhesive tiles work with the new wall color.

Two of my favorite additions to the room are the sunny yellow chandelier…

…and this sign I bought at Carolina Pottery (my new favorite discount decor spot.)

I had some leftover pieces of Flow Wall panels that I installed on a short section of wall.

Just enough room to hold cleaning and dusting supplies.

The valance is still just the loose fabric draped over the rod. But, hopefully one day soon I’m going to make it a faux roman shade.

Okay, just one more look at my new laundry room wall. Do you remember the before?

And now the ahhhh-after:

Can you believe it is the same room? Yeah, me either. I absolutely adore the Flow Wall System and I’m thanking my lucky stars that they offered to send me their products to try.


Disclosure: I have been compensated for my time and received the Flow Wall System compliments of Flow Wall. However, the ideas and words are all my own. I was not told what to write. I believe you have the right to know when a post is sponsored. Regardless of whether a post is sponsored or not, I believe in honesty, truthfulness, and complete transparency in my posts.

Thank you! I may end up making my own, I have been unsuccessful finding one in the colors I want. 🙂
This looks amazing! I love the little curtain and the spray painted light fixture! I priced this system online and it is kinda pricey. I have a very small weird shaped laundry room, but it would still cost me several hundred for the system to do just the wall over the W/D. It is still a very impressive system, however, and you did a great job!
The question that nobody seems to be asking is where did that adorable ironing board cover come from? This would be perfect with my laundry room colors!
Cheryl, 😉 I’m pretty certain I bought it at Target last year.
Love your laundry room. What was the paint color you chose to match the fabric?
Love every detail! Do you know the name of the fabric you used? It’s gorgeous.
Danielle, it is called Waverly Pom Pom Spa. I got it here, but looks like it’s sold out: http://www.fabric.com/ProductDetail.aspx?ProductID=14fb3e76-4204-4c19-b8db-1e3c766378c4&CategoryID=2170fc07-92c6-4059-b731-7373285bca44
Amazing I’m going to love your site!! Where did you get the fabric it is so super cute!
What color are the walls in your laundry room? Just put in white and grey cabinets and this color would be perfect. Thanks!
I would love to know what color your walls are too… I am having a hard time find the right color for a completely different room.
Thanks, Kim
The color I used was Tropical Surf by Glidden, but I had Benjamin Moore match the color ;-).
Just saw this. Thanks for the color.
Your laundry room looks amazing…so clean and neat. The valance fabric is a great touch of whimsy. Also love your ironing board cover!
Hi there! I found your ite through the linky at Oopsey Daisy and had to come over and check it out. I am so glad I did! I love your new laundry room, but I also clicked all around your blog and am so impressed with everything I have seen! I am now proud to say I am your newest follower. I can’t wait to see what you do next and will be trolling through the archives as well I am sure.
Thanks for a very informative and helpful blog site, truly one of the best I have ever seen. I hope you win with the laundry room.
Maureen
pinterest ageorgiamomma
http://pinterest.com/ageorgiamomma/