Refinishing a Garden Bench

Recently I decided my garden bench that used to be a Craig’s List bed frame, needed to be refinished. I repaired, sanded and repainted the bench before setting it onto our porch where it would get less exposure to the rain.

Well, it wasn’t weathering the elements too nicely. Or maybe I should say it was weathering them poorly. Regardless, I really liked the bench and decided to strip it and start over again. I believe the main problem was that the bed frame was not solid wood, it was glued pieces. Then, if you factor in that I used spray primer and spray paint, the rain and moisture got in easily and caused the wood to swell and some of the glued joints to come undone.

But, the bench was still structurally sound, so we moved it onto the screen porch and I got ready to refinish it.
Refinishing a Weathered Garden Bench
Safey First, (as Meri-K will tell you.) Because I was sanding and scraping the old paint I had to wear eye protection and a dust mask. I also wore ear plugs while sanding and gloves to keep my hands from getting rough.

Materials:

(I’ve included affiliate links for your convenience. I earn a small percentage from a purchase using these links. There is no additional cost to you. You can read more about affiliate links here.)
- Power Sander
- Sand Paper (100 grit & 220 grit)
- Purdy Paint Tool Scraper
- Wire Brush
- Gloves
- Safety Goggles
- Dust Mask
- Wet wipes
- Primer
- Roller & Tray
- Brush
- Paint
- Gorilla Glue
- Clamps
- Wood Glue
- Toothpicks
Instructions:
Begin by using the wire brush to remove any flaking paint and to get into the grooves of the spindles (and other hard to reach places.)

Tip from a Handy Girl: I am about to share with you a helpful time saving trick, so pay attention. If you have a power sander that holds the sandpaper with a clip. You can stack your sandpaper. I put the 220 grit on the bottom, then put the 1oo grit on top of that. After sanding my bench with the 100 grit, I simply tear off the top sheet and expose the finer 220 grit.

Sand down the bench with a rough 100 grit paper first, then follow up with a finer 220 grit sand paper.
Secure any loose pieces of the bench. To use Gorilla Glue, you need to moisten the two pieces that you will secure.

Then put a small amount of Gorilla glue onto one of the pieces.

Clamp the joined pieces and allow to dry overnight. (By the way, don’t waist your money on cheap clamps. That little black & orange number below just bit the dust last weekend. My Irwin clamp is a CHAMP!) Check back after 30 minutes to wipe off any Gorilla glue that has spread out of the seam.

Because the posts on my bench were really falling apart, I decided to remove the ball finials.
Use a saw to cut both finials off.

Patch the hole using toothpicks and wood glue.

After the glue has completely dried, saw off the toothpicks.

Add a curtain rod finial on top of the sawed off posts.

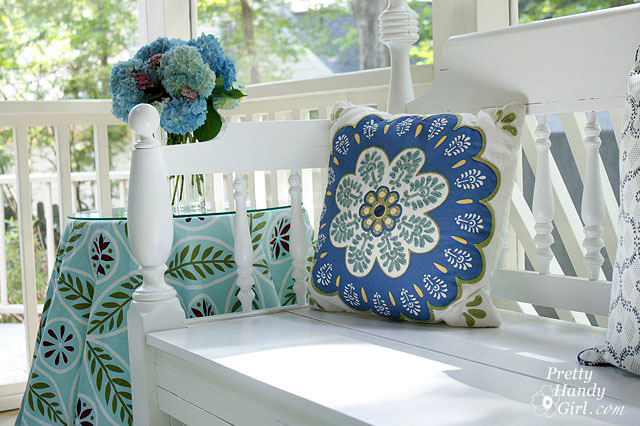
It looks like those finials were there all along!

Clean your bench off with a damp rag to remove any sawdust.
Cover the entire bench with one coat of KILZ Clean Start Primer. Want to know why I use KILZ Clean Start primer for all my projects now? Read how much I love it in this post where I used the same primer for painting a bamboo rug. I’m never buying any other primers (unless I’m priming a tricky surface, then I’ll use BIN 1-2-3 oil based primer. But, I won’t be happy about using that stinky stuff.)

After the primer has dried, use a piece of fine grit sand paper to gently remove any burrs or imperfections.

Then wipe off the bench with another damp wipe. I used Benjamin Moore Impervo Semi Gloss paint for the top coat on my bench. It leaves a really tough coating and will hold up to wear and tear.

Roll on the paint in one area. Then follow up with a brush to even out the paint. Remember to run your brush in the same direction as the grain of the wood.

Lightly sand after the first coat has dried and finish up with a second coat of Benjamin Moore Impervo paint. I didn’t add polyurethane, but if you are really concerned about a piece of furniture that will be exposed to the elements, go ahead and add two or more coats of polyurethane.
My bench should successfully last outside now for three reasons:
- I moved it inside the porch and out of the direct sun and rain.
- I primed the bench with a good quality brush-on primer (instead of a spray paint type.)
- I brushed on two coats of paint making sure I got into all the cracks and crevices of the bench.
Here she is in her newfound home, our screen porch:


With zero VOCs and the quality that is standard in all the KILZ products, this primer is a must have for the DIY painter!

Disclaimer: The products mentioned in this post are products that I use and stand behind. The opinions expressed in this post are authentically mine. I was sent a gallon of KILZ Clean Start Primer and the Irwin Quick Grip clamp to try out, but I was not paid or swayed to write favorable things about the products. If I don’t like a product, I won’t write about it. And I certainly won’t pass it off on my valued readers.


I follow your blog and I stalk you on Facebook!
Soooo pretty!
I am planning to paint my coffee table very soon…it was my grandmama’s and doesn’t match my house, but I wouldn’t dare think about getting rid of it. I also have a dresser, rescued from a trash pile, that I want to make into a outdoor plant display in need of some serious attention.
I love how your bench turned out!
I recently became a follower of your!
I have a hope chest that is just waiting to be sanded & primed…I’d LOVE this for this project!! 🙂
I follow you!!
Hey Brittany,
I added you in my google reader, so now I get to see all your posts! Thanks again, I look forward to more of your projects!
Kristina
(@KristinaCombs)
I have enjoyed your blog since I found you. Now that I’ve learned how to “follow” (two days ago) I am now one of yours! I’d use the new Kilz primer on my bathroom cabinets I need to paint but have put off far too long. Thanks for the chance to win your giveaway.
Thanks so much for the tutorial! I love the bench in white and the new finials look great.
I’m a follower
Wow! Where has this blog been all my life? I may no longer have to ask a friend to always do some of what I consider the more difficult parts to home projects. Love the way this post was put together step by step. I just did s similar post about making a chandelier but I am so not worthy after having visited here. 🙂 I’ll be back!
I would use this on two twin beds that desperately need to be painted! Thanks for the chance to win.
The first project I would use this on would probably be one of the dressers sitting in my garage waiting for me to refinish…or maybe my Seller’s cabinet that is stripped and waiting to be repainted.
I need primer to use on some nightstands I just bought at a thrift store I want to paint!
Becky B.
http://www.organizingmadefun.com
Organizing Made Fun
I follow your blog.