
Installing a Branch Towel Bar

The other day I showed you how to prep and sand a branch to make a towel bar. If you haven’t viewed that tutorial, you may wish to do so now.
Okay, so let’s get started. This shouldn’t take too long, but you’ll want to grab a few supplies before you begin.
Materials:

- Prepped tree branch
- Tape measure
- Pencil
- Level
- 2 Handrail brackets
- Drill with drill bits
- Philips head screwdriver
- Safety Glasses
- Miter saw or hand saw
- Water-based Polyurethane
- Brush
- 180 grit or finer sandpaper
- Damp Rag
Tutorial:
Start by marking the desired height of your towel bar. I hung mine at 38″ high.

Use the drill and the philips head bit to insert one screw into the bottom of your handrail bracket. Drive the other two screws into the bracket.

Repeat the steps above to install your second bracket.

Rest your branch on top of the brackets. Mark the desired length of your towel bar onto the branch.

Cut the branch with a miter saw or hand saw.

Sand down any rough edges at your cuts. Lay the branch on top of the brackets.

Center the branch and check to make sure it is relatively level. If it isn’t, you might need to move one of your brackets.

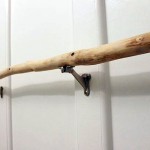
Hold the “U” shaped hook under the handrail bracket and make a mark where the holes are on the branch.

Choose a drill bit slightly smaller than your screw.

Drill pilot holes into your branch for the first bracket only.

Rest the branch onto the bracket and drive the screws loosely through the “U” shaped hook and into the bottom of the branch.

Line up the other end of the branch onto the handrail bracket and trace the holes through the “U” shaped hook.
Remove the screws holding the first hook and drill pilot holes where you marked for the 2nd “U” shaped hook.
Lay the branch back on top of the handrail brackets. Attach the screws through both “U”shaped hooks and into the branch’s pilot holes.
Wipe off the branch with a damp rag. Brush a water-based polyurethane over the entire branch and allow it to dry (about 30 minutes.)

Gently sand any burrs or imperfections off the branch and wipe the branch with the damp rag.

Add another coat of polyurethane.

Repeat sanding and adding a coat of polyurethane until your branch has 5 coats of poly. Do not sand the last coat.

Let the branch dry completely for a day and then add towels to your unique branch towel bar!

I purposely left some extra overhanging branch on the ends for extra towels.

I don’t know about you, but I love it! I think the branch is unique and adds some warmth to the bathroom. How about you? Do you like it? Or is a branch in your bathroom just wack-a-doodle!
Linking to: Funky Junk Interiors Branch Party.

LOVE IT!!! I was looking to buy something like this, but I think you’ve inspired me to do it myself:)
Holy smokes…what a LOT of WORK! Sure looks GREAT though!
Deborah (happily visiting from
http://upcyclingmylife.blogspot.com)
I have wanted to do this EXACT thing in our bathroom for the past 4 years and haven’t “gotten around to it”. Thank you so much for sharing! Now I can do it RIGHT! 🙂 Love it!
I absolutely LOVE it – it’s not only unique, it’s beautiful! When I’m ready to patch up the big gaping holes that my builder-grade bar will leave when removed I think I will copy you and do this, it would so “go” with my bathroom!
What a creative idea! I love the rustic look of it! 🙂
Your branch turned into a towel bar is really nice! Good job!
Hope you will bring one of your projects or posts to my Potpourri Friday Party. Link up begins Thursday afternoon. Your participation will help make it a success!
wow i love it! what a great idea and looks so professional!
Love this Brittany. I am always looking for ways to bring nature into my house. This is so doable.
My best- Diane
Cool idea and so beachy fun.
That looks great! We’re doing some work in our bathroom this weekend, and I’ve been perusing your blog for tips. 🙂
Love the branch towel bar! It adds a unique rustic touch to the bathroom.
I think it looks awesome. It is out of the ordinary and it is also sentimental too. I love when people think outside of the box. 🙂
beautiful, love it!
d e n i s e