
How to Repair a Leaky Shower or Tub Faucet

You know that saying, when it rains it pours? That statement has become an actuality in our home. While we are trying to build back from the plumbing leak, one of our tub faucets developed a leak. When I tried to tighten the handles to stop the dripping, this is what happened:

Oops. Luckily, I knew the fix was an easy one, if you can screw in a light bulb, you are qualified to fix a leaky faucet!
I’ve solved this problem in a few tubs and showers (including one on the day I went into labor with my youngest.) Yup, you could say that the faucet wasn’t the only thing that sprung a leak. LOL.
My main complaint is that this was just one more project keeping me from the kitchen.
Leaky Shower or Tub Faucet Tools:
(I’ve included affiliate links for your convenience. I earn a small percentage from a purchase using these links. There is no additional cost to you. You can read more about affiliate links here.)
- IRWIN Vice Grip Pliers
(or monkey wrench)
- Philips head screwdriver
- Flat head screwdriver
- Jar gripper
- Rag
- Optional: bath and tub caulk
Leaky Shower or Tub Faucet Instructions:
Before performing any work on your tub, locate the water shut off and turn off the water to the house! After the water is shut off, turn on the water in the tub to drain any water inside the pipes.
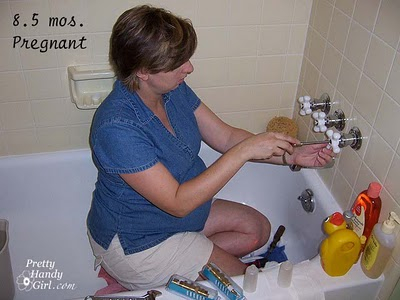
Locate the screw on the faucet handle. Sometimes it is exposed. Sometimes you have to pry the center off the faucet handle. Use your fingernails or a flat head screwdriver to remove the cover.

Remove the screw holding the handle on and pull off the handle. (Our shower handles have a collar just below the handle that needed to be removed as well.)

Unscrew the escutcheon (the collar that fits against the wall.) By the way, this repair is a great little plumbing project that your child can help with. It is easy for him or her to help unscrew the parts once they have been loosened.

If the escutcheon is stuck on tight, cover it with a jar gripper and use the pliers to loosen it without marring the metal.

After the escutcheon has been removed the stem will be exposed. Position the pliers over the rear nut and turn the stem counterclockwise. Once it is loose, you should be able to unscrew it by hand.

If the stem hex nut is recessed into the wall, you will need a stem wrench to reach into the wall.
Have a rag ready to shove into the hole once the stem has been removed. This will prevent any remaining water from dripping into the wall cavity.

Take the old stem to the hardware or plumbing supply store and purchase a new stem that is identical to the one you removed. The part that wears out most often are the two washers. There is one at the end and one around the threaded portion. You could simply replace just the washers, but new stems aren’t expensive and in my case the stem was really showing excessive wear and tear.

Slip the enclosed washer ring onto the new stem.

Gently thread the new stem into the wall. Do not force it or you could damage the threads in your plumbing. Hand tighten the stem.

Use pliers to tighten the stem. (I usually tighten about 1/2 – 3/4 of a turn more.)

Reuse the threaded tube from the old stem on the new one. This is what your escutcheon threads onto.

Thread the old escutcheon back on. Be careful not to over tighten or you risk cracking your tile. For an ultra-tight waterproof seal, spread a thin layer of caulk where the escutcheon meets the wall.

Replace the handle assembly.

Replace the screw holding the handle on and replace the cap if necessary.

Turn the water back on and test the tub or shower faucet. Your leak should be fixed!
If you have the single handle style shower or tub, you might want to look at this tutorial from Family Handyman.
Now, tell me the truth, that doesn’t look so hard does it? Next time you have a leaky shower or tub, save the money you would have paid a plumber and do it yourself. You can also check out other easy plumbing repair tutorials here:

See you in a few..


Exactly what I needed to know! thank you.
Thank you so much. I fixed it. ^_^
High fives!!!!
I really liked your tip about using a jar gripper to help grip the escutcheon and twist it off. It would probably work for a lot of stubborn bolts too. Anyway, I agree that fixing a leaky faucet is a definite DIY project, but I would suggest that while the water is off you can check the other pipes in your house for problems and general wear. Chances are you won’t find anything, but it doesn’t hurt to check. However, I wouldn’t recommend trying to replace pipes yourself unless you are really practiced.
Hello, im soo frustrated when I replace both my valves and seats
I still get cold water leaking…I even turned down water pressure
And still leaks cold….arrrrghhh teflon used on all fittings
But still doesn’t stop leaking. I live in California so you know
my metered house bill will be in soon…please help….
Hi,
Great job on the repair. I was wondering what the name of this faucet was or where to purchase it.
Thanks
Matthew
Sorry Matthew, I don’t know. It was installed by previous owners.
Thank you so much for your tutorial! I read it and thought “I can do this!”
So, here I am. Sitting in my bathtub, attempting to fix my leaky (and rusty rotten) 50 year old faucet and knobs. Alas, nothing is ever easy.
The main water supply has been shut off for several hours now. There is nothing from the kitchen or bathroom sinks, and yet, the tub faucet is STILL dripping!
Two of the three knobs had screws that came out easy, the third stripped. I tried to use the “SpeedOut” bits to extract it….nada.
Oh well, moving on…one handle popped right off with some persuasion. The second won’t come off…it is absolutely refusing. And, of course, the third is sitting pretty with its stripped screw.
The faucet is rotting as well, and I was told those just screw on and off…but it won’t budge.
Other than calling a plumber, do you have any ideas or advice? (I might have $5 in my account if I’m lucky…can’t afford a plumber…but I have to fix this….I already have the parts…)
Thank you so much for your website. I love it, even if the things in my house don’t love me!
Laura, I’d spray the last one with WD-40 and walk away for 15 minutes. Then try gently tapping on the valve with a hammer to hopefully break any corrosion or rust. Good luck, and yes, sometimes DIY projects can be a real pain. Hope this one has a happy ending.
I got it!!! Thank you so very much!
I ended up drilling the stripped screw out, and was very careful to make sure I didn’t damage the valve. The WD-40 helped tip get theThe handles off. The valves were actually in very good shape for their age, they just needed a lot of good write brush scrubbing. I replaced the washers, and put everything back with the new non-corroded handles, and the drip is now gone!
Thank you so much for giving me confidence to do this myself! You rock!!
I have a drip behind my tile wall-I can run a bath and there is no problem-it is when I have a shower that
there is a drip happening behind the wall from either the shower head or the diverter. I did have a plumber (a friend’s husband) come out and he quoted me for a ‘rebuild’ and charged me $265.00. Two weeks later I could still hear a drip, drip drip when downstairs below the tub. There is no water coming through-but something is still wrong. I let this company know and my concern was dismissed. Two months later it is still a problem. I spoke to another plumber and he told me that this was a lot of money I was charged-and I still have a leak and I do not think I had a ‘rebuild’ done that I was charged for-the second plumber said that a rebuild is taking out the wall or accessing it from a room behind it and putting in completely new piping-this was not done. I am upset and let this company know and asked for my money back. The second plumber said he could come by-and offered to charge me less to help me-and said he can diagnose where the leak is by putting a light down through the hole by the shower head and looking.
Would you recommend this? I am nervous that there may be damage behind the wall-but do not want to rip the wall out if I do not have to. Any suggestions. Also what is a rebuild. The first plumber was here for about 1 hour – and I think put in new washers and the new stem, valves-is this a $265 job?? Thanks! J
Jen, a dripping sound inside the wall is not a good sign. You don’t want to mess with potential water leaks. I think it’s important cut into the wall from the other side and assess the situation before it gets worse. Sorry, I wish I had better news for you It also sounds like the first plumber should have done that from the start.
Thank you so much. This is almost exactly what I’ve done when I replace both hot & cold cartridge stems & seats. However, my tub faucet still leaks & the handheld shower doesn’t work (now). I don’t know how long the shower portion has not worked (maybe it’s just from my recent replacement of the cartridge stems & seats for the hot & cold handles or maybe it hasn’t worked in awhile, as my roommates did not tell me if the shower was not working or not before I undertook this project). Any suggestions, anyone on what I should do next, as I can’t afford a plumber right now, as I live in poverty & have returned to college for a degree? Thank you.
—Bill.
Also, for clarification, the diverter (for either the tub or shower that is in between the tub handles) does go back & forth, physically, from left to right, but no water comes from the showerhead, while the faucet still leaks with a semi-considerable flow (similar to before my attempted repair).
—Bill.
“Take the old stem to the hardware or plumbing supply store and purchase a new stem that is identical to the one you removed.”
Forgive my ignorance, but my tub fixtures are over 30 years old! What if the hardware or plumbing supply store don’t carry identical replacements?
Joan, our house is over 30 years old too. As long as it is a major plumbing manufacturer (and chances are that it is) they should be able to match. If not, you can talk to someone at the store to find out your options. But, you’ll be surprised, chances are they can probably match it.