How to Install Radiant Floor Heat using WarmlyYours

Are you ready to get toasty today? Today is the day that I’ll be showing you how to install the WarmlyYours TempZone radiant floor heat. Can I tell you a little secret? I was terrified! I was so fearful of breaking the heating wire, that I handled this roll with kid gloves. And I yelled at ANYONE who dared step on the mats in shoes. I realize now that I may have been paranoid and overreacted a little. I was just so anxious to have warm floors that I protected our radiant floor elements like a Mama bear of her cubs.
Remember on Wednesday how I told you how I had chosen WarmlyYours radiant heating systems because of their awesome warranty? Well, I also read feedback about their customer service and it ROCKS as well! That service starts with the ordering process. I was in contact with a representative from WarmlyYours who helped answer ALL of my questions (of which I had many.) She reviewed my room layout and suggested the TempZone Cut & Turn Rolls which is one long mesh roll with the heating element woven and evenly spaced throughout the roll. I was doubtful and wasn’t sure how the roll would fit through the doorway and “roll” around our laundry room. But, she reassured me that they would send me detailed plans for installation. And that a DIYer like myself should have no problem with the installation.

Within a week, I received my custom TempZone roll with a layout just for MY space.
Not just a standard layout, but a custom plan for my exact room dimensions and usage. I was extremely impressed to say the least, because the plan was very detailed showing the exact location of the cuts I needed to make in the mesh mat (not the wire.) Having this map saved me hours of brain-twisting planning at the least.

Before installation, I read the instruction manual in its entirety (highly recommended.) Remember, I was a little nervous and didn’t want to do anything to damage the heating mat. I even made sure I was hopped up on caffeine so I could absorb every nugget of the lesson.

I also prepared the floors by installing cork underlayment (as detailed in this tutorial.) Are you ready for the tutorial to install radiant mats? It wasn’t as difficult as I anticipated and this part went fairly quickly. Let’s roll!
Materials:
- WarmlyYours TempZone Roll
- WarmlyYours Circuit Check (shipped with roll)
- Instruction Manual
- WarmlyYours Custom Layout
- Tape Measure
- Scissors
- Hot glue gun and glue
- Carpet remnants or pads to walk on
- Multi-meter
(I’ve included affiliate links for your convenience. I earn a small percentage from a purchase using these links. There is no additional cost to you. You can read more about affiliate links here.)
Instructions:
Unpack your TempZone roll and gently pull the wires out from the inner cardboard tube.

Turn on your multi-meter to 200 and touch the leads to the two inner wires of the heating elements. Look at your reading.

It should match or be very close to the Ohm reading for Core to Core ohm reading that is on the label of your roll. If it doesn’t come close, contact WarmlyYours immediately for assistance because your heating element may have been damaged during shipment.

If the reading is close to the pre-shipped number, make a note on page 9 of the instruction manual. Next test the braided outer wires that surround the inner wires on the wires (heating element) that you just checked. Again, make sure the numbers are very close to the Sheath to Sheath reading on the label. Keep this chart handy because you need to take ohm readings throughout the process.

All your numbers check out? Then we’re ready to roll (pun definitely intended!) Unpack the roll and gently cut the tape surrounding the TempZone roll.

Before you do anything (don’t even breathe on that baby…kidding), hook up the circuit checker to the roll wires. Peel back the outer sheath wires and twist them together. Then insert and secure them to the screw opposite the green wire (as shown below). The remaining inner wires from the heating wire can be secured to the screws across from the red and black wires. Move the switch to on and nothing should happen. Keep the circuit check turned on anytime you are working with or on the roll.
If the alarm buzzes, check your connections. If it continues to sound, contact WarmlyYours to make sure you don’t have a break in your wire.

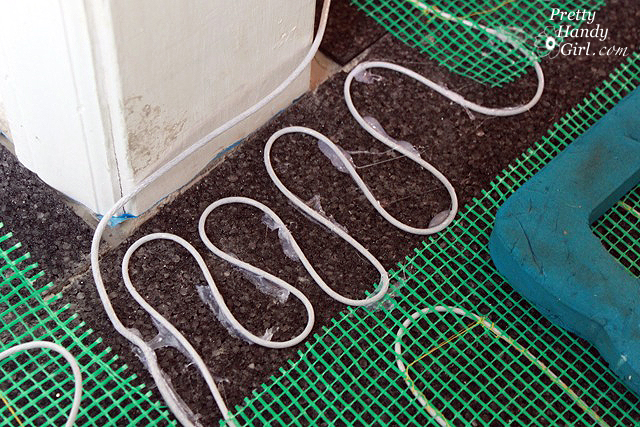
Review your custom layout plan. Notice where the triangle is. This indicates where your roll will start. The square is the location of the end of your roll.
Each turn is clearly marked by symbols and arrows. The cuts that have a circled inch measurement are locations where you have to free the element from the mesh before making the turn (more on that soon.) Here’s the direction that my roll is to be installed:

Position the TempZone roll at the start as indicated by your custom plan.

Roll the mat out until you reach the length indicated on your plan. The first run on my plan calls for 18’4″ and then has the squiggly line with 4″ in a circle pointed at the squiggly. This indicates that I have to make a freeform turn and I will need to cut a 4″ section out of the fiberglass mesh mat. (IMPORTANT: YOU DO NOT CUT THE WIRE!!!)

As directed, I carefully made my first cut though the fiberglass mesh (NOT THE WIRE!) at 18’4″. Then I made a second cut 4″ past the first as indicated by the number in the circle.

To remove the wire from the mesh, I gingerly cut the small thread that holds the wire onto the mesh. (I tried like crazy not to shake, but I was nervous having my scissors so close to the wire feeding power and life to my baby.)

Once the wire is released, turn the mat and start in the opposite direction as indicated by the installation plan.

The end of the second run calls for a simple cut turn:

All I had to do was cut through the mesh at 18’10” (avoiding the wire.) And rotate the mat 180 degrees and roll the mat towards the laundry room.

Easy, right?! Yup, not hard at all because the installation plan fit my space down to the inch! The laundry room required a few more cuts and a flip turn (where the wires are now on top of the mesh.) All of the install was very simple to do by following the instructions.

As I worked around the room, I laid down carpet remnants to protect the radiant floor elements. (Yes, I truly babied this floor! But, I wasn’t taking any chances.)
As I made the last cut and laid the end of my roll, I was amazed that it ended perfectly according to the plan! This is where I was truly impressed, because WarmlyYours had custom cut my roll to fit perfectly within my rooms! Woot!
It’s not time to celebrate yet, it is time to take another reading and record it in on page 9 of the instruction manual. (Big sigh of relief from yours truly because the reading was the same! Phew.)
And now it was time to put my crafting skills to work. I broke out the hot glue gun and an entire package of glue sticks. (Never used hot glue before? Learn how to use a hot glue gun safely and spare your fingertips.) I set up the hot glue gun on a glass cutting board and had a butter knife to help spread the glue. The kneeling pad protected the wires where I was working.

As the glue begins to melt in the gun, spread some glue onto the cork mats and gently press the wire into the glue. For the free form areas, serpentine the wires, but don’t ever cross them or lay them on top of one another. Keeping space beween them will insure more even heating in your floor.
Secure the TempZone mats to the floor by spreading a glue stripe every foot or so (between the wires.) Then spread the glue with the butter knife.

After the mat and heating wire has been secured, run the excess ends of the wire at the base of your wall (the wire fits perfectly in the channels made with the foam insulation strips I used when pouring the self leveler.)
Run a line of hot glue along the channel.

Gently press the wire into the glue. Make sure the wire isn’t on top of or near any sharp objects that could puncture or break the wire.

Your lead and end wires should meet in the same location where they will be fished up into the wall to your controller thermostat. You will need to lay the sensor wire near this location as well. The sensor will be hot glued to the floor underneath the mesh and in between two wires (I forgot to photograph this step, but here’s the picture from the instruction manual.)

Check the sensor wires by setting the multi-meter to 20K ohms. It should read around 12 ohms.

Tape the sensor and the TempZone heating wires up and out of the way. Cover your floor with pads and/or carpet scraps to prepare to lay the tiles.

I chose to hire a tile setter to install the tiles. He carefully troweled thinset over the radiant floor wires and mats, then laid each tile and put spacers in between the tiles. We were both on high alert during this process worrying that the circuit check alarm would go off at any moment. But, it never did, and the final check revealed the same ohm reading. Huge sigh of relief from both of us.

There are several tasks that I decided I need to contract out so we can move closer to getting our house back to normal. This was one of those jobs, but I have decided that I will install my own tile backsplash. So, be prepared for a tutorial on that in the near future. I also hired an electrician to run a dedicated line for the radiant heat and to hook up the thermostat. Wiring the thermostat yourself is not difficult. WarmlyYours has a great video showing you how to wire the thermostat and program it. Plus, lots of other helpful installation videos.
The SmartStat thermostat I used is programmable. It comes pre-programmed to lower the temperature at night and during the day when everyone is at school or at work. You can program it to meet your specific needs. Either way, it is a great way to save energy.

One important note: Your thermostat needs to be installed in a metal 4″ x 4″ box (or double gang size). The thermostat and the wires will get very warm and need the extra room to breathe. Make sure your electrician does this if he (or she) is handling the thermostat installation.
As you can see, I have another thing on my to do list:

Number 35: Add drywall around thermostat.
After a week of use, I can honestly say that I am in LOVE with our new radiant heat floors. AND, those two previously chilly rooms are now up to the same temperature as the rest of the rooms in the house (temperature shown in the circle above.)
If you have any other questions, WarmlyYours has a FAQ section on all of their products. Plus, they have an amazing technical support staff. Both times I called, I talked to an English speaking tech who answered my questions and explained things to me clearly. They offer 24/7 support on their (800) 875-5285 toll free number. I didn’t have to wait on hold or listen to elevator music. Who offers that kind of support? I didn’t think anyone did anymore, but clearly WarmlyYours does. Thank you guys, you ROCK!!!

I hope you’ll consider adding radiant heat in one of your cold rooms. You can install a simple mat to greet your feet when you exit the shower. Or install one of their other radiant heating products. With all the step-by-step instructions, videos and their awesome support — this is definitely a DIY job you could handle. Have a great weekend. See you next week.

Disclosure: The radiant heat roll and supplies were provided to me compliments of WarmlyYours. However, I was not paid to endorse WarmlyYours. I was not told what to write. I chose to contact WarmlyYours because I was interested in their product and I read about their excellent warranty and customer service. All opinions and instructions provided in this tutorial are my own. If you are uncomfortable with any part of this tutorial, you can hire a professional to assist you. There’s no shame in that.
Pin for later!


Hi there – great post! I know you were given the mats from warmly yours, but I was wondering if you know the cost of what all the warmly yours supplies would have cost for the size of project you did? Also, curious if you noticed a big difference on your electric bill? It’s been awhile since you installed these – are you still totally happy with them? Thanks!
OMG! Yes, I love them. I’m sorry I don’t have any information for you on the cost or our electric bill. We installed these four years ago. But, I’m going to add radiant heat in our master bathroom next. I hate cold tile floors.
Great job Brittany!! You convinced me to give radiant heat a shot next.
Even though we’ve had a relatively warm winter the tiles in our bathroom are certainly cold in the am.
Can’t wait to see your backsplash project 🙂
Jeff, even on the mild days we’ve had, I really love the warm floors!
So awesome!!! I’m glad you got warm rooms now!!
Thank you Crystal.