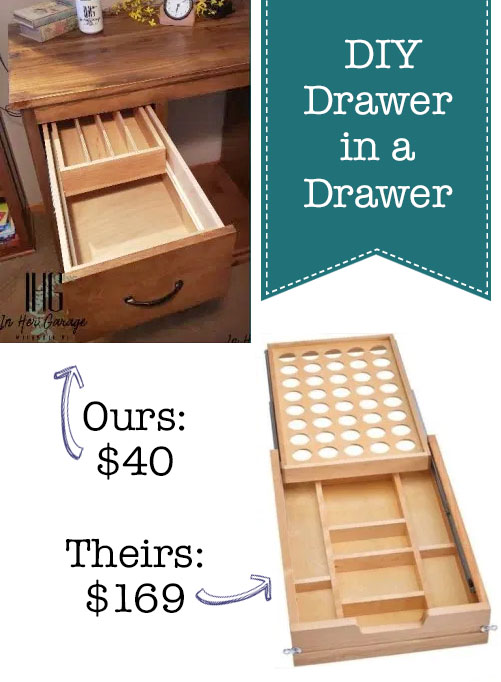
DIY Drawer in a Drawer
Have you ever wanted to maximize the space in one of your drawers? Do you have a drawer that acts like a black hole? Learn how to build a DIY Drawer in a Drawer and watch your organizational dreams come true.
 DIY Drawer in a Drawer
Hi! This is Kristen from In Her Garage, and I’m here with a tutorial just for you. We all love organization, but in almost every room of the house we have a drawer that houses those tiny little necessities. And inevitably they end up scattered and lost within the drawer depths. Today I’ll teach you how to build a DIY drawer in a drawer to keep those little things easily at hand while still allowing use of the drawer beneath. You could just build a small separate top drawer, which would be fine if that is the outward aesthetic you want, but if you desire your uniform size drawer front, then this is a perfect solution. And, great news…this can also work as a modification to an existing drawer.
There are similar drawers available online but chances are they won’t fit the size drawer you’re building or already have. Not to mention the cost! Why not just do it yourself?!
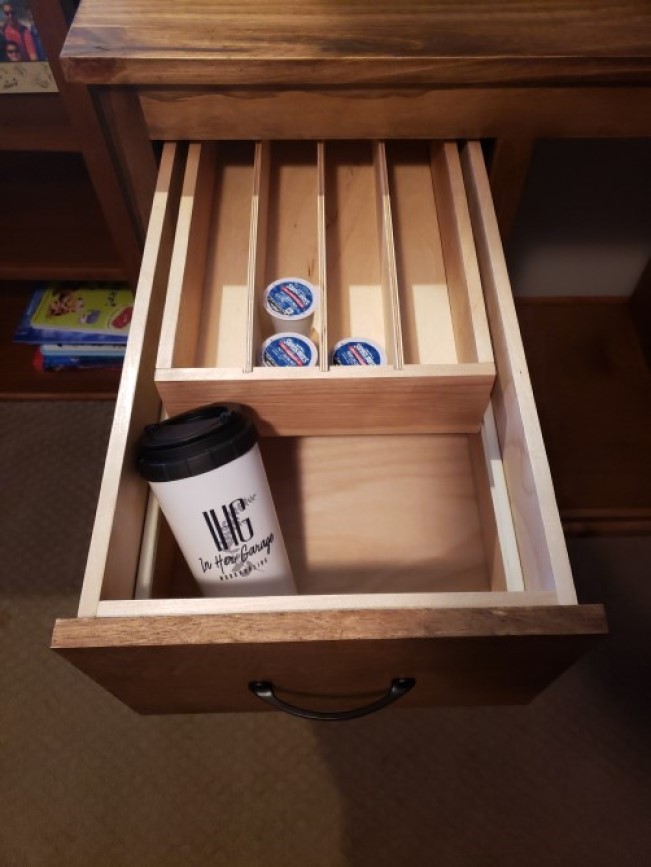
I have built this drawer several times and each time I made it for a coffee bar/beverage center I was building. This drawer makes the perfect K-cup organization drawer. My clients had complained, “I’m sick of these K-cups laying all over the drawer!” or “I do not like the look of the K-cups on the tabletop. It looks like clutter!” I was thrilled to be able to help with this issue by building a DIY drawer within a drawer. Once you know how to make this insert drawer, you can use it to hold more little things such as:
- Office, craft room, kid’s craft room- holding paper clips, push tacks, post-its, those sticky page marker tab things, pens/pencils, markers, scissors, legal pads
- Bathroom- makeup, hair ties, bobby pins, Qtips, all the little creams, first aid supplies
- Junk drawer!!- batteries, keys, phone chargers, pens/pencils, tape, rubber bands
I’m sure the list could go on but let’s get down to it and start making this drawer happen!
(I’ve included affiliate links for your convenience. I earn a small percentage from a purchase using these links. There is no additional cost to you. You can read more about affiliate links here.)
Tools:
- Drill with Phillips head bit
- Brad Nailer with 3/4” nails
- Self-centering drill bits (optional but makes life easier!)
- Table saw or circular saw
- Miter saw or circular saw
- 6” Combination Square
- Jigsaw– if you are modifying an existing drawer
Materials:
- 1/2” birch plywood (size will depend on the drawer you plan to build)
- 1/4”x 12” x 24” craft plywood, found at the local big box or craft store (optional)
- Using 1/4″ plywood for the bottom of the drawer and the drawer dividers makes the drawer lighter
- Bottom-mount drawer slides one size smaller than the drawer slide used for the base drawer
- White Birch Iron-on edge banding for finishing the exposed edges of the drawer (optional)
- Titebond II wood glue
Please read through the instructions first to gain a basic understanding of what you will be building.
Instructions:
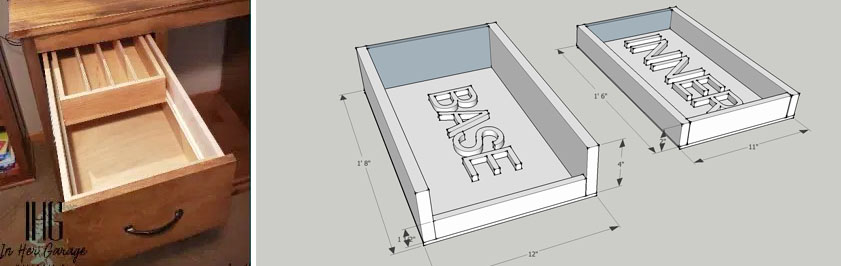
Figure out the size of your drawer you want to build. Then select a height for the inner drawer based on what will be stored in it.
- If you plan to use it as a K-cup organization drawer allow at least 2” inches in height. (Standard K-cup dimensions are 1 ¾” tall x 2″ top diameter and 1 ¼” bottom diameter.)
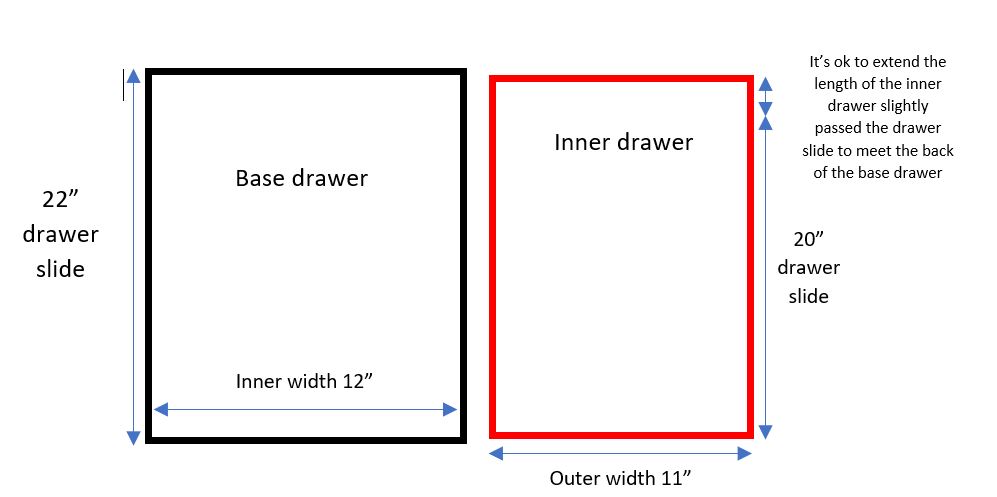
Next, you will need to figure out the dimensions of the inner drawer. Follow the instructions for the drawer slides you chose for the base drawer for sizing. (My slides dictated 1/2″ for each.) The front and sides of the base drawer should be cut to the same height BUT the back of the drawer should be shorter to allow the inner drawer to roll away. See the photos below.
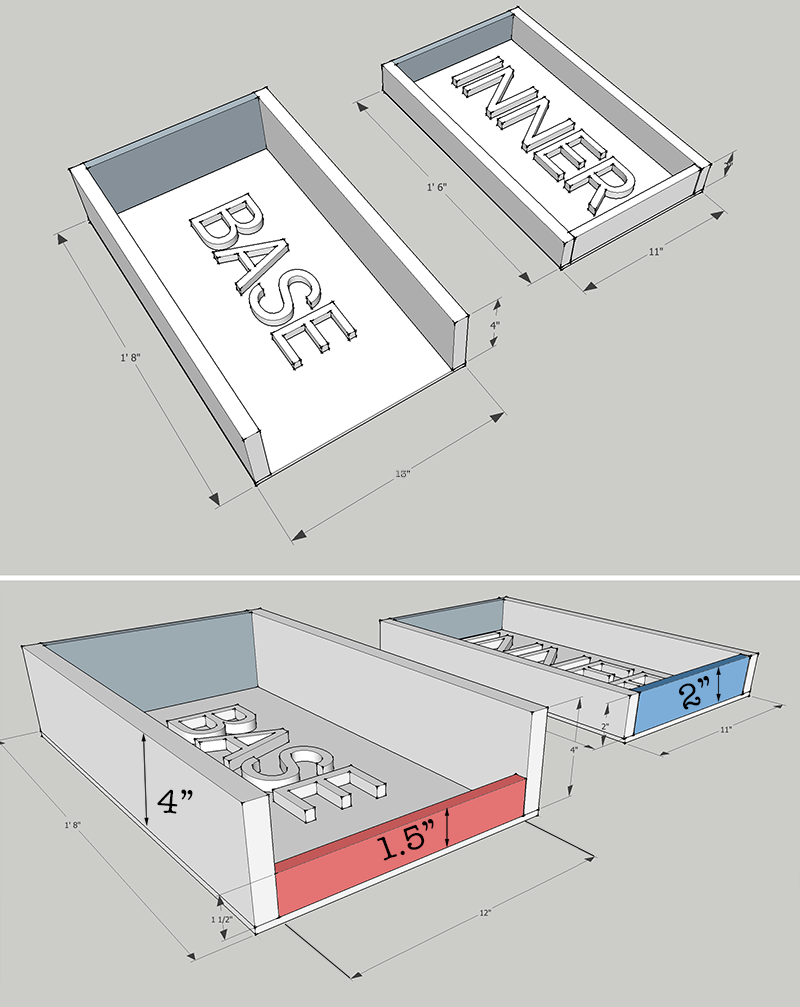
The equation to figure out the back of the base drawer:
The inner height of the base drawer – (the height of the inner drawer + 1/2”) = Back of the base drawer
Using the example as shown above:
4” inner base drawer height – (2 ” inner drawer + 1/2”) = 1.5” back of the base drawer
If you are modifying an existing drawer, cut the back panel to this same height using a jigsaw.
Feeling good about that? Great!
Building Your Inner Drawer:
Now it’s time to assemble the inner drawer components. (Double-check your measurements below):
- Height- you’ve already chosen this dimension
- The width will be 1 inch narrower than the inner width of the base drawer to allow room for the drawer slides
- The length will be slightly longer than the length of the drawer slide so the drawer meets the back of the base drawer.

Assemble the inner drawer using wood glue and brad nails.
Installing the Drawer Slides for the Inner Drawer:
You can watch this video and then read the directions, which should help clarify installing the drawer slides.
Set out the base drawer components you pre-cut.
Note: Installing the drawer slide is the opposite of what you would normally think. You always pull a drawer open toward you but this drawer will operate by being pushed away from you to reveal the base drawer beneath it. Meaning the front of the inner drawer slide is now the back. You’ll see what I mean in a minute.
First, take the two sides from the base drawer and mark the front and top of both sides. Now, using your combination square, mark the height of the inner drawer on the sides of the base drawer measuring from the top down. Add about a 1/8” to let the drawer sit slightly lower than the top of the base drawer.
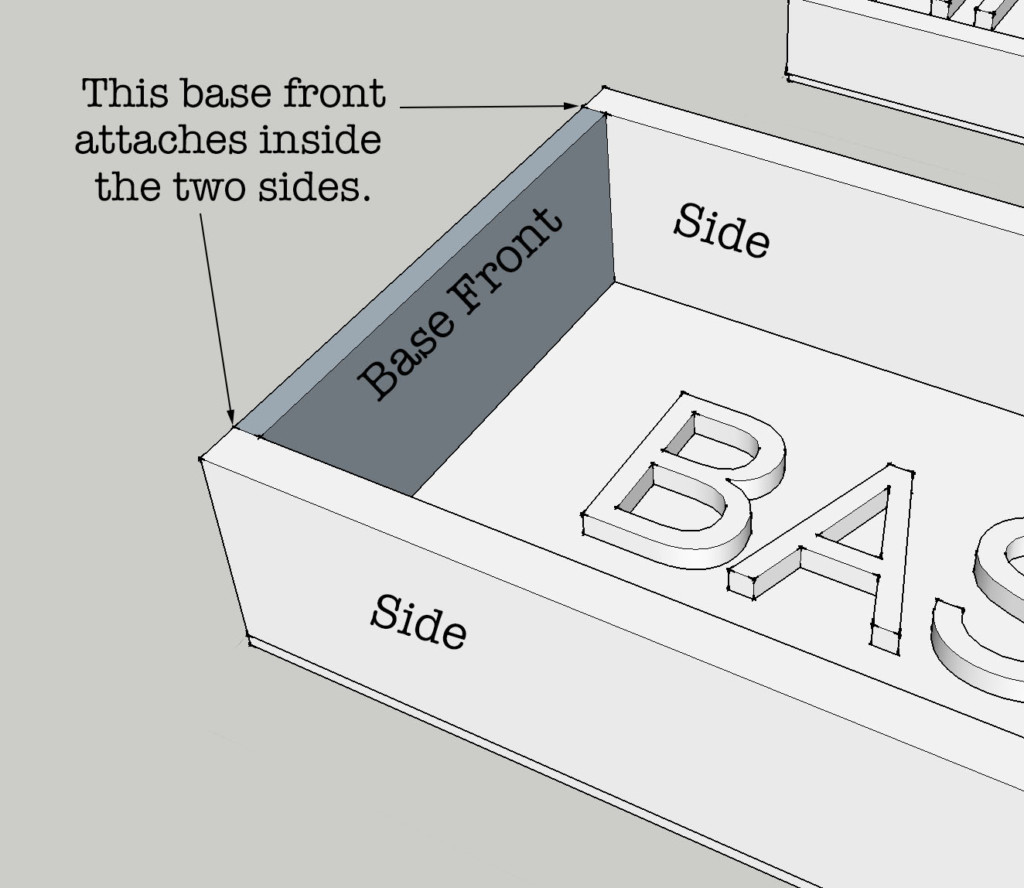
Now figure out where the “front” (actually the back) of the inner drawer slide will be attached. (Allow 1/8” from the front of the base drawer.) Remember to take into account whether or not the base drawer front attaches inside the sides (as shown in the picture below) or in front of the sides. If the front does attach between the sides, be sure to allow for the thickness of the drawer front when attaching the slides to the sides.
Mark a pencil line where you will be attaching the drawer slides. Attach the inner drawer slides to the inside sides of the base drawer. Lining up the “front” and bottom of the slides with the two lines you’ve drawn.

Attach the other piece of the drawer slide to the inner drawer bottom (double-check you are lining the back of the slide up to the “front” of the drawer. Normally you would align the front of the drawer slide to the front of the drawer but what was the front of the drawer is now considered the back.)
Now that the drawer slides are installed, Assemble the base drawer (pretend there are drawer slides in the photo below.)

Finishing Your Drawers with Edge Banding:
For a finished look, cover the exposed edges of the plywood with edge banding. I prefer iron-on edge banding because it is easy, inexpensive, and finishes nicely. Brittany has a great tutorial for how to finish plywood edges which includes iron-on edge banding, click here to check it out.
Nesting the Inner Drawer:
Slide the inner drawer into place inside the base drawer. Now you are ready to set your base drawer back into the cabinet it goes in. That’s it. Good work!
Optional last step: you can add little felt pads to the front and back of the inner drawer. This will make closing the drawer whisper quiet. Most people will pull the inner drawer closed before closing the base drawer after use but it isn’t necessary if there is a back to the entire cabinet piece. The inner drawer will simply hit the back of the cabinet and be pushed back into place when closing the base drawer so having little felt pads on the back of the drawer will make this quieter and having pads on the front of the drawer will help with this too.
Good luck keeping all the little things organized and I hope this DIY drawer in a drawer will come in handy for any room in your home! Happy Building!

Find more projects and inspiration In Her Garage and follow my DIY journey on Instagram and Facebook.
![]()

Hi! I’m Kristen, from In Her Garage, and I am a self-taught woodworker and DIY fanatic from Minnesota where I live with my husband and our two daughters. Between being a wife, mom and, registered nurse, I try to make as much time for DIY as possible. My love for building came after our family built our current home in 2015. After we moved in, we needed furniture and instead of spending massive amounts of money to order the pieces we wanted I decided that I would build them myself. I started with a buffet table plan from the fabulous Ana-white and quickly set out to remodel my entire home office.
Since then I have started a side business building furniture for the people in my community. I love hearing my clients talk about the pieces they wish they had whether it be a rustic buffet table, a one drawer side table, or a toy box and then making it a reality for them. While starting my small business it made perfect sense that I would document my building journey so I simultaneously launched the In Her Garage blog and I love sharing my plans, tips and tricks.
Making something beautiful with your own two hands through a little preparation and determination is an amazing feeling and I hope to bring inspiration and know-how to those looking to tackle a big or small project.
I am so glad that you found me here and please feel free to connect with me on Pinterest, Instagram, and Facebook to see what I am working on right now.
Just what I needed: a very simple solution to access the cutlury cassette piled up in the drawer.
I’m planning a few of these for the kitchen, especially for a spice drawer. Thanks for the ideas.
That’s awesome!! This will be great for a spice drawer. Good Luck!