Create Your Own Decorative Bin

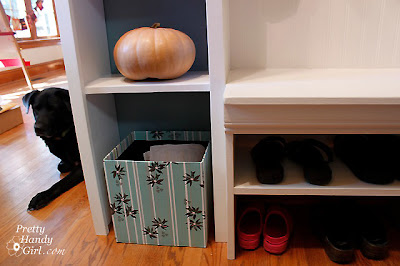
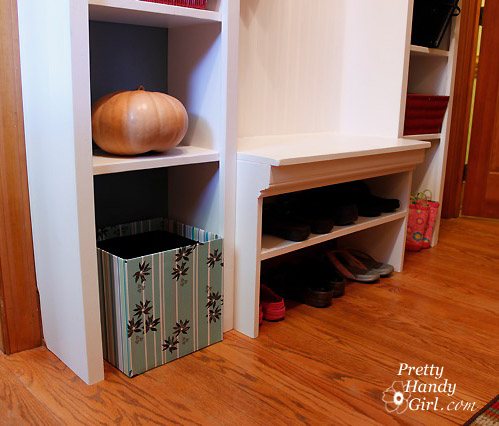
Do you remember that cute little blue striped bin in Renee’s storage unit? The one that she uses for junk mail and recycling.
How much do you think she paid for that? Would you believe nothing?! I made it for her out of a cardboard box and art supplies I had on hand.
Materials:
Cardboard Box
Black Spray Paint (or other color)
Spray Mount (Spray Adhesive)
Elmer’s Glue
Scissors
4 sheets of scrapbook paper (wrapping paper, fabric or wallpaper)
Instructions:
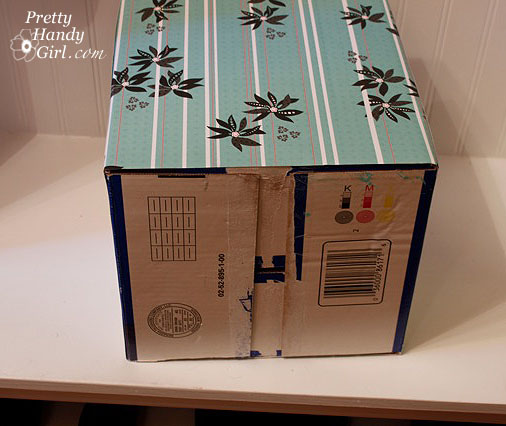
1. I started with a square Huggies Pull Ups box. I knew you wouldn’t believe me, so here is the picture to prove it.
2. Spray paint the inside of your box (be sure to wear gloves because the spray will coat your hand since it swirls around inside the box.)
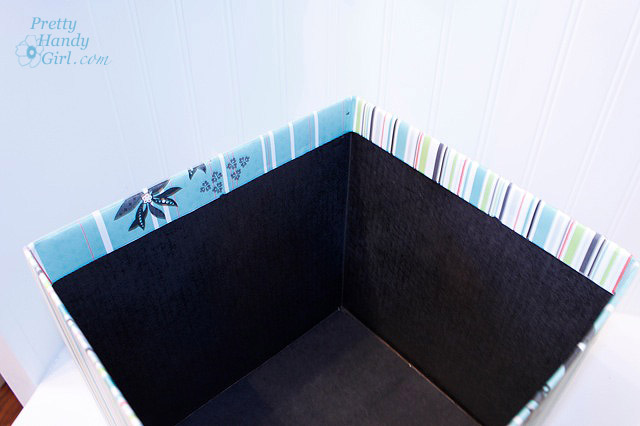
3. Spray adhesive on the back of 2 sheets of scrapbook paper.
4. Attach them to opposing sides of the box.
5. If your scrapbook paper wraps around the sides, that is good. Be sure to snip the top of the paper at the corners of the box so it can fold over inside the box.

6. Cut your other two sheets of scrapbook paper to the exact width of the uncovered box sides. Spray adhesive on those two sides and attached them to the box. Then fold over the top edges of the paper.
7. If the folded top edges don’t stay glued, put a little elmer’s glue underneath and then use a book, clothespins, or binder clips to hold it down while it dries.

AMAZING!! this is beautiful, and you're right, i wasn't going to believe you that it was a huggies box, so good thing you included the picture. 🙂
I love this! I have been covering cardboard boxes with old sheet music and love how it looks (no pictures up yet of course, that would be way too organized for me) but I have been leaving the insides all ugly and cardboard-y. Thanks for the great idea and the tip about the glove!!
Cute and easy, I love it! Thanks so much, I'll be linking.
You have been on my mind so much lately! I keep thinking that if I had an ounce of skill you have I would be so much more happier. I have been doing simple projects, like drilling holes for pulls, hanging drapery rods, TP and towel bars…and honestly I HATE it. No matter how hard I try, I am 1/4" off and have to re do it, or have the wrong screw or make such a big hole in the drywall I can't hang the rod! I can not fathom how you do what you do and make it look so easy. Are you for hire in San Diego? LOL
Hi Brittany..
I just did this exact same thing myself a few weeks ago to go in our newly organised coat cupboard.. http://jdumoulin.blogspot.com/2010/09/box-for-laundry-cubbies.html
I added a handle too… Works like charm.
Thanks for the tip on spray painting the inside btw.. I'm doing some of that this weekend and you have saved my hands a lot of scrubbing..
Jo xx
Okay, I have no diaper boxes but I think I can find a substitute! Now, for some pretty paper. Yours looks great!
Now that's pretty handy!
very clever! love this idea!!!
I'm totally doing this for my jewelry supplies. Obviously, smaller boxes, because beads aren't THAT big, but you get the idea.
hmmm what a great idea! Ive been trying to come up with something for our newspapers
What a great idea, Brittany! I love how easy AND cute it is! 🙂
I love simple and easy to do projects that serve such a useful and practical purpose!
Very Cool! Thanks for the idea! I can't wait to try this. I don't have diaper boxes either (thankfully) but I get some great boxes from time to time and never know what to do with them besides recycle. This is going into my memory bank to do very soon! I loved that box when I saw it in your post before 🙂
Thank goodness I don't have any diaper boxes…but I have plenty of other boxes I could use. 🙂 Sandra
That is awesome! I have so many of these diaper boxes and I've been looking for a storage solution for the shoes that pile up in the bottom of out coat closet. This is perfect. I'm copying!!!! like TODAY!