Changing Out an Old Outlet
So, this is one of those not so pretty posts, but I promise it is Oh So Handy! Learn how to easily change out an old outlet.
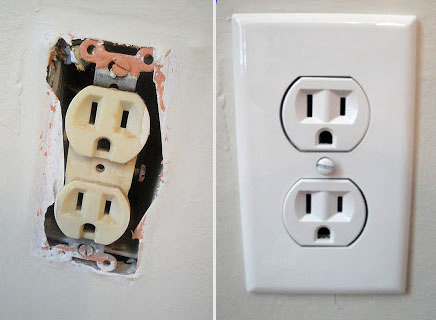
Changing Out an Old (UGLY) Outlet
Our home was built in 1978 and most of our outlets are almond colored and many are so worn that they won’t hold a plug anymore. I used to get annoyed EVERY TIME I vacuumed downstairs and turned the corner only to have the vacuum plug slip from the outlet. Not only is this frustrating, but it is also a fire hazard. Old outlets should be replaced for safety reasons (but, hey, I’m okay if you just want to change them to a pretty white outlet.). Changing Out an Old Outlet is easy!
I distinctly remember my father showing me how to wire an outlet when I was about eight years old. I didn’t remember exactly what he taught me, but I do remember the feeling that – yes, I can do this myself! Being the father of three girls, Dad taught us all the things he would have taught a son. This is a picture of my Dad, my sisters and me teaching him all we knew about bows, barrettes and bobby pins.

I know several of you would never think of taking apart your outlet. You might say electricity scares you. Well, that is a good thing! A healthy fear of electricity will make you more cautious, so don’t lose that fear. It is a good thing to double and triple check your safety when working with electricity. Now, are you ready to update your outlets? Changing Out an Old Outlet is a relatively easy task to do. And, I promise I will show you step-by-step instructions.
I highly recommend performing outlet replacements during daylight hours (or have a lamp that you can plug into an extension cord from another room.) Also, don’t let your little ones watch you, we don’t want them to stick a screwdriver in the outlet when you aren’t looking. Therefore, it is best to handle this fix during nap times.
Materials needed:
(I’ve included affiliate links for your convenience. I earn a small percentage from a purchase using these links. There is no additional cost to you. You can read more about affiliate links here.)

- Needle-nosed pliers with rubber or plastic handles*
- Flat head screwdriver*
- Phillips head screwdriver*
- Wire Strippers*
- Wire cutter*
- Voltage tester
- Night light
- 15 amp/ 125 volt or 20 amp/ 120 volt duplex outlet
- outlet cover
* It is safest to work with tools that have rubber or plastic handles that won’t conduct electricity.

Optional tools:
- vacuum to clean out the receptacle box (there will be dirt and dust in there and this may be the only opportunity you will have to clean it!)
- cushion to sit on
- power drill with screwdriver bits to speed up the process
Required Safety Instruction:
Turn off the power to the outlet you are working on. I highly recommend putting a night light or light in the outlet and turn it on. Then shut off the circuit at your circuit breaker and check to see that the light has gone out.
Also note that just because two outlets are in the same room, it doesn’t necessarily mean that they are on the same circuit. Plus, it is possible for the top and bottom of one outlet to be on separate circuits. Always check both the top and bottom of an outlet before you work on it.
Instructions:
Okay, let’s begin. Take a deep breath and realize that if an 8 yr. old can do it, so can you!
1. First, turn off your power, double check both outlets with your light to make sure the power is out to both top and bottom outlets.
2. Then take out your voltage tester. Insert a probe into each of the top two holes. If the tester lights up, you need to back up and turn off the power to the outlet! If it doesn’t light up, then check the bottom outlet as well. Still no light? Perfect, the power is off to your outlet.

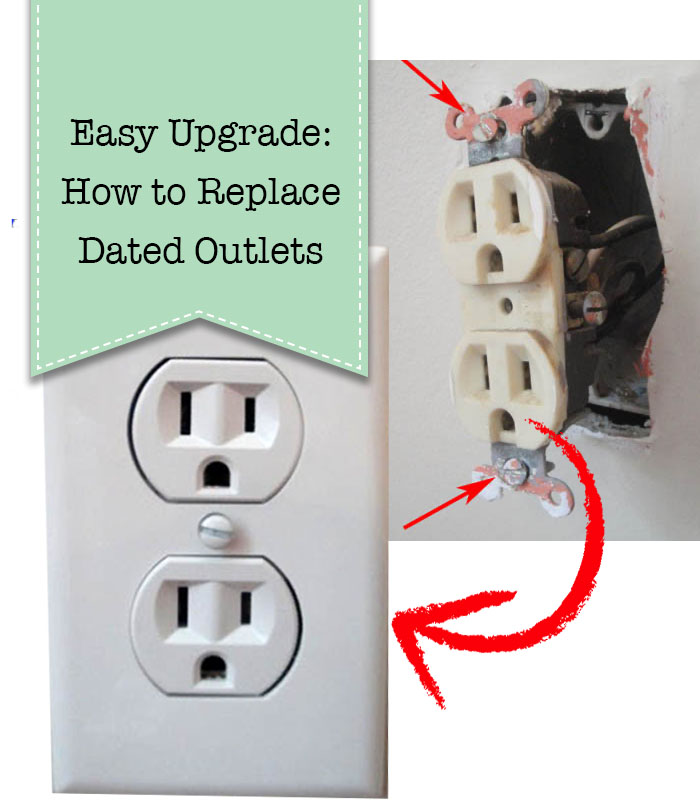
3. If you haven’t done so already, remove the face plate from your outlet by unscrewing the middle screw.
4. Unscrew the two mounting screws as shown below.

5. Gently pull the outlet out of the receptacle box. Inspect the outlet and see if you have the same amp replacement outlet. (Usually there are marking denoting 15A 125V or 20A 120V on the silver tabs, on the back or near the screw hole in the middle of the outlet.)
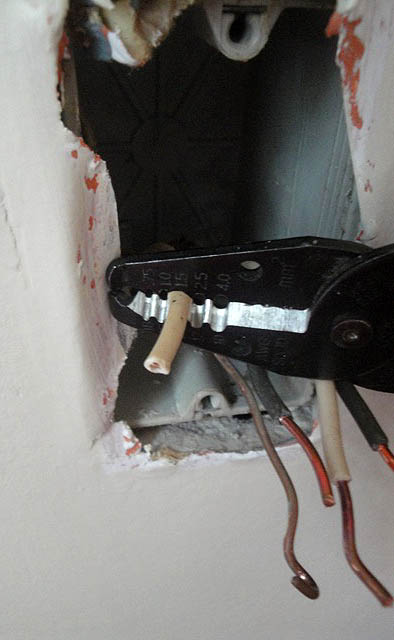
6. Note which wires are attached to the outlet and where. Then make a drawing if you need to of their position. Or work by transferring one wire at a time.

7. If the wires are wrapped around screws (lucky you), unscrew your wires and skip to step 10. If your wires are poked into holes in the back of the outlet, you may choose to try to release them by poking a flat head screwdriver into the slot next to the wire, or you will need to cut the wires as close to the outlet as possible.

8. Now strip about 1/4 inch of the insulation from the end of your wire.Then gently use your wire strippers to clamp down on the wire being sure it is scoring the insulation. If you need to, rotate your wire strippers 90 degrees and cut through the insulation again. then while the strippers are still around the wire, pull gently towards the end of the wire to remove the cut insulation.
9. Next take your needle nosed pliers and grasp the end of your wire and twist the end to make a shepherds hook shape. Do this for all your remaining wires.

10. Looking at the back of your new outlet, you will see that one side has silver screws and/or markings on the back that says white wire. The other side of the outlet should have gold screws and/or markings indicating hot wires (the black wires). And one screw towards the bottom that is green, this screw is for your bare or ground wire.

11. Hook each of your wires around the appropriate screw (Gold Screws = Black wires; Silver screws = White wires; Green screw = bare or green wire).

12. Further, using your needle nosed pliers, pinch your wires tightly around the screws attempting to close the loop.

13. After that tighten each screw being sure that the wire stays tightly wrapped around the screw.

14. If all your wires have been screwed tightly onto the outlet you can gently push your outlet back into the receptacle box. Try to rock the outlet in by alternately pushing on the top and then the bottom. If your outlet doesn’t go in, pull it out and rearrange the wires so they fold neatly behind the outlet and try again.

15. Screw in the mounting screws.
16. Finally, replace the faceplate.

Now you can turn the power back on and use a nightlight or lamp to make sure your outlet works!
Hey, you are done! Congratulations, you did it. Reach up and pat yourself on the back because I’m proud of you! Now that you know Changing Out an Old Outlet is easy as can be, I have a next level swap for you! You can use the same tutorial to install a USB Charging outlet!
Let me know how you did. Changing Out an Old Outlet was easy, wasn’t it?!


Nice post. As an FYI: You do not have to cut the wires. You can insert a small flat-head screwdriver into the squarish opening, above where the wire connects to the outlet. This will release the teeth that are clamping on the wire.
THANKS!! Can't wait to get to work on this!! BTW – just found your blog via hand me down house and I love everything so far…keep up the great work!
Thanks so much for sharing this great tutorial with us at Anything Related!
{Rebekah}
Thanks for the post
I learned by closely observing what I removed (and studiously inspecting that little booklet that comes with the new outlet).
Don't get discouraged if you have a hard time getting the outlet back in the wall. Sometimes the spaces are tight and the wires difficult to bend. But a little bit of patience and Faith after following Brittany's directions to rearrange the wiring will have you wiggling the new box right back into place.
Brittany – you may want to add a short addenda to cover GFCI's.
So that's how a voltage tester works!!!
Excellent. I'm so happy to know this. Between you and me — hubby always acted like this was a big and dangerous "job" that he would have to tackle. HAHAHA. I love the man dearly, but some of the things that he thinks are hard end up being pretty darn easy when a competent woman explains it to another competent woman. BOOKMARK AND A NEW FOLLOWER!!! I invite you to visit my place and do the same!
That voltage tester is going on my shopping list. Your cousin got zapped after her darling fiance assured her – twice – that the electricity had been cut (I was installing a new light switch). Oddly, that was the second time in a week I got zapped – the other time was with a dog bark collar. Now convinced they are a form of animal abuse.
Brittany – I think we are like twins or something! 🙂 My dad showed me how to rewire an outlet too — and we too have a wonderful picture of dad with barretts and bows in his hair! 🙂
Wonderful tutorial – thank you!! 🙂
This is a very helpful post… I know how to do this.. but it's always good to have a little confidence booster when you haven't done it for a while..
good pictures too.
Great timing. I just spent my entire Sunday afternoon doing just this. The scramble was to get it done before my daughter woke from her nap and wanted the TV. Spoiled child but much better looking house.
Here from between naps on the porch.
I love your blog wallpaper, btw!
Thanks for linking up to the Mad Skills party!
I have ivory outlets in my I wish they were white home…hmmm, trick is now jumping in and switching them out. Thanks for this!
Your instructions are so detailed! It really makes it look easy! I am going to save this one for my new son-n-law. Him and my daughter are in the process of buying their first house, and he could use these "how to" tutorials you post. I just love each and everyone one of them you do. You again, are amazing, but I think your dad was more amazing by having the sense to teach his girls the way he did!
Nice! I'm going to refer people to you when I get asked how to do this. I refused to take responsibility if someone zaps themself. :o) You did a really fabulous job of explaining everything. I think an 8 year old could do it with you as their guide!