Changing Out a Light Fixture (Bye-Bye Hollywood Strip Light)

Have you had it with those ugly Hollywood light fixtures? The ones where the bulbs are lined up in a straight line staring you in the face? Did you know that you don’t have to live with them? Even if you live in an apartment, you can switch light fixtures out fairly easily. (Be sure to keep the old fixture and all the parts so you can re-install it before you move out.)
Light fixtures range in price from $20 to well over $200. Sometimes you can luck out and find some nice light fixtures on Craig’s List or eBay for less.
I hope you can benefit from this tutorial. I think you’ll agree, it is neither difficult nor challenging changing out a light fixture.
Instructions:
Before beginning the installation you MUST turn off the power to your fixture.

Required Safety Instruction:
Turn off the power to the light fixture you are working on. I highly recommend turning on the light you will be working on, then shut off the circuit at your circuit breaker and check to see that the light has gone out. Also note that just because the light fixture power is turned off, it doesn’t necessarily mean that other outlets or lights in the same room are on the same circuit. Always check for the presence of power before you work on it.
Tools:
(I’ve included affiliate links for your convenience. I earn a small percentage from a purchase using these links. There is no additional cost to you. You can read more about affiliate links here.)
- Light Fixture
- Needle-nosed pliers
- Wire cutters and stripper
- Flat head screwdriver
- Phillips head screwdriver
- Optional: electrical tape
Unpack your new (or slightly used) light fixture. Read through the directions as some steps may vary from this installation tutorial.
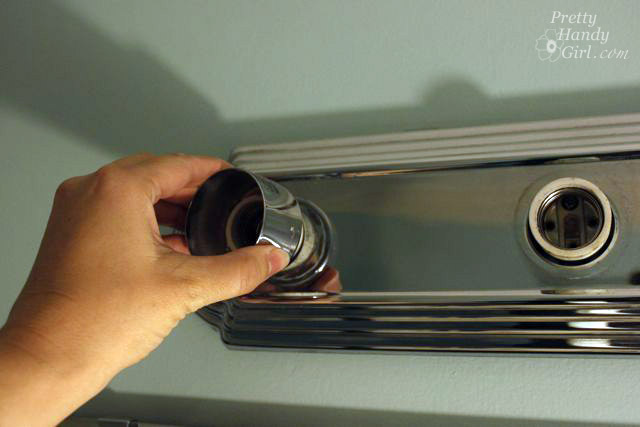
Begin by unscrewing the light bulbs and then remove the collars around the light bulb sockets.
Locate any other screws that might be holding the fixture in place. This fixture simply popped off.

Untwist the wire nuts holding the wires together.

Once all the wires are disconnected, unscrew the two screws holding the mounting bracket.

Remove the mounting bracket…

…and now you should be able to remove the light fixture. Laugh at any hidden colors and wallpaper beneath the fixture. (Toile! Ah, not so bad.)

You should be left with just the junction box and three wires protruding from the box. The bare or green wire is your ground wire. The white is your neutral wire and the black is your hot wire.

If you were eagle eyed, you might have noticed a small nick in the insulation of the neutral wire. This could cause a short, so I wrapped some electrical tape around the nick.

Install the new mounting bracket that came with your fixture (if you bought a used one, you may have to use the old mounting bracket from the Hollywood Strip). Attach the screws through the bracket and into the junction box.

The mounting bracket that came with my fixture has a rotating bar that can swing 180 degrees. Position this bar so the fixture will hang level.)

Test fit your fixture and adjust the depth of the mounting screws (the “no head” screws on the mounting bracket) and the angle of the swinging bracket arm. Once the bracket is level and fits snugly with only a small portion of the headless screws poking through; remove the light fixture and tighten the screw in the middle of the mounting bracket to secure the rotating bar.

Wrap the ground wire from the junction box around the green or bare screw on the mounting bracket.
Connect the ground wire from the light fixture to the ground wire from the junction box. Twist them together and secure them with a wire nut.

Twist the black wires from the junction box and the light fixture together.

Twist a wire nut on to secure them.

Repeat the same process to connect the white wires.

Gently fold and tuck the wires back into the junction box. Try to position the white wires on the opposite side as the black wires.

Place your light fixture onto the headless screws and secure the fixture by screwing on the small ball caps.

Remove the shade ring from the light bulb sockets.

Slip the glass shades onto the socket and then screw the collar back on to hold the glass light shades.

Repeat for the remaining light sockets.

Many vanity light fixtures are reversible.

I decided to rehang my fixture facing up for less direct light and to avoid bumping into the mirror frame.

What do you think? Do you like the new look? Do you think you will try it yourself? I hope so, it was easy!

Fantastic tutorial!!! With the clear photos and directions, I now feel confident enough to do this myself.
I really liked the article about “Clearing Clogs in Your Apartment.” I have a constant problem with my bathtub drain clogging. I learned a bunch of new things from this article.
Thanks again for your wonderful tutorial.
You make it look so easy….maybe this is something I could actually tackle all by myself! 🙂
my problem is that the strip of Hollywood lights is built into the wall length mirror in my bathroom. Special challenge!
Following on Twitter! 🙂
Liked on fb. 🙂
Love this tutorial. We have the same Hollywood fixture but it does not make our bathroom glamorous in the least.
I also read the toolbox article to make sure my toolbox was in tip top shape before embarking on these home makeover journeys.
I liked on Facebook! Really enjoyed your tutorial!
Really enjoyed the tutorial! The pictures make it seem so easy. Checked out the Moving Today site- I appreciate the articles on money management.
I found the finding furniture article “Maximize a Small Space with Multipurpose Furniture” super helpful- especially since I just moved into a new place. I may need to take their advice and get a bed with drawer storage underneath.
Following on twitter :-).
Liked on facebook :-). Great tutorial.
The article about whether or not to call the handyman is super helpful. Thankfully I have a father in law who can handle most things! 🙂
Great tutorial. When I just swapped out my bath light to a barn light fixture, I called down to Hubs to take a look. He said, oh you need help? My response was not at all, turn the breaker on on your way up to check it out. I was so proud I did it all myself. Wire nuts and all.
I’m checking out the website! I am loving the post about Hard to Kill Plants. I need those kind of plants! Computing on the Cloud was a good one too. I hear so much about that, so it was good to have a little info all in one place! I wish this website had been around about 20 years ago when we were doing the move and rent lifestyle. I would have been all over it.
Awesome tutorial! Now can you do one to tell me how to re-wire an outside fixture through the plaster wall to the existing light switch? lol (it stopped working last season and we noticed something chewed through the wire)
I do like it better facing up, less ‘crowding’ of the mirror.
Good job Brittany!