Book Page Rose Wreath

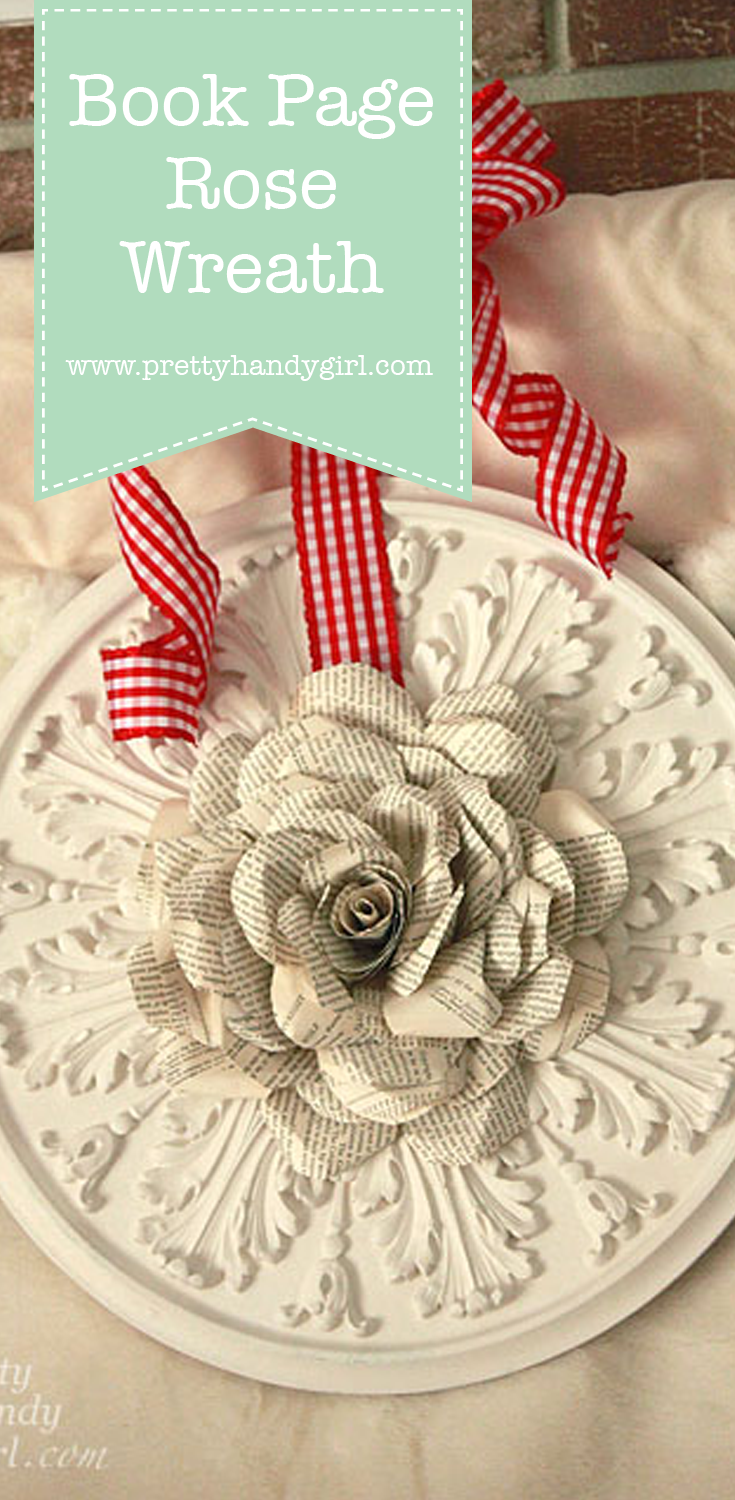
Are you drawn to the amber color of aging book pages? Do you love the scrolling detail on an ornate ceiling medallion? Do you like roses? Yes, yes, and yes?! Well, this post has your name written all over it!

I must say, I really enjoyed photographing this tutorial. The dimensions and shadows in the rose and medallion lend themselves so nicely to photography.

Before we start, I need to give credit where credit is due. I saw a beautiful  paper rose bouquet on 100 Layer Cake the other day, and knew I wanted to make one giant one. The bouquet was created by Valerie Lloyd for a wedding.  So beautiful and unique!

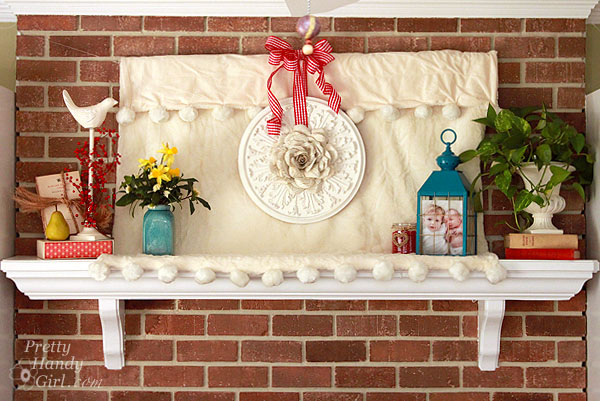
I had not taken down our Christmas decorations on the mantle (I know, slacker that I am.) But, this project propelled my desire to create a Valentine’s Day themed mantle.

Material:

  • Old book
  • Scissors
  • Hot glue gun
  • Hot glue sticks
  • Ceiling medallion
  • Small piece of cardboard
  • Ribbon
Difficulty: Easy
Step 1. Start by tearing a dozen pages out of an old book. (Check Goodwill and thrift stores. You’re bound to find some for this project.)

Book Page Rose Wreath

Step 2. Cut out petal shapes from the book pages. Make some slightly larger and some smaller for the insides of the rose.

Book Page Rose Wreath

Step 3. Curl the top edges of the petal back.

Book Page Rose Wreath

Step 4. Fold the petal in half lengthwise. The curled edges will be on the outside of the fold.

Book Page Rose Wreath

Step 5. Roll several of the smaller petals into a tube shape for the center of the rose.

Book Page Rose Wreath

You should have a decent pile of petals collected before proceeding.

Book Page Rose Wreath

Step 6. Cut a long piece of ribbon to feed through the center of the medallion. It is important to add the ribbon now before you build out your rose and cover the hole.

Plug in your glue gun and let it warm up.

Book Page Rose Wreath

Step 7. Cut a piece of cardboard large enough to cover the center of the medallion. Run a line of hot glue around the center hole on the back of the medallion. Place the cardboard over the hole.

Book Page Rose Wreath

Step 8. Squeeze a large dollop of glue into the center of the cardboard (on the front side of the medallion.) Press one of the small petal tubes into the center of the glue. Hold it until the glue hardens and sets.

Book Page Rose Wreath

Squeeze more glue around the base of the first petal. Wrap a few more of the small petal tubes around the first one.

Book Page Rose Wreath

Experiment with folding the base of each petal or leave them open (your choice.) Variety will make your rose look more “real.”

Book Page Rose Wreath

Step 9.  Continue working around the rose from the center out until you have a very full paper rose.

Book Page Rose Wreath

Step 10. Let the hot glue cool. Fluff the rose and add any petals where you think your rose might need more.

Book Page Rose Wreath

Tie a bow at the top of the ribbon and hang your beautiful wreath!

Book Page Rose Wreath

Stand back and admire your new romantic book page wreath.

Book Page Rose Wreath

What did I tell you? This rose is so beautiful and fun to photograph.

Book Page Rose Wreath

I’d love to hear from you if you make your own! Very rewarding and a relatively easy project.

Book Page Rose Wreath

I hope you are having a fabulous week!

Book Page Rose Wreath

Pin for later!

 Book Page Rose Wreath

It’s true, I JUST took down the rest of the Christmas decorations. Yes — I know it is February — but honestly I’ve been a bit busy lately. I carved out a little time to spray paint a lantern and hot glue a new wreath. And that was all it took to put me in the mood to decorate for the season.

I wanted some cozy warmth and a little brightness on our mantle, so I hung a soft faux fur throw up. To avoid nailing into the brick, I used a wooden dowel rod that spans the width of the throw. I added two screw eyes in either end of the rod and fishing line that feeds through the eye hooks and wraps around nails that are secured into the crown moulding on either side of the fireplace.

I really like the softness of the throw.

A berry wrapped white bird on top of a paper wrapped book helps bring in a little more romantic red.

Michael’s has this crackle vase on clearance now, but be careful about filling it with water because it will leak. Inserting a small yogurt container inside made it possible for me to use it for fresh flowers.

I am really excited about the book page wreath I made, but I think I’m more excited about that old light fixture that I revamped. One of my facebook fans thought it was from Pier 1. That was the ultimate compliment for something I paid $5 for at the Habitat ReStore!

The paint color I used on the lantern is Rustoleum’s Lagoon, and it has sent me on a big aqua kick!

More books and a plant to balance the right side of the mantle.

I’ll have a tutorial for this book page wreath on Wednesday, so get busy finding an old book and a ceiling medallion!

I used the chandelier turned candelabra to bring some Valentine’s whimsy to our kitchen table.

The hearts on a stick were purchased from the Dollar Tree, I just slipped green straws over the stems to beef them up a little.

I did pull the stems off the rest of the hearts and piled them in this other lantern with some faux grass.

A few recycled jars pulled together make a crisp and clean flower arrangement. We have some flowers blooming in our yard already (only about one month early), but I picked up these agapantus and alstroemeria (peruvian lilies) from the grocery store.

 I think of my sister everytime I see agapanthus, because they grow right outside her front door! Lucky duck.

My friend, Leen the Graphics Queen will recognize this bottle from our antiquing trip to Southport, NC. I’d never been to Southport before, but I will definitely have to go again. It is a really neat little town by the sea.

I couldn’t neglect the mudroom.  This is where my tree branch heart wreath hangs out.

Because this is our family’s main entrance, I chose some sweet smelling daphne and daffodils to create a fragrant and colorful welcome home.

I couldn’t truly welcome spring yet (since technically it is still a month and a half away.) So, I scribbled “Hello Spring?” on the chalkboard.

I hope you have a fabulous February and a sweet Valentine’s Day.

 P.s. How many of you watched the SuperBowl (or at least the commercials and/or halftime show) last night? What were your favorite commercials? I have to say I really liked the VW, Doritos and E-Trade commercial. And my son and I were up off the couch and dancing with Madonna! I thought she rocked the halftime show.

Trying to get into the Valentine’s Day spirit? Need to inject a little romance into your home? Yup, me too! I’m embarrassed to say that I still have my Christmas mantle up. But there is hope on the horizon! Home Stories of A to Z is having a Valentine’s Day mantle link party on Thursday, January 26th! Thanks Beth for giving me the push to get busy re-decorating.

While researching for ideas, I came across some really amazing wreaths made from some unique materials. Cupcake liners, coat hangers, and thrift store wool coats to name a few. Check out these super creative wreaths at Parentables today!

See you next week with a VIA (Very Important Announcement!)

Valentines Day Wreath

When I saw this mirror frame Jaime from That’s My Letter made, I was instantly head over heels in love with the branch circles.

Valentines Day Wreath

Valentine’s Day Wreath

So much so, that every branch I passed by I would think, “Hmmm, I wonder what the disks on that branch would look like. It’s a sickness y’all.

So, this past weekend, I hauled in a bunch of branches and began to formulate a design for my Valentine’s Day Wreath that wasn’t overtly cutesy.

Valentines Day Wreath

I even called my neighbor to ask if I could have one of their logs from their woodpile. (Yes, I was coveting thy neighbor’s wood. Sheesh.)

I am thrilled with the final results. Although I had to engage in a few extra spray painting steps to get here, I’ll spare you the details. Let’s just say that no matter what color you paint thin wire, it just doesn’t show up on top of wood disks.

Valentines Day Wreath

Here is the tutorial y’all. Take it or leave it, but just be sure you ask before cutting down your neighbor’s cherry tree.

Valentine’s Day Wreath Materials:

(I’ve included affiliate links for your convenience. I earn a small percentage from a purchase using these links. There is no additional cost to you. You can read more about affiliate links here.)

Start by setting up a stop block by clamping a small piece of wood against the fence of your miter saw. (Or be prepared to be diligent about measuring every slice you cut. My slices are 1.5″ wide.) IMPORTANT: Wear your eye protection and hearing protection!

Valentines Day Wreath

Hold your branch against the fence and cut into the log. The larger logs cut fine, but the smaller branches and sticks tended to kick back all over the place, so be sure you stay on the right side of the saw and the slices are on the left. This way you’ll be out of the path of the flying disks. Cut, until you have a large collection of wood slices in a variety of sizes.

Valentines Day Wreath

It was at this point that I looked down and noticed this little worm squeezing out of the log!

Valentines Day Wreath

Ewwww. I rushed inside to research killing bugs in wood. I read you can either bake your wood in the oven at 175ËšF – 200ËšF for a few hours. Or microwave the wood for a minute. Being the perfectionist and neurotic termite-fearing person I am, I did both!

Valentines Day Wreath

After roastin’ and nukin’ those little buggers, you can lay out the slices onto the plywood in a heart shape.

Valentines Day Wreath

Trace roughly around the shape.

Valentines Day Wreath

As I said I’m a perfectionist, so feel free to skip this next step.

Fold a piece of scrap paper in half and cut out a half heart shape to give you a symmetrical heart shape. Trace around the template onto the plywood.

Valentines Day Wreath

Use a jigsaw or Dremel TRIO to cut out around the shape.

Sand the edges until they are no longer jagged.

Lay the scrap paper template back on top of the heart shaped plywood. Fold it in half. Drill a hole through the top of one of the sides of the heart (through paper and wood.) Open the template back up and mark where the hole is in the paper. Drill through the other side.

Valentines Day Wreath

Thread a length of ribbon through one hole. Tie a washer onto the end of the ribbon on the back side.

Valentines Day Wreath

Hang the heart up in your desired location. Adjust the length of the ribbon and then tie another washer onto the ribbon.

Valentines Day Wreath

Begin to lay the wood slices back onto the plywood and start gluing each one using Liquid Nails.

Valentines Day Wreath

It may take a little maneuvering and trials to get the slices to fit neatly within the heart shape. But, hey it wouldn’t be fun without a little trial and error.

Valentines Day Wreath

After your shape is filled, lay a folded towel, some scrap wood and heavy weights on top. Do a few bicep curls before setting them down, just because.

Valentines Day Wreath

While your wooden heart is drying, bend the word “Love” into the wire using needle-nosed pliers.

Valentines Day Wreath

Wrap white pipe cleaners around the word.

Valentines Day Wreath

Then wrap red pipe cleaners around leaving space so the white pipe cleaner shows through.

Valentines Day Wreath

Tie a bow at the top of the hanger ribbon. Thread another length of ribbon through the bow and secure it to the “L” and “e” in Love.

Valentines Day Wreath

Find a spot to hang your unique wreath.

Valentines Day Wreath

I wonder if I can put another word on there for St. Patrick’s Day? Maybe “Luck” with some green ribbon.

 Valentines Day Wreath

Valentines Day Wreath

Valentines Day Wreath

Today I am going to show you how to Make Your Own Fall Wreath. If you’ve been following me for long, you were witness to my one wreath with many different looks for one year. Well, I’m ready for a change. So, I decided to create something completely different.

When I think of fall, I think of cooler weather, sweaters, autumn leaves and flowers. This wreath encompasses all those elements.

Lucky for me I had all the materials on hand. Especially the XL cable knit sweater that I picked up at Goodwill thinking I could make sweater vases out of it.

Materials:

(I’ve included affiliate links for your convenience. I earn a small percentage from a purchase using these links. There is no additional cost to you. You can read more about affiliate links here.)

Instructions:

Start by cutting off the sleeve of the sweater.

Cut, the sleeve in half lengthwise. Then put the right sides together.

Stitch the ends together (try to line up the stripes or cable knitting.) Trim off any excess.

Open your sleeves up to give you one long length of sweater material.

Preheat the hot glue gun. Lay the wreath form on top of the sweater material.

Put a bead of hot glue on the back side of the wreath form and glue one edge of the sweater material to the wreath.


Squeeze out another bead of hot glue, wrap the other side of the sweater material up and glue it against the already glued piece.


Realistically, this is the backside of the wreath, but if you have a see through door like I do, you will want to roll under your raw edges to hide the seams.


Work in 3-4″ sections, adhering one side and then the other until you reach the end of your wreath. Cut your sweater material slightly longer than you need, then roll under the raw edge and glue it down.


Your wreath should resemble something like this:


Hot glue some leaves onto the wreath covering one of the seams.


Then add some flowers. And more leaves, and more flowers, until you have burned your fingers to smithereens!


Next tie one loop of ribbon to cover the top seam.


Tie more ribbon to the loop to give your wreath a more “substantial” bow.


And now you have a warm, cozy and colorful fall wreath! What do you think? I just want to snuggle up to it every time I walk through the door.


Have you started to decorate for fall? Do you have your wreath yet? I’d love to hear about your unique wreath project. And if you need more ideas, enjoy these 24 more Fall wreath ideas:

24 Creative Fall Wreaths | Pretty Handy Girl
Y’all have a fabulous weekend!