framing opening and plumbing run between kitchen bathroom

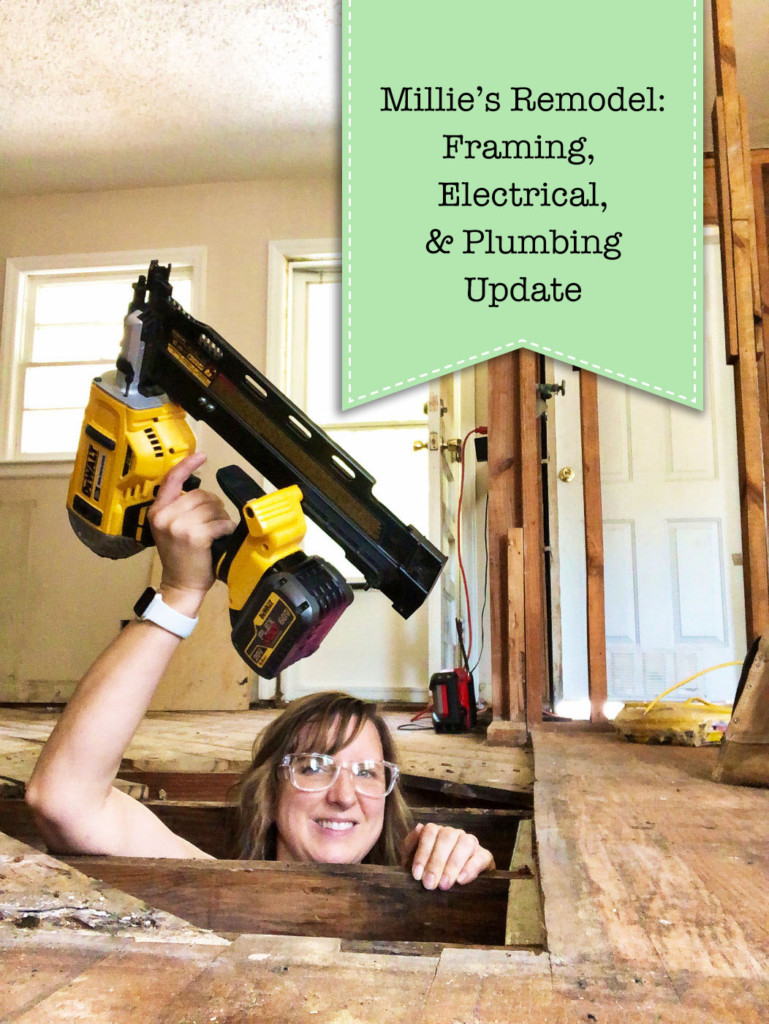
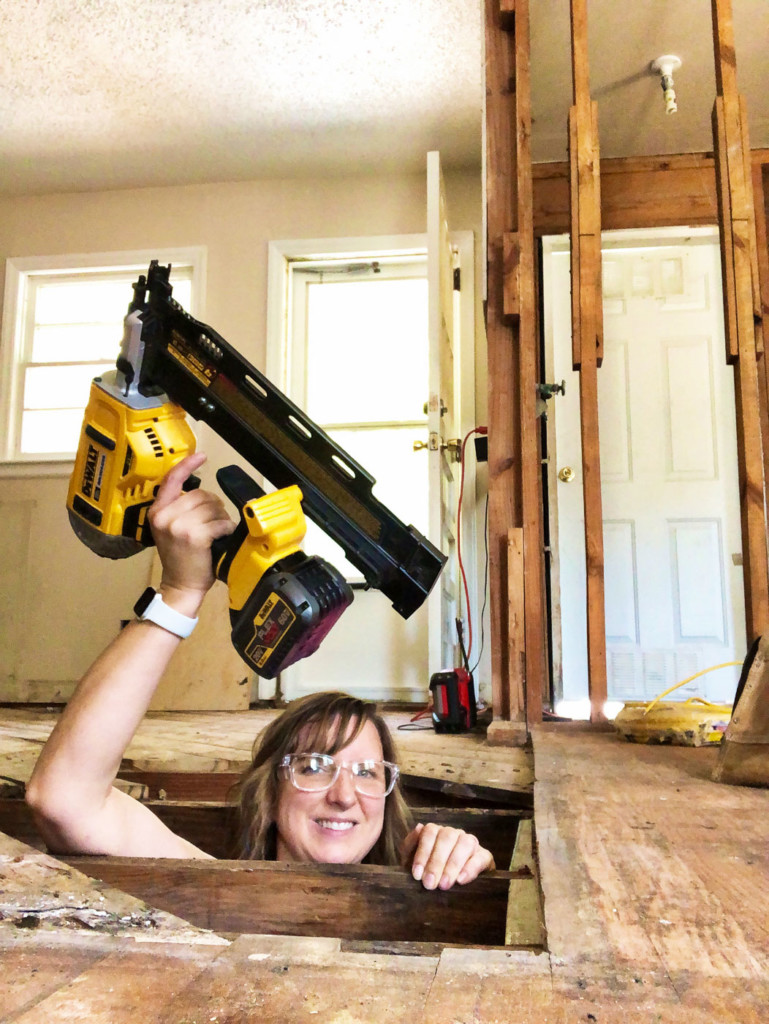
Millie’s Remodel: Framing, Electrical, & Plumbing – Oh My!

Come take a peek into the Millie’s Remodel project house and see the progression as I start to build back after demolition. Did I say demolition is finished? I thought it was, but looks like there might be a tad more. Let’s take the tour.

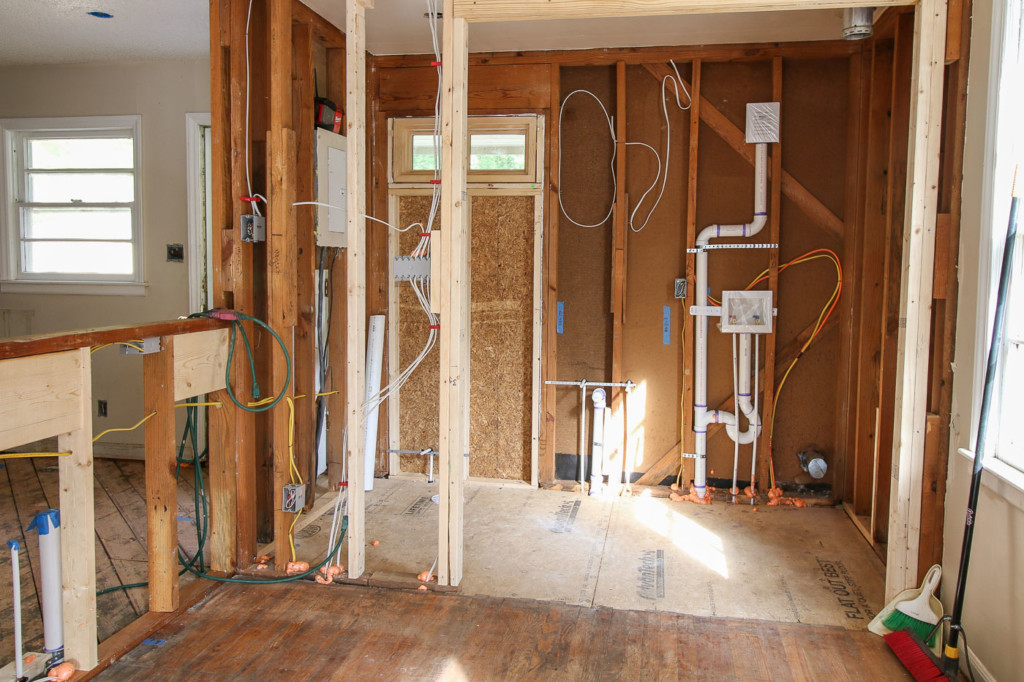
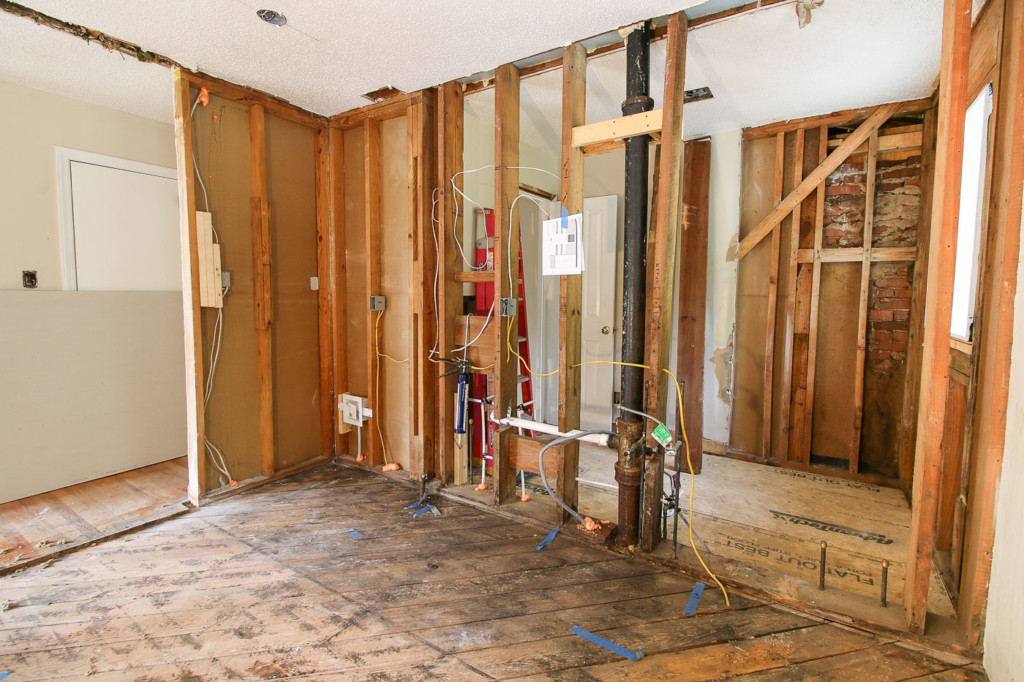
It’s been a busy few weeks since the demolition. But I want to give you a little tour and show you what’s happened at the Millie’s Remodel project. There’s a lot of change and the new plumbing and electrical is going in.

view into living room and kitchen walls down to studs and framing

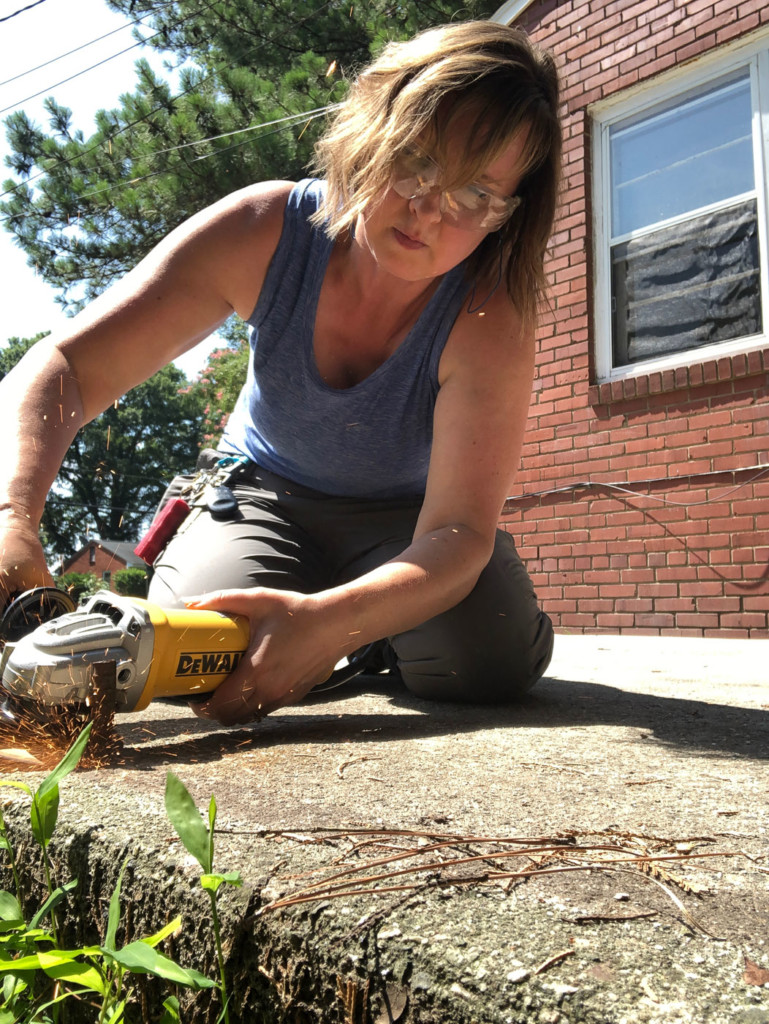
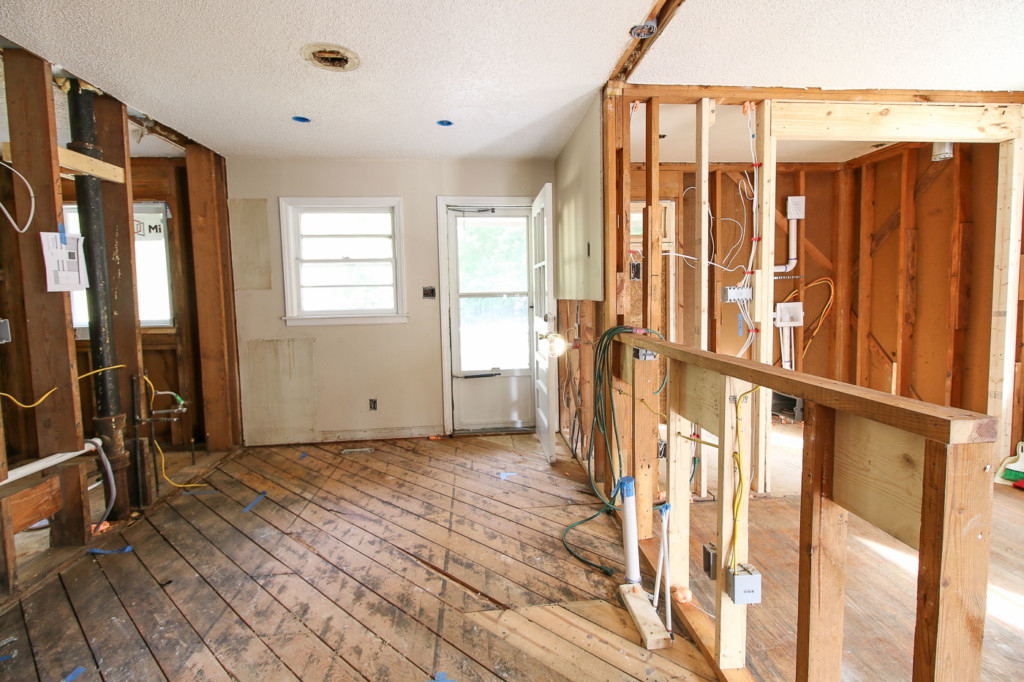
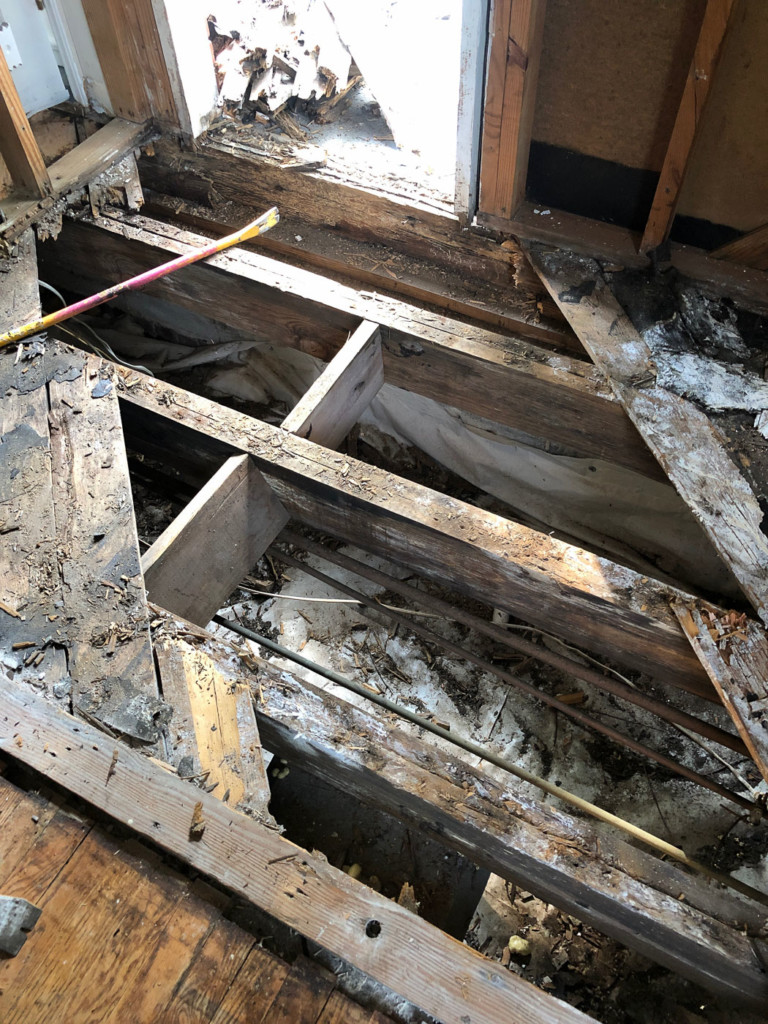
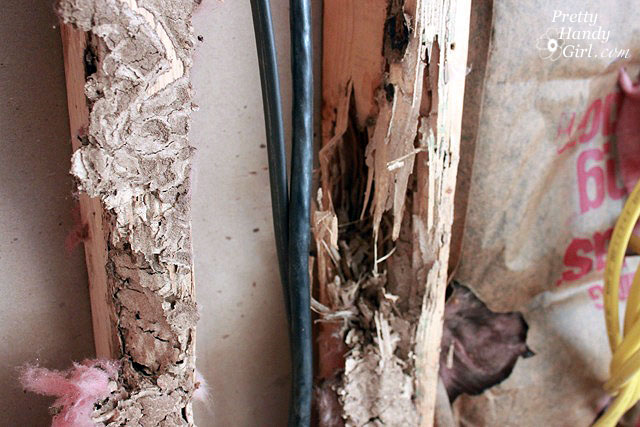
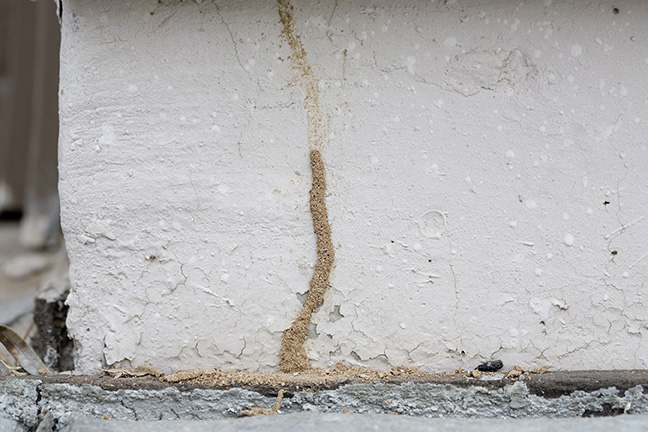
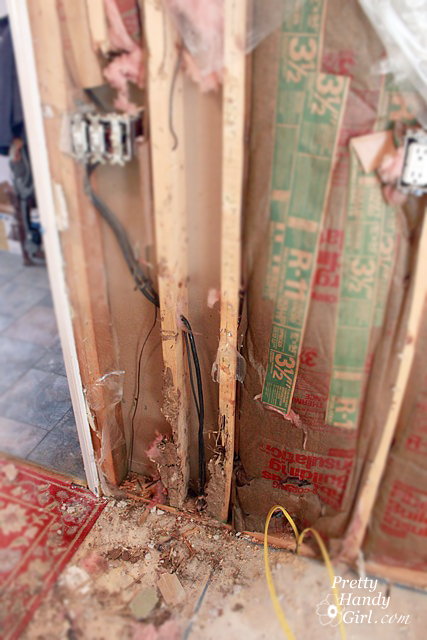
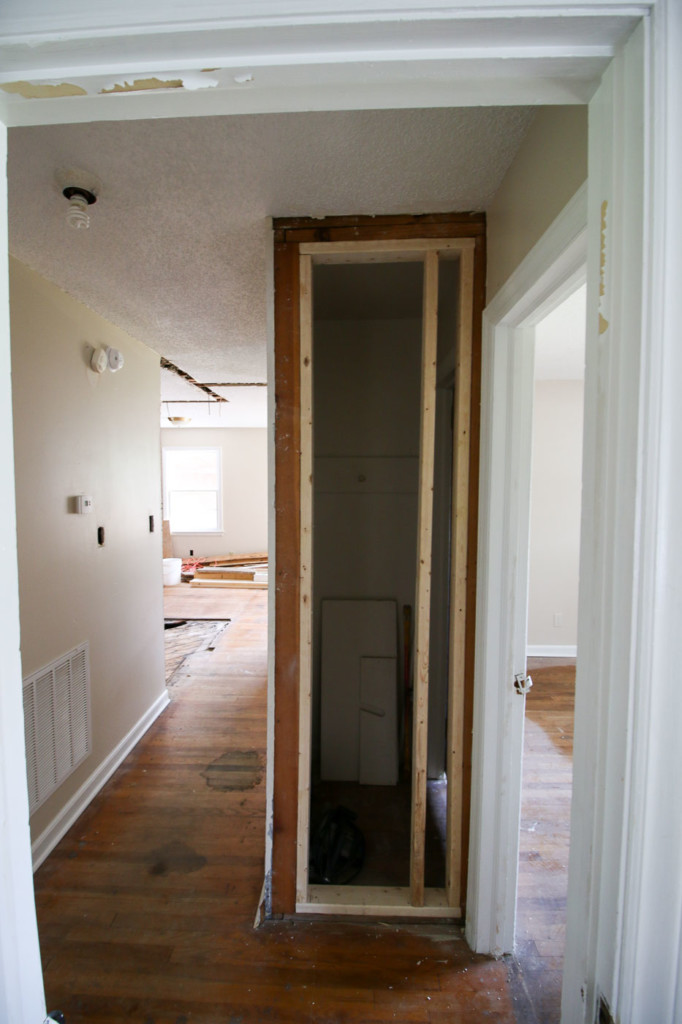
While the electrician and plumber were running the new lines, I spent my time framing the pocket doorway opening and adding blocking to weak areas under the floor. And although I thought demolition was done, I was only dreaming.

Want to see the video tour and updates? Watch my video filled with behind the scenes footage and a tip below:


You can see my plumber has been busy running the new plumbing in the shared powder room and laundry room. I still need to frame the header for the sliding door, but first let me take you on the rest of the tour.

open framed wall looking into new powder room and laundry room

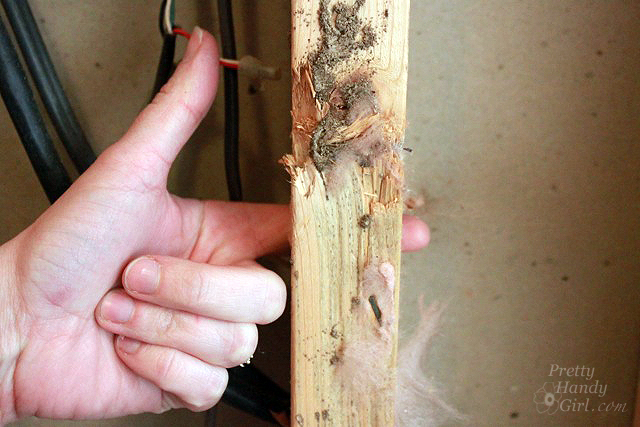
I probably spent the better part of the day adding blocking under this section of flooring and other areas where the subfloor was weakened by water damage or where an air duct was added (without additional support for the flooring that was cut.)

pretty handy girl in crawlspace with framing nailer extended over head

My plumber has already tied into the old cast iron vent stack. We decided to leave it instead of having to patch the roof where the stack exits the house. My plumber and electrician did work together to remove the insanely heavy old cast iron tub. I don’t know what I’d do without these guys.

framing opening and plumbing run between kitchen bathroom

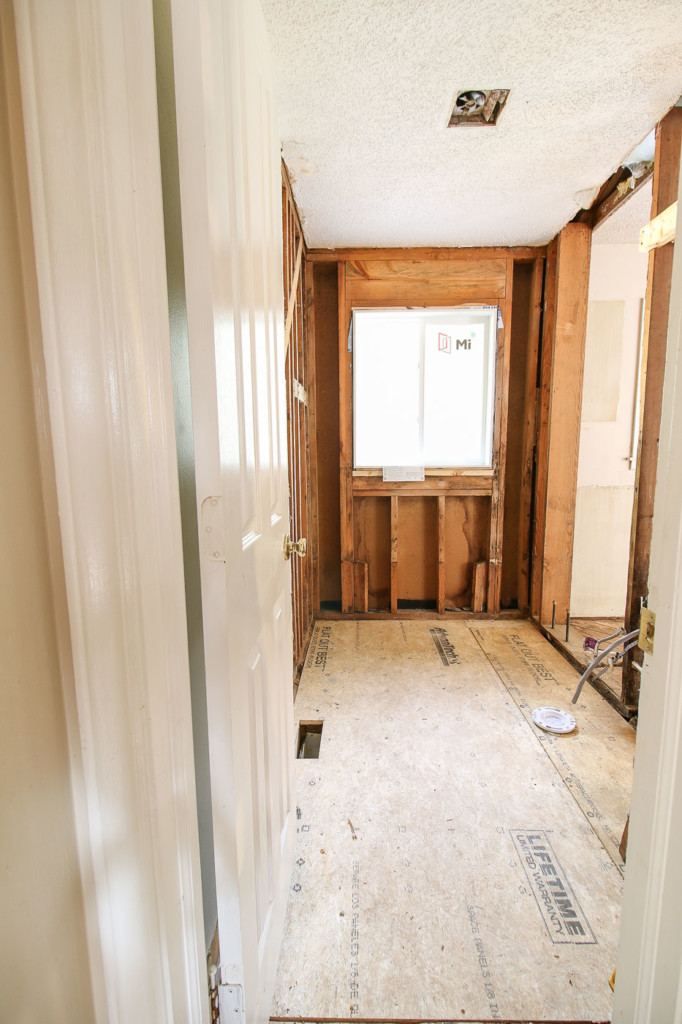
My siding contractors, Stephanie, and I worked together to install the new bathroom window. The old one was wooden with see-through glass. This new window has obscure glass and is made mostly of PVC.

view of framing and new subfloor in bathroom

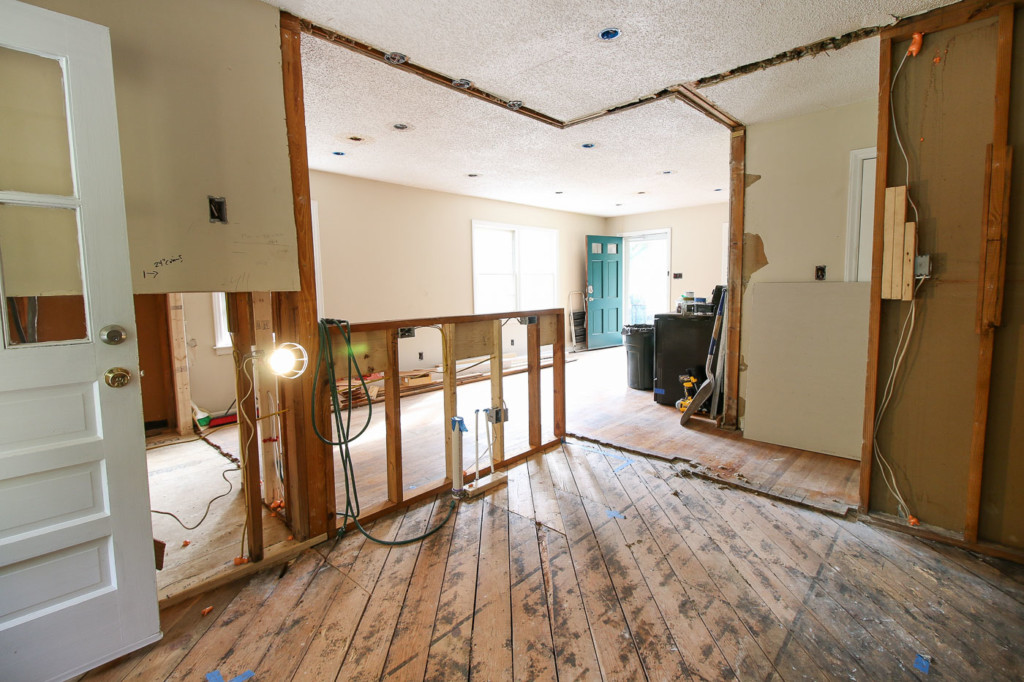
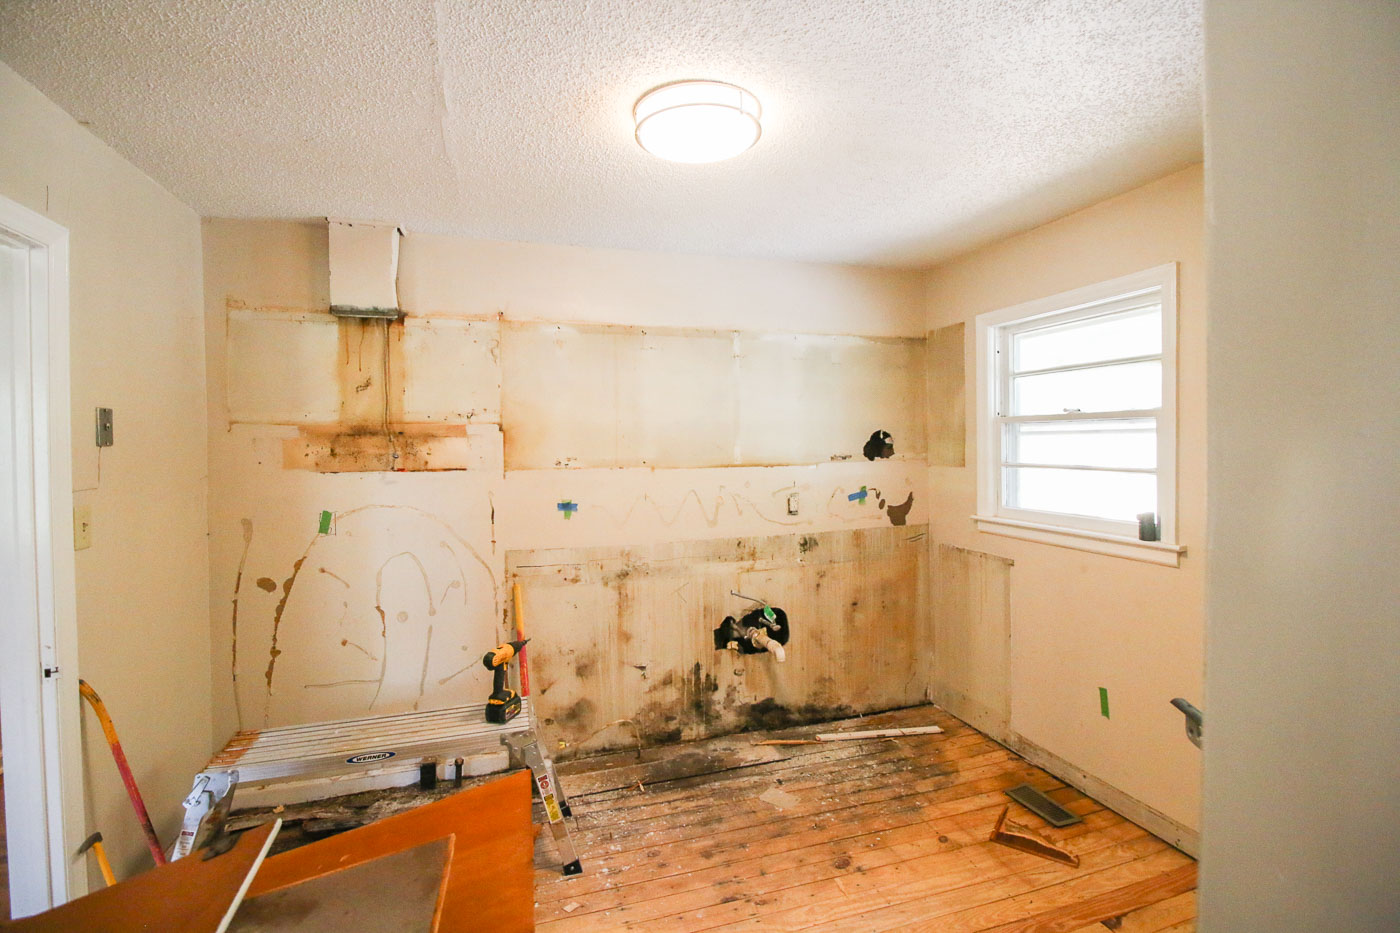
In the kitchen, after patching the subfloor, I framed up the half wall for bar seating on the other side of the kitchen. I’m definitely excited to see this new layout come together.

view from kitchen into living room showing new open concept

I worked with Elizabeth Burns, a local designer, to help me with kitchen floor plan ideas.

kitchen layout of Millie's Remodel project

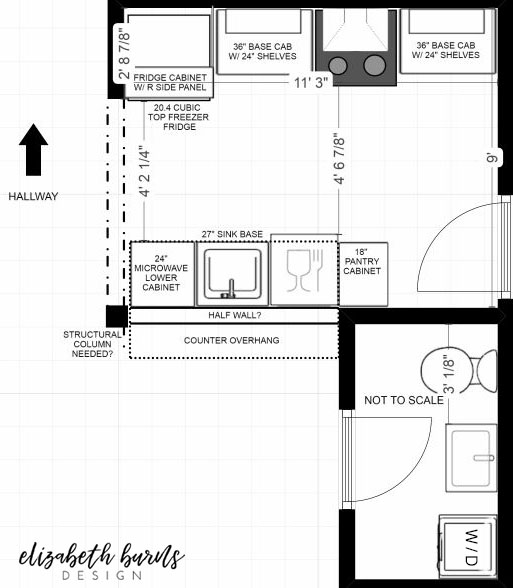
She designed a galley style kitchen and I’m thrilled with the plans. I can’t wait to see it in reality!

Pencil sketch of Millie's Remodel Kitchen

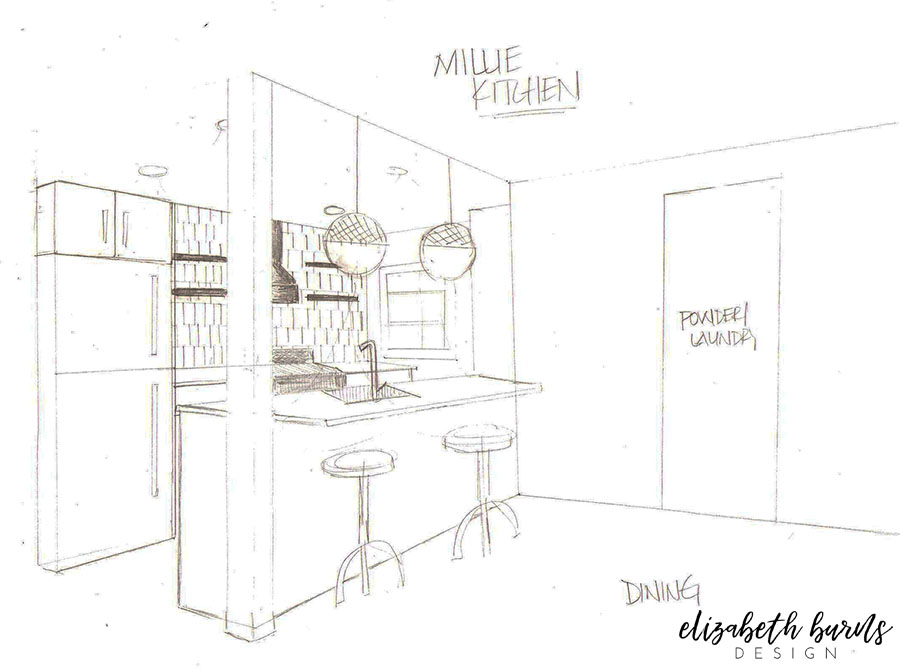
It’s going to be a beautiful light-filled kitchen!

new pony wall installed in kitchen

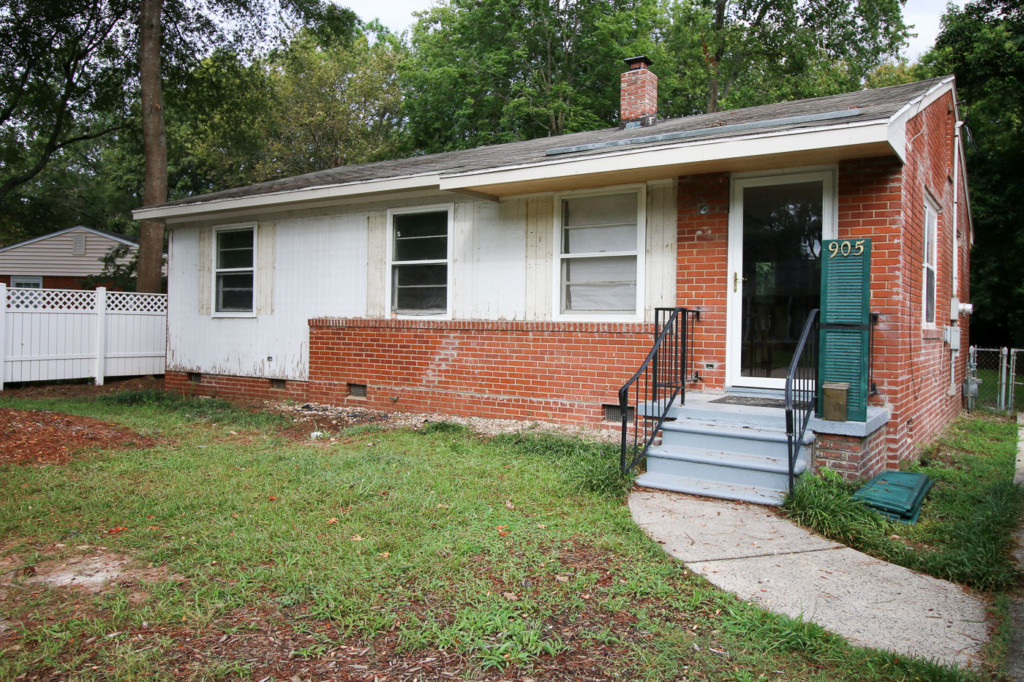
Out front, you can see the old vinyl siding has been removed and my siding contractors are adding new fascia board and soffits. Remarkably the original wood siding (that was under the vinyl) is still solid. I’m planning on cleaning off some of the flaking paint and repainting it.

front brick ranch with original siding exposed

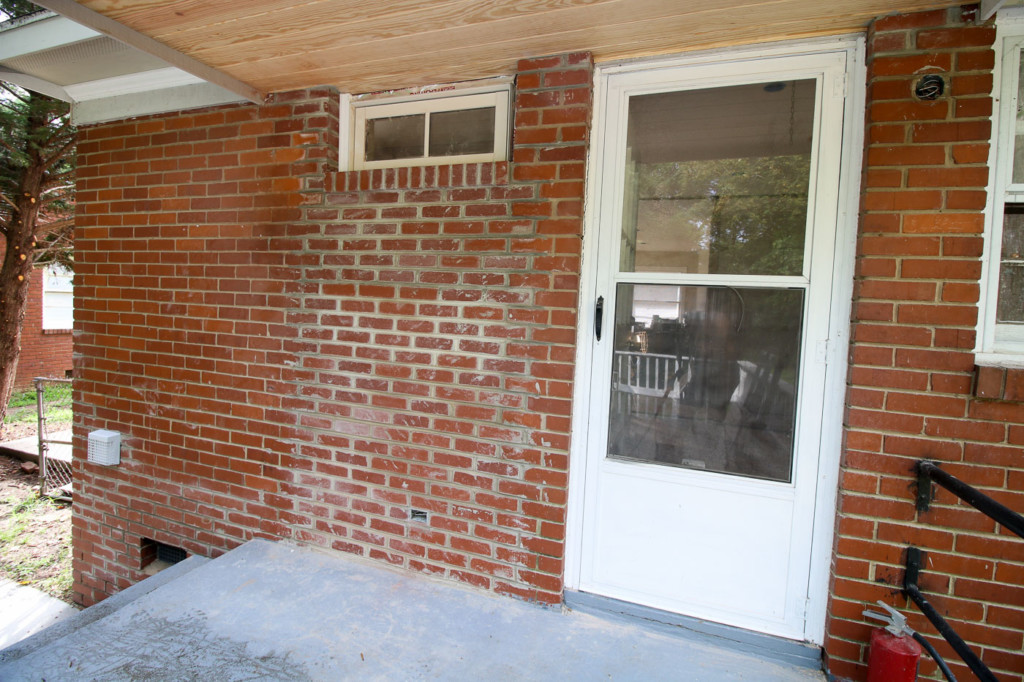
Off the back porch, you can see where my brick mason closed up the old doorway into the laundry room. We installed the transom window at the top of the old doorway and I’m excited to have a little bit of natural light coming into the powder room/laundry room.

back door bricked up with transom window installed

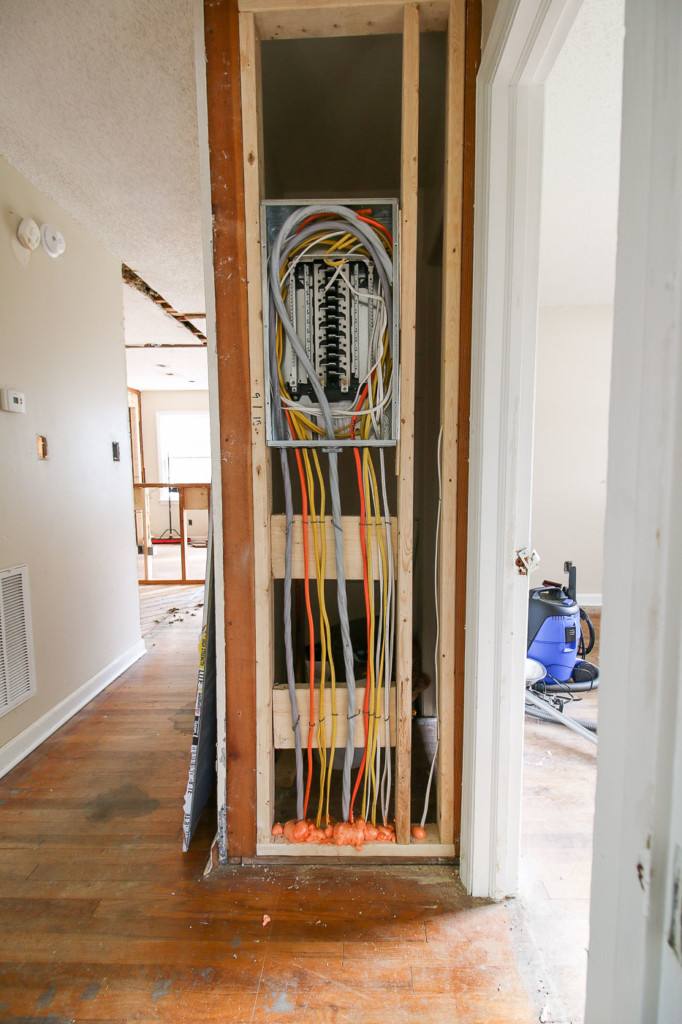
Because the old subpanel was in the room that is becoming the new powder room and laundry room, we had to move it to meet building codes. I framed up this little wall, so we could install the subpanel. The other wall had all the studs turned sideways so we didn’t have the depth we needed. But now we do. And we have a new subpanel and wiring installed. Isn’t it beautiful?

new subpanel wired in new framed opening

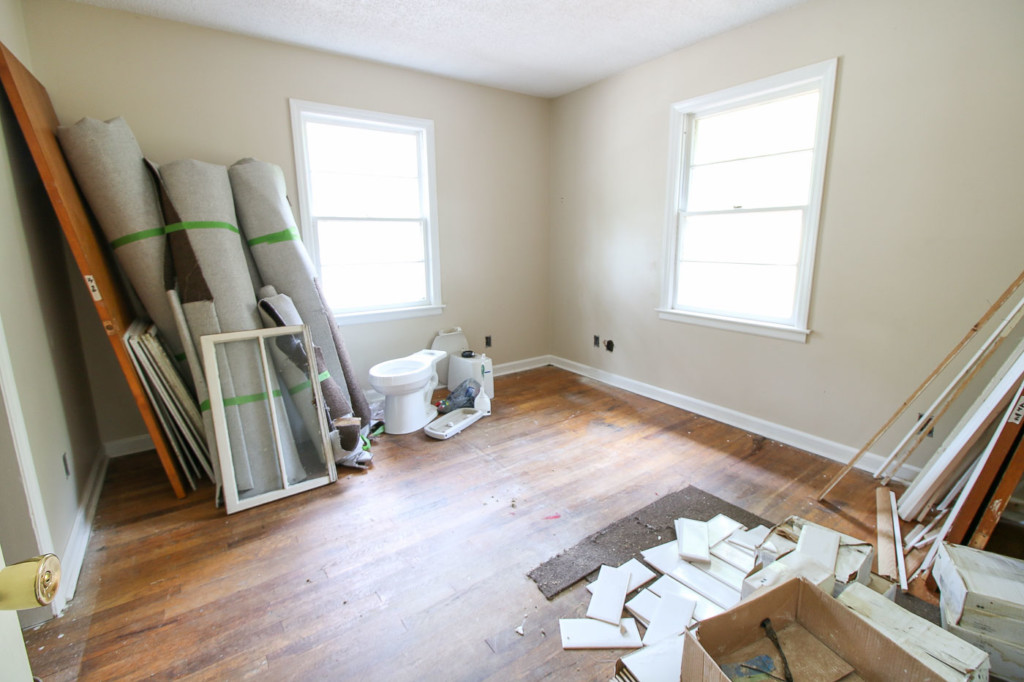
For now I’ve been using the back bedrooms to store the salvaged materials and tiles. Thank goodness I have a roof and walls in this house as opposed to the Saving Etta house. To store materials at Etta, I had to buy a storage trailer.

tile and storage in bedroom

I hope you’re enjoying the Millie’s Remodel updates. Getting the framing, electrical, and plumbing finished is a big step forward. After we pass the rough-in inspection, I should be able to get my drywall contractor in to start putting the walls back up! Hooray!

Stay tuned for more updates soon.

A special thank you to the Millie’s Remodel Sponsors:

The Millie’s Remodel project sponsors have donated materials for the Millie’s Remodel project. As you know I am very particular about the brands I work with and recommend. As a general contractor, I choose the products used on my projects wisely to make sure they last a lifetime. Therefore, I have no reservations putting my name behind each and every one of these sponsors.

millies remodel sponsors logos


How to Protect Your House From Termites or Why I’m Canceling My Termite Treatment

You may have seen my update at the Millie’s Remodel and how I found termite damage under the laundry room floor. I was just completing demolition and discovered the two exterior rim joists crumbled in my fingers. I quickly called my framing contractor and begged him to come out as soon as possible to repair the damage. Then I quietly cursed the former owners of the house for not properly knowing how to protect the house from termites.

Unfortunately, work on the house had come to a screeching halt until this fix could be completed. Luckily, my framers came at the end of the week and replaced the destroyed joists and subfloor. But, all this could have been avoided if the owners knew more about termites. So, today I’m here to beg you to educate yourself on termites and the costly damage they can do to your home. Learn how to protect your house from termites! If you live in the United States (with the exception of Alaska), you have termites! All you Northerners, stop shaking your head at me. I know you’ve been told termites aren’t an issue for you. Keep reading and I’ll tell you why you do need to be concerned!

As a general contractor, a real estate investor, and all around handy girl, I’ve seen my fair share of termite damaged homes (including my personal home.) Therefore, when I hear from people that they don’t believe in termite treatments, I give them a dumbfounded look.

Termites can damage your home, causing costly repairs—or worst yet—an unsafe home. Did you know there is a termite species that can cause major structural damage to a house within six months! And these termites (Formosan Termites) love warm and humid environments. If that describes your area, you are playing with fire (or little wood eating insects) if you don’t have a termite prevention plan.

Top Myths Why People Don’t Have a Termite Treatment Plan:

  • Termites Aren’t Common in Our Area
    Currently termites have been reported in all of the United States with the exception of Alaska. Warmer temperatures have created a friendlier atmosphere for termites, even in northern states.
  • My House is Made of Brick
    You may think because your home’s exterior is brick, you aren’t at risk of a termite infestation. But, what’s inside your walls? If your home’s framing (interior walls, floor and ceiling system) have any wood, you are at risk. Not to mention those beautiful wood floors you cherish. The only exception would be if you live in a concrete bunker (or concrete block house) with vinyl or tile floors. And even still, if you have any wood in your house, it can be at risk.
  • I Get an Annual Termite Inspection
    Some people think they can have their home inspected on a regular basis, and if termites are discovered they can treat the infestation. Remember what I said about the aggressive termite colony that can do major structural damage in as little as six months. This is a new strategy I just heard about, but frankly I believe in prevention vs. repairs.
  • I’ve Never Seen Any Termites Near My Home
    Most termites are subterranean, meaning they live underground. It’s not likely you would see them or notice an infestation until your home has sustained major damage. Termite tunnels can be detected inside a crawlspace or on the foundation walls. If your home’s foundation is close to ground level, you may not see anything at all until it’s too late. Also, if you have an enclosed crawlspace or encapsulated crawlspace, you may not see the tunnels behind a vapor barrier.

Types of Termites in the Colony:

  • Termites workers (the ones that do the actual damage) are small white insects approximately 1cm in size. They are actually very fragile and need moisture to live. Therefore they will bring moisture with them, which helps break down the wood fibers faster. The workers feed the colony.
  • Soldiers: Like their name suggests, the termite soldiers have armored heads and powerful jaws eager to defend the colony from enemies such as ants.
  • Swarmers: In the spring and early summer, termites will swarm. This is when they grow wings and mate. Sometimes swarming termites are mistaken for flying ants. Although similar, upon closer inspection termites do not have three distinct body segments that ants have. Termites also have four wings the same shape and size. If you see swarmers (or a collection of wings) anywhere around your home, you should contact a professional pest control company immediately!
  • The Queen: This Mother can reach up to four inches in length and is responsible for increasing her colony size. Her sole purpose is to mate and lay eggs. At a pace of one egg per second, she can lay up to a million eggs in her lifespan. Lest you think the colony is dead when she dies, another queen is merely waiting in the wings (so to speak.)

How Can You Tell if You Have Termites?

  • Swarming termites or termite wings around or inside your home.
  • Cracked, bubbled paint, or pin holes can be a sign of termites trying to get out of the walls to swarm.)
  • Wood that sounds hollow when tapped.
  • Mud tubes or tunnels on your home’s foundation, walls or crawlspace.

Top Ways to Protect Your Home from Termites:

  • Eliminate water from around your home:
    • Fix leaky faucets and pipes, repair or replace defective gutters or downspouts, get rid of standing water, and trim excessive vegetation from around your home.
  • Eliminate food sources for termites on and around your home:
    • Keep firewood, paper, and untreated lumber away from the exterior of your home.
  • Make sure your home’s siding is not touching or below the ground level. Only concrete, cinder block or brick should be in direct contact with the earth.
  • Keep up with all home maintenance and inspections.
  • Siding should be in good condition. Replace rotted siding as soon as possible.
  • Keep mulch and organic bed coverings at least a foot or more away from foundation walls.
  • Inspect your foundation and crawlspace walls for mud tunnels.
  • Have an annual termite inspection and termite contract with a reputable company

What to Do If You Find Termite Damage in Your Home?

Dealing with termite damage can be as easy as adding a sister board to a damaged joist or stud in your crawlspace or attic where the framing members are accessible. Worse damage may require replacing the framing member. Some damage requires removing interior finishes and drywall to replace damaged studs and wall members inside the wall. Severe damage may require a structural engineer consultation to determine how to repair, support, or replace load bearing framing, beams, or girders.

Types of Termite Treatments:

  • Soil-Applied Barrier Treatment – a trench is dug around the home and chemicals containing termiticides are poured into the trench.
  • Bait Stations – Cellulose and insect growth regulator housed in bait stations are installed in the ground around the perimeter of the structure to be protected.


Why I am Canceling My Termite Treatment:

Here’s where I want to let you know this is a sponsored post for Corteva, the manufacturers of Sentricon. I think you know by now that I don’t write sponsored posts unless I thoroughly believe in a product. Yes, I was compensated for my time, but I care more about getting the best information and advice into your hands than I do about collecting money in my account.

Now, let me tell you why I’m canceling my traditional termite treatment plan and how I’ve decided to switch to the Sentricon bait system.

Several months before I found the termite damage at Millie’s Remodel, I renewed our termite contract on our personal residence. The scheduler told me I was due for an inspection and the booster treatment. I knew this meant they had to dig a trench and create a liquid barrier around our home. But, I had no idea how much liquid (aka chemicals) had to be poured in the trench. I was shocked as I watched the technician pour a small river around the entire house. Secretly I thought to myself, “There has to be a better solution.” At the time I wasn’t convinced there was a better termite treatment available. And I certainly wasn’t going to gamble the safety of my house with termites.

A few days later I couldn’t get the images of all those chemicals being poured into the soil out of my head. As an environmentalist, I don’t like using any chemicals around my home, so why would I want massive chemicals dumped into the soil at the base of my house? I ended up doing a lot of research and came across an excellent source of information about termites and EPA approved treatment plans. One of the things I saw on the website furthered my concern about using the traditional soil-applied barrier method to protect our home from termites.

A quote from the EPA website regarding Liquid Soil-Applied Termiticides (aka trench and liquid pour):

If conducted improperly, these treatments can cause contamination of the home and surrounding drinking water wells and will not protect against termites. For that reason, it is important to hire a pest management professional who is licensed and trained to take proper precautions.

I still wasn’t ready to forgo a termite treatment plan. I had seen first hand the damage termites did to our kitchen walls. The problem was our house was not treated before and after a garage addition was built. (Always talk to a termite contractor before building a home or addition. A treatment has to be applied before framing while the crawlspace or slab is open.)

Therefore when Sentricon approached me about their termite system, I was all ears. You should know I was skeptical about bait systems. I mistakenly thought they would attract more termites to a property. After asking a lot of questions, I agreed to try the Sentricon system. But, I talked to several experts at Corteva (the manufacturers of Sentricon), and after thirty minutes of me peppering them with questions, I felt at ease about trusting my investment property with their termite system.

Want to do your own research about the Sentricon System? You’ll want to read more about home treatment on the Sentricon website. Plus, you’ll find the FAQ page extremely helpful for answering a lot of your questions.

How the Sentricon Termite Bait System is Installed:

I scheduled my local Sentricon specialists to first inspect the property to see if it was a good candidate for the system. The tech came out and looked in the crawlspace and around the property. Then he drew a map with a plan for where to install the Sentricon bait stations.

Next we scheduled an installation day. Dave from Arrow Exterminators arrived promptly on install day and was polite enough to answer another list of questions I had. Instead of making you read them, you can watch my video from the Sentricon installation date.

Let me tell you, it was definitely a lot less shocking watching Dave from Arrow Exterminators installing the Sentricon system versus watching chemicals being liberally poured against the foundation.

After numbering the stations, the tech removes the cap on the bait station and scans both the cap…

…and the bait.

The information is stored and makes their job easy when they come back out to check the stations.

Small holes are drilled into the earth around the perimeter of the house.

Then the bait station is inserted into the hole.

The tech may kick dirt over the station to make it invisible to humans! But, it’s not invisible to termites. Although they are blind, they will find it.

When the termite company returns next year to check on the stations, they can use a special wand detector (like a metal detector) to locate the bait stations (after checking the map saved in the file.)

Want to learn more about termites? The Sentricon blog is full of amazing facts and good information about termites and treatment plans. If you want to find out more about the Sentricon system, you’ll find their FAQ page helpful!

Hopefully I’ve helped educate you on termite treatments. I leave you with these questions: How confident are you with your termite treatment plan? Is it worth risking your home’s health? From past experience I can tell you I’d rather have a prevention plan than a wait and see plan. How about you?

Disclosure: This is a sponsored post for Corteva, the makers of Sentricon. I was provided complimentary termite protection for a year and was compensated for my time and efforts to promote Sentricon. I was not told what to write. All opinions are my own. I am particular about the brands I represent and will always let you know when you are reading a sponsored post.

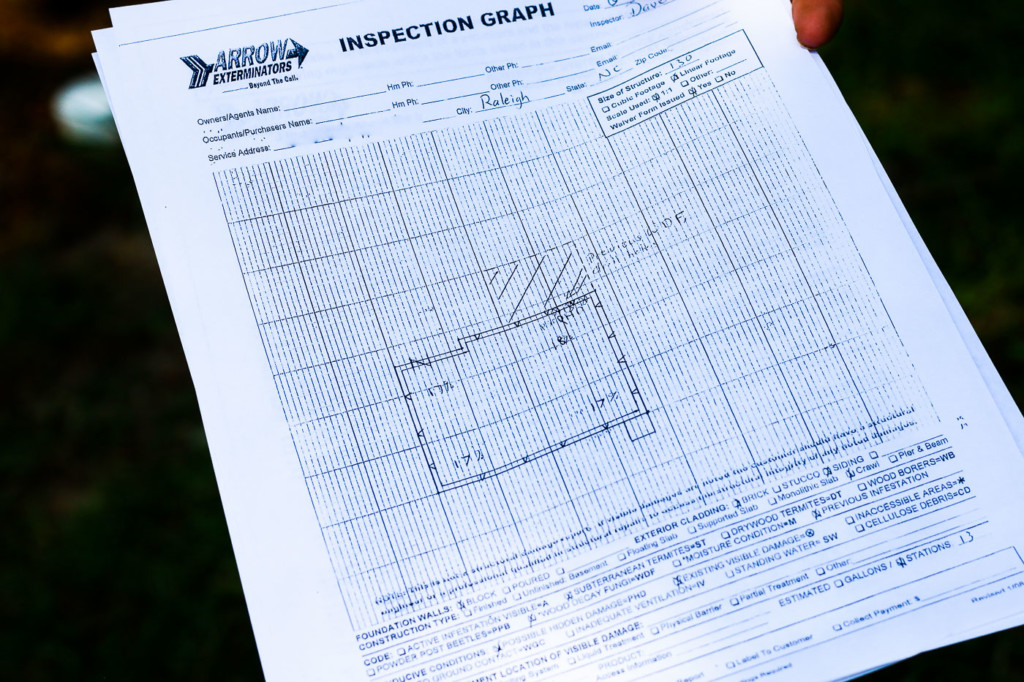
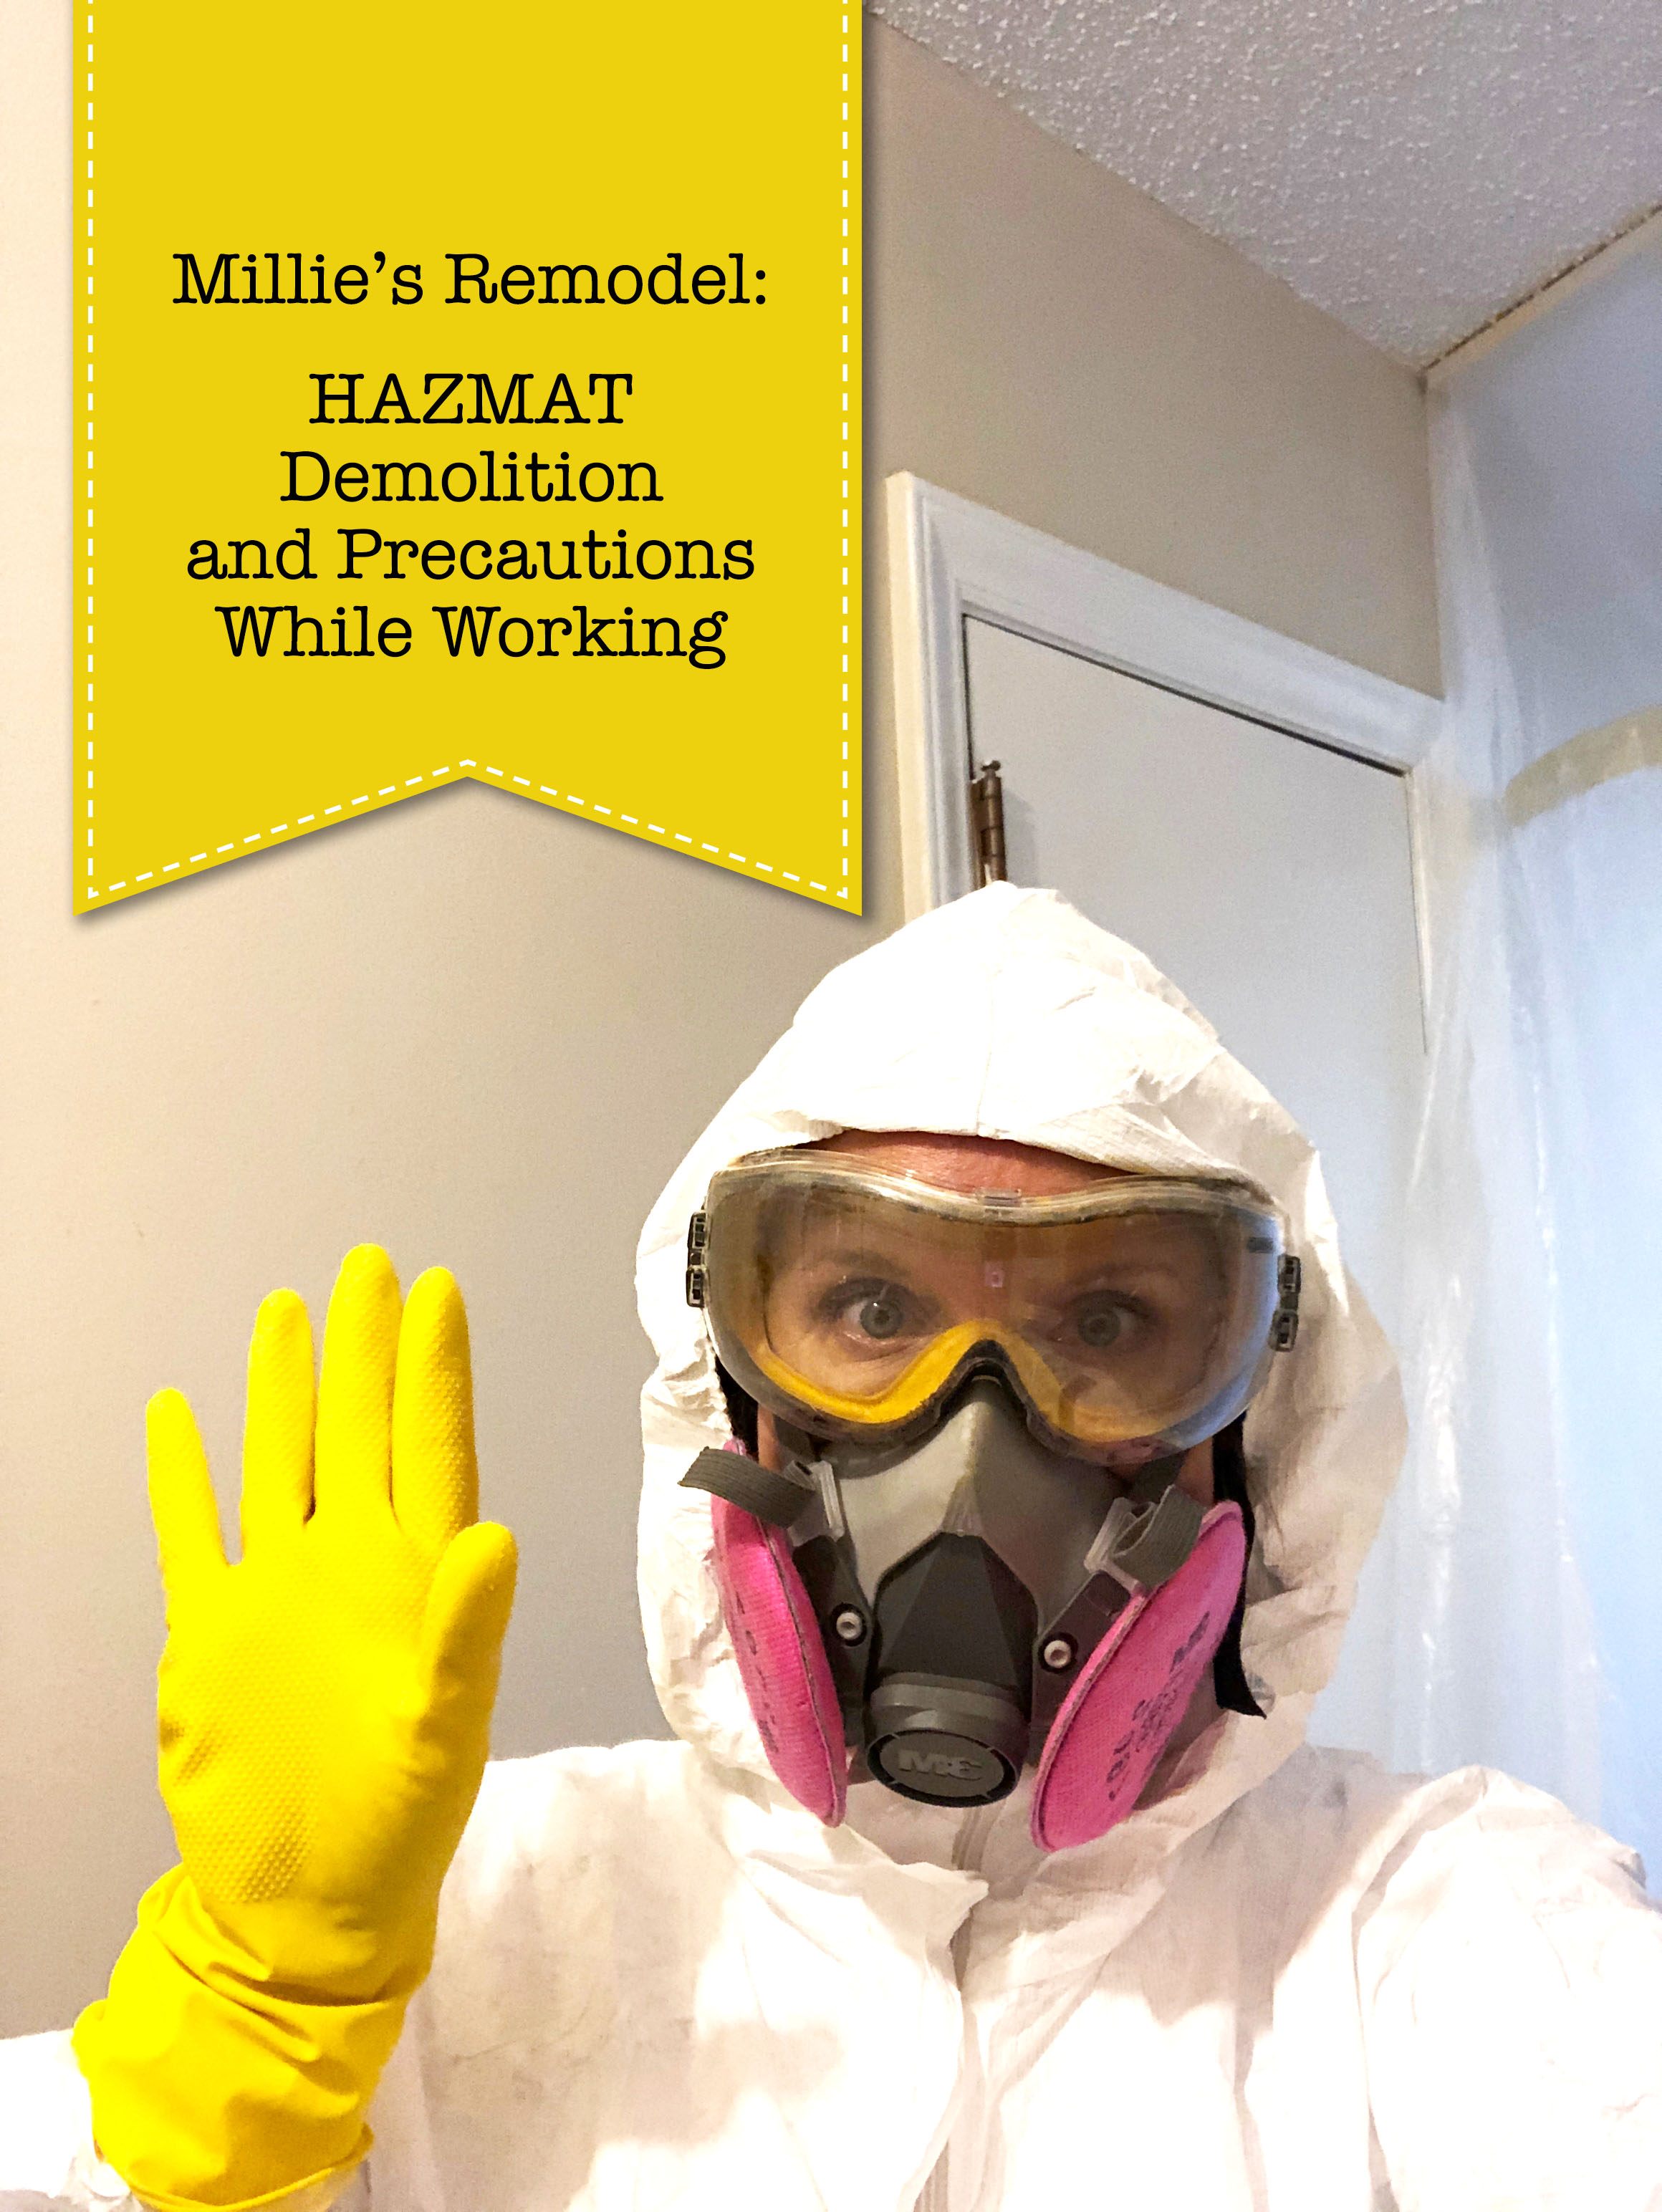
Millie’s Remodel: HAZMAT Demolition Progress
and Precautions

It took me two weeks, but the HAZMAT demolition process is finally finished. Truth be told, I never wanted demolition to be completed more than on this house. It seemed like every wall I opened and every piece of subfloor I removed lead me down a black hole of more mold, rotted floor joists, and termite damage. I was so anxious to start building back. But, what I wanted more was to turn the air conditioning back on in the house and start a day working in my clothing and not the unbearably hot Tyvek suit and respirator!

Let me back up and explain why the need for full protective gear. I know the house, I affectionately refer to as Millie, was built in 1957. For that reason, I took lots of samples from the ceilings, walls, and floor and had them sent to our local EMSL laboratories. The results from the front exterior came back positive for lead paint. And I knew there was some suspicious mold on the drywall in the laundry room and the kitchen wall. But, little did I know how much mold was hiding in the wall. And therefore, I’m really glad I took the proper precautions during the HAZMAT demolition process.

black mold on drywall

Boy am I thankful I had on all the protective gear. Especially when I discovered hundreds of rusty razor blades in the wall behind the bathroom. I can’t imagine how dangerous it would have been to cut my hand and have mold get into the wound. (Shuttering.)

Removing Lead Paint and Black Mold

Some friends have asked how I safely remove the lead paint and black mold. A month ago I got certified in Lead Safe Renovation, Repair and Painting. It was a full day class, and we learned the protocol for dealing with lead paint dust. The precautions are almost identical for dealing with mold or other hazardous materials in a home. As a licensed general contractor and certified lead paint contractor, I can complete this type of demolition myself (while following the protocol for safe abatement.)

I won’t go into details because dealing with hazardous materials in your home is not a DIY project. The consequences of exposure or poor abatement practices can be hazardous to your health or your family members’ health. I highly recommend hiring a professional who is certified in abatement for mold, asbestos, lead paint or other environmental hazards. If you have a house built in 1980 or earlier, insist on having samples sent to a lab looking for lead or asbestos. You can learn more about asbestos and why it is important to know if your home is at risk here.

Safety Equipment & Demo Tools:

These are the tools I used and the personal protective gear I wore for the demolition.

(I’ve included affiliate links for your convenience. I earn a small percentage from a purchase using these links. There is no additional cost to you. You can read more about affiliate links here.)

Shovel
Demo Hammer
Pry Bar
Medium Disposable Tyvek Suit
Gloves
Anti-Fog Goggles
Respirator
HEPA Vacuum
Garden Sprayer
Cleaning Wipes

HAZMAT Demolition Time Lapse Video:

Want to watch my time lapse video of the demolition? Enjoy the efforts of three days compressed into just a few minutes.

I wish it felt this short in real life. In actuality it was so hot and the demolition went on for two weeks. A bra and underwear were all I wore underneath the TYVEK suit because it was so incredibly hot in the suit. To protect the house outside the demo area, I had plastic on the floor and the air conditioner turned off to contain any demolition dust and debris. A garden sprayer filled with water was used to carefully spray down each area to keep dust at a minimum.

I found a flat end shovel was one of the best demolition tools (thanks for the idea Melbourne Chippy Chick!) The thin blade slips between the drywall and studs. Then I could press against the opposite drywall for leverage and pop the drywall off the side I worked on (while keeping the back side drywall in tact.)

After the drywall was removed and carefully disposed of in trash bags, I removed all the drywall nails. Then I cleaned and sprayed the wall studs that had mold on them.

Two Chemicals Used for Eliminating Mold:

Mold Cleaner

Mold Killer

Because of all the mold, I had to remove all the drywall between the kitchen and the bathroom and the tile around the tub. I’m so glad I did because I uncovered the source of the rodent access between the crawlspace and the attic. I can only speculate there was an opossum or a raccoon gaining access because of the size of the poop in the attic. Gross!

I also couldn’t believe the toilet didn’t fall into the crawlspace after I removed the tile and found the subfloor crumbled in my fingers.

rotted floor around toilet

Speaking of falling, I also discovered termite damage along the outside band joists of the laundry room. It’s amazing the house wasn’t sagging there.

laundry room floor termite and mold damage

Be sure to watch my video to see the demolition process and the reveal after demolition was finished! You can also find out why I had to add some framing to this small hallway wall.

new subpanel framing

Thank you to the sponsors of Milllie’s Remodel for helping me give this old gal a makeover!

millies remodel sponsors logos

Until the next Millie’s Remodel update! In the meantime, you can follow the real life progress on Instagram and weekly updates on Facebook!

Make sure you are subscribed to my YouTube channel to keep up with the Millie’s Remodel project!

Subscribe to my YouTube Channel

Millie's Remodel Mini Demo Update
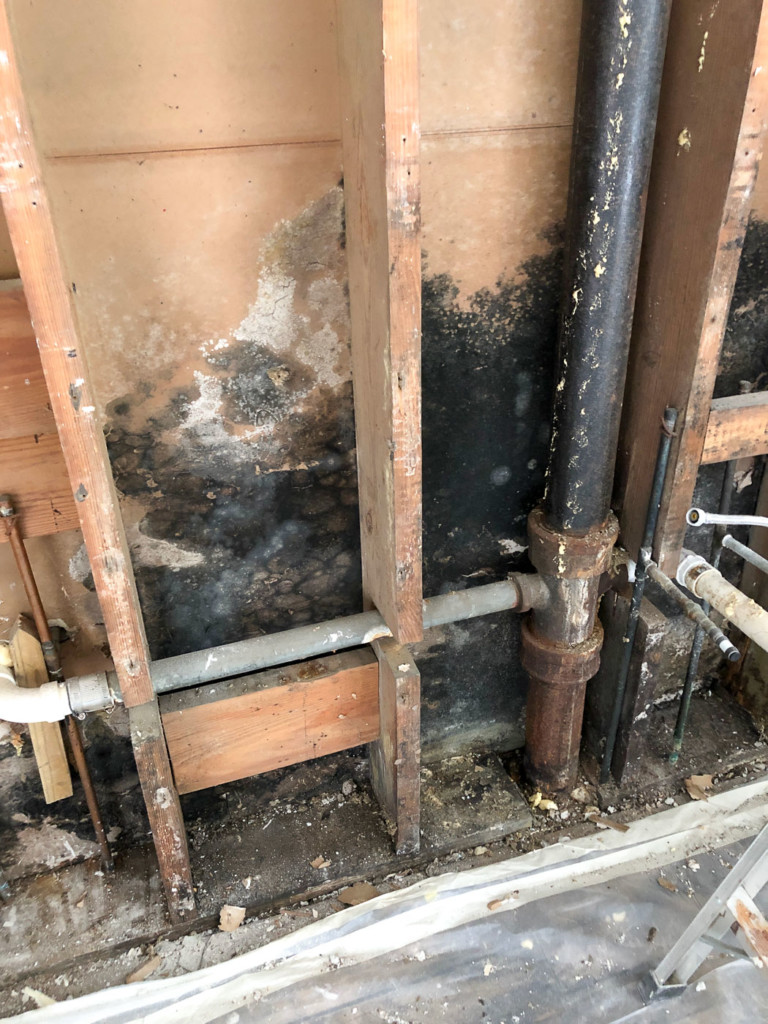
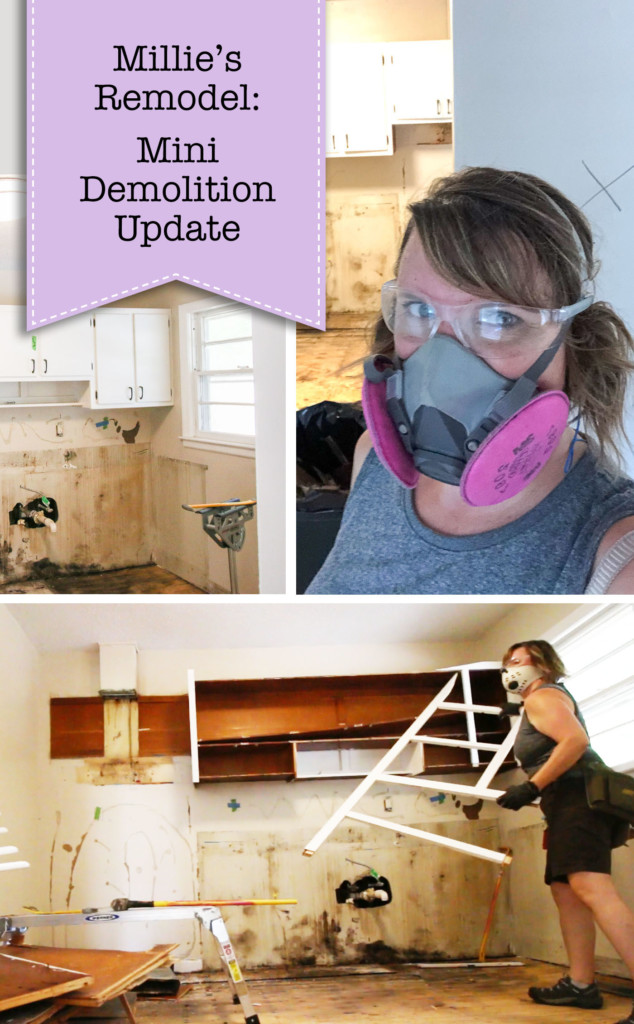
Millie’s Remodel: Mini Demolition Update

I know it’s been a few weeks since you had an update on the Millie’s Remodel project. If you’re wondering who is Millie and what am I doing to her, you can read more here. Otherwise, let me give you the latest update on mini demolition and share the state of Millie’s Remodel.

With a few family vacations and several weeks of meeting with subcontractors, progress has been slow on the house. However, as you’ll see in my video, there has definitely been progress, but I still have more to do.

Anyone who has been involved in demolition knows a few things about demolition are for certain:

  • It’s fun and great for getting out bottled up aggression.
  • It’s hard work and can give you a better workout than a CrossFit workout.
  • It can be unpredictable and you risk opening a can of worms (or a wall full of razor blades. True story!)
  • Sometimes you discover more damage than you anticipated and have to do more demo.
  • Demolition feels like you are moving backwards instead of making progress.
  • Once you finish demolition, hopefully it’s all progress and building back from that point.

Since purchasing the house, I sold the carport immediately! After the carport was hauled away, the only thing left were several anchor rebar stakes sticking out of the driveway. I must have tripped on them a dozen times until I finally took care of them. It was a quick task cutting them off with my grinder. (Frankly I always like the opportunity to make sparks fly, so I’m not sure why I waited almost two weeks to remove them.)

grind rebar from driveway

The old refrigerator was also easy to sell and the man who picked it up was more interested in poking around the house and giving me his opinion about everything (insert my eye roll here.) He had no idea I’m a general contractor and didn’t need his mansplaining.

Unfortunately, I’m still trying to sell the brand new range. It’s black and has never been used, but I’m replacing all the appliances with stainless steel appliances.

My plumber showed up a few weeks in and helped get the water heater and dishwasher disconnected. He scared the bejeezus out of me by cutting the live electrical wire to the dishwasher because the circuit for it wasn’t labeled. Talk about flying sparks! Luckily we’ll be wiring and plumbing the entire house to bring everything up to code (and you know I’ll label those circuits clearly).

Are you ready for another tour of the Millie’s Remodel project after mini demolition? I can’t wait to give you the plans for the future layout and show you one last look before the major changes happen. Also, I’m giddy about my haul from our local Habitat ReStore! It’s going to really help with my renovation budget!

Watch this video for the mini demolition video and tour of the house:

What did you think? Would you reglaze the tub or replace it? What do you think about my ReStore treasures?

Keep in mind you can always follow the day-to-day snapshots of the project on my Instagram account. And I try to give a weekly Facebook Live update on Fridays (although this week it was on Saturday.) Of course, you definitely want to subscribe to my YouTube channel to see my videos before the blog posts go live:

Subscribe to my YouTube Channel

Get ready for the next update, it’s gonna be big. I’m all dressed up and ready to bring it to you!

But, I may have shed several pounds after sweating in this get up for two weeks.

Thank you to the sponsors of Milllie’s Remodel for helping me give this old gal a makeover!

millies remodel sponsors logos

Screen Porch Makeover with Invisible Mosquito Screens

I’m incredibly excited about our screen porch makeover with invisible mosquito screens. But, I also can’t wait to share with you the almost invisible insect window screen material I found to replace our old screen porch screens. It’s honestly a night and day difference! Read on and you’ll see! And if you like anything you see, scroll to the end of the article for my source links.

But, before we get to the screens, let me fill you in on the screen porch decorating progression. It has been an ongoing work in progress for twelve years!)

Budget Makeover:

The screen porch is definitely the place we love to hang out. If the weather is nice, one (or all of us) are enjoying sitting outside.

Our porch was one of the things that sold us on this house (in addition to the fact that we used to live across the street and always loved this house before we owned it.) We had longed for a screen porch because anyone who lives in the south knows the mosquitoes, flies, and bugs are no joke. It’s a real nuisance when all you want to do is sit outside but instead you become a mosquito cocktail within minutes.

When we first moved in, we didn’t the cash to furnish the porch because we scraped together all our funds to purchase the house.

Screen Porch Makeover with Invisible Mosquito Screens

But, after a few years I was able to decorate the screen porch using a lot of cheap and found objects. I built the bench using an old headboard and painted a thrift store bamboo rug.

Screen Porch Makeover with Invisible Mosquito Screens

I also turned an old ladder into leaning display shelves and created pendant lights with old minnow traps.

As luck would have it, I stumbled upon a dumpster destined coffee table and (after giving it a new top and paint) it worked beautifully on the porch.

Screen Porch Makeover with Invisible Mosquito Screens

I was proud of my frugal porch furnishings, but after many years of use, I was cravings something new. I also wanted to update the furniture to accommodate more people comfortably.

Screen Porch Makeover 2019:

In the beginning of the summer, I sold all my DIY upcycled furniture except for one piece. I kept this plant stand that was an antique dry sink I scored at a yard sale for $3!

(I’ve included affiliate links for your convenience. I earn a small percentage from a purchase using these links. There is no additional cost to you. You can read more about affiliate links here.)

With the cash I made selling my old furniture,  I shopped online until I found the perfect outdoor sofa set from Wayfair. The price was great, but the reviews said it took a long time to assemble. In actuality, it took me less than two hours (with a few breaks in there.)

The sofa is sold with throw pillows that are plain and bright green. I threw them outside onto the deck furniture and went on a quick trip to my local AtHome store to purchase boho inspired pillows.

I also found a little side table from AtHome.

To round out (and maximize) the seating, I bought two stackable modern chairs and cushions from AtHome.

Although my painted bamboo rug was still in good shape, I wanted something more modern and less attention seeking. This rug is an outdoor rug that can be easily cleaned if it gets dirty and it doesn’t mind not being the show stopper.

The other side of the sofa has a garden stool topped with a glass round to make another side table. This might be unconventional, but I wanted a taller plant on the porch. On a whim, I set this cast iron plant on the side table and instantly loved it there. Have no fear, there is still enough room for beverages on the glass round.

With the new furniture set up, the screen porch has become my new favorite spot to work.

But, as I sat on the new furniture working, I looked up and thought, “There is one project I have always wanted to tackle on our screen porch…”

“…the ceiling.”

The wood ceiling has called for a fresh coat of light blue paint since we bought the house (about twelve years ago.) But, I never got around to it. I decided the new furniture would look so much better with a painted ceiling. Am I right?

Light Blue Painted Porch Ceiling:

Unfortunately, I was too busy working on the Millie’s Remodel project to do it myself, so I contacted my painter. He gave me a price I couldn’t turn down and I gladly turned over the task to him.

Luckily our Hunter fan still looks amazing with the light blue ceiling.

I also had him paint the rest of the porch rails and trim white because it was in need of a fresh coat. He and his partner had to remove all the screens to paint the railings. When I saw how amazing the view was without screens, I decided to look for some of the nearly invisible mosquito screens I have seen on house tours.

Nearly Invisible Mosquito Screens:

After installing the first panel I was speechless. The difference was almost day and night! The old screens are on the left and the new on the right.

But, here’s where you can really see the difference:

The screen door still has the old screens. See how much darker and fuzzier the view is? I purchased the BetterVue Nearly Invisible Insect Screens from Amazon and could not be happier!

Need more proof? Here’s the scene through the old screens:

And now through the new screens:

There is no photoshop or trickery there, you can clearly see the difference the new screens make.

The Finishing Touches:

For decor, I kept it simple. A few magazines and a piece of driftwood in a tray.

Fresh cut hydrangeas fill a big vase.

Unfortunately the ones still outside are turning brown in the hot summer sun.

Our rope hammock gets lots of use. It’s definitely a favorite for the kids and the adults.

Especially when you can nap and listen to the low tones of the wind chime my family gave me for Mother’s Day one year.

Do you love my screen porch makeover? Look at how much light comes through those new insect screens!

When the weather isn’t insanely hot and humid, you will likely find me here:

I hope you enjoyed my Screen Porch Makeover with Invisible Mosquito Screens.

Here’s a fun video I made showing you how quiet and beautiful it is on the porch.

Screen Porch Makeover with Invisible Mosquito Screens Sources:

And if you liked anything you saw, here is a list of my sources for the screen porch furniture, decor, and of course the nearly invisible screens!

Nearly Invisible Insect & Mosquito Screen Replacement Roll

Sources to Achieve My Boho Screen Porch Look:

5 Piece Outdoor Rattan Sectional
Gray Modern Stackable Chairs (similar)
Navy Seat Cushions
Mullen Gray/Navy Indoor Outdoor Herringbone Rug
White Ceramic Lattice Garden Stool
18″ Round Glass Table Top

Square Planter Pot (similar)
Deep Tone Wind Chimes
Pawley’s Island Rope Hammock
Aqua Stripe Turkish Towel (similar)
Hobnail Planter Pot (similar look)
Hunter Caneel Bay Outdoor Ceiling Fan
Copper Tray
Driftwood

Similar Outdoor Pillows:
Fringed Pillow
Macrame Pillow
Tribal Diamond Pillow
Navy Tribal Ikat Pillow

Hope you got some great ideas and hope you are enjoying some outside time where you are!