31 Days of Handy Home Fixes | Pretty Handy Girl


Want to cut down on your vacuuming? Want to make your carpets last 10 times longer? Want to keep bacteria out of your home? Wow, sounds like a miracle product right? Actually you can accomplish all of the above by simply training yourself and your family to remove their shoes at the door.

close_up_river_rock_inlaid_doormat

Day 13: Remove Your Shoes at the Door

The carpets in our home are at least 13 years old. Believe it or not, they are in great shape! The main reason is that we don’t wear our shoes in the house. The carpeting is good quality carpet. We clean up spills immediately with our carpet steam cleaner (you can’t have kids and pets without one!) I’ve had the carpets professionally cleaned twice since we’ve owned the house in 7 years.

mudroom_shoe_storage_bench

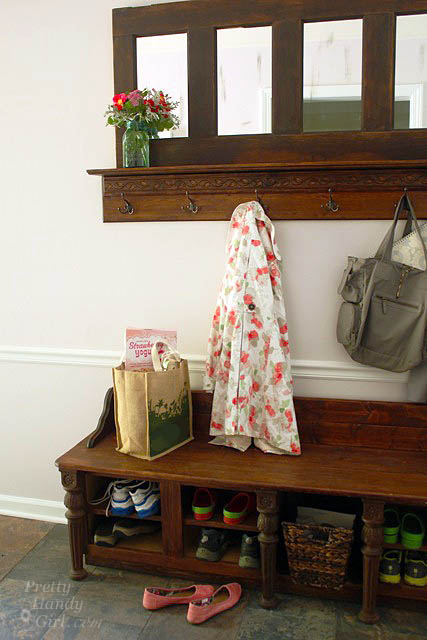
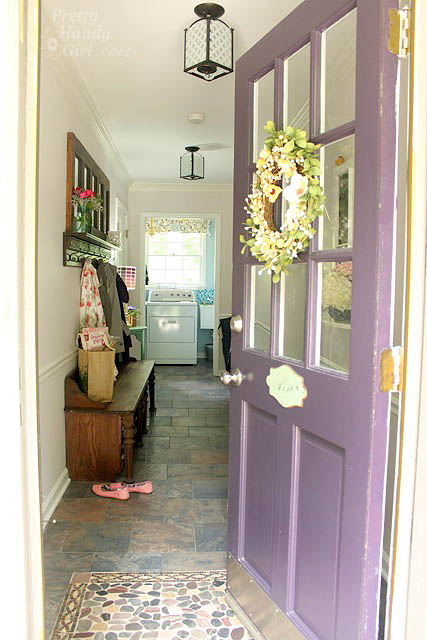
Do we require our guests to remove their shoes? No. But, most of them do anyway because when they come in the mudroom it’s evident that we take off our shoes at the door.

mudroom_tour_entrance

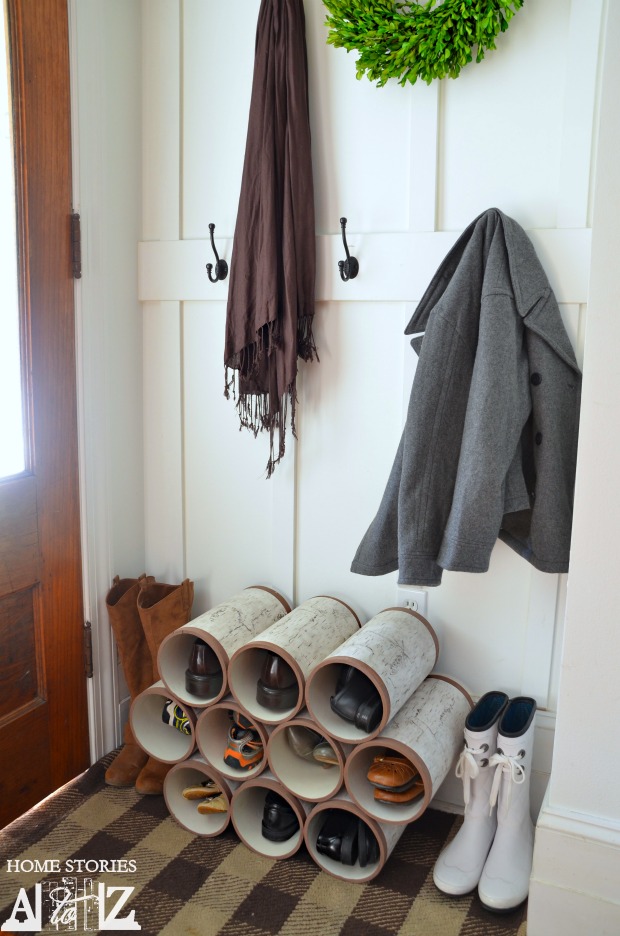
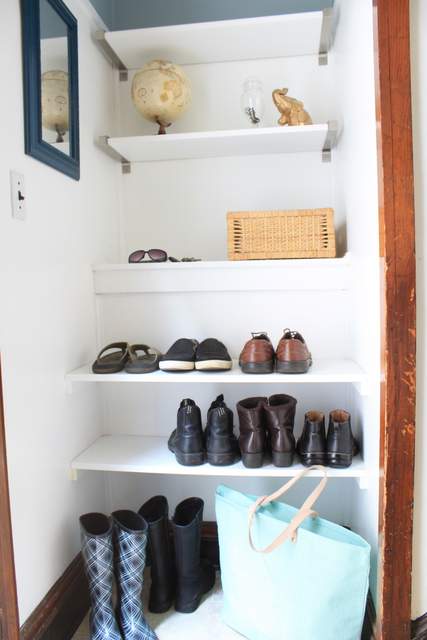
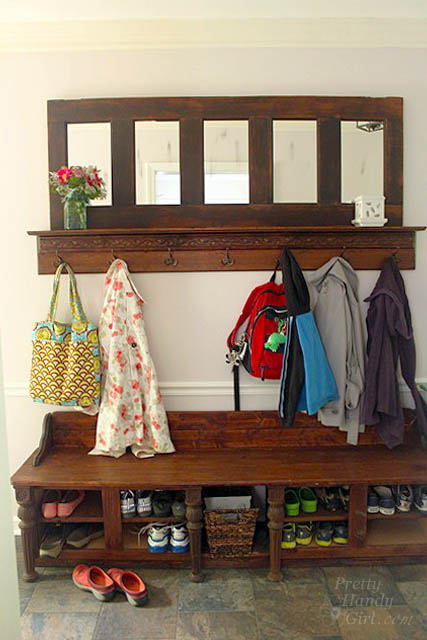
In order to create a habit of removing your shoes at the door, it’s important to have a convenient storage location for shoes. Creating shoe storage doesn’t have to be expensive.

Beth made these beautiful faux birch log shoe storage out of PVC pipe:

PVC Birch Shoe Storage

Jessica shared how she took a nook and put in shelving for shoe storage.

Built In Shoe Shelves

I made a small shoe storage bench out of a kitchen cabinet.

Shoe Bench from a Kitchen Cabinet

But, my sanity saver is this larger shoe storage bench I made out of salvage materials.

DIY Mudroom Storage Bench

Do you have any other tips for keeping your carpets looking like new?

PHGFancySign

I’m participating in Nester’s 31 Days Challenge. Check out all the other bloggers who are participating!

31 Day Writing Challenge

Don’t miss a single tip! Sign up to get all the tips in your email:


Sign Up for Email Subscription


Other tips in the 31 Days of Handy Home Fixes series:


How to Build Custom Rustic Crates | Pretty Handy Girl

How to Build Custom Rustic Box Crates | Pretty Handy Girl

Making custom rustic wooden box crates is super easy. You can build your crates to fit in a book case or use them as drawers in a cabinet. When I was giving my IKEA cabinet a makeover, I chose to remove a door and build custom box drawers instead.

How to Build Custom Rustic Crates | Pretty Handy Girl

Here’s the super easy tutorial so you can build your own:

Materials:
(some links are affiliate links)

Tools:

Instructions:

Begin by cutting the 1/2″ plywood into four pieces the size you want for your crate sides.

How to Build Custom Rustic Crates | Pretty Handy Girl

Test fit the sides together. Add a line of glue to the ends of the plywood. Read more

Rustic IKEA Hack Cabinet Transformation | Pretty Handy Girl

Rustic IKEA Hack Cabinet Transformation | Pretty Handy Girl

Rustic is not usually a word used to describe IKEA. IKEA is better know for their modern furniture, simple lines, meatballs and funny Swedish words. Today I’m going to change how you perceive IKEA furniture forever! Are you ready for this? Well, hang onto your hästes (Swedish for horses) because you’re going to see a transformation nothing short of amazing! You too can customize your plain jane furniture by adding legs and cladding the exterior with reclaimed picket fence wood.

This tale starts with a hunter green stained IKEA storage chest that I bought for our first apartment and stained myself (can you tell what decade it was? Hint: hunter green, honey pine, throw some burgundy in there and I’m sure you’ll be guessing no more.) It moved from room to room each time we settled into a new home. But, it never really fit in.

ikea chest in guest room

The cabinet was short and not very deep. Plus, it bore the mark of the popular 90’s hunter green. It was ugly. Why didn’t I get rid of it years ago? Maybe I was attached to it because it was the first piece of furniture I ever stained myself. And it brought back fond memories of calling the fire department because I smelled gas. Turns out you aren’t supposed to use an oil-based stain indoors, especially if you have a gas stove. Lesson learned.

Rustic IKEA Hack Cabinet Transformation | Pretty Handy Girl

Fast forward two decades and it’s still hanging around. The other day as I was lamented the fact that our foyer is too small to fit a cute dresser, I found myself looking at this sad little IKEA chest. I picked it up and put it in our foyer. The fit was perfect in the small space behind the front door! But, it was short and let’s not mention the hunter green again. Plus, it just wasn’t cute. And it doesn’t reflect my warm and weathered style. But, you know me, I wasn’t deterred.

I did some mental gymnastics and began to hatch a plan to create a marriage that would last longer than two decades.

Old picket fence pieces

It began with some pieces of old picket fence that I found by a dumpster. They were perfectly chippy and rustic! Luckily the 3M Lead Check results were perfectly negative. I carefully took the fence apart and removed all the nails.

Lead check picket fence paint

Ready to see how I convinced the two polar opposites that they belonged together — rustic and modern — to create a match made in heaven? Let’s explore this couples’ counseling further:

Read more

Wall-mounted IKEA LILLÃ…NGEN Mirrored Cabinet turned Stuffed Animal Storage | Pretty Handy Girl

Wall-mounted IKEA LILLÃ…NGEN Mirrored Cabinet turned Stuffed Animal Storage | Pretty Handy Girl

Have you ever shopped the “As Is” section at IKEA? There are some deals to be found there! Like this IKEA LILLÃ…NGEN Mirrored Cabinet. The cabinet had a small bent piece at the bottom and was therefore marked down to $60 from $100! Score! I easily bent the metal back in place with pliers once I got home. Then I decided to use it as a wall-mounted mirror locker for my son’s stuffed animals. Hang out for a few minutes and I’ll show you how to safely mount this cabinet AND move an outlet into the cabinet.

Wall-mounted IKEA LILLÃ…NGEN Mirrored Cabinet turned Stuffed Animal Storage | Pretty Handy Girl

Handy Boy #2 had a narrow spot between his closet and reading nook that I knew would be perfect for this cabinet. The idea was to give him some storage for his ever multiplying stuffed animals. (They are seriously like rabbits! It never ends. I might need to look into a forced sterilization program.) Knowing my son and his antics (have I told you how he can climb his way around the room without setting foot on the floor. It’s amazing, albeit scary to watch. I’ll have to video him sometime.) I knew that I needed to secure this locker to the wall. But, there was an outlet in my way. And this is the outlet that gives power to the copper wall sconce in his reading nook. Therefore, I had to have access to the outlet. Plus, when he gets older he could charge his electronics in the locker.

Wall-mounted IKEA LILLÃ…NGEN Mirrored Cabinet turned Stuffed Animal Storage | Pretty Handy Girl

(I should note that I neglected to buy the optional base for this cabinet. Instead, I built a quick one using 2×4’s and 1×4’s.) 

Materials:

  • Drill
  • Quilting pin
  • Measuring tape
  • Pencil
  • Outlet extender
  • Multi-purpose tool
  • Toothpaste
  • Screwdriver

Instructions:

First I located the stud in the center of the wall. Locating studs is easy by using a quilting pin. Read more

Easy Added Color to a Dresser | Pretty Handy Girl

Easy Added Color to a Dresser | Pretty Handy Girl

Adding color to dresser drawers is definitely an easy way to add a pop of color to an otherwise boring piece of furniture. Add some new knobs and your dresser will look like a new piece of furniture! (Tutorial for creating custom knobs coming soon.)

You could say that I finally got that Kick in the Pants I needed to start working on my son’s room. One makeover I had in mind was giving his dresser a pop of color.  The top and sides of the dresser were in great shape and it has a tough laminate top. Instead of painting the entire dresser, I decided to paint only the drawers because — knowing my little guy — he would have it scratched up in no time.

Easy Added Color to a Dresser | Pretty Handy Girl

Materials:

Instructions:

Start by removing clothing from the drawers. Then firmly pull the drawers all the way out. Some drawers have a clip at the end, just pull straight toward you. Others may require you to lift up on the front to release the drawers from the track. Mark the inside of the drawer so you know which slot to return it to.

Read more