Behind the scenes, I’ve been working on improvements for the Best Fit Face Mask and am thrilled to finally share with you the Most Comfortable Best Fit Face Mask.


Most Comfortable Best Fit Face Mask

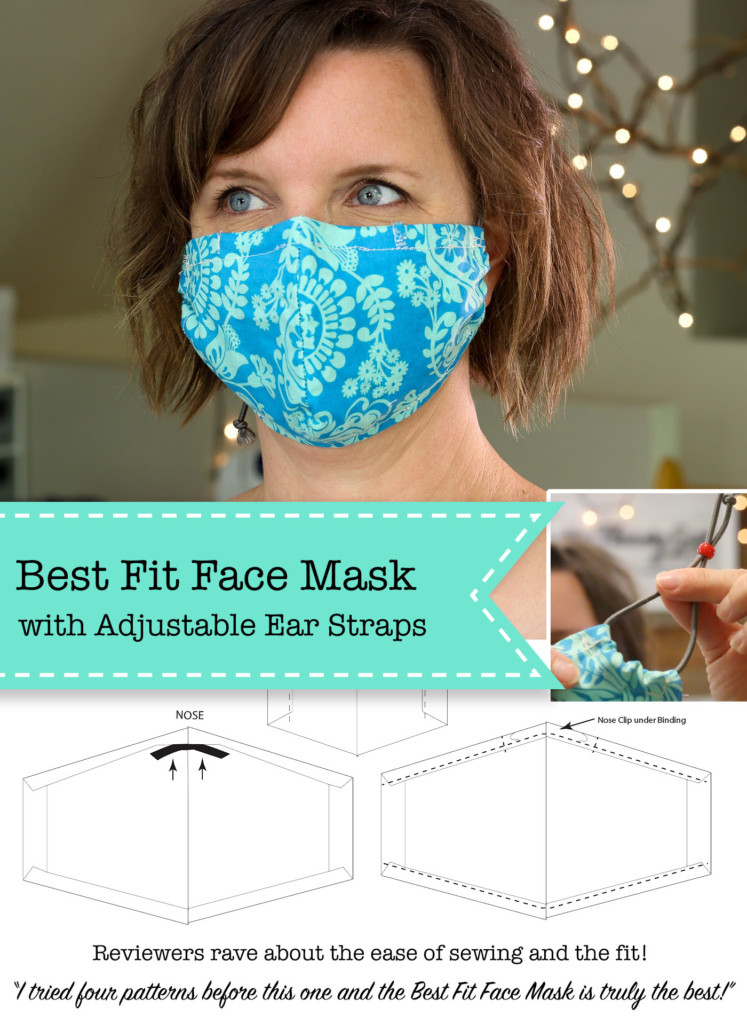
I’ve heard from thousands of you who have emailed me, or commented and told me how much you love the Best Fit Face Mask. So many have remarked how easy it was to sew and how it truly is the best fitting face mask available. In an effort to provide better comfort and ease of wearing, I’ve changed the mask slightly to be the Most Comfortable Best Fit Face Mask!

hundreds of best fit face mask pictures

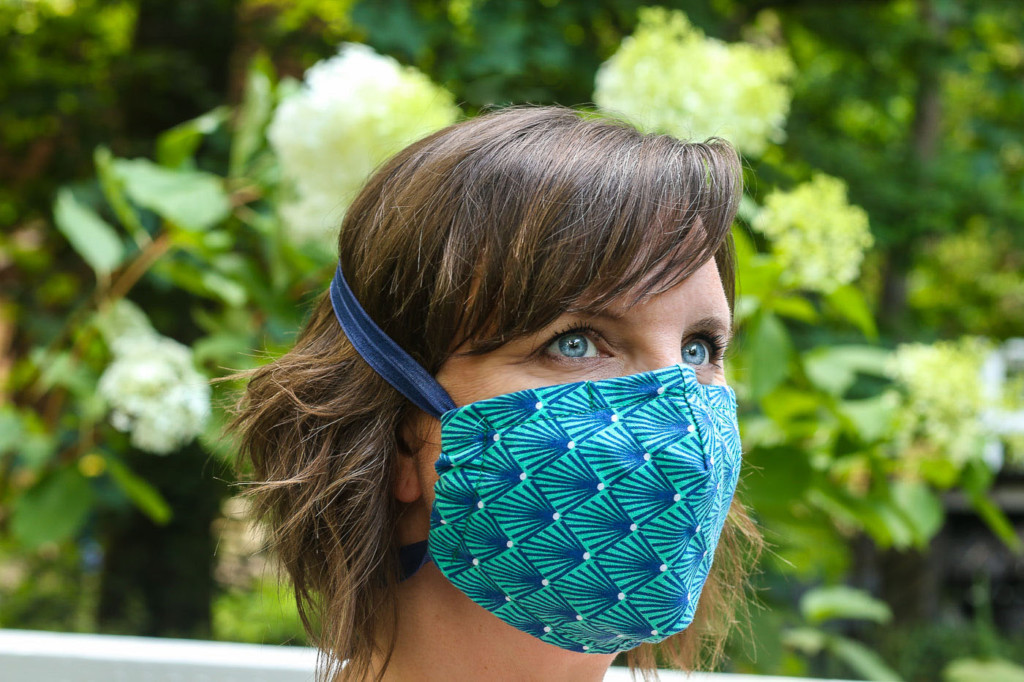
You heard me right, this is by far the most comfortable, not to mention best fitting face mask. This new design uses the same Best Fit Face Mask pattern but I’ve changed the straps slightly so they don’t go behind the ears.

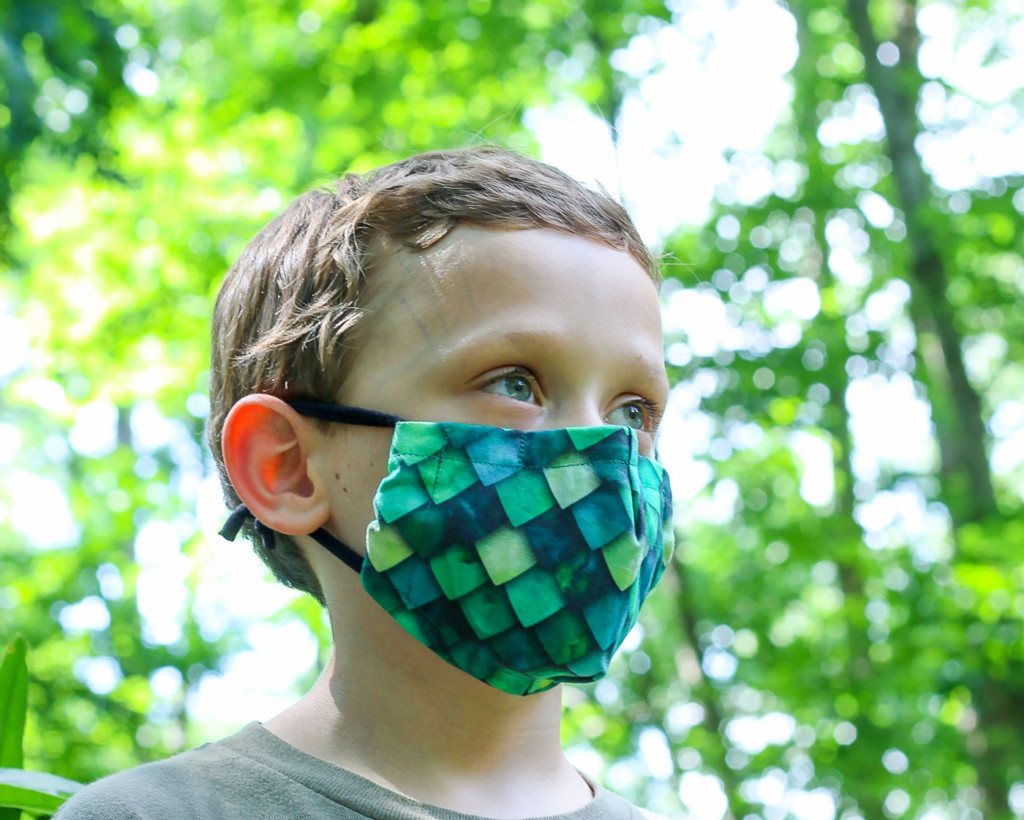
The Most Comfortable Best Fit Face Mask is super popular with:
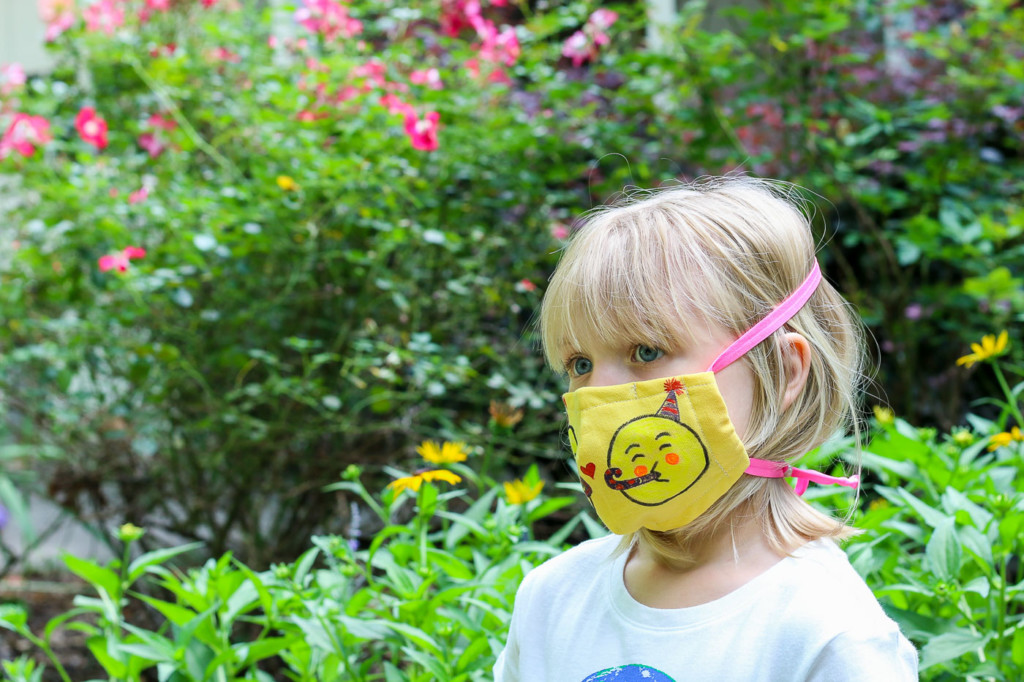
  • Children
  • People who wear glasses
  • People who wear hearing aids
  • People with sensitivity issues
  • Workers who see people on and off during the day
  • Medical professionals who don’t want anything on their ears
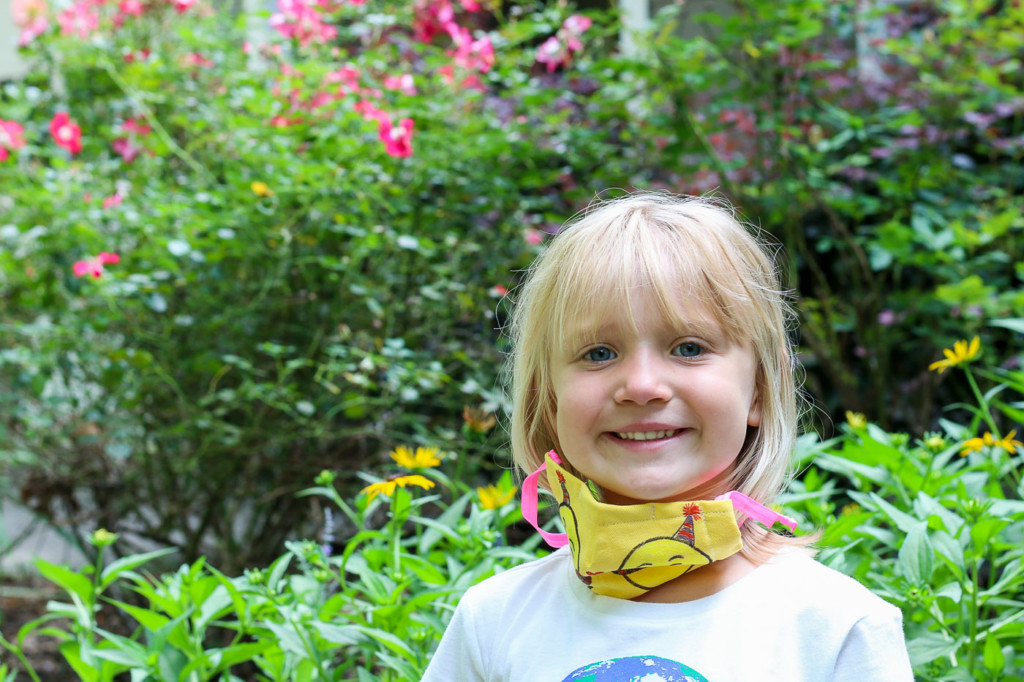
  • People who want to wear the mask around their neck when not needed

This mask design will be invaluable for children who are heading back to school or people going back to work. It allows the wearer to pull it on and off quickly with ease and without the risk of misplacing their mask! Then when wearing the mask is no longer necessary, they can simply pull it down and let it hang around the neck until needed again.

child wearing most comfortable best fit face mask

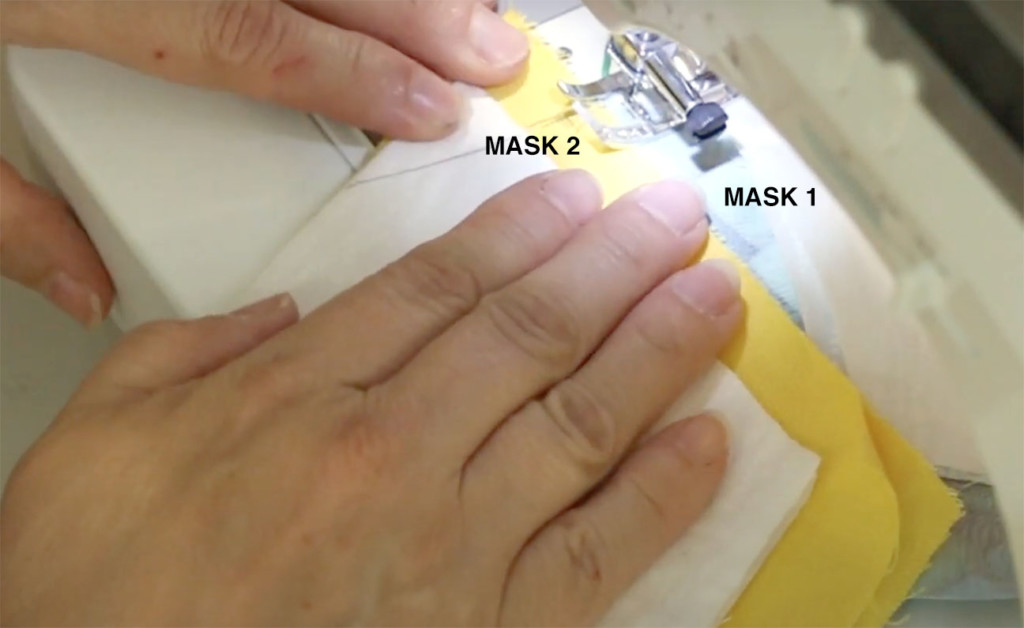
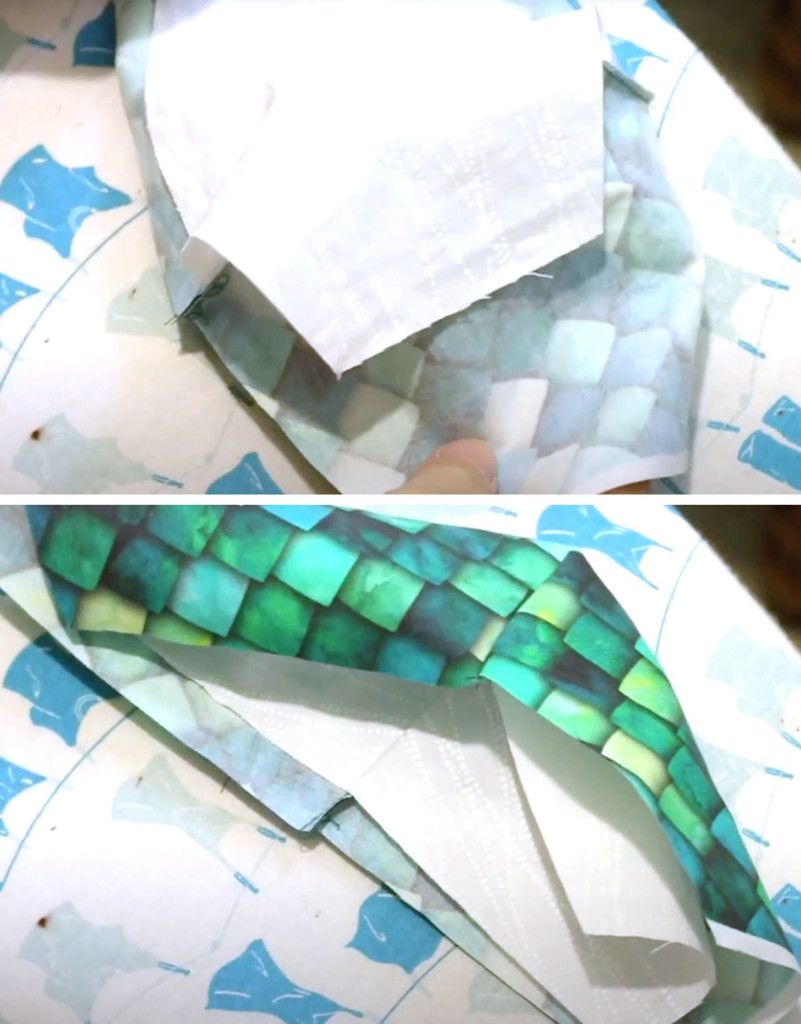
You’ll use the same pattern and instructions to make the mask as the Best Fit Face Mask. When you get to the final sewing step in my tutorial, you are NOT going to add the ear straps. Instead, just sew the sides and I’ll show you how to thread the straps next.

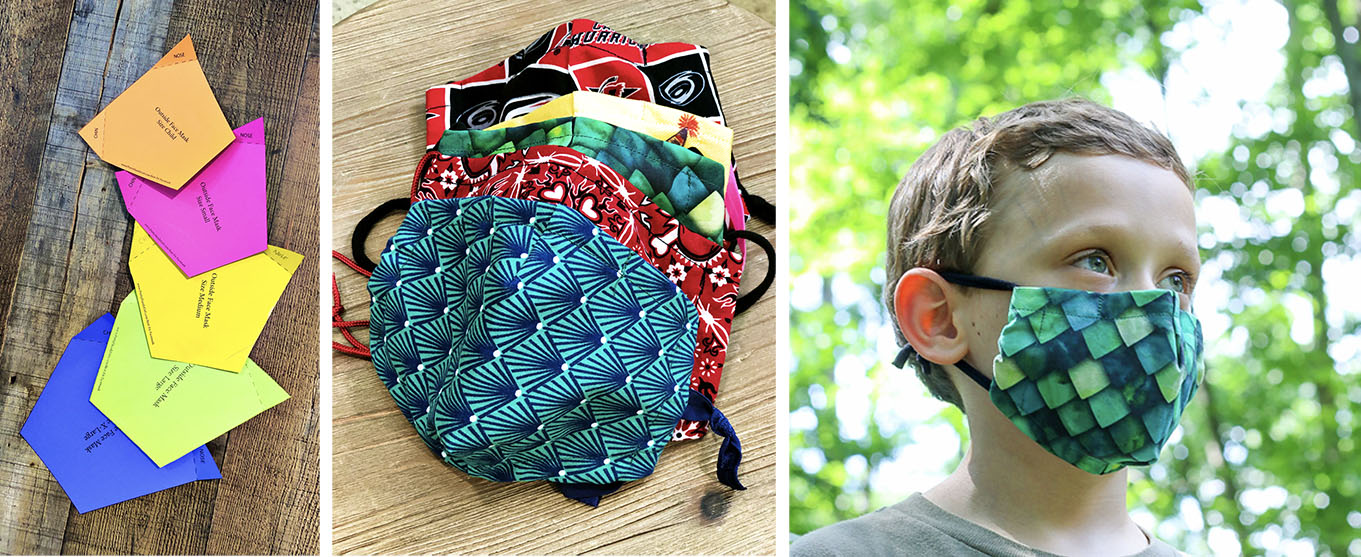
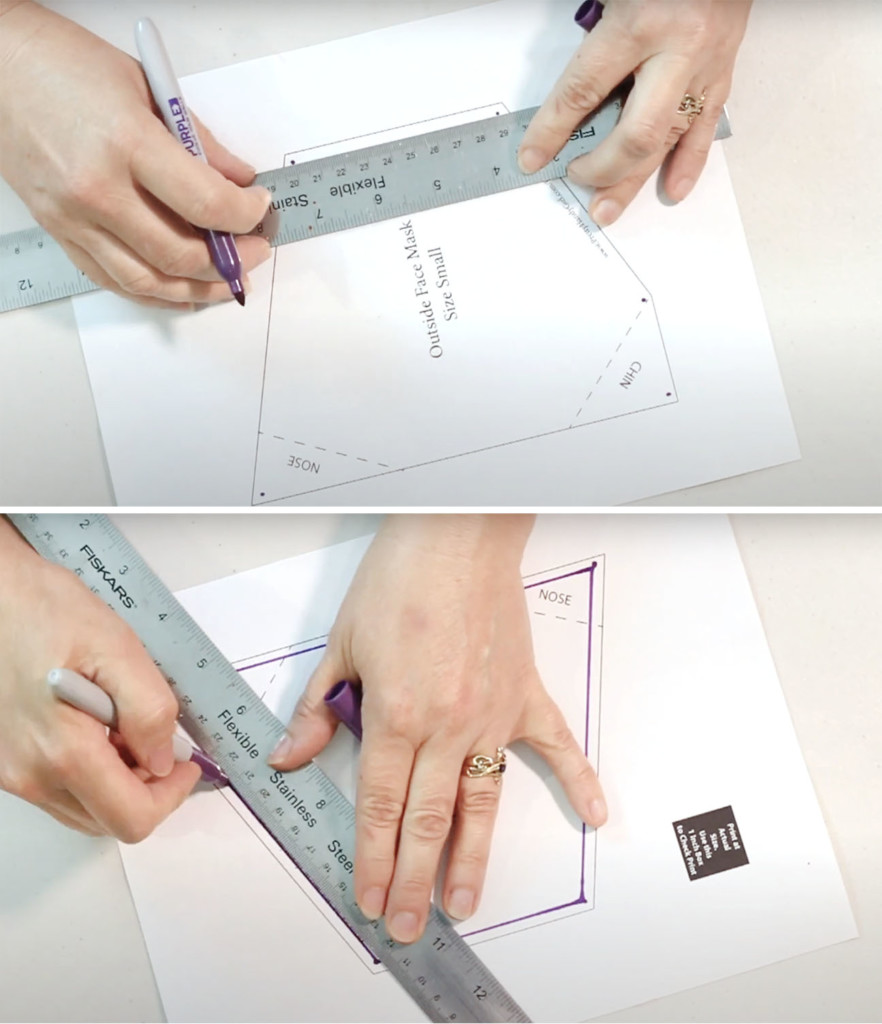
Go ahead over to the tutorial, download your choice of five size patterns and start making your mask.

Then watch this video to see how to turn that Best Fit Face Mask into the Most Comfortable Face Mask:

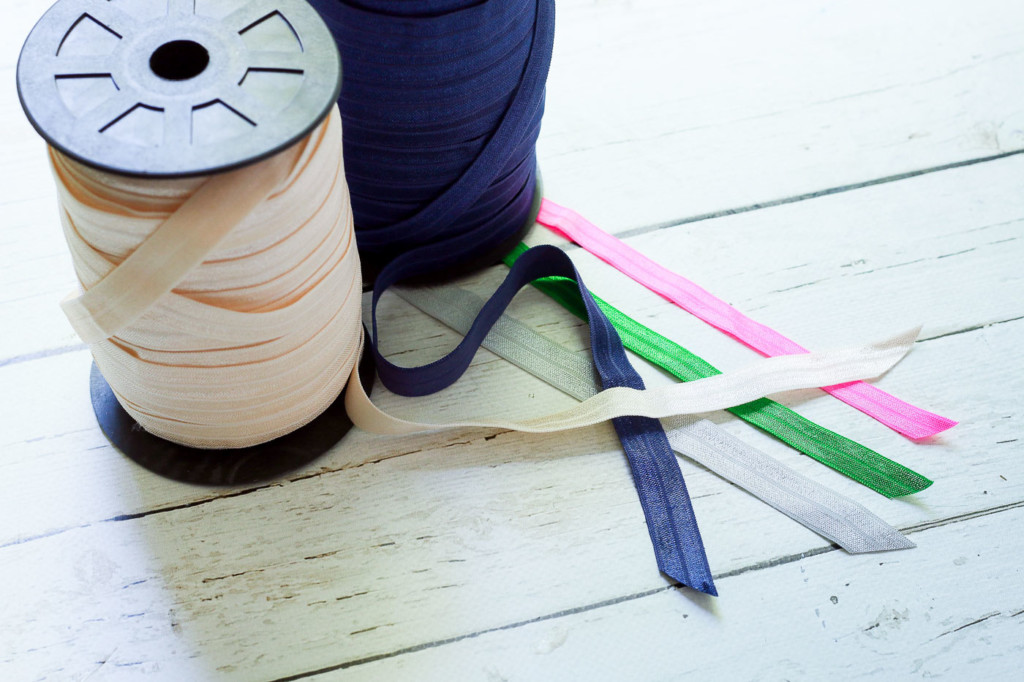
Most Comfortable Face Mask Materials:

I found that the ⅝” flat foldover elastic hairband material is the most comfortable strap material for over the head wearing. It is super soft, stretches easily, and doesn’t pull on your hair or face. For this strap design, cut the elastic at 36”. You may trim a little off the length later if you find it too long (especially for a child-size mask.)

Flat 5/8" Foldover Elastic for Most Comfortable Face Mask

My Source for Flat Foldover Elastic: Amazon or Etsy

Don’t have foldover elastic? Not a big deal, you can also use any cording you like for this mask, but it may not fit through the adjustment bead. You can simply tie the tails instead. Not using elastic straps means it might not be as comfortable or as easy to slip on and off, but it’s still desirable if you want to move away from ear straps.

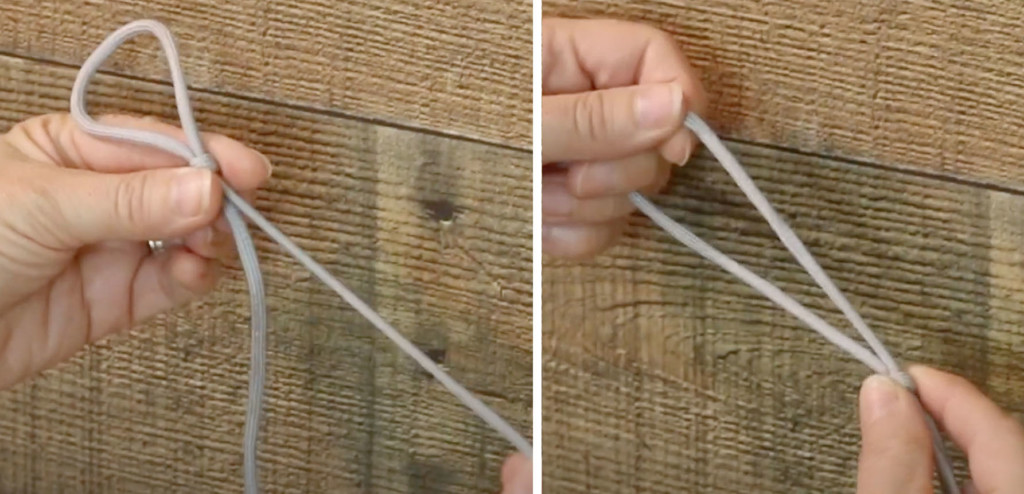
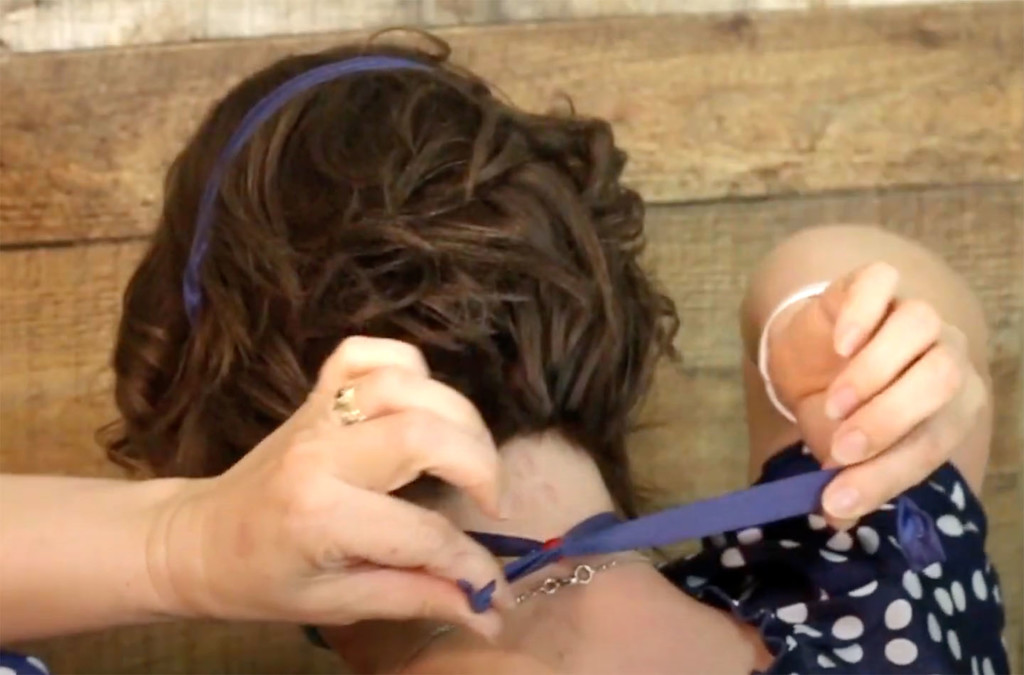
How to Feed the Straps Through the Most Comfortable Best Fit Face Mask:

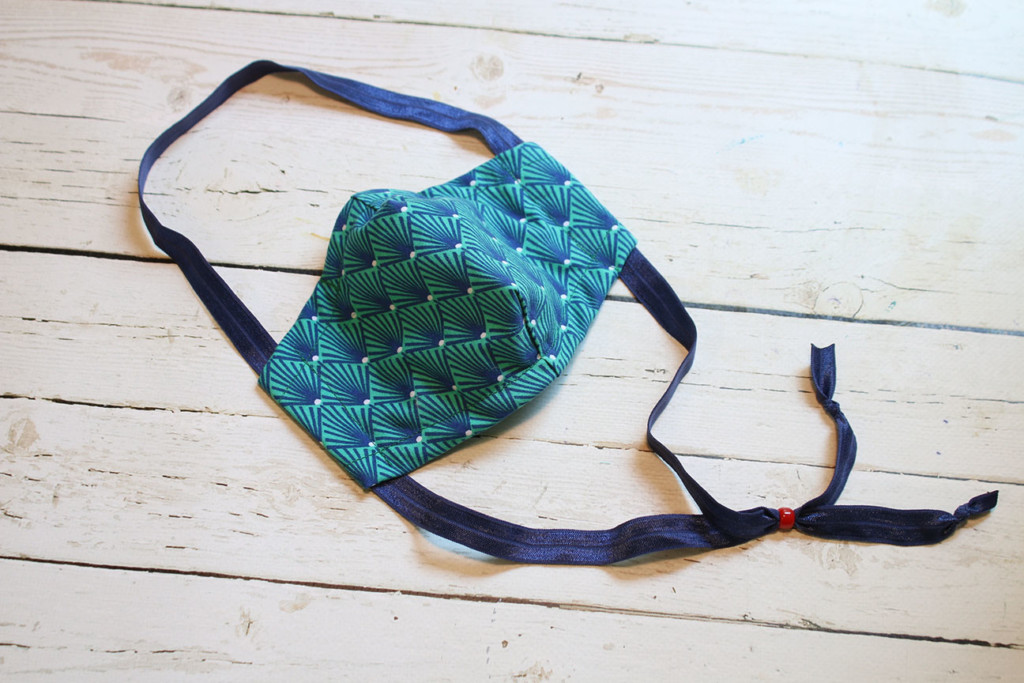
Pin a safety pin to the end of your elastic. Starting from the chin side of your mask, feed the elastic up through one side, then down through the other side leaving the ends on the chin side.

feed straps through mask

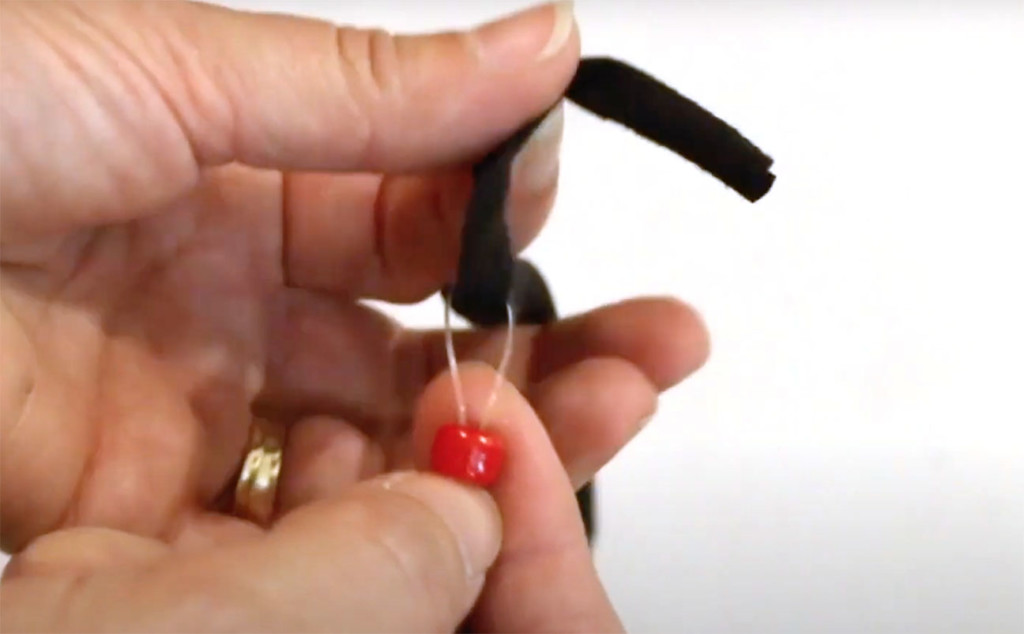
Adding an adjustment bead helps make this mask easy to adjust. To feed the straps through the bead, fold some fishing line in half. Feed the loop end through the bead. Slip both strap ends through the fishing line and pull back through the bead.

feeding adjustment bead onto face mask straps

Pull the strap ends through the bead completely. Tie the ends of the ribbon elastic and singe the ends to keep them from fraying.

Finished Most Comfortable Best Fit Face Mask

Ways to Wear the Most Comfortable Best Fit Face Mask:

1. Straight Forward:

best face mask for kids

To put the mask on, make sure the nose clip is facing up. Put the bottom strap (or the tail end side) over your head first and rest it around your neck. Then pull the top strap over your head and let it rest on or slightly below the crown of your head. Pinch the nose clip against your nose. Then pull on the tails to tighten the strap to your comfort level. To loosen the straps, move the bead away from your neck.

easy adjustable face mask straps

2. The Good Hair Day:

no more bad hair day with face mask straps

One thing I love about the straps on this design, is the versatility. If you are having a good hair day, congratulations. You can simply put the top strap over your ears and behind the base of your skull. Now tug on the tails of the strap until it’s comfortable. Adjust your hair over the straps. Now you go rock that great hair today!

3. Both on Top:

both straps on top of head wearing face mask

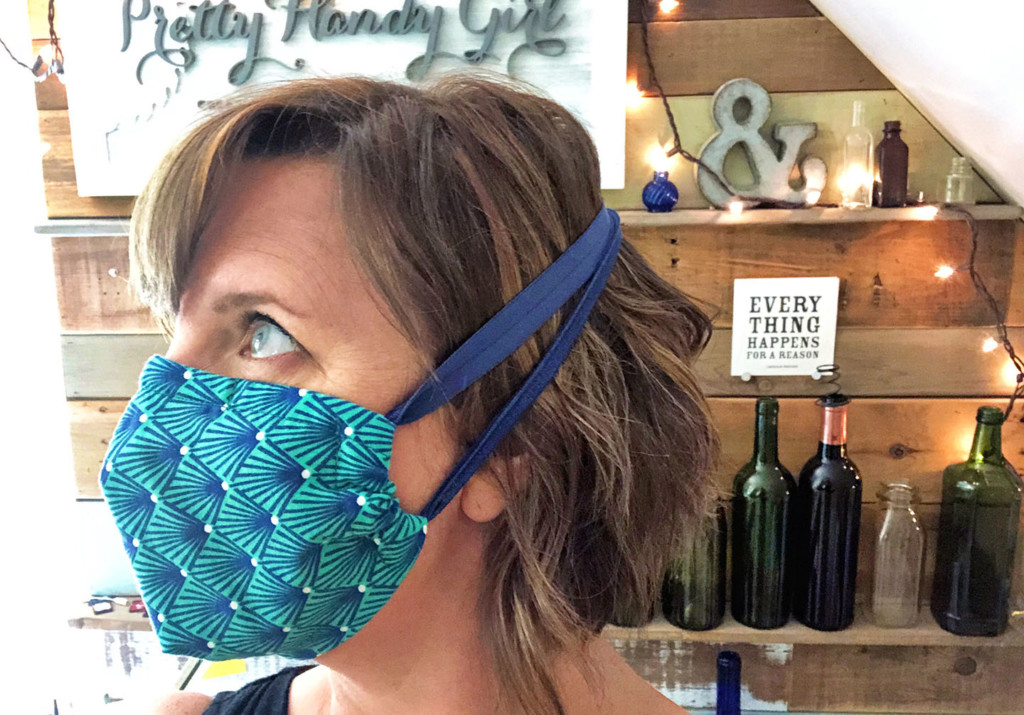
If you don’t want the straps on your neck, or want a very secure fit under the chin, pull both straps to the crown of your head.

I’d love to hear from you in the comments if you find other ways to wear the mask. I know you’ll love how comfortable it is and how lightweight it is when hanging around your neck. I also know that kids are going to love this design change!

child wearing most comfortable best fit face mask

Please share this tutorial with friends and family. I see so many disposable and poor-fitting masks out in public. This is a much better solution, but I need your help to spread the word. In the meantime, thank you all for doing your part to stay safe and stay kind.

Pin this image to share:

Don’t forget to see my Time Saver tips when sewing the Best Fit Face Mask:

Best Fit Face Mask Time Saver Tips New Sizes

Finally, if you are looking for the original Best Fit Face Mask tutorial, here it is:


Two months have passed since I designed the Best Fit Face Mask. By popular demand, I’m putting out three new sizes (child, small, and x-large) to fit everyone! I’ve also developed some time-saving tips to help you sew masks faster.

Best Fit Face Mask Time Saver Tips New Sizes

Best Fit Face Mask – Time Savers and Sizes to Fit Everyone

Before I get started with today’s post, I have to thank you all. I received thousands of comments from people saying how much they loved the Best Fit Face Mask design. If you haven’t seen that video, you can see the video here.

For those of you that have watched that, I have to say you blew me away, because there were over 4 million people who watch the video. I hope that has translated into each and everyone of them making at least one mask if not multiples to protect everyone around the world from the coronavirus! Thank you to those that sent me pictures of your masks. This makes me happy to see so many different people and different masks!

Video on Best Fit Face Mask Time Savers + Updates and New Sizes:

I’ve covered the majority of today’s post in this video. I know it goes fast, so feel free to watch and/or read the rest of this post.

New Sizes – Child, Small, and X-Large Mask Patterns:

Today I’m back because so many people had asked for different sizes and I can appreciate that there are many different size faces. I appreciate your patience with me as I finally developed a child size, a small size, and an extra-large size (in addition to the previous medium and large sizes.) Patterns for all five sizes can be downloaded here (look under Face Mask Template subheading).

Although I had to stop resizing at some point, I decided to show you an easy way to resize your pattern!

How to Resize Your Face Mask Pattern:

Just a quick note before you rush to resize your pattern. Make sure to pre-shrink your fabric. You’ll also want to wash the mask after sewing because oftentimes the mask will shrink a little more.

To resize your pattern, simply print out the size closest to what you need. To reduce, use a ruler to mark points inside the template at each corner. I suggest reducing by ¼” increments. Then use the ruler as a straight edge to connect the dots. To enlarge, repeat, but add your points outside the template. Simple, right?!

More Alternate Ear Strap Materials:

(I’ve included affiliate links for your convenience. I earn a small percentage from a purchase using these links. There is no additional cost to you. You can read more about affiliate links here.)

Over the past two months I’ve learned a lot by testing several different strap materials. In the first mask, I used elastic paracord. Although this worked great, it was hard to find and hard to thread the bead through. Here are some alternatives to the elastic paracord.

The old t-shirts, are so comfortable and soft (and most likely FREE! Especially if you have stained shirts or ones your kids have outgrown.) Cut them into one-inch strips and pull them to make them curl. These should feed through the craft beads easily.

Regular paracord (non- elastic) works well too. This is like hiking boot laces. I found the 550 series (7 strand core) is the perfect size to still fit through the craft beads.

Elastic shoelaces are a great alternative to the flat elastic most people want for face masks. In full disclosure, Xpand sent me some elastic shoelaces to try out. I’m happy to say they work great. They are stretchy and you can feed a craft bead onto it.

Slip Knot instead of Craft Beads (or Cord Locks)

No Craft Beads, No Problem! Many people have struggled with the craft beads. Sometimes the strap material doesn’t feed through easily. For this reason, I have the solution if you are ready to ditch the bead! It’s simple, tie a slip knot!

How to Make a Slip Knot:

A slip knot is a knot that slides up and down along one strand. It’s perfect for adjusting the length of the ear straps, yet still holding it in position.

Watch my video (already forwarded to the slip knot tutorial section) to see how to make a slip knot. It’s easy and a great knot with many uses.

Cut your straps about 12 – 15 inches long. (You can trim the excess afterward.) Fold the strap in half. I’ve knotted one end to help clarify this demonstration.) Position the knotted end on the bottom. Take the knot and wrap it over the other end one time. Now reach your fingers through the loop you made and grasp the non-knotted end and pull it through the loop while holding the other two ends. Tighten the knot and now test to see if you can slide the knot up and down your strap. Easy, right?!

Nose Clip Update – Answer to the Question: Do they hold up in the wash?

First, there many people who said they like using pipe cleaners. Frankly, I’ve never been a fan of these because they just don’t have the hold or the memory to do great as a nose clip. Plus, several people have been reporting that pipe cleaners are rusting in the wash and breaking.

There were a lot of people who were concerned about the coffee tabs and how they hold up in the wash and dryer! My own original mask has been washed probably fifteen times now. There is no rust showing. The coffee tabs are coated in plastic, so I don’t think this will be an issue. Some have asked about drying the masks on a lower heat setting in the dryer. I’ve dried mine on high heat, but have switched to a medium heat just to prolong the life of the coffee tab. The beads have been fine in the high heat, but again, why not play it safe?

Time Savers when Sewing the Best Fit Face Mask:

If you’re like me, you likely make a few masks at a time. Typically I like to knock out a dozen when I have time. They usually take a few hours to make, but when you break it down, the masks take me about 15-20 minutes each. To get the full tutorial for the Best Fit Face Mask, download the instructions and templates from my Best Fit Face Mask tutorial post.

After you’ve cut out your fabric, fold the fabric so the printed sides are facing in. Mark the locations for your nose and chin folds. Now, position the liner on top of the outside mask fabric. Line up the nose and chin stitching marks.

Stitch through both pieces of fabric along the fold lines.

To save time while sewing multiple masks, chain stitch all the masks one after the other. Below you can see after sewing through the chin seam on Mask 1, I have Mask 2 lined up to sew through the nose seam.

After sewing and cutting the excess material off your masks, you simply open the masks so the outside fabric is on the outside and the liner is right sides facing out.

open face masks

As you stitch the sides, you can continue to save time by chain stitching all the nose hems together. Then rotate your chain of masks and stitch the chin hems (effectively chain stitching multiple masks together. After separating and folding the side ear strap folds, you can chain stitch all the sides of the masks. Here’s a funny picture of me with six chain-stitched masks.

chain stitching masks

How to Simplify Threading the Craft Bead Through the Straps:

Time to show you how I feed my straps through the bead. This is a tip my father-in-law showed me and I’m eternally grateful for his idea! I’ve forwarded the video to show this process below:

Grab a length of fishing line and fold it in half. Stick the loop end through the bead. Feed half your strap through the fishing line loop. Then pull the fishing line and strap back through the bead.

feeding straps through the craft bead with fishing line

That’s all the time-savers I have for you today. I am working on one new addition to the Best Fit Face Mask, so be sure you are subscribed to my email newsletter. You’ll also get access to my Free Mini Course: 6 Simple Steps to DIY Anything!

Make Your Own Monster Dolls

Teaching children to sew can be a fun and rewarding lesson if you let them take the lead and design their own monster dolls.

let your child make their own monster doll

Make Your Own Monster Dolls

Aren’t they cute?! Okay, they may have a few imperfections, but I don’t want to hear about it because my boys made them! That’s right my 4 and 7-year-old sons made their own Monster Dolls (with a little help from me). It was a perfect way to spend a summer afternoon together. And as a bonus they learned some basic sewing skills.

My 7 year old really dove in and enjoyed every aspect of making his monster. He used the sewing machine with my help. My 4 year old needed a bit more guidance and help. He was very tentative about the sewing machine, but I convinced him to push the pedal. After one time pushing it, he was LOVING puttin’ the pedal to the metal! LOL!

Materials:

Monster Dolls Designed and Made by Your Kids | Pretty Handy Girl

Instructions:

Let your child draw their monster on a piece of paper.

Monster Dolls Designed and Made by Your Kids | Pretty Handy Girl

Help your child draw the outline of the monster onto the backside of the fleece. Explain that you might need to fatten up any skinny appendages so you can turn the monster right side out and stuff (him or her) after sewing.

Monster Dolls Designed and Made by Your Kids | Pretty Handy Girl

Pin two pieces of fleece together (right sides together.) Help your child cut out around the outline of the monster’s body. This will give you two identical pieces for the monster doll body.

Monster Dolls Designed and Made by Your Kids | Pretty Handy Girl

Cut eyes, nose, and mouthparts out of colored felt. Pin the facial features to the right side of one of the body cut-outs. Let your child use the vanishing marker to mark other facial features that will be stitched.

Monster Dolls Designed and Made by Your Kids | Pretty Handy Girl

Using the sewing machine, stitch the facial features and attach the felt pieces.

Helping Children Learn to Use a Sewing Machine:

To help my boys learn to sew, I let them depress the pedal on the sewing machine. We focus on light pressure, slowing down, and stopping. Meanwhile, I guide the fabric through the foot.

Monster Dolls Designed and Made by Your Kids | Pretty Handy Girl

To emphasize the features we drew over the stitching with the Sharpie marker.

Monster Dolls Designed and Made by Your Kids | Pretty Handy Girl

Use buttons or the Sharpie to create pupils for your monster doll.

Monster Dolls Designed and Made by Your Kids | Pretty Handy Girl

Pin the right sides together (facial features inside) of the doll. Stitch around the edge, leaving a small three-inch opening for stuffing.

Monster Dolls Designed and Made by Your Kids | Pretty Handy Girl

Trim any excess fabric away from the edges before turning the doll right sides out.

Monster Dolls Designed and Made by Your Kids | Pretty Handy Girl

Turn the monster doll right sides out. Use a pencil’s eraser side to poke out any corners and turns. Stuff the monster with polyfill stuffing. Use the pencil to push filling into small areas.

Monster Dolls Designed and Made by Your Kids | Pretty Handy Girl

Whipstitch the opening closed after the doll has been fully stuffed.

Monster Dolls Designed and Made by Your Kids | Pretty Handy Girl

Your child’s monster doll is complete!

Monster Dolls Designed and Made by Your Kids | Pretty Handy Girl

Ugly Monsters or Adorable Monsters? What do you think?

Monster Dolls Designed and Made by Your Kids | Pretty Handy Girl

Your child will surely love his creation and will definitely feel a huge sense of pride that he (or she) designed it themselves!

Monster Dolls Designed and Made by Your Kids | Pretty Handy Girl

I let my boys do as much as possible so they could feel a HUGE sense of accomplishment when they were done. They both were so proud of their monsters. They tote their monster dolls everywhere and tell friends and family, “I made it!”


Pin for later!

thumbprint pillow tutorial

Envelope pillows are the easiest pillow covers to sew. Combine a beautiful pillow with a personalized thumbprint design and you have a great gift idea for parents or grandparents!

How to Make Thumbprint Design Pillows

How to Make Thumbprint Design Envelope Pillows

Hello, it’s Cristina from Remodelando la Casa once again happy to share an easy and fun project where kids are more than welcome to give a helping “thumb” 🙂

Thumbprint starfish pillow2 with tag

Envelope pillows are the easiest pillow covers I’ve sewn and let me tell you, my sewing skills are not that good.  A fabric rectangle is folded to create an “envelope”, four simple straight lines to sew and your cover is done! No zippers, no Velcro, the envelope holds the pillow really well.

Materials:

(I’ve included affiliate links for your convenience. I earn a small percentage from a purchase using these links. There is no additional cost to you. You can read more about affiliate links here.)

*Pre-wash and iron the fabric

Instructions:

For a 17″ x 17″ pillow insert, use the following dimensions.

Envelope pillow 17x17

Once the fabric is cut to size (18″x 40″), hem the left and right edges.  (Fold  in ½”  twice, as seen in the picture below.  Iron it flat and hem.)  Do the same on the other side.

envelope pillow side hems

To create the opening on the back, fold the left side over and iron.

Envelo pillow first fold

Do the same on the other side.  These folded lines are a good visual point to help you center the design on the front face of the pillow later on.

envelope pillow second fold

Before sewing across the top and bottom of the cover, let’s work on the design (the fun part!)  Print the starfish and seahorse silhouettes. (for these pillows print at 120%.)

starfish and seahorse silhouttes

Place each design on top of a big piece of contact paper, tape it in place.

starfish profile

Using the x-acto knife, cut through the printout and the contact paper following the outline of the silhouette.

cutting starfish profile out

After cutting, peel off the outer piece of contact paper and center the design on your pillow cover.  Press the contact paper firmly all around the design to prevent paint from seeping through.

contact paper silhouete on fabric

Now it’s time to call all those little artists and give them each a set of fabric paint.

kids thumbpainting

The thumb-printing / painting can begin…

thumb painting

…until the shapes are filled.

thumbprint starfish and seahorse

Let it dry according to the paint manufacturer’s instructions.  After the paint dries you can sew across the top and bottom, making sure the designs are on the inside.

sawing across envelope pillowIf desired, wash and iron the pillow covers. Insert your pillow form.

Thumbprint seahorse pillow front and back

Place it on your favorite chair and enjoy!

Thumbprint starfish pillow1

Our pillows are a present for a special person close to our hearts.

Thumbprint pillows with tag-2

Of course, the artists had to sign it, or thumbprint it! Well, we did both!

Thumbprint pillows with tag

Are you ready to give the thumb printing a try?  Kids love it!  Hint, hint… this could be a nice project for Father’s Day (or Mother’s Day).

Photobucket

  ~ Learn more about Cristina ~

17 DIY Garden Flags | Pretty Handy Girl

Did you know a placemat is the same size as a garden flag? Yes! It is. Check out these ideas for garden flags for every season. If you don’t have fabric, use one of your old placemats to make some of these DIY Garden Flags for Every Season.

17 DIY Garden Flags | Pretty Handy Girl

DIY Garden Flags for Every Season

One of the easiest and cutest ways to decorate your home’s entrance is with garden flags. If you use a placemat, there’s little—if any—sewing! Find the perfect DIY Garden Flag for your home and for any season below. Click on the link to take you to the full tutorial.

valentine-garden-flatValentine Garden Flag


Valentine Burlap FlagValentine Burlap Flag by Sew Woodsy


Spring Garden FlagSpring Garden Flag by Erin Bassett


Garden-FlagMonogram Garden Flag by Blue Sky Confections


Monogram Garden FlagSpring Garden Flag by Peek-a-Boo Pages


Home State Pride Spring Garden Flag | Pretty Handy Girl

Home State Pride Spring Flag from a Placemat


Monogram-Garden-FlagMonogram Garden Flag on Pinterest


DIY Monogram Garden Flag Sewing Tutorial Silhouette Heat Transfer Project Serenity Now blogMonogram Garden Flag by Serenity Now


Garden-FlagMonogram Garden Flag from Placemat


 Black & White Monogram Burlap FlagMonogram Burlap Garden Flag at Tatertots & Jello


Burlap Monogram Flag Monogram Garden Flag by Unoriginal Mom


Welcome Baby J Whale FlagBaby Shower Flag by Sew Woodsy


Make a Summer Garden Flag from a Dollar Store Placemat | Pretty Handy GirlSummer Garden Flag from Placemat


Patriotic-Garden-FlagPatriotic Garden Flag by Ella Claire Inspired


Garden-Flag-from-PlacematGarden Flag from Placemat by Random Thoughts of a Super Mom


Fall Garden Flag from Placemat


Snowman-Flag-from-PlacematSnowman Flag from Placemat

Are your creative juices flowing now? Which flag is your favorite?

Thanks for letting me spend some time with you today. I hope a garden flag is on your to-do list now.


Pin for later!

DIY Garden Flags for Every Season | Pretty Handy Girl