31 Days of Handy Home Fixes | Pretty Handy Girl

Curtain rods, towel bars, and other wall mounted accessories are relatively easy to hang. The trick is securing them to a stud so they can hold up to the abuse. But, how often have you found that you don’t have a stud where you want it mounted? Probably 98% of the time, right? That’s where it is important to use good wall anchors (specifically for your type walls.) Today I’m talking about drywall anchors.

Day 15: Use Good Wall Anchors

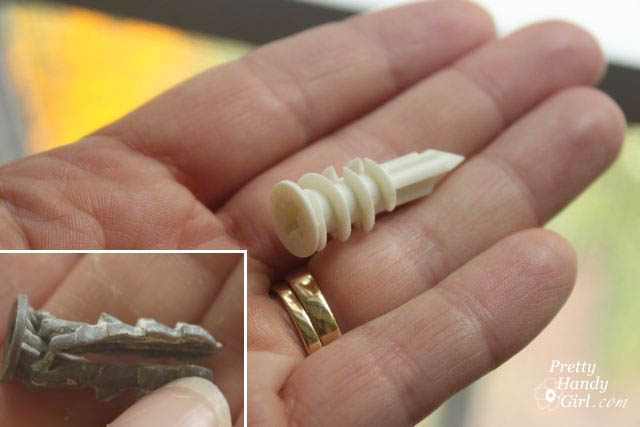
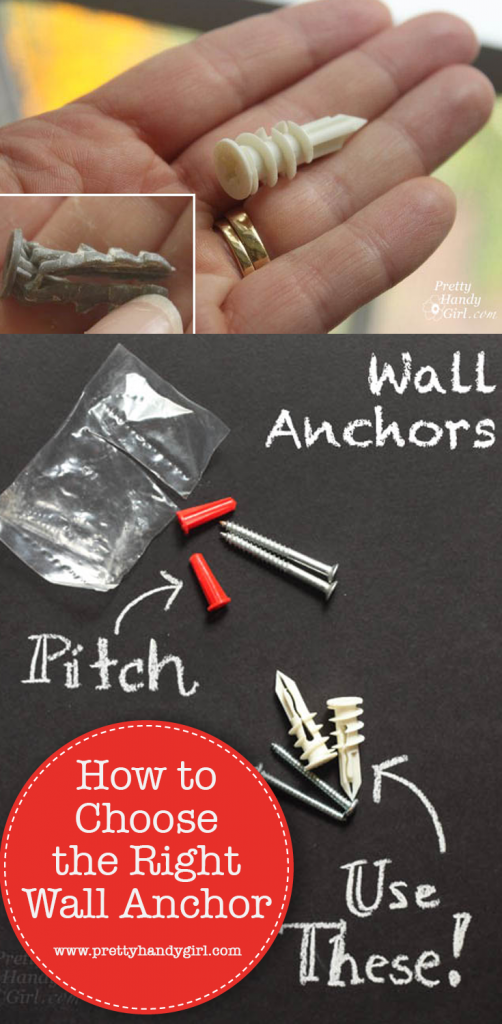
You are probably thinking, “Okay, no problem. The towel bar I bought came with wall anchors. I’ll just use those.” And that would be a mistake!

use_better_anchors

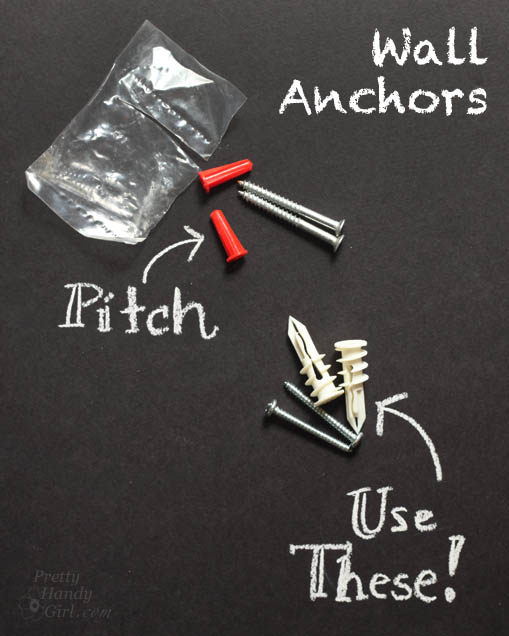
Why? Because those freebie wall anchors get mangled and they won’t hold up to regular use. DO NOT USE those El Cheapo wall anchors that come with your curtain rods, shelves, towel bars, toilet paper holders, etc. In fact, don’t even save them if you don’t use them. PITCH ‘EM…NOW… JUST DO IT!

I am a big fan of the TOGGLER wall anchors because they are easy to drill into drywall and you can remove them fairly easily with a phillips head screwdriver. There are several other brands and types of wall anchors that will work just as well. When purchasing wall anchors, pay attention to the weight limit and wall types they are designed for.

Now, pin this post because friends don’t let friends use el Cheapo Wall anchors!

Good & Bad Wall Anchors | Pretty Handy Girl

PHGFancySign

Pin for later!

how to choose the right wall anchor

I’m participating in Nester’s 31 Days Challenge. Check out all the other bloggers who are participating!

31 Day Writing Challenge

Don’t miss a single tip! Sign up to get all the tips in your email:


Sign Up for Email Subscription


Other tips in the 31 Days of Handy Home Fixes series:


Adding Foam Weatherstripping | Pretty Handy Girl

31 Days of Handy Home Fixes | Pretty Handy Girl

Welcome to Day 5 of my 31 Days of Handy Home Fixes. Winter is fast approaching and now is a good time to assess your doors and windows. Do you feel a draft by your window when the wind kicks up outside? Can you see daylight seeping through your door?

Adding Foam Weatherstripping | Pretty Handy Girl

If you answered yes to either of those questions, you are throwing away money on heating and cooling your home. Today I’ll show you a super quick fix to make your home more energy efficient and weather tight.

Day 5. Add Weatherstripping to Doors and Windows

The photo above is a picture of the gap between our front doors. We were losing heat and letting the cold air inside through this gap. The solution is as simple as buying a roll of foam weatherstripping.

Adding Foam Weatherstripping | Pretty Handy Girl

Peel off a section of weatherstripping. Press it onto the door jamb. Peel off the protective paper. Test your door by closing it and look again for light.

Adding Foam Weatherstripping | Pretty Handy Girl

No drafts will be sneaking in here! You can also use the same weatherstripping on the bottom of your old windows.

PHGFancySign

Benjamin Moore Yellow Highlighter Painted Interior Doors | Pretty Handy Girl

Benjamin Moore Yellow Highlighter Painted Interior Doors | Pretty Handy Girl

I painted my interior front doors Benjamin Moore’s Yellow Highlighter. It’s my way to start my day off on the right foot. When I get up in the morning and head downstairs, I see my front doors and immediately Good Day Sunshine starts to play in my head!

Let me tell you how this happened. Remember when I was in the middle of the DIY project from HELL?! I tried to paint our front doors on the outside and the paint was peeling off. I wanted to curl up in a ball and cry. I wanted to run down the street screaming. Instead, what did I do? I decided to create a cheerful view when I go downstairs every morning. I put stripping the outside of the doors on hold for a day or two and focused my efforts inside.

Benjamin Moore Yellow Highlighter Painted Interior Doors | Pretty Handy Girl

The solid wood doors are original to our house and had cracks in them.

Benjamin Moore Yellow Highlighter Painted Interior Doors | Pretty Handy Girl

Instead of replacing the doors, I fixed them by scraping the edges until they were smooth and devoid of bumps. Read more

How to Trim Closet Doors with Dremel UltraSaw | Pretty Handy Girl

How to Trim Closet Doors with Dremel UltraSaw | Pretty Handy Girl

I have a friend named Holly. She and I live in the same neighborhood and we help each other out with DIY projects. Last week she asked me to help her come up with a solution to hide her dirty laundry.

How to Trim Closet Doors with Dremel UltraSaw | Pretty Handy Girl

Holly and I were trying to figure out how to replace her sad laundry room door(s). The right side door had broken off and was unusable. We floated several ideas, originally thinking about creating inexpensive sliding barn doors. But, we scaled back that idea after realizing that inexpensive pipe hardware (spanning over 8 feet) was still too expensive for the budget. We began discussing buying cheap bi-fold doors and dressing them up. However, even new bi-folds aren’t super cheap. I mentioned she “might” have luck going to the Habitat ReStore to find the exact size doors. We both knew that was a slim chance. Then an idea hit me like a bi-fold door falling off its hinges! Among the multitude of things I have stored in my attic, were two sets of closet doors! One that used to be on my son’s reading nook closet. And the second set used to be on the pantry.

Would it be fitting that the only before pictures I have of the pantry doors are these gems?

How to Trim Closet Doors with Dremel UltraSaw | Pretty Handy Girl
The Streaker

How to Trim Closet Doors with Dremel UltraSaw | Pretty Handy Girl
The Goofball

You get the picture. They are ordinary bi-fold doors. After the doors were removed from our pantry I liked how open it was. Although sometimes I wonder if I am just too lazy to open and shut the doors every time I want food.

How to Trim Closet Doors with Dremel UltraSaw | Pretty Handy Girl

Regardless, I liked the open concept, but not necessarily our food being constantly ON DISPLAY. I have plans to add built-in cabinets and shelving to the pantry, similar to what my friends The DIY Village created, but for now we just have it open.

I ran home to dig through the attic and find the two sets of doors that might work for Holly. I held my breath (partly because the attic was stifling hot) as I measured the doors. My son’s closet doors were…too narrow. Whomp wah. The pantry doors were… a perfect width!!! But, they were 2″ too tall. No worries, I knew I could trim them down.

Here’s how to remove (and install) closet doors and cut them down to size using a Dremel Ultra-Saw:

Read more

How to Tile a Small Table Top

How to Tile a Small Table Top

Hello and happy summer pretty handy readers. It’s Jessica from Decor Adventures. With the weather getting warmer, I’m completing lots of outdoor projects these days. One DIY adventure I’ve never actually tackled is tiling, but I’ve always wanted to. Today I’m going to show you how to tile a small table top. It’s easier than you think and is perfect for the outdoors too.

Tile a Small Table Top Materials:

How to Tile a Small Table Top

  • Small table
  • Tile adhesive (also called mortar or thinset)
  • Tile (enough to cover the top of the table)
  • Notched trowel
  • Rubber float
  • Grout
  • Grout sponge
  • Tile cutters
  • A bucket
  • Paint for the table (optional)
  • Water
  • Plastic gloves
  • Eye protection


Tile a Small Table Top Instructions

First, prepare your table. The small table I’m using was the one we used for my pet parrot when I was little! His name was Woodstock, and no he didn’t talk. I guess my mom taught me and my sister to talk instead :-). The table had sentimental value, so I knew I wanted to create something special with it.

Read more