After demolition, I realized several water leaks left some low spots in the kitchen floor at Millie’s Remodel. Today I’m going show you how to use self-leveler to fix a sagging floor. I’ll also show you a few tools you’ll find helpful when pouring self leveler.
Tips & Tricks to Self-Level a Floor at Millie’s Remodel
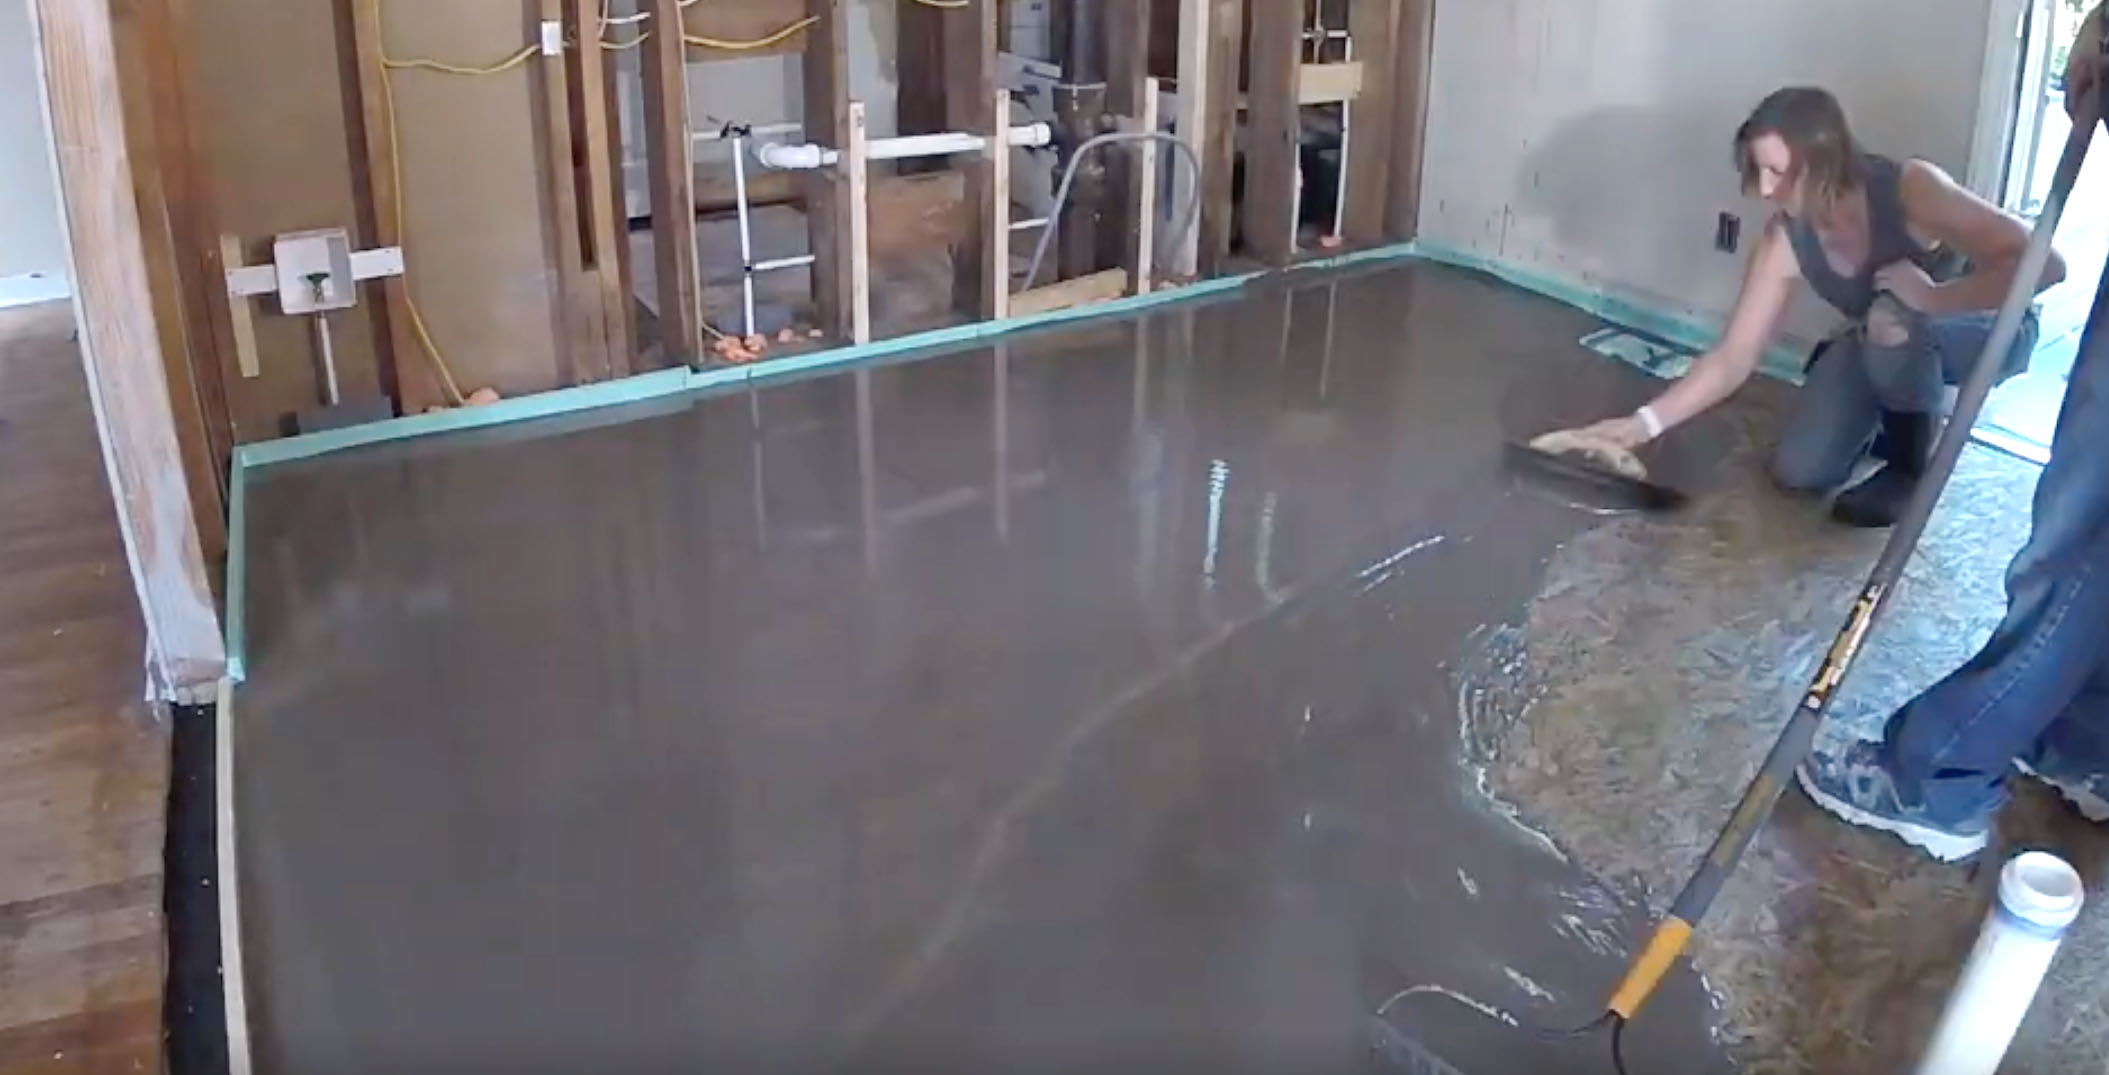
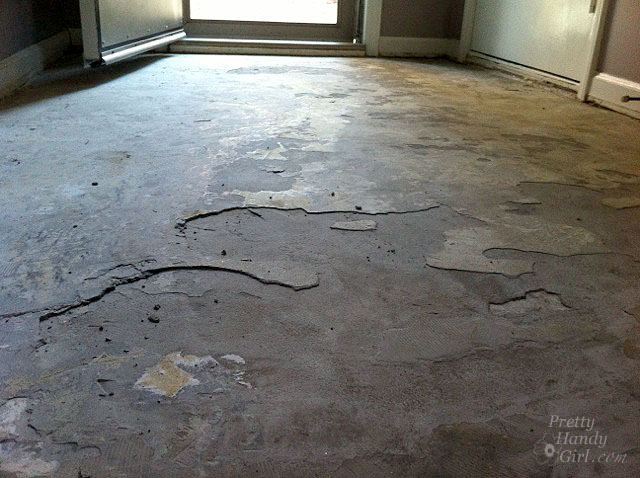
Can I level with you? LOL. Seriously, when I bought the Millie’s remodel house I knew there were some plumbing leaks. But, I had no idea how much damage the water had done to the floor in the kitchen. I discovered a pretty decent hump in the middle of the room with low spots on either side. To combat the hump my assistant, Stephanie, and I secured cedar shakes to the floor in one of the low spots. Then we laid 1/2″ OSB plywood on top. This helped a little bit with the bow, but we still had some issues.
One corner of the room was 3/4 of an inch lower than the other corner. Plus you could still detect the hump. I decided the best way to deal with the dips, hump, and creating a flat surface to tile onto was to pour a self-leveling concrete in the kitchen.
Prepping the Room for Self-Leveling Concrete Pour
Before pouring self-leveler, you should understand the properties of this mix. When you first mix the product, it’s very liquid and will flow to the lowest spot in your floor. It’s important to seal any cracks or gaps in the floor or your mix will seep through the cracks. You also need to cover any vents or you’ll watch all the mix pour into your ducts (no bueno!)
I like to use rigid foam insulation to prep the perimeter of the room. This creates a form and keeps the liquid from flowing outside the room. I use a sharp utility knife to cut strips from a big 4×8 sheet of rigid foam insulation. I found it easiest to use my trim nailer to nail the pieces to the perimeter of the room. Then I sealed the joint where the insulation and subfloor meet with a line of caulk. If you’ve never mastered spreading caulk quickly and cleanly, you’ll want to see my tutorial for using a caulk gun.
Now that the prep work is done, you’ll need to gather a few tools for this project.
(I’ve included affiliate links for your convenience. I earn a small percentage from a purchase using these links. There is no additional cost to you. You can read more about affiliate links here.)
Before pouring the self-leveling concrete, read the directions on the bag. Most leveling mixes specify you apply one coat of primer to a clean floor and let it dry before pouring the self leveler.
Tips for Spreading Self-Leveler:
Watch this video to see how we quickly and efficiently spread the self-leveling concrete mix:
Can you believe how helpful a simple garden rake is for spreading self-leveler? Me either!
After pouring your self-leveler, use a long level to check to see if you need to pour in more areas. Finally, use the concrete float to smooth and feather the edges of the self-leveling material into the floor.
Stay off your concrete pour until it has hardened. Make sure you clean any self-leveler off your tools, boots, or areas you don’t want it to harden onto.
After the self-leveling concrete has hardened, you are ready to tile or install your flooring!
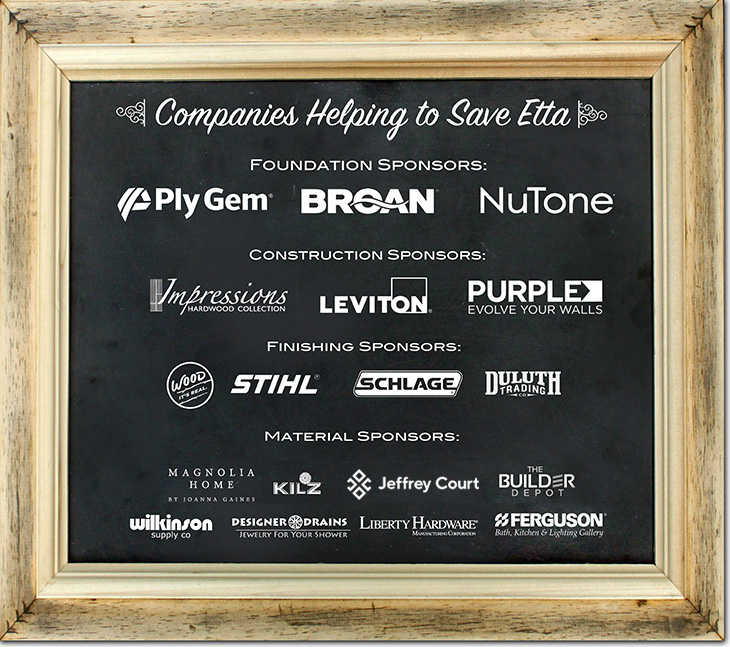
A special thank you to the Millie’s Remodel Sponsors:
The Millie’s Remodel project sponsors have donated materials for the Millie’s Remodel project. As you know I am very particular about the brands I work with and recommend. As a general contractor, I choose the products used on my projects wisely to make sure they last a lifetime. Therefore, I have no reservations putting my name behind each and every one of these sponsors.
https://prettyhandygirl.com/wp-content/uploads/2020/02/phg-leveling-kitchen-floor-millies-remodel.jpg10752109Brittany Baileyhttps://prettyhandygirl.com/wp-content/uploads/2021/07/PHG-logo-tagline-2020-1030x211-R.jpgBrittany Bailey2020-02-21 10:00:002020-07-22 19:06:20Tips & Tricks to Self-Level a Floor at Millie’s Remodel
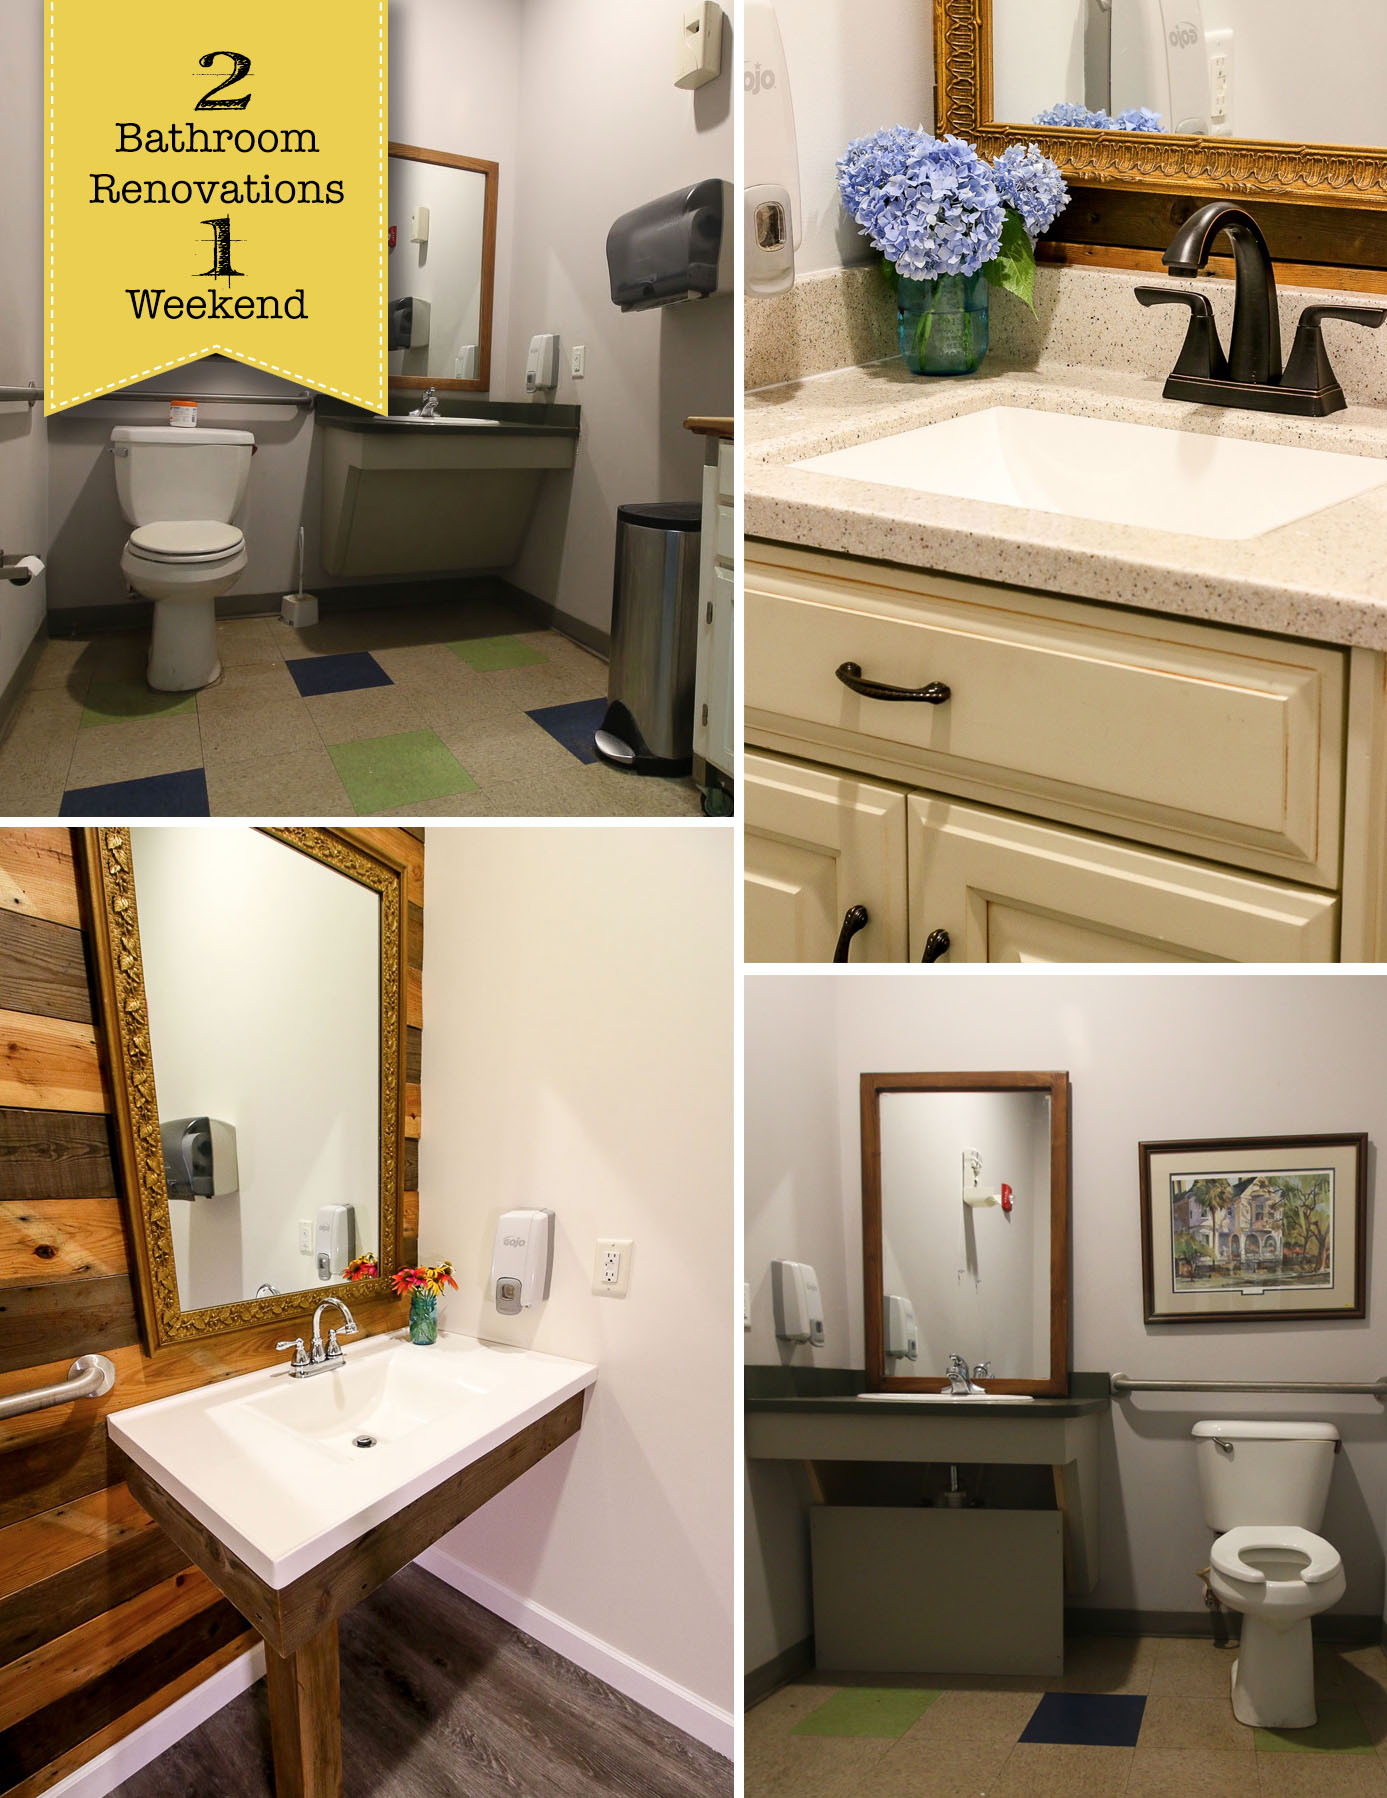
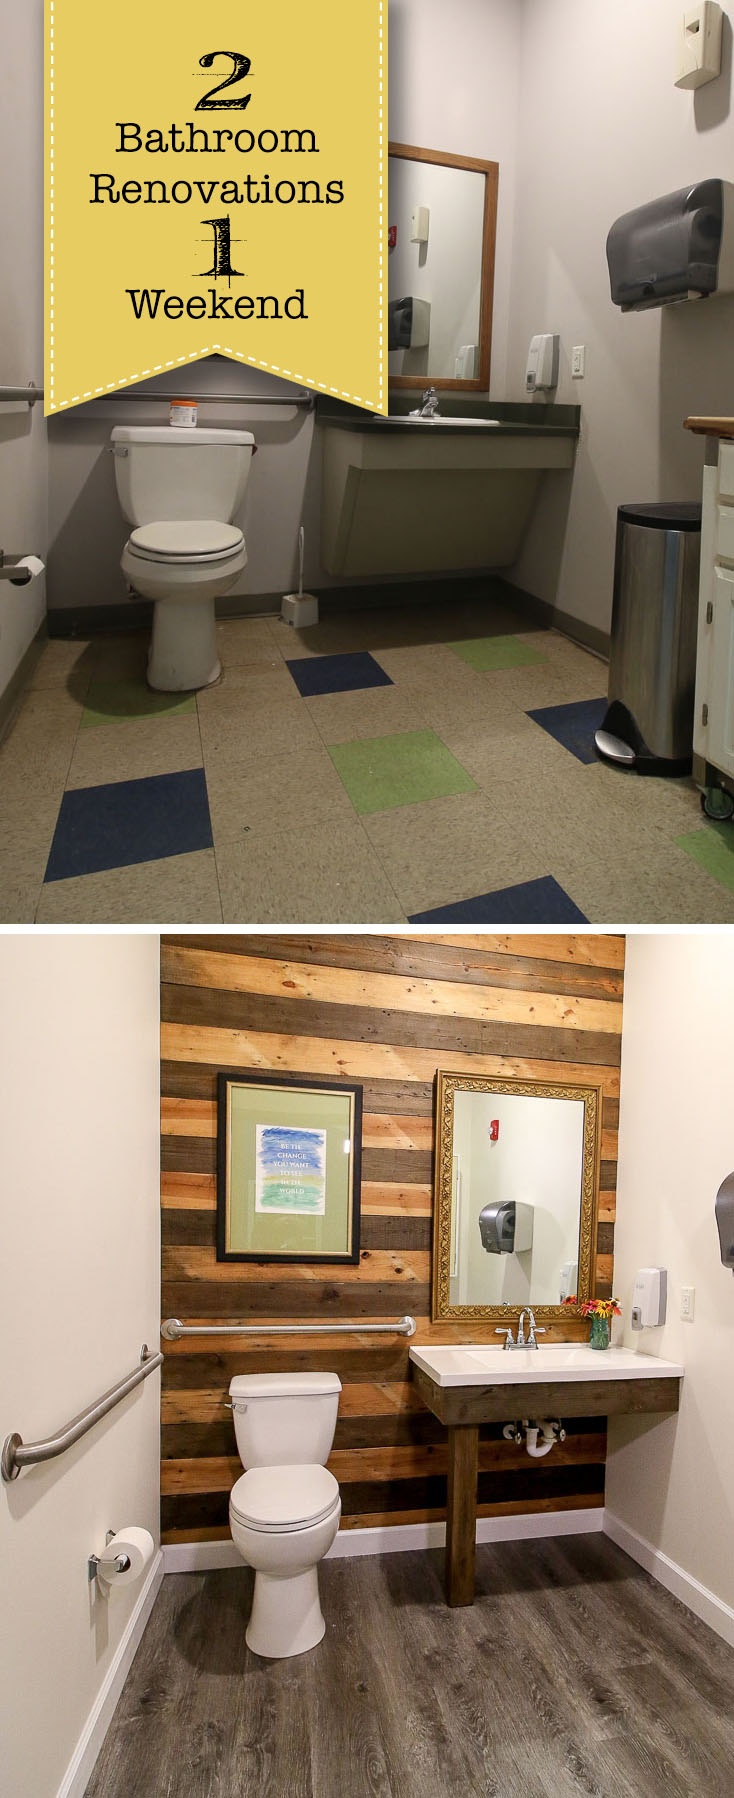
We recently completed Habitat for Humanity Bathroom Renovations in a Weekend.
I don’t usually work for others, but when the executives at my local Habitat for Humanity office asked me to come in and take a look at their dated bathrooms, I said I could. But, I quickly stated I don’t traditionally offer my general contractor services to anyone. Most of you know that Habitat for Humanity is one of my top charities. And for good reason! Our local Habitat for Humanity has built over 600 homes to help address the affordable housing crisis in our area. I would do anything for this organization, but renovating two bathrooms wasn’t a job I’d usually tackle unless it was for one of my own properties.
However, when I saw their sad and dated twin bathrooms, I changed my mind about offering my services. I knew I could improve the bathrooms as a way of thanking the employees for the work they do for our community. I also knew it would be a great way to keep busy before closing on Millie’s Remodel. Between Habitat for Humanity’s calendar and mine, we finally settled on the last weekend before I signed the contract on Millie.
In my head, I thought it would be a quick two day renovation easily accomplished over a weekend. Instead, it turned into a four day marathon working into the evening on two of those days. In an effort to explain my faulty time estimation skills, I submit two facts:
I’m an overly optimistic person. I will always see the glass half full.
I’m not the sharpest math person and forgot to multiply my time by two for two bathrooms.
Oops! Luckily, I got some help from two local friends: Sophie from @TheHipperFam and Stephanie from @UncommonOutpost. Without their help, I might still be working on these bathrooms.
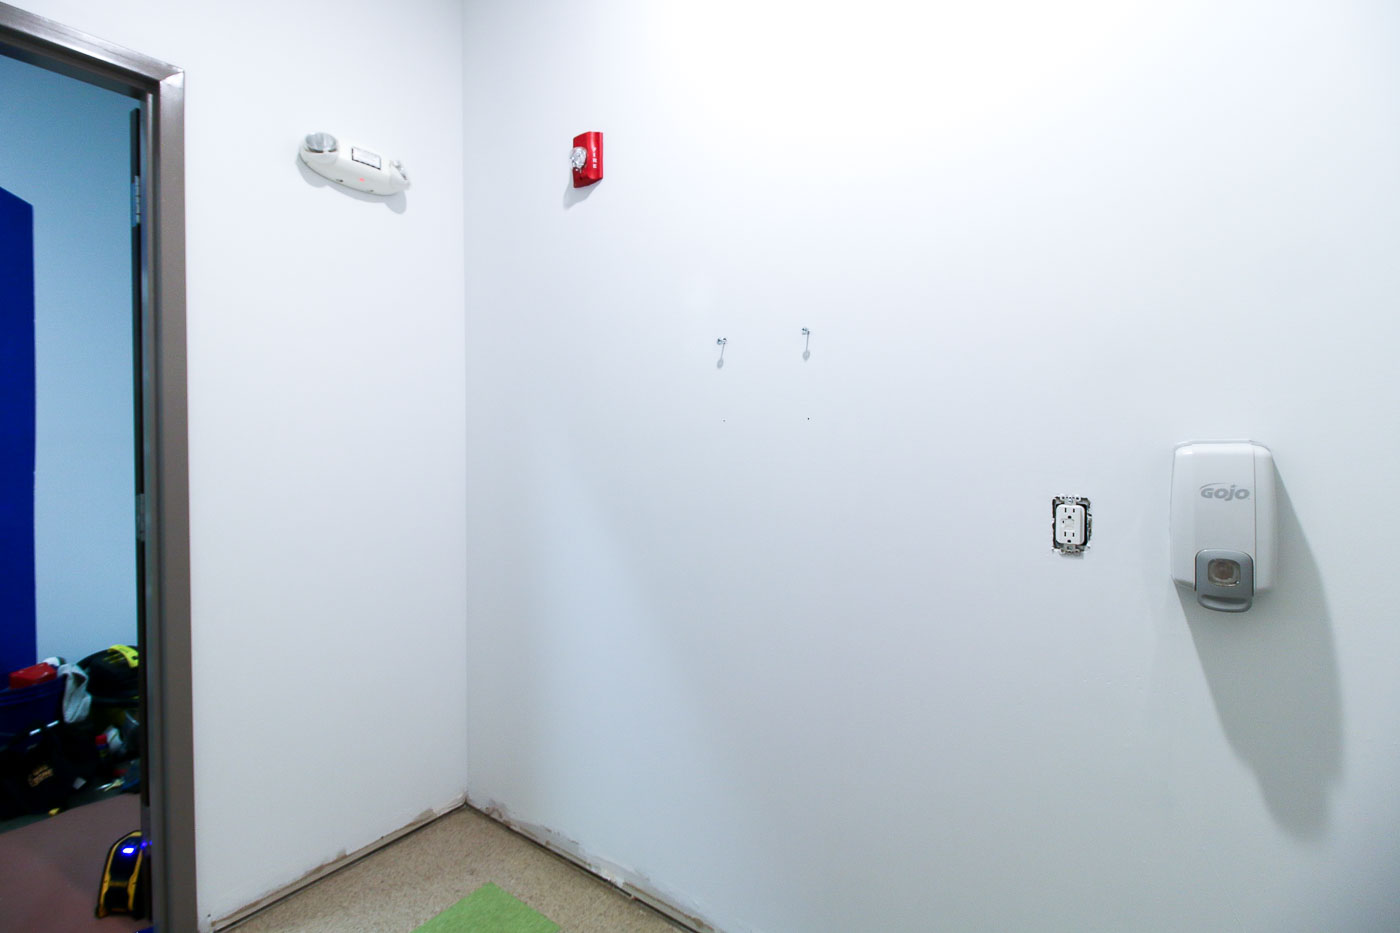
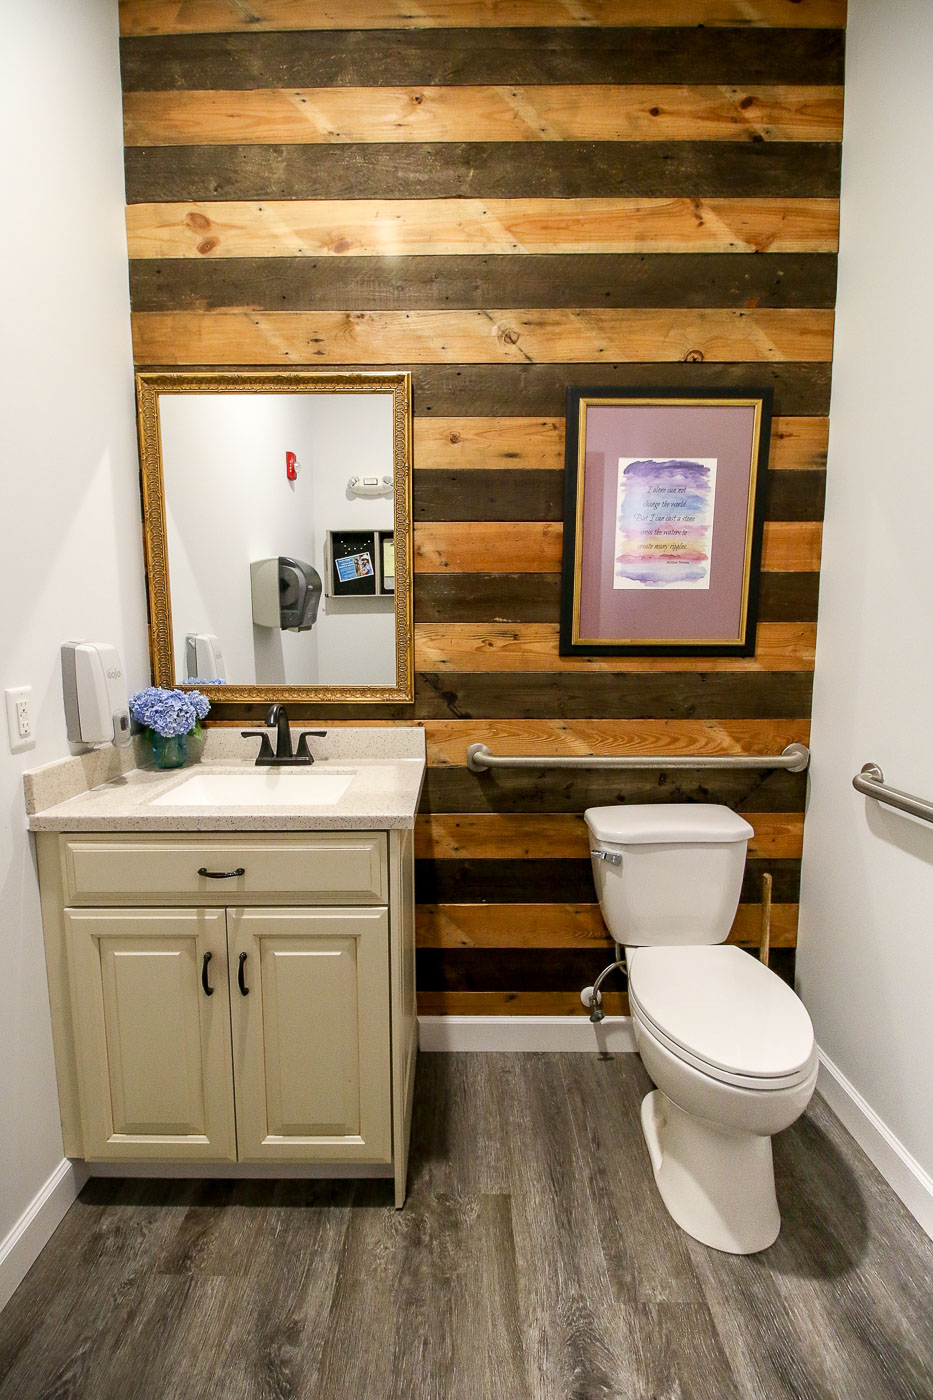
The Before:
Although the pictures look dark, what you can’t see in these photos is the horrible flickering fluorescent light fixtures. The lighting was so dismal, I knew I had to change out the fixtures. Because no matter what updates were made, the lighting would always act as a wet blanket on the new look.
The old vanities were both built for handicap accessibility which left no room for storage under the sinks. Therefore, each bathroom had a ReStore salvaged kitchen cart to make up for the lack of storage. But, the carts were dirty and looked out of place in the bathrooms. I knew I had to come up with a plan to get rid of them.
Speaking of dirty, the walls definitely needed a new coat of paint. The grime and scuffs were everywhere.
The Design:
For the design plans, I challenged myself to work within a small budget and use as many items as possible from the Habitat ReStore. With this in mind, I created a plan in Photoshop and submitted it to Habitat for Humanity for approval.
Luckily they loved the design idea and gave me the go ahead to renovate the bathrooms. But, I kept a few things secret from them. After all, what fun is a makeover project without a little surprise, right?!
The Renovation Plan:
Electrician to replace CFL tube lights with LED Recessed Can Lights
Pretty Handy Girl build storage cabinet and one handicap sink frame
Plumber to Remove Sinks and Toilets
Remove all Fixtures from Bathroom
Remove Flexible Vinyl Baseboards
Clean and Patch Walls
Clean floor with TSP Cleaner
Paint Walls
Lay Waterproof LVT Flooring
Sand and Prep Reclaimed Lumber
Install Reclaimed Wood Wall
Install Vanities
Add Wood Baseboards and Paint
Plumber Replaces Toilets and Installs Faucets
Add Mirrors, Art, and Replace Fixtures
Stand back and admire the renovation results (and snap a few pictures)
Let the Habitat for Humanity Bathroom Renovations Begin:
A few days before I started the renovation, my electrician stopped by the offices to swap out the old fluorescent lights with brighter (and less flickery) recessed LED lights. Immediately the room felt brighter, but it wasn’t as bright as I had hoped. To help lighten the space more, I chose light paint shades for the walls. The colors I selected are from Magnolia Home Paint Line because I loved working with the paint in the Saving Etta house.
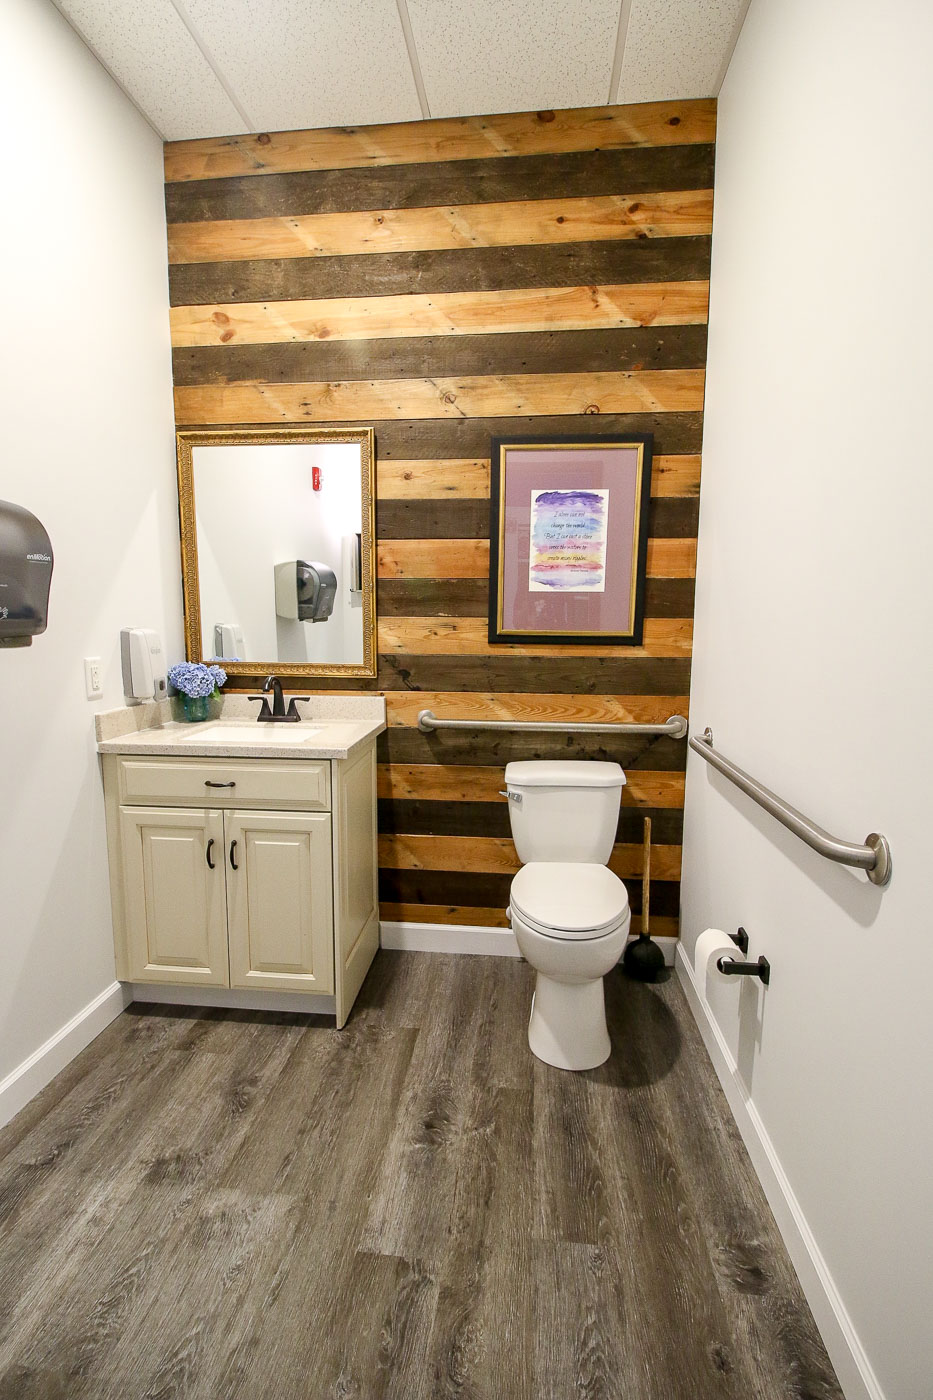
The handicap accessible bathroom was painted Carter Creme. I knew this color would look beautiful with the reclaimed wood wall and add a little warmth to the room.
I would have liked to use the same color in the other bathroom, but the vanity color was already a cream color and I didn’t want to draw attention to the slightly dated vanity color (or accidentally match it). Using Cloudy Gray, a paint color with cool tones, helped tone down the warmth of the vanity and provided some contrast.
Both paint colors were light enough to do wonders for improving the light in the windowless bathrooms.
After painting, Sophie and I worked the afternoon to lay LVT waterproof flooring (also from the ReStore) in one bathroom. The flooring went in very easily, but we did have to slow down to cut around the toilet flange and the doorway.
After Sophie left, I tackled the second bathroom floor, working late into the night. It’s amazing what a difference the new waterproof LVT flooring made in these bathrooms.
On Sunday, Stephanie helped sand and prep reclaimed lumber from the ReStore for installation. We ran out of weathered boards, so had to improvise with a vinegar and steel wool concoction I whipped up the night before. My friend, DIY Pete, has a great tutorial for making this solution here. After the boards were dry, she and I clad the back walls of the bathrooms with the reclaimed lumber.
To achieve the striped look, we alternated the weathered side with the protected side of the wood. These boards were originally subflooring in an old house, so they have lots of character, nail holes, and a beautiful warm color. To protect the boards from water and to keep them from flaking, we coated them with a clear varnish.
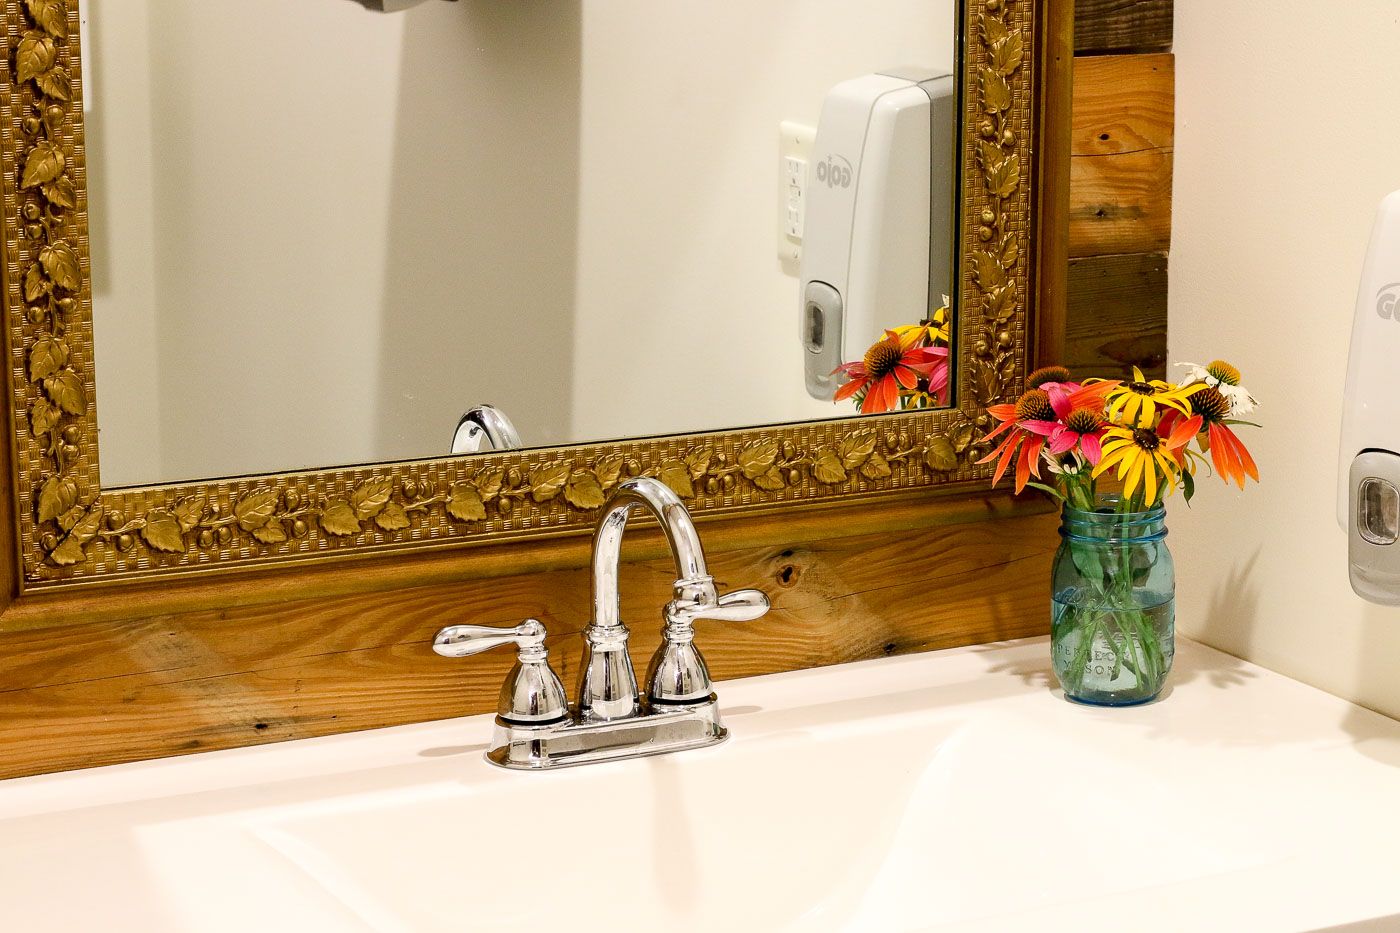
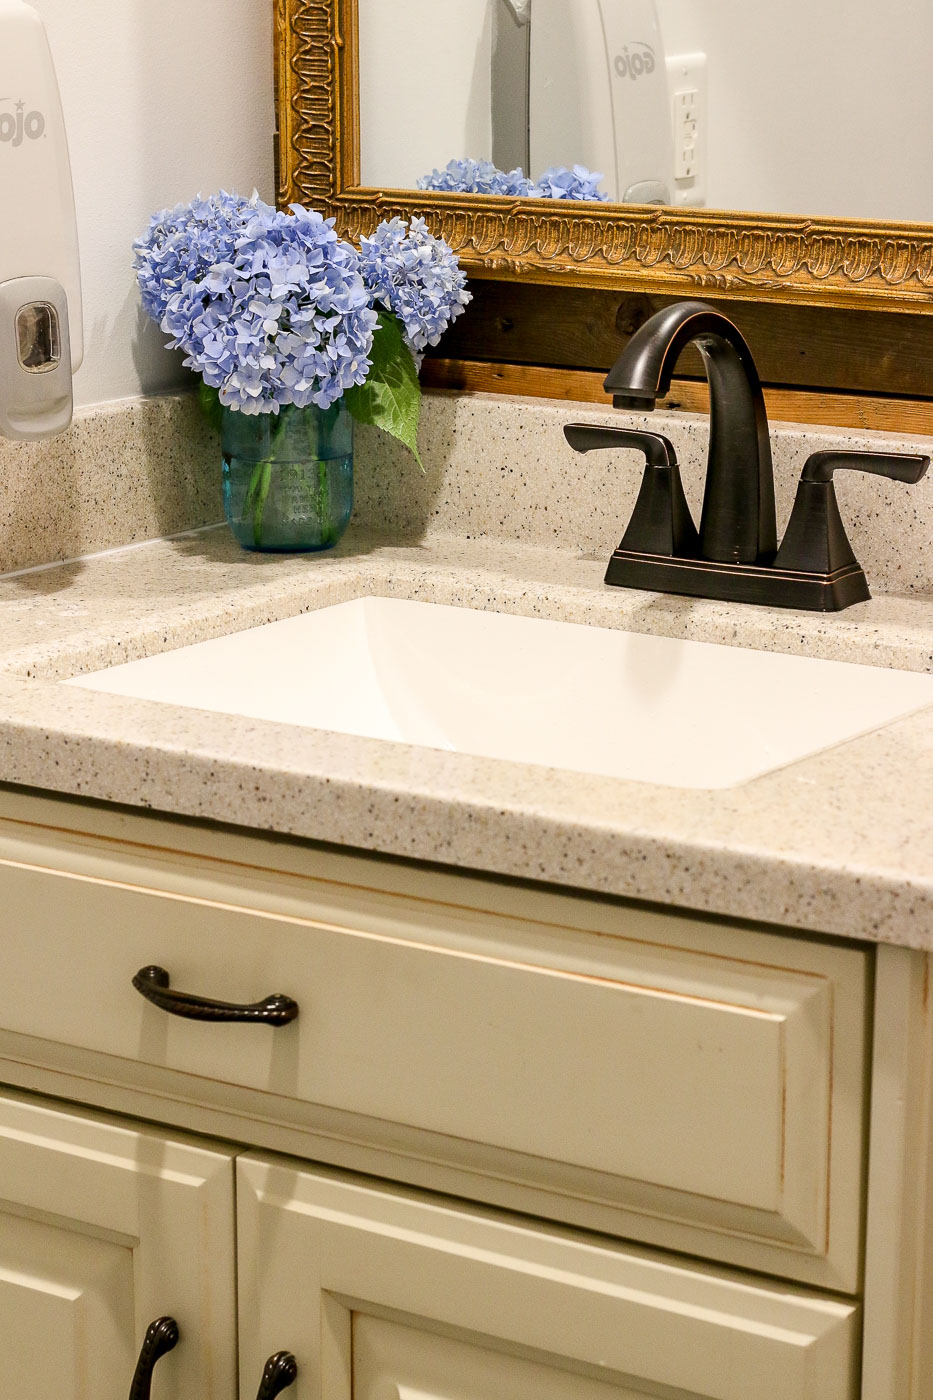
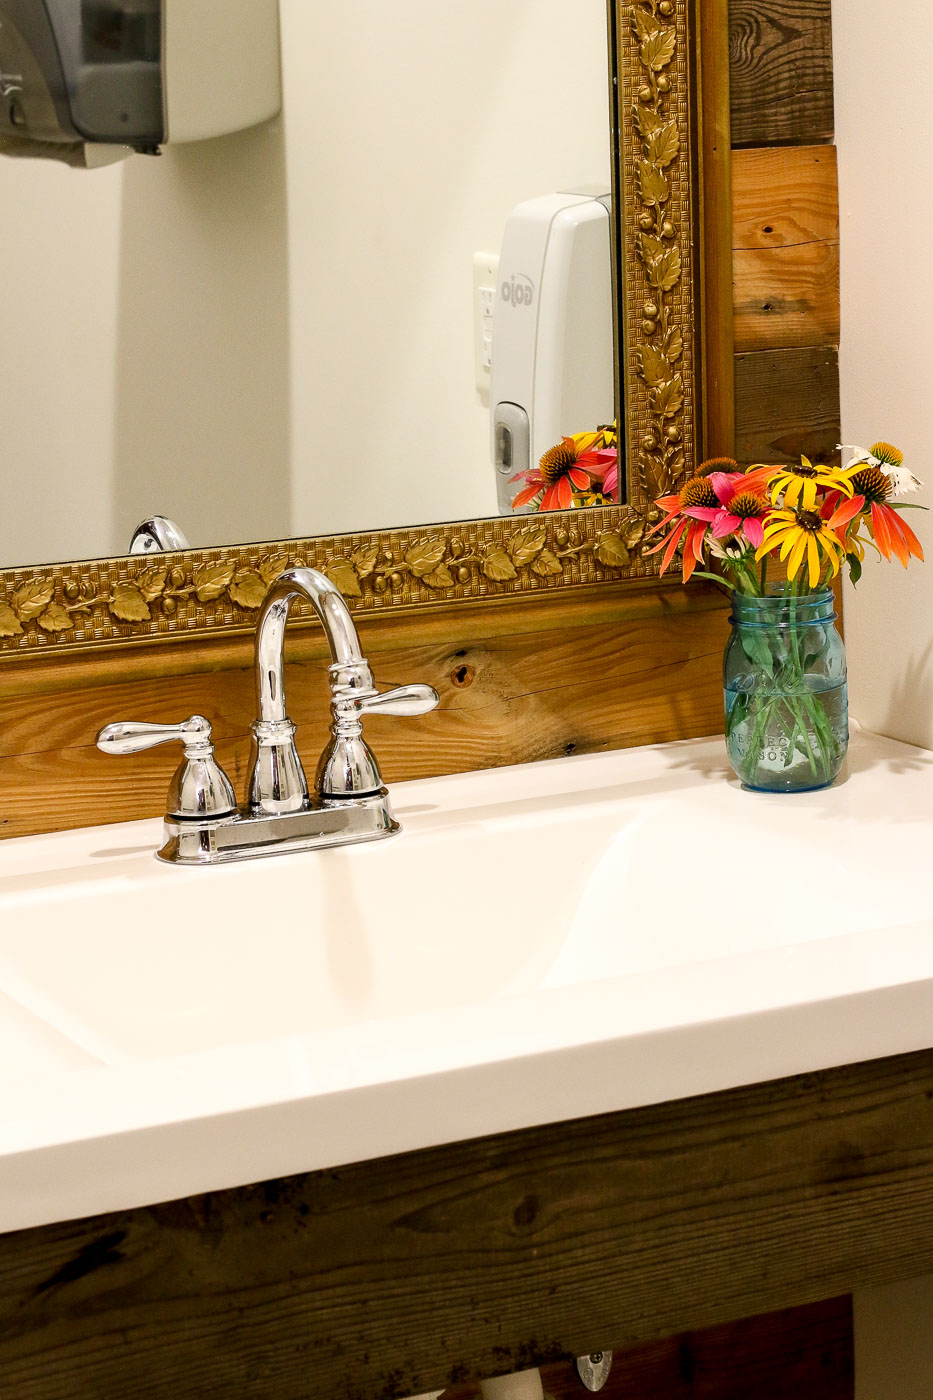
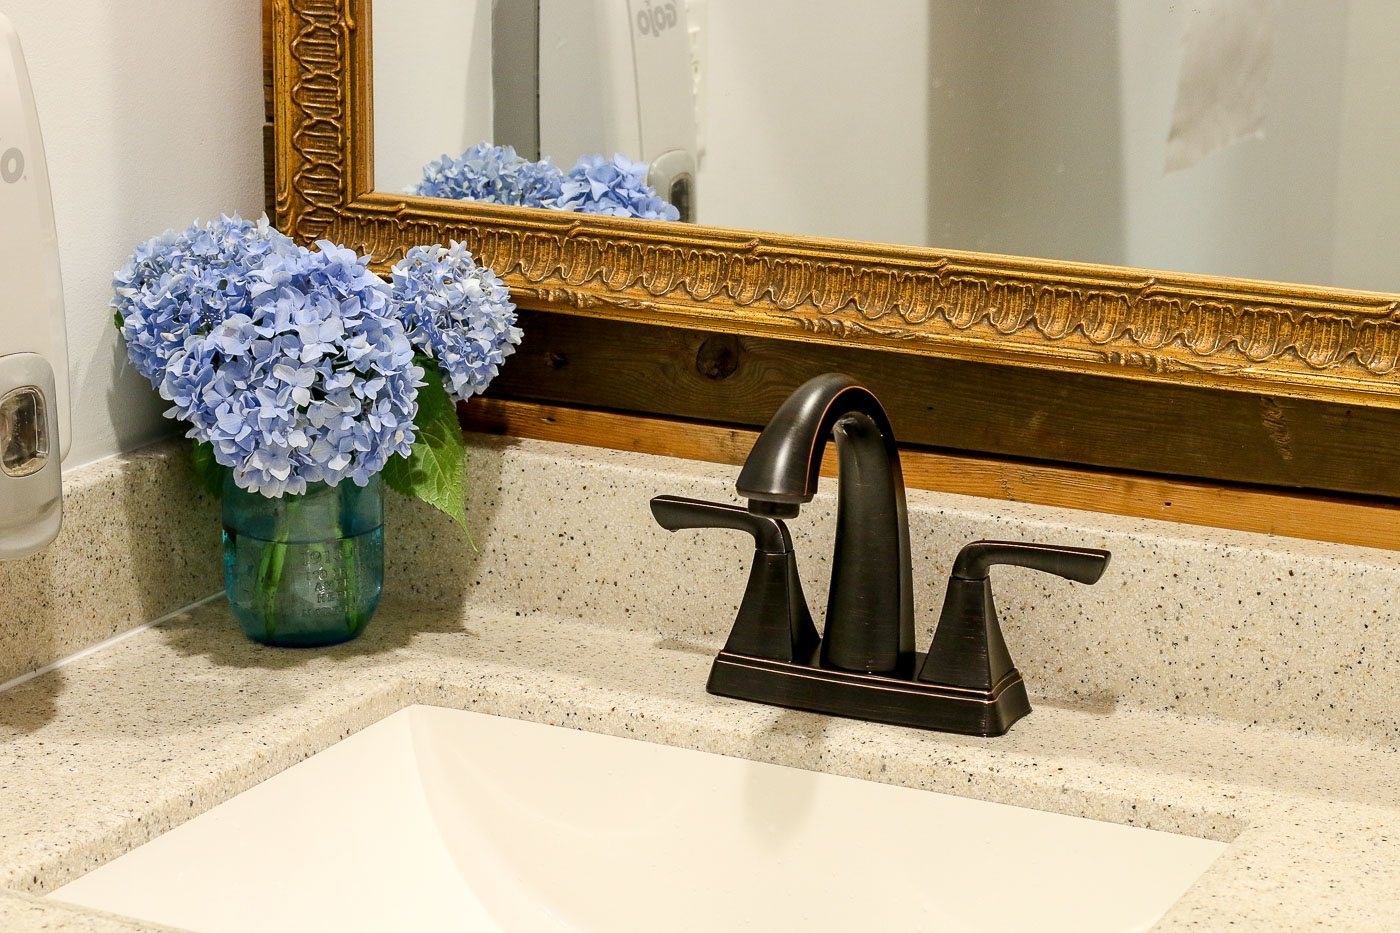
Finally on the afternoon of Day 4, I gave my plumber the go ahead to come back to install the new toilets (courtesy of Wilkinson Supply Co.) and the sink faucets. Stephanie and I worked feverishly ahead of him trying to hang the mirrors and art.
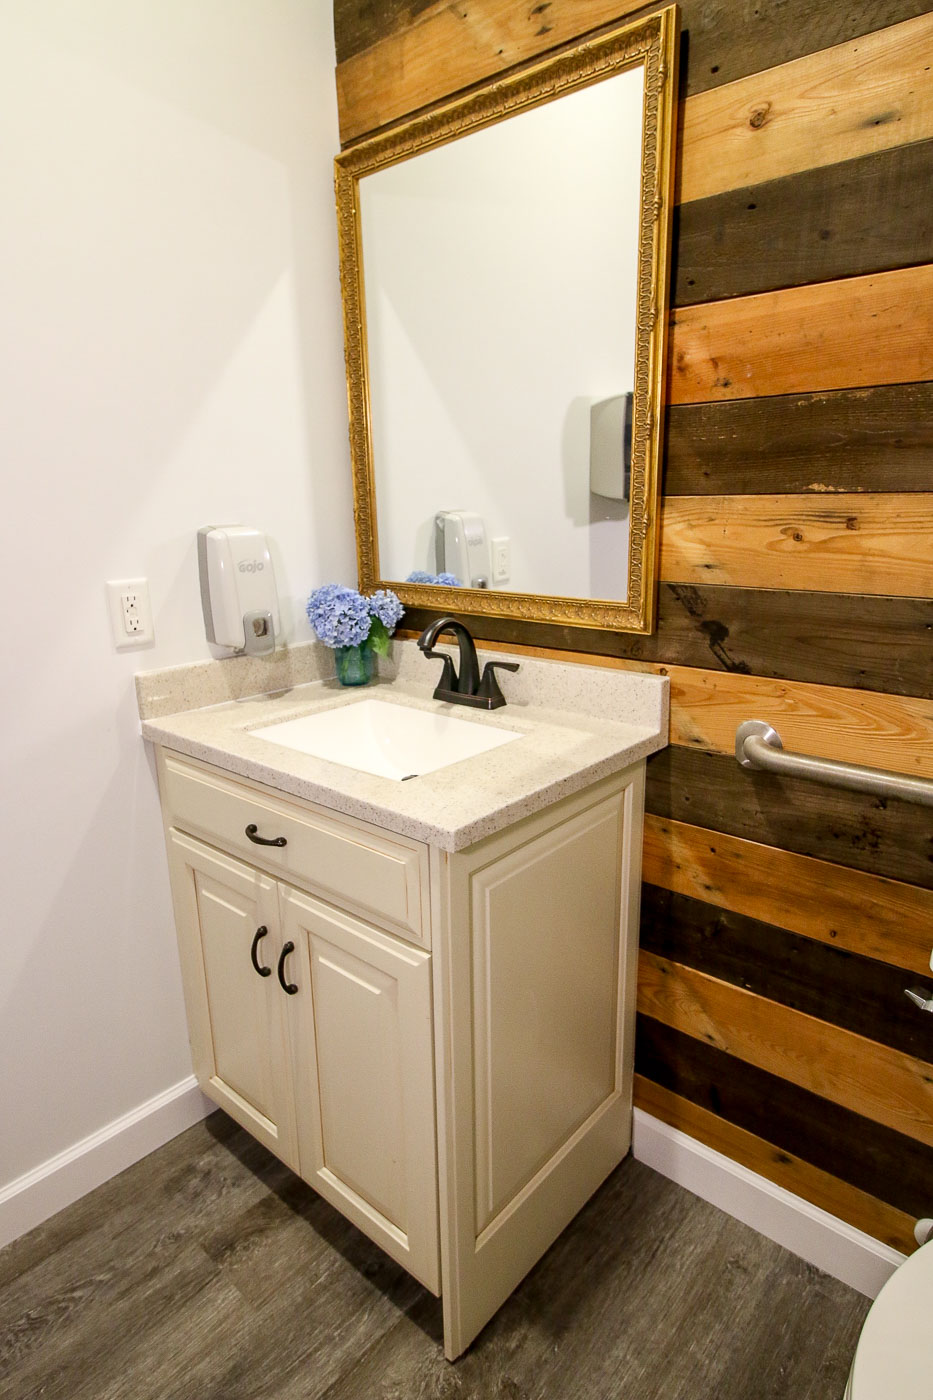
We replaced the dated oak mirrors with pretty gold framed ones. I found the first mirror super cheap at a thrift store.
The other one was a gold art frame from the ReStore. I replaced the picture with mirrored glass and it looks like it was always a mirror!
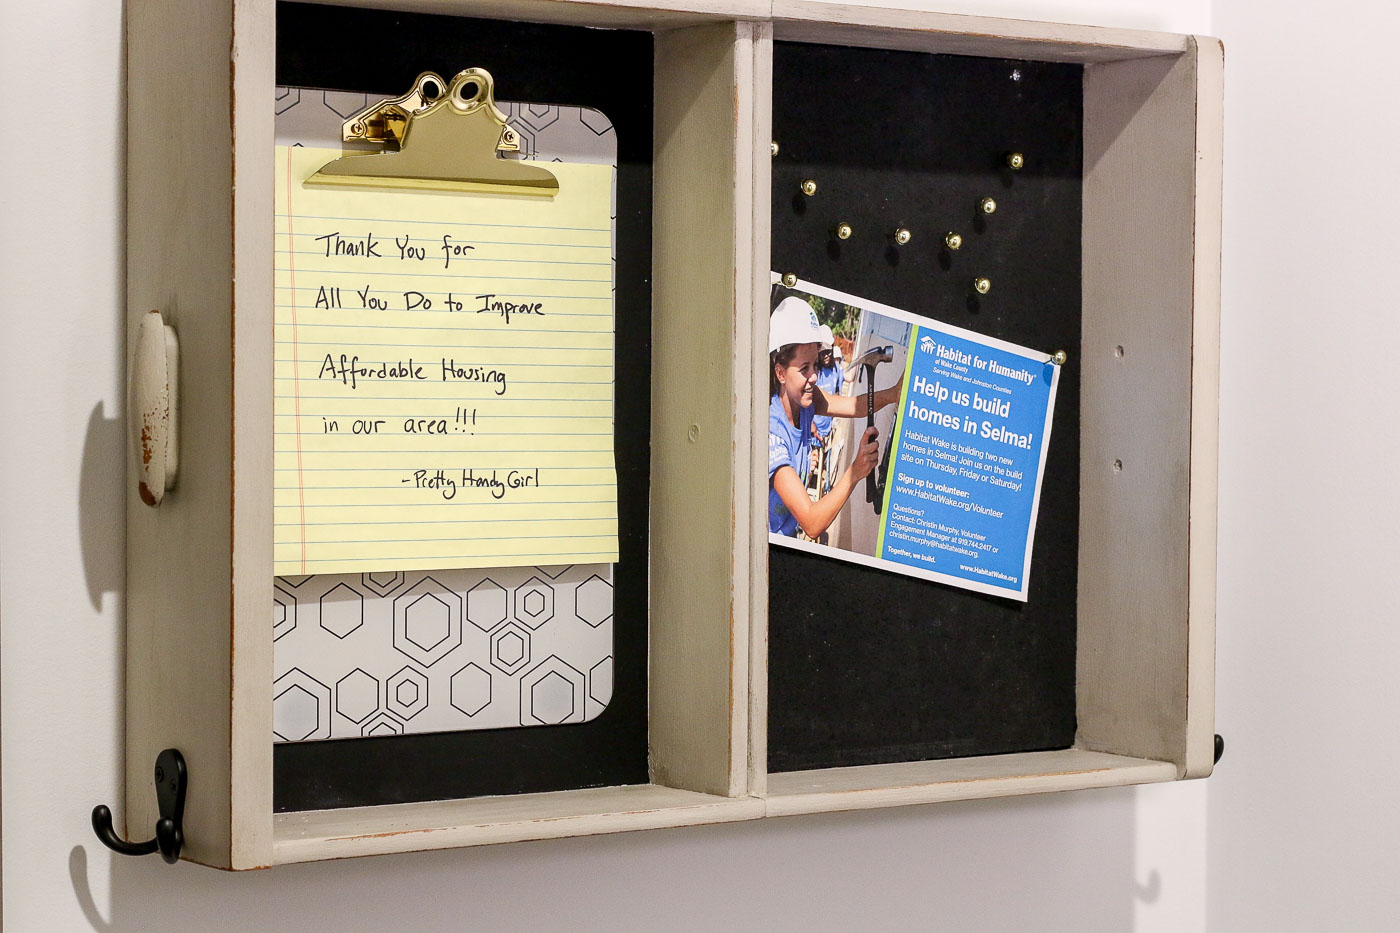
This is a little message area was created by screwing two drawers (salvaged from the ReStore) together and adding cork and a clip board.
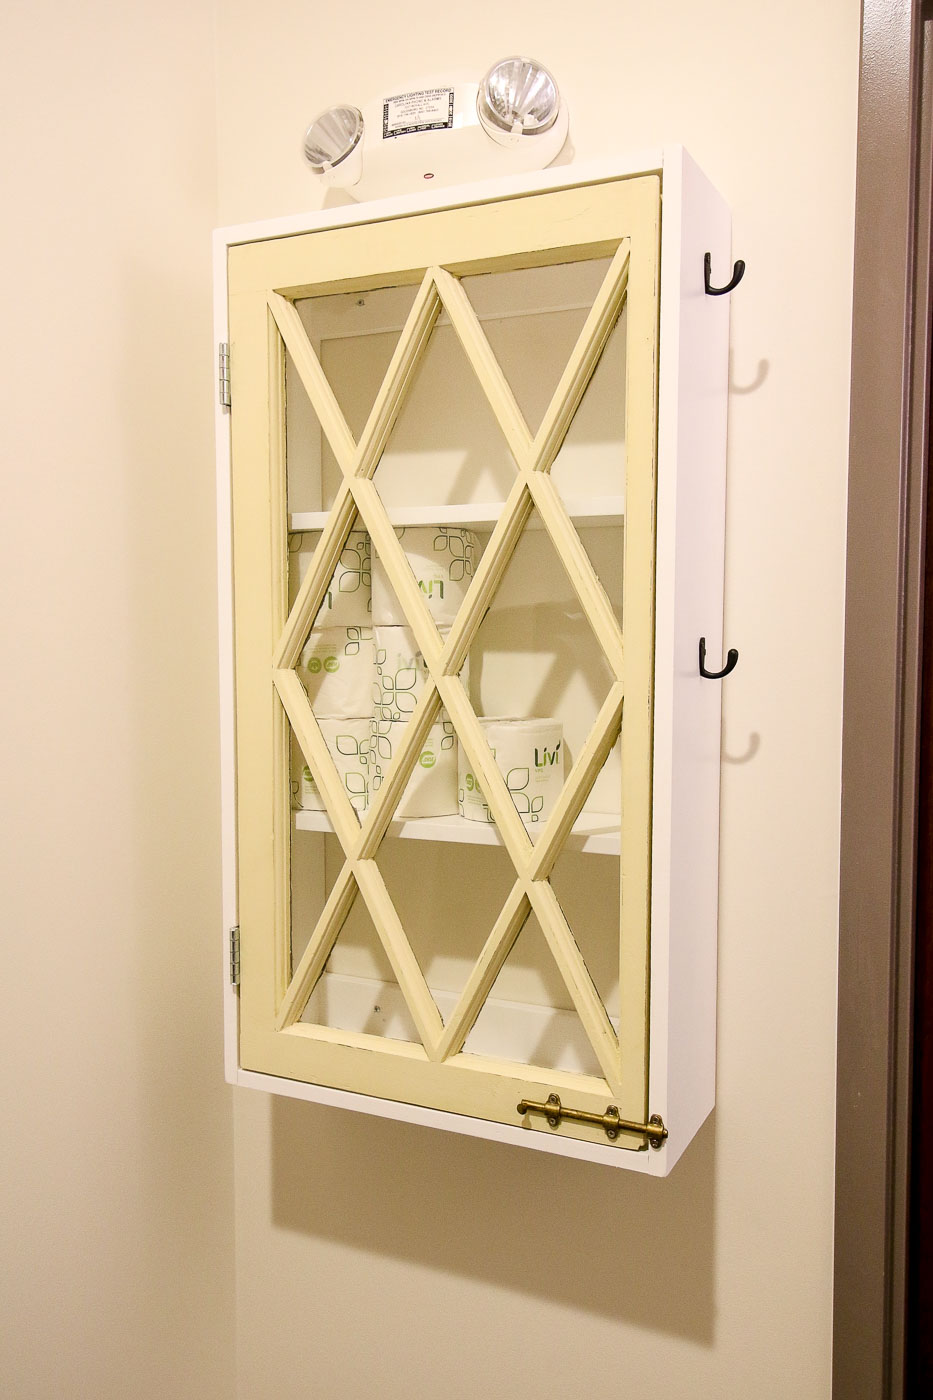
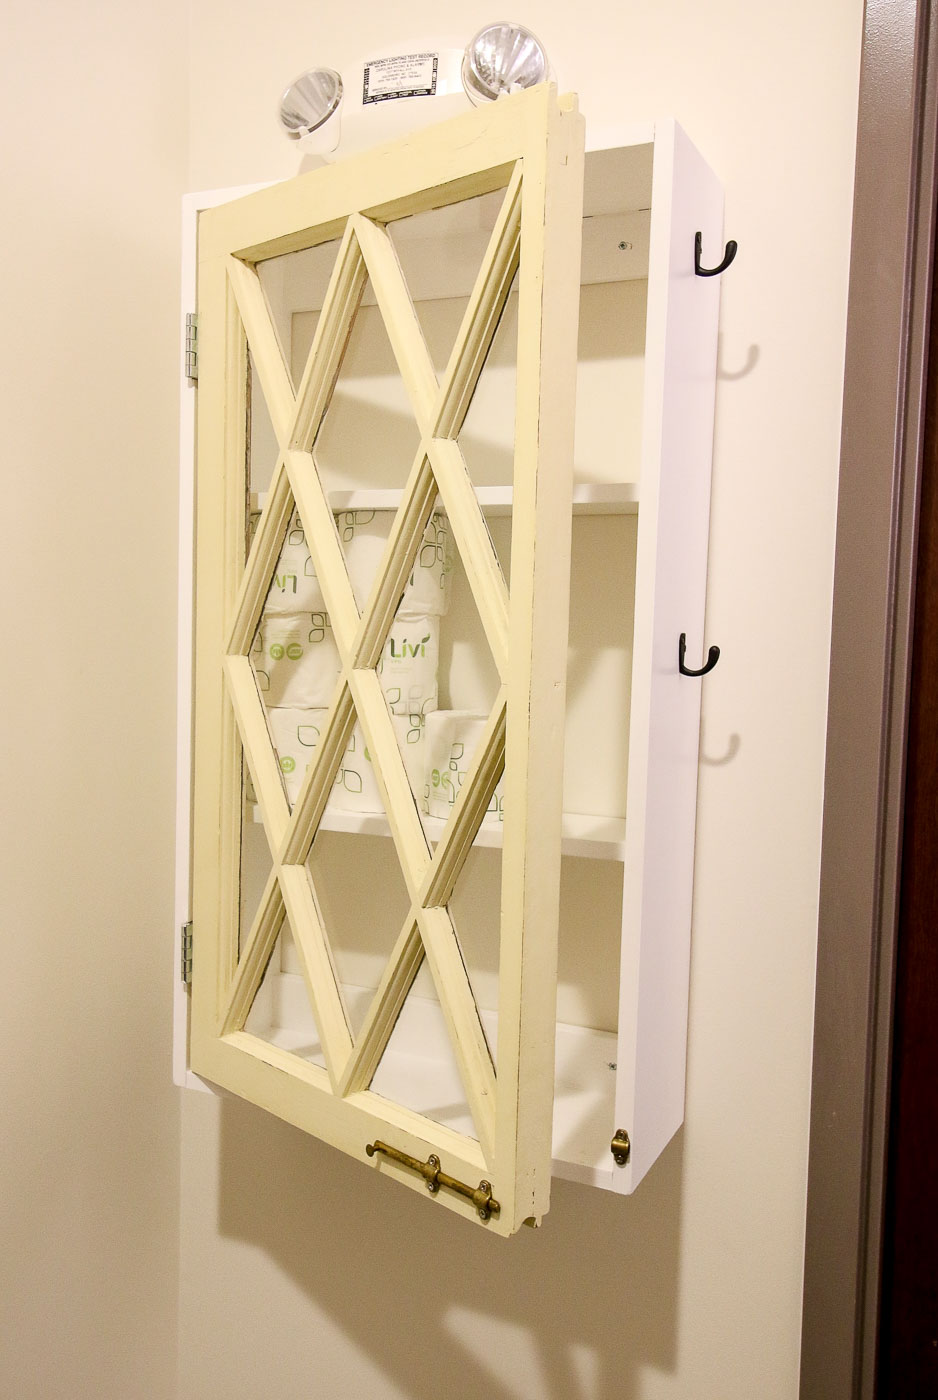
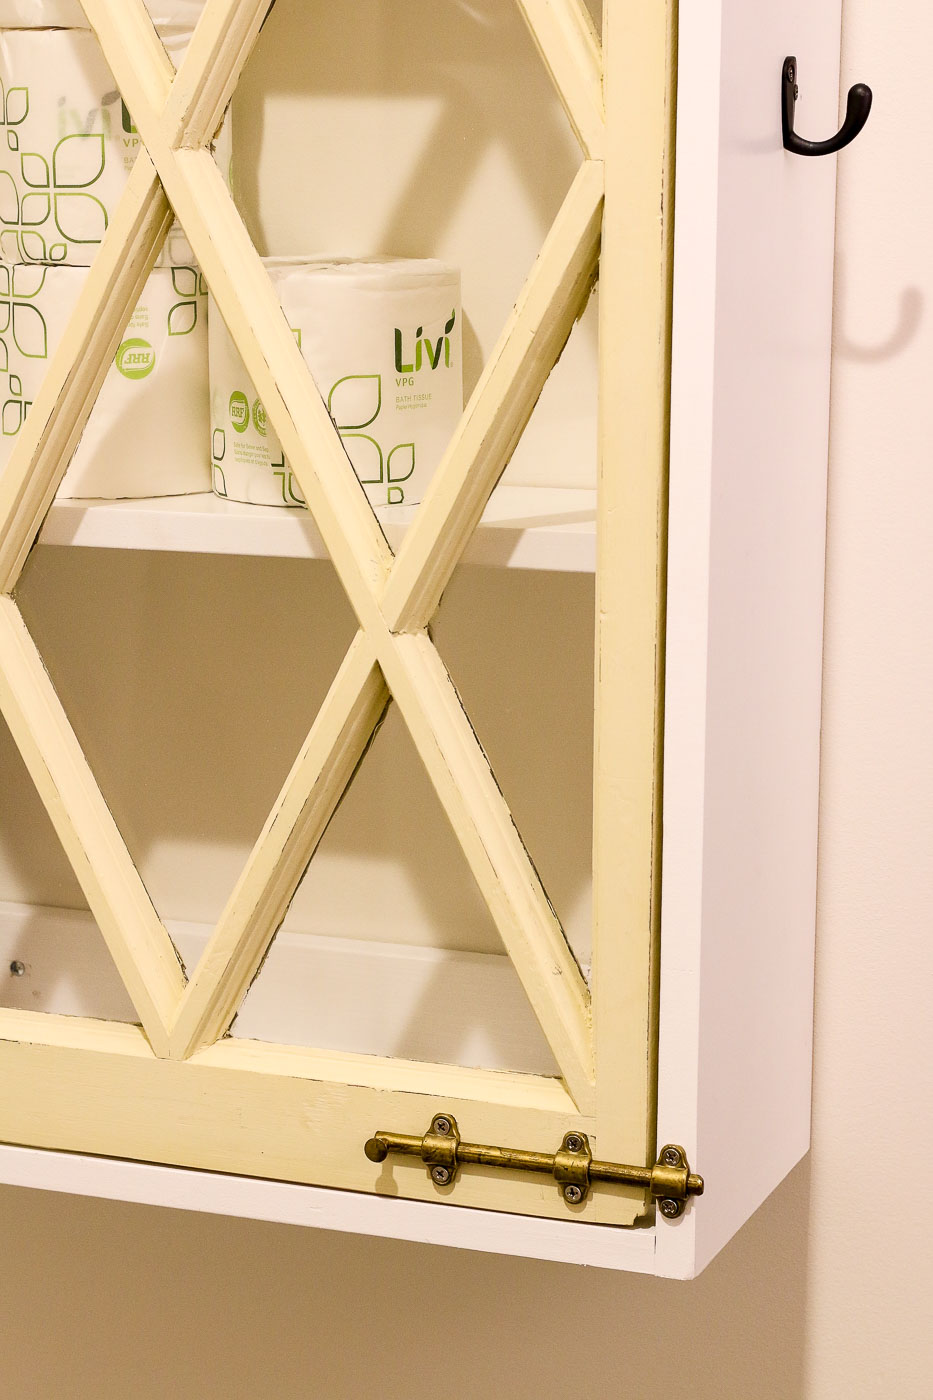
The handicap bathroom needed additional storage since it didn’t have a sink cabinet. To solve the issue, I built this little wall cabinet using an old window from the ReStore.
Then I added a little reclaimed door latch to keep the door closed. Hooks on the side are for hanging up a purse or light jacket.
Two Bathrooms in One Weekend – The Reveal:
Are you ready to see the final results? First here’s a reminder of what the bathroom looked like four days earlier. (The new LED light was already installed by my electrician in this photo.)
And here’s what the same bathroom looks like now!
Originally I thought we could secure the sink base to the studs. But, after discovering the studs were all metal, we decided to add one leg to the front corner of the sink apron for more support.
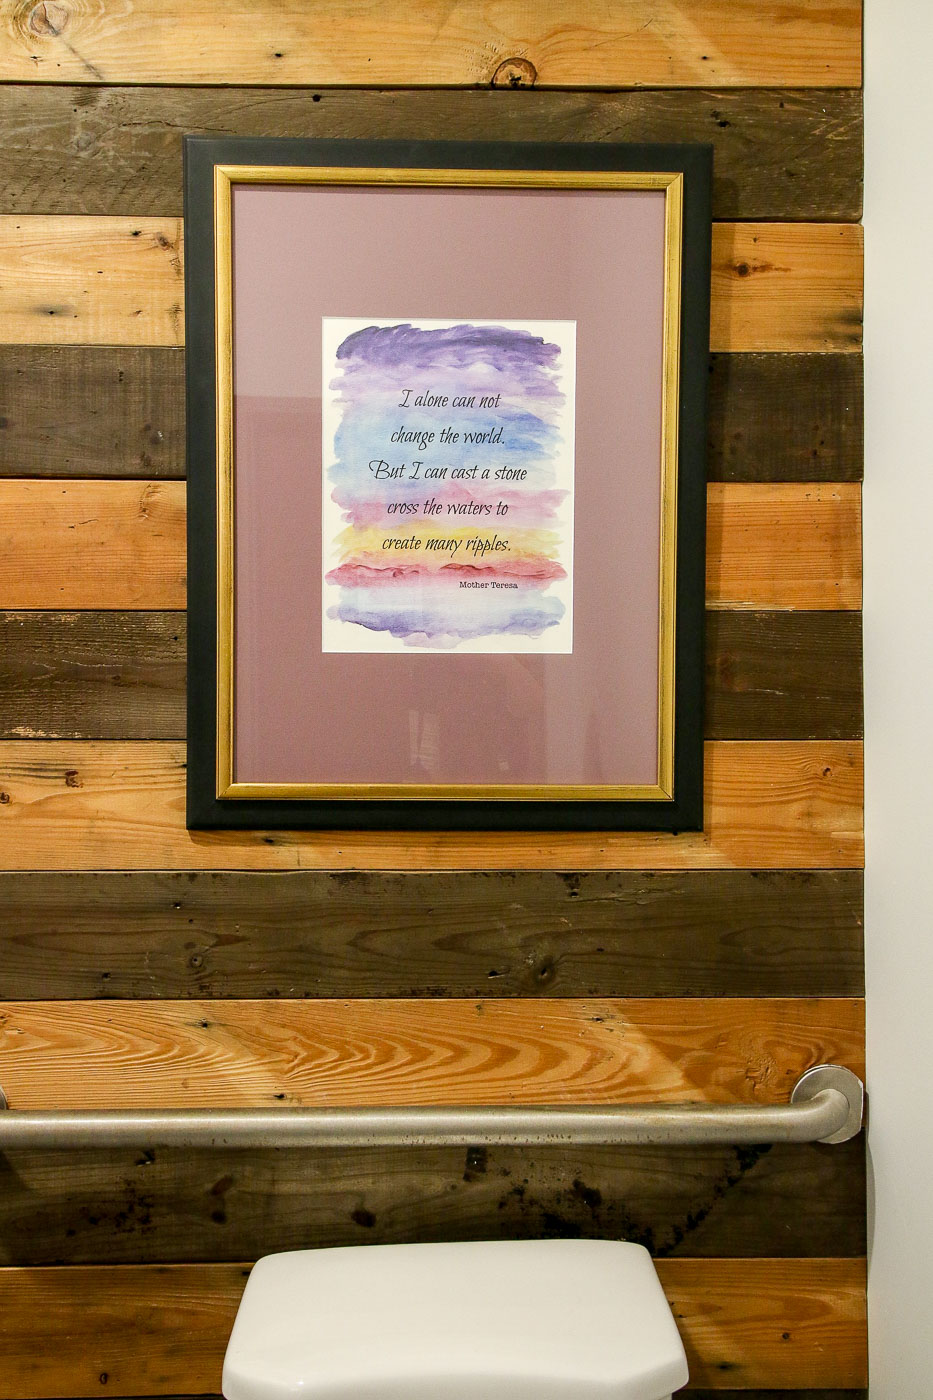
The art quotes were created by reusing ReStore art frames. I simply created some watercolor art and added the quote in Photoshop.
The twin bathroom looked like this before:
And now!
The sink vanity was from the ReStore. We were lucky the Raleigh ReStore has a huge selection of donated cabinets.
I documented the entire renovation on video, hopefully, you’ll enjoy watching the whole Habitat for Humanity Bathroom Renovations process.
Want to Help Habitat for Humanity and Work Along Side Me?
Have you ever wished you could work next to me? Learn some tricks and tips of the trade? Well, now you can! I’ve signed up to volunteer for this year’s Women Build, She Nailed It Campaign with our local Habitat. This is a one day opportunity to help build a house with ALL WOMEN! Don’t be intimidated, you won’t be asked to do anything you aren’t comfortable with. But, you may gain a little empowerment and learn a new skill or two!
The date is Saturday, September 28th in Wake Forest and I’d love to meet you there and share a day of swinging hammers. What do you say? Want to join me? If you can’t, but still want to contribute, please make a donation to the Women Build Campaign. Even the smallest donation will help us accomplish our goal.
Again, I have to give a huge shout out to Sophie from @TheHipperFam and Stephanie from @UncommonOutpost who came to help me on this project and gave up their weekend. Also, a big thank you to ALM Plumbing and Wilkinson Supply Co. for donating the toilets.
I hope you liked the video. If you aren’t subscribed to my YouTube channel, definitely do so now to stay up to date on all my tutorials and renovation projects!
See you all soon.
Be sure to pin this image to share how to accomplish a bathroom renovation in one weekend!
https://prettyhandygirl.com/wp-content/uploads/2019/07/close-up-gold-frame-sink-top.jpg9331400Brittany Baileyhttps://prettyhandygirl.com/wp-content/uploads/2021/07/PHG-logo-tagline-2020-1030x211-R.jpgBrittany Bailey2019-07-12 07:00:002019-11-03 17:51:18Habitat for Humanity Bathroom Renovations in a Weekend
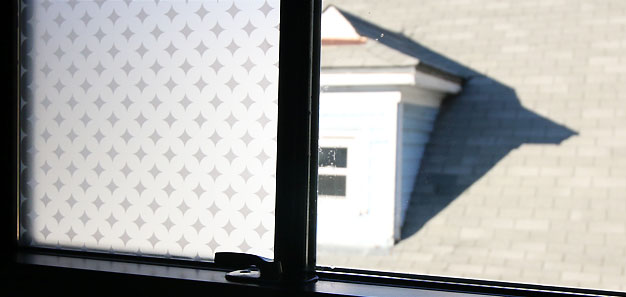
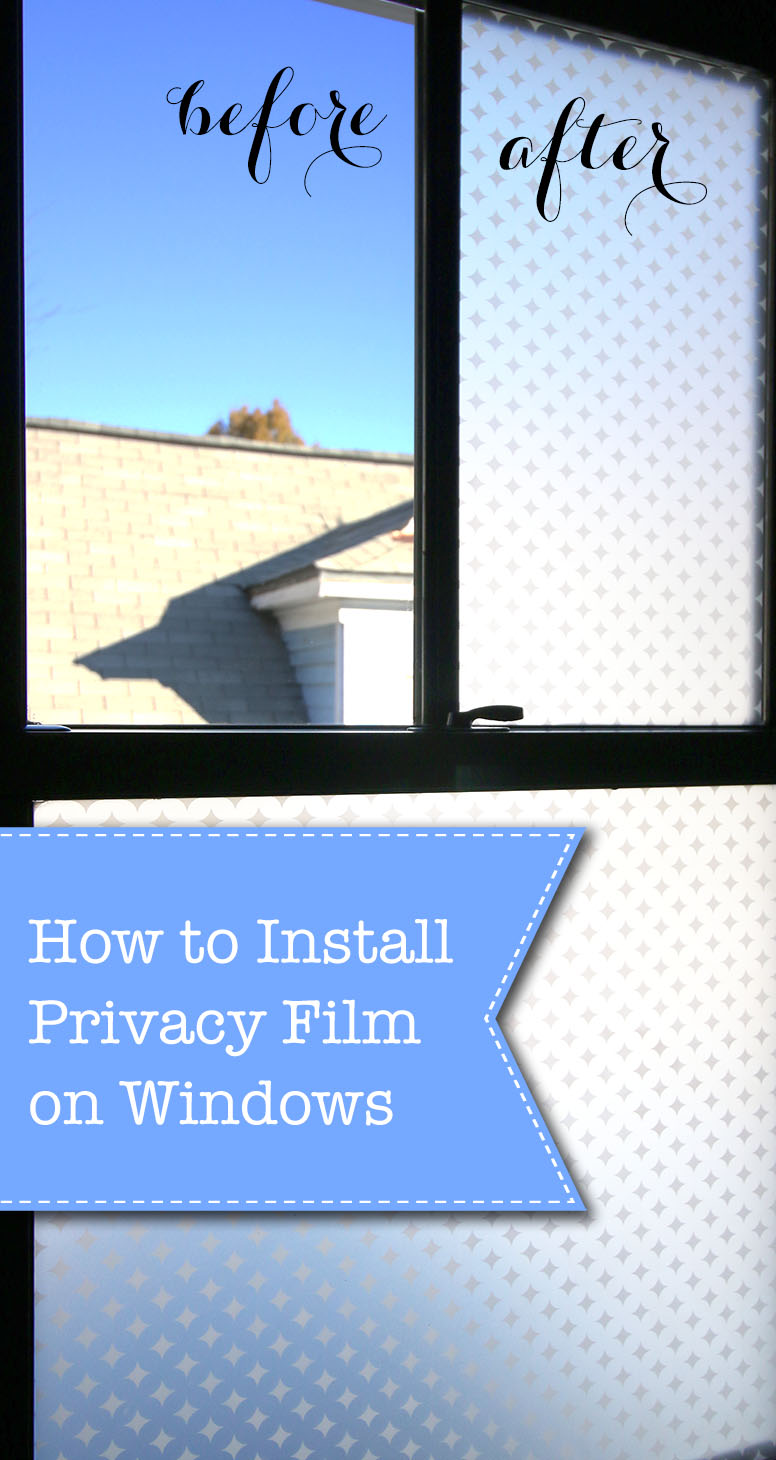
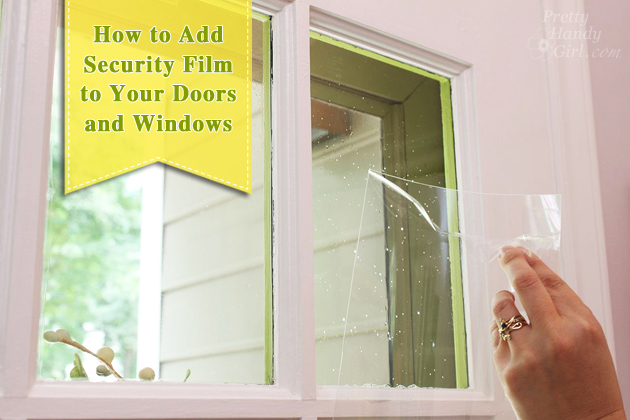
Do you have a window in your house that puts you on full display? Or maybe your neighbor’s house is very close to your’s and you feel like they can see in your window (especially a bathroom or bedroom window.) Sure you can add curtains or blinds, but then you won’t get the natural light you want from your windows. Today I have the solution to your privacy needs without blocking the light. Let me show you how easy it is to install privacy film to your windows with professional looking results.
Materials:
(I’ve included affiliate links for your convenience. I earn a small percentage from a purchase using these links. There is no additional cost to you. You can read more about affiliate links here.)
Privacy Film >>Get 20% OFF anything at StickPretty.com by using “PrettyHandyGirl” in the coupon code area!<<
About the Privacy Film:
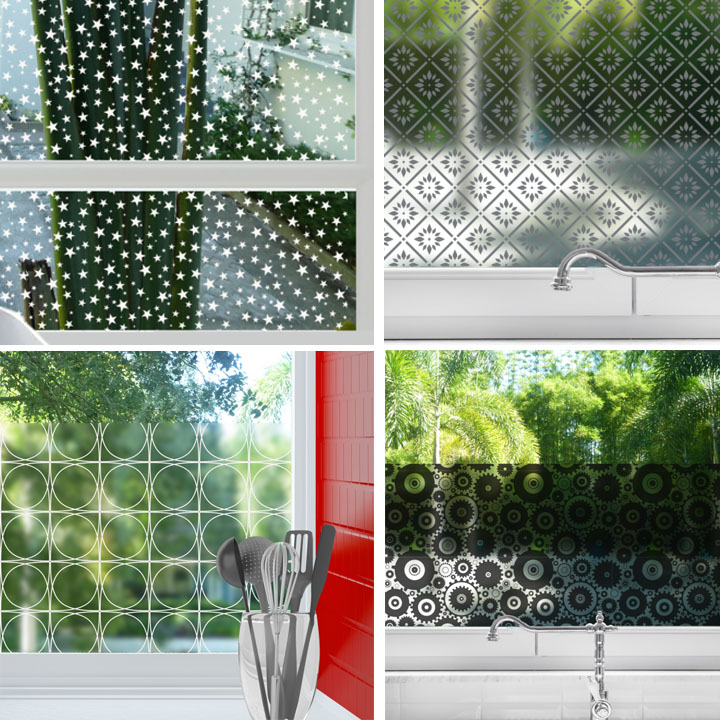
Before we begin, I have to tell you when Stick Pretty approached me about using their product I was thrilled to find they have some very attractive options for privacy film! Those of us that shop at the big home improvement stores know the options for privacy film are fairly limited. Feast your eyes on just a few of the beautiful adhesive film patterns Stick Pretty has to offer:
And there is a semi-transparent option for blurred viewing (less opaque.)
That’s not all. You can also order any of the patterns in a sheer adhesive film to dress up your windows. All the adhesive window films are customizable with white, fog, mushroom, or black designs.
I’d be remiss if I didn’t mention Stick Pretty also sells tile decals (to brighten your tiles or cover up ugly tiles.)
And they offer decorative adhesive panels for use on walls, furniture, or anywhere your imagination can think of.
If you find yourself falling in love with any of the products on the Stick Pretty website, don’t forget to get 20% OFF your order if you use the code: “PrettyHandyGirl” at checkout.
Now, on to the tutorial for installing privacy film on your windows.
Instructions:
Watch this quick video to see how easy it is to install privacy film to any window.
Step 1. Clean
Use glass cleaner and a lint free rag to clean the window really well. Make sure there’s nothing on the glass that will stick under the adhesive film (which would stick there forever until you take it off).
Step 2. Measure & Cut
Measure each pane of glass on your window. Add 1/8 of an inch, because it’s better to cut the film too big. We will cut off the excess at the end.
Transfer your measurements onto the privacy film. Use a sharp x-acto blade and a metal ruler to guide your cuts. Apply gentle pressure as you cut the film.
3. Installing the Privacy Film
Carefully peel up your privacy film and take it to the window immediately. If you wait, dust can settle onto your film.
The key to a really good adherence of the film to the window (with no bubbles or wrinkles) is to use a mixture of water and a few drops of dish soap in a spray bottle.
It also helps to use a good squeegee.
Spray a liberal amount of the water and soap mixture onto the glass. If you find the film sticking too much to the glass, spray more of the mixture onto the glass.
Line up the film at the top. Using your hands, push from the center, down and out to set the privacy film. If needed, lift the film and reposition.
Use the squeegee to push out any water and air bubbles. Again, working from the center out and top down.
Use a clean rag and run it along the edges to clean up any water that has squirted out.
Step 4. Trimming Excess
If your film is too large and overlaps off the glass, take a sharp x-acto knife and cut off the excess. Peel off the trimmed excess.
Then squeegee the film again and clean it up any water from the edges.
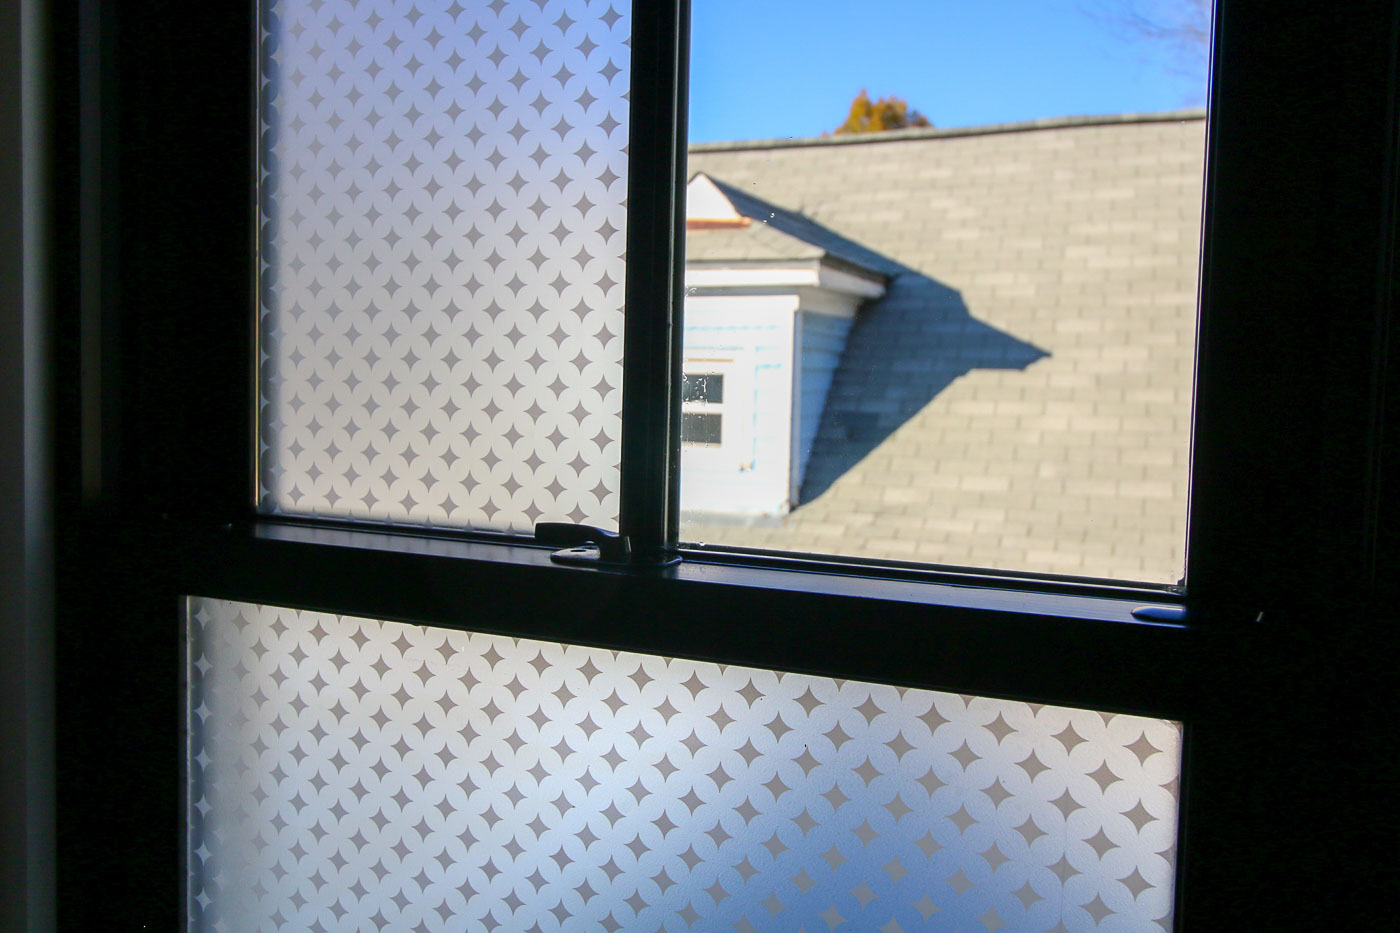
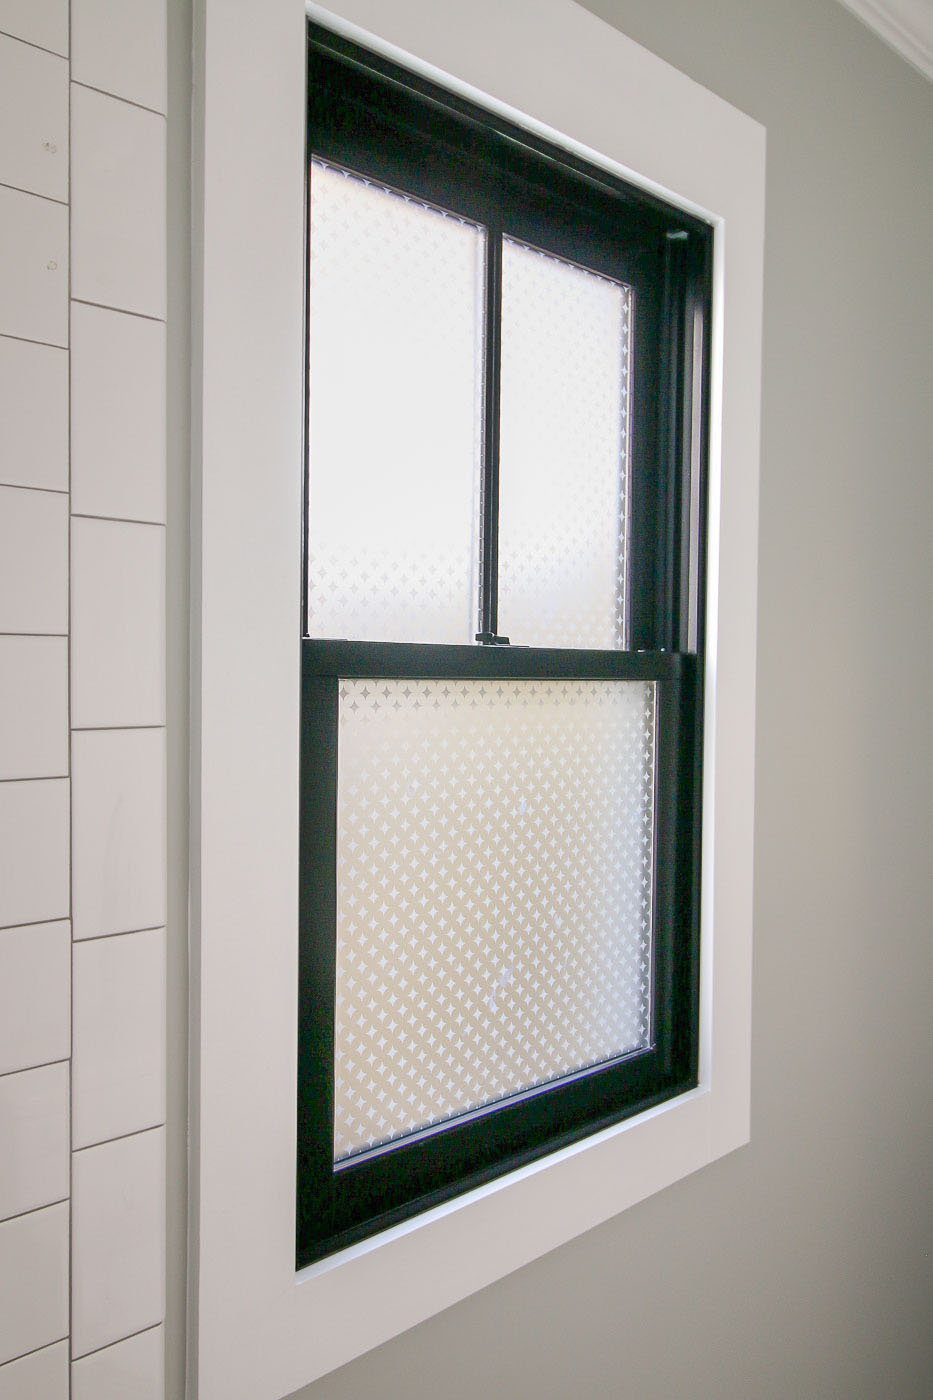
You can see the difference between the regular window glass and the glass with privacy film on it below.
After installing your privacy film, you may see some ghosting between the film and the window. As long as you have pushed all the air bubbles out of the film, the ghosting should go away after a few days. (Can you spot the ghost spots in the picture below? Within 48 hours they had disappeared.)
Hopefully this tutorial will help someone reclaim some privacy in their home without giving up natural light! Pin this image to share with a friend:
Friends, I have a question for you:
I decided to let the video tutorial guide you through the process on this tutorial instead of the usual step-by-step photos. Let me know what you think and if you miss the photos when there is a video tutorial. Thanks for your feedback.
Disclosure: Stick Pretty sent me the privacy film at no cost to try out on the Saving Etta project. I was not told what to say. All opinions are my own. If you use the coupon code: “PrettyHandyGirl” on the StickPretty.com website, you will receive a discount and I will receive a small percentage of the sale. As always, I am very particular about the brands I represent on this website and will always let you know if you are reading a sponsored post or if I received free materials.
https://prettyhandygirl.com/wp-content/uploads/2019/04/how-to-install-privacy-film-feature.jpg297626Brittany Baileyhttps://prettyhandygirl.com/wp-content/uploads/2021/07/PHG-logo-tagline-2020-1030x211-R.jpgBrittany Bailey2019-04-29 07:00:002019-11-03 17:44:58How to Install Privacy Film on Windows
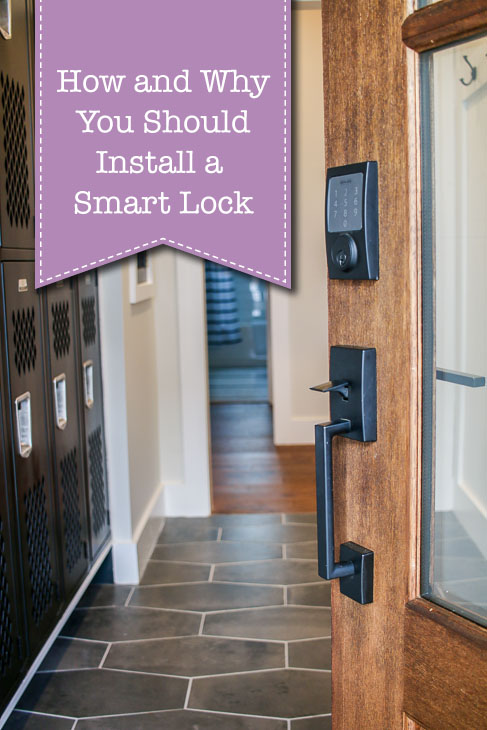
How and Why You Should Install a Smart Lock on Your Door
Smart locks have been around for a while, but I’ve been slow to jump on the bandwagon and install a smart lock. I worried they might be tricky to install and had heard stories of the technology being glitchy (although I can’t find a lot of concrete evidence beyond this firmware update glitch that left 500 LockState locks completely useless.) However, after installing a Schlage smart lock on the Saving Etta house, I am a converted technophobe.
If you’ve never installed or used a smart lock before I have some considerations for you when deciding How and Why You Should Install a Smart Lock on Your Door.
Why are Smart Locks are a Good Investment?
If you’ve ever had the unfortunately situation of locking yourself out of your home, with a smart lock this is a thing of the past! You only need to remember your code! Do you hire contractors or cleaning people to work at your house? Now you don’t have to take off work or give them a key if you aren’t home. Set up a temporary code for each person and remove the code when they are done. The same can be done for guests or for an AirBnB property.
Do you have kids old enough to let themselves in after school? Why not give them a code so you don’t have to worry about them losing a key and you can keep track of when they got home.
Finally, if you’ve ever had that nagging feeling that you left the door unlocked, you can rest easy by simply checking or locking the door remotely from your smart phone.
What if I told you a smart lock can also help lower your homeowner’s insurance and could be a selling feature when you sell your home? Is there really any reason you wouldn’t want a smart lock? There may be, so read on.
Some Things to Consider Before Buying a Smart Lock:
Do the centers of your deadbolt and door knob holes have at least 5 ½” between them? (If not the interior circuit and alarm unit may not fit.)
Does your deadbolt hole equal 2 1/8″ in diameter?
Does the deadbolt and door knob hole backsets equal 2 3/8″ or 2 3/4″ from the edge of the door to the center of the holes?
Is your door thickness 1 3/8 – 1 3/4″ wide?
Is the latch bore hole in the door frame at least 1/2″ – 7/8″ deep?
If you couldn’t answer yes to all of these questions, a smart lock may not be right for your current door.
If you have a door that requires you to push hard, pull up, or hip check it, you will need to make adjustments to your door before installation. Why? A smart lock is activated by an electronic mechanism. The deadbolt needs to move freely into the frame to work properly.
Do you have a smart phone? If you don’t, you can still use a smart lock, but understand that you can’t take advantage of all the remote features.
Most smart lock run on batteries, but many needs Wifi or Bluetooth to handle features performed on your phone remotely. Obviously these functions may not be available if the power is out in your home. For this reason, it’s always good to carry a back up key on your keychain.
Finally, there is the cost to consider. Smart locks aren’t cheap, but as I mentioned above, they can save you money on insurance or give you more money in your pocket when it’s time to sell.
How Hard is it to Install a Smart Lock?
Installing a smart lock to your entry door may seem like a hassle, but it’s actually a fairly simple installation anyone can accomplish.
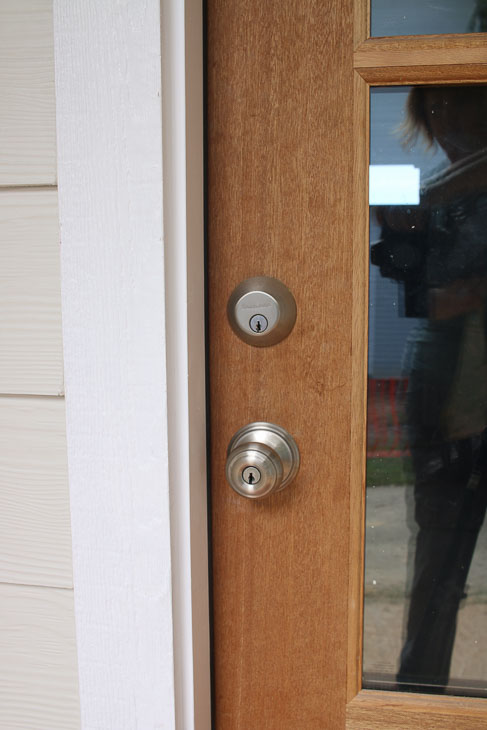
For some reason I thought the install would be more difficult, which is why I installed the ho-hum satin nickel knob and deadbolt on the Saving Etta house door. Sadly, it stayed on the door for months. As the completion date neared, I thought I’d need to clear an hour or so to install the Schlage Smart Sense lock. Boy was I mistaken, it took less than 30 minutes!
Let’s give your home a smart upgrade by installing a smart lock today. Here’s how to install the Schlage Smart Sense Deadbolt in thirty minutes or less.
(I’ve included affiliate links for your convenience. I earn a small percentage from a purchase using these links. There is no additional cost to you. You can read more about affiliate links here.)
How to Install a Schlage Smart Sense Deadbolt:
Remove the Smart Sense Deadbolt from the box and make sure you have the booklet included. This booklet has the programming codes and must be kept in a safe place. DO NOT THROW IT AWAY!
First check to make sure your deadbolt engages freely into the door frame and deadbolt strike plate.
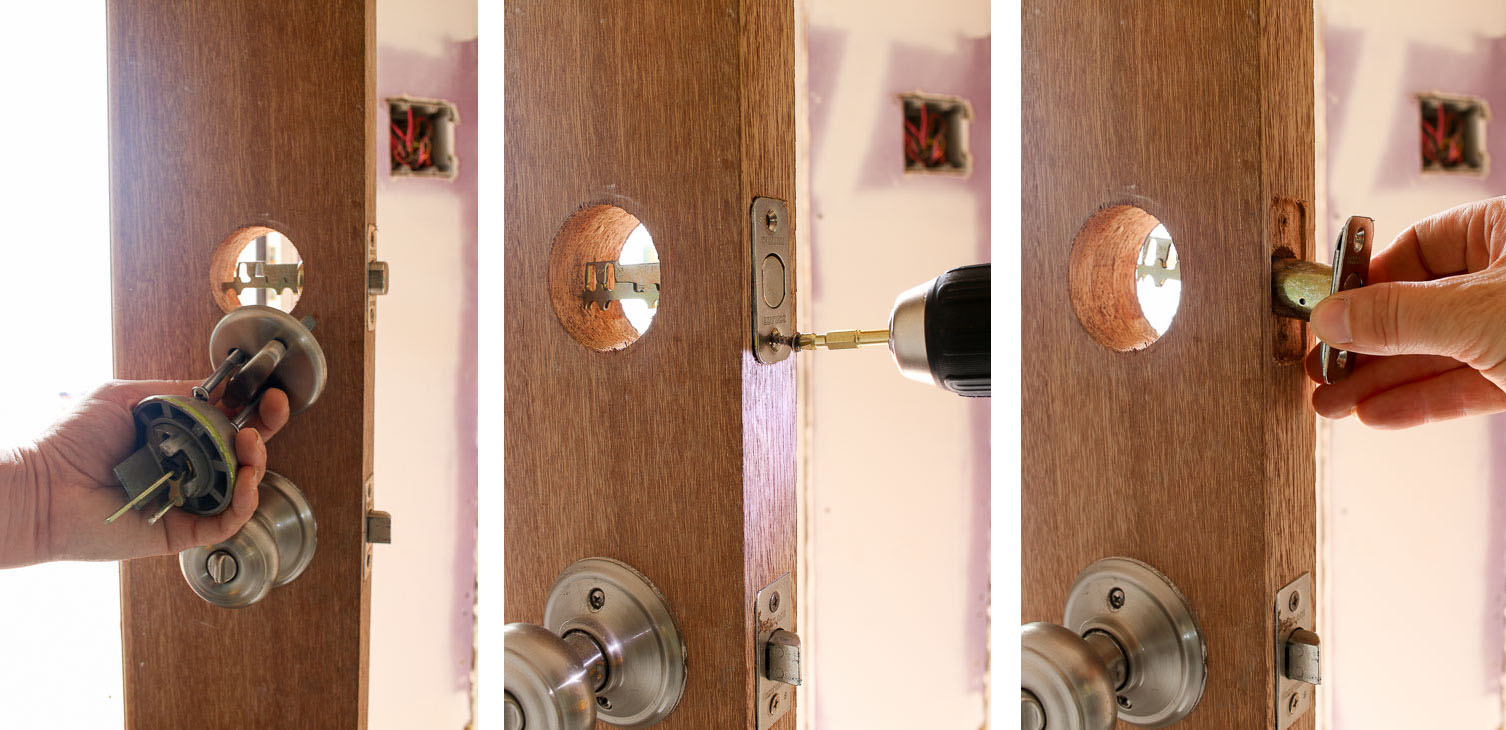
Remove the existing hardware.
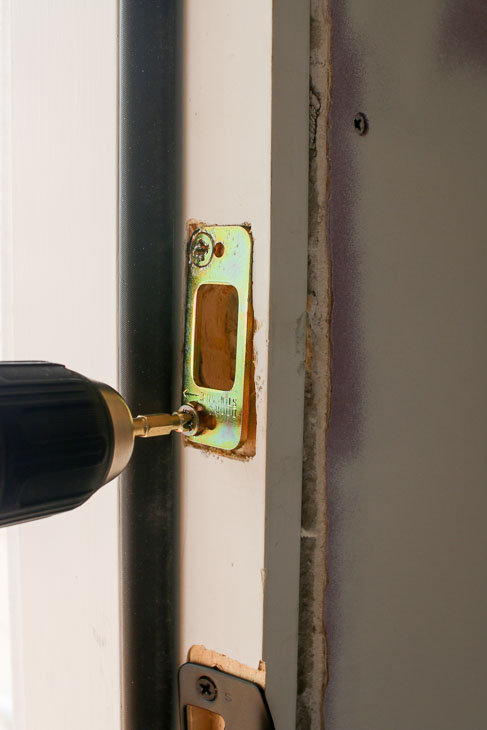
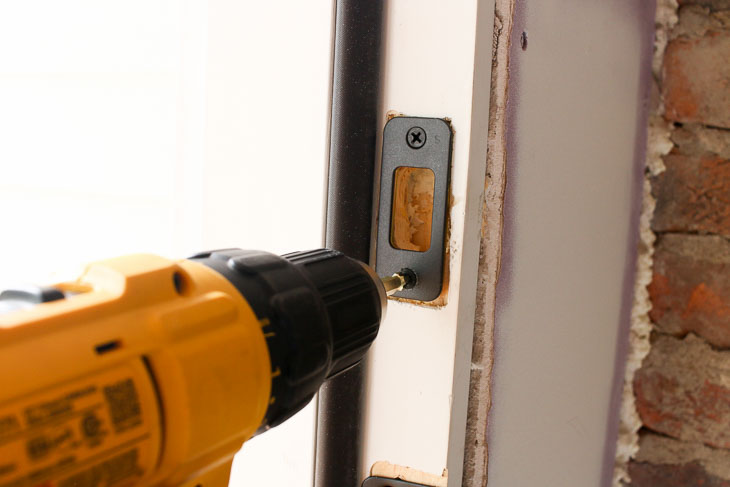
Also remove the existing strike plate from the door frame. Then install the reinforcement plate into the door frame using the longer reinforcement screws. (Pay attention to the wording on the reinforcement plate telling you which way to orient the plate.)
Install the new strike plate on top of the reinforcement plate.
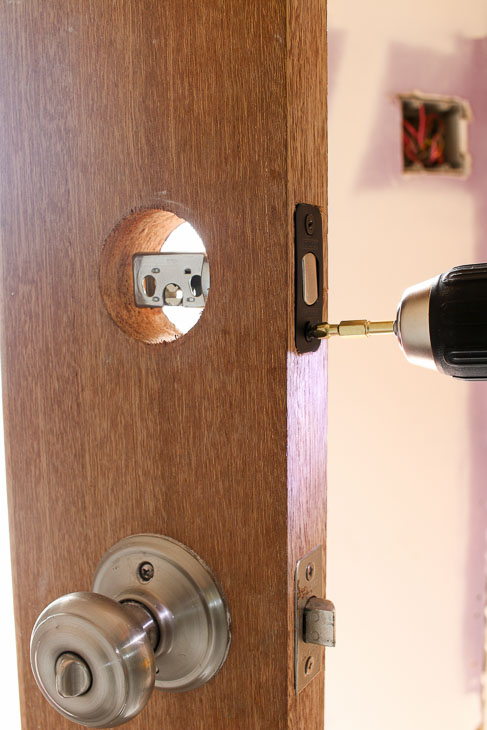
Insert the new bolt into the door (if you have a circular faceplate in the door, you’ll have to swap the rectangular plate with the round one in your kit and use the hammer and block to tap the bolt in.) Secure the bolt to the door.
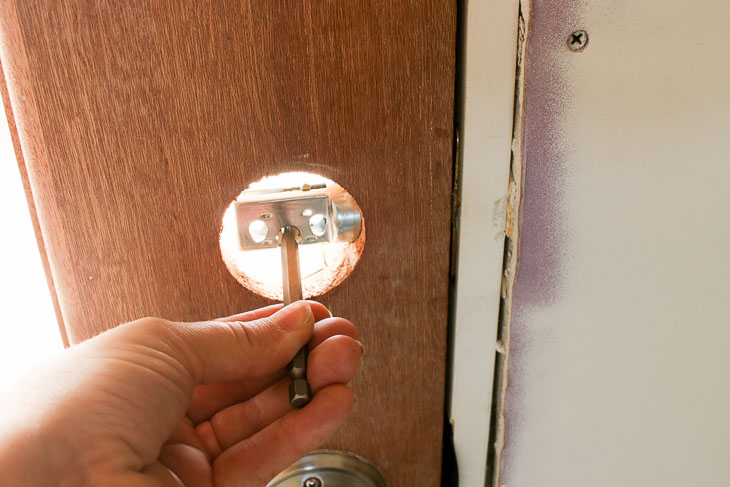
Close the door and use the flat head screwdriver to test the locking mechanism. Does the deadbolt seat properly in the door? If yes, move on. If not, make any adjustments to your door now.
My door needed some adjusting (a shim behind one of the hinges to square up the door) before the deadbolt could open and close freely.
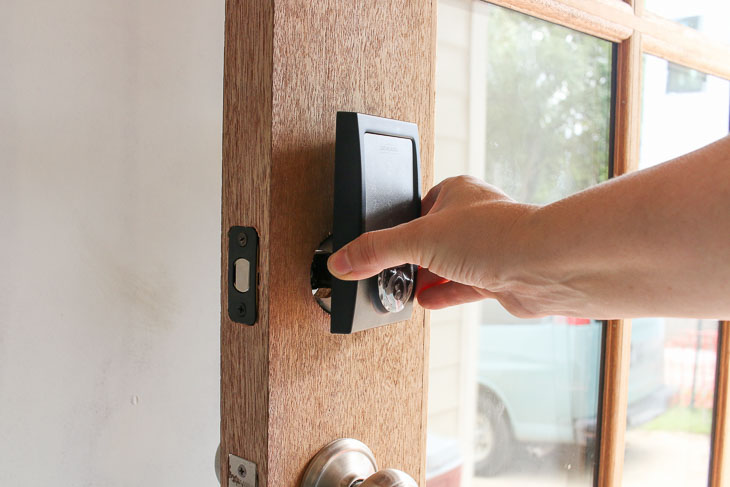
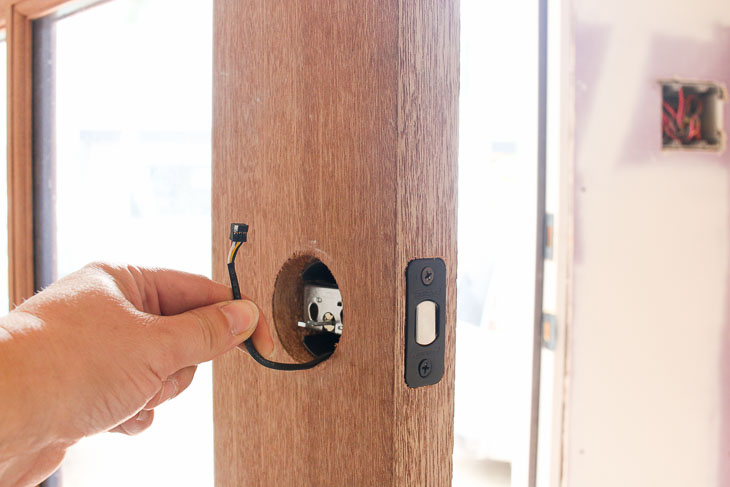
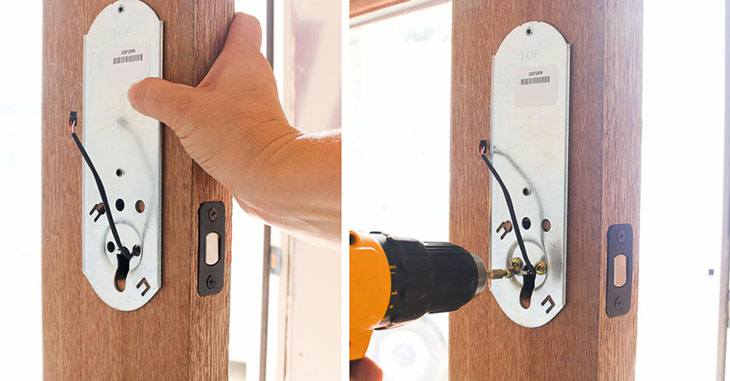
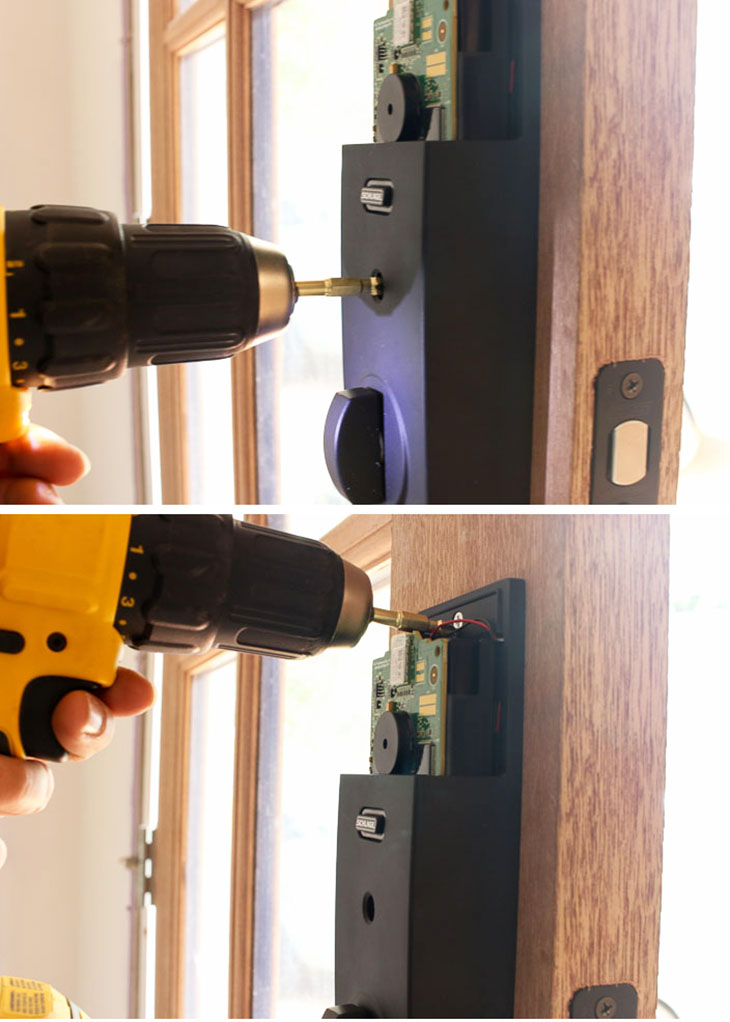
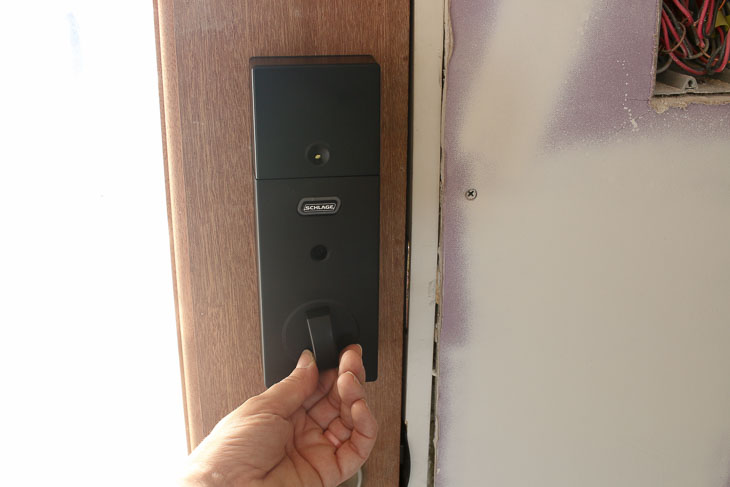
Now that the bolt seats properly, add the keypad to the outside of your door (be sure to feed the cable through the door and under the bolt as you seat the keypad.)
The cable should be positioned under bolt and exit on the interior side the door.
Add the support mount to the interior of the door using the mounting screws provided. The support mount is stamped with the words TOP and AGAINST DOOR. Be sure to orient the support accordingly. Make sure the support mount and keypad are straight and plumb before tightening the screws.
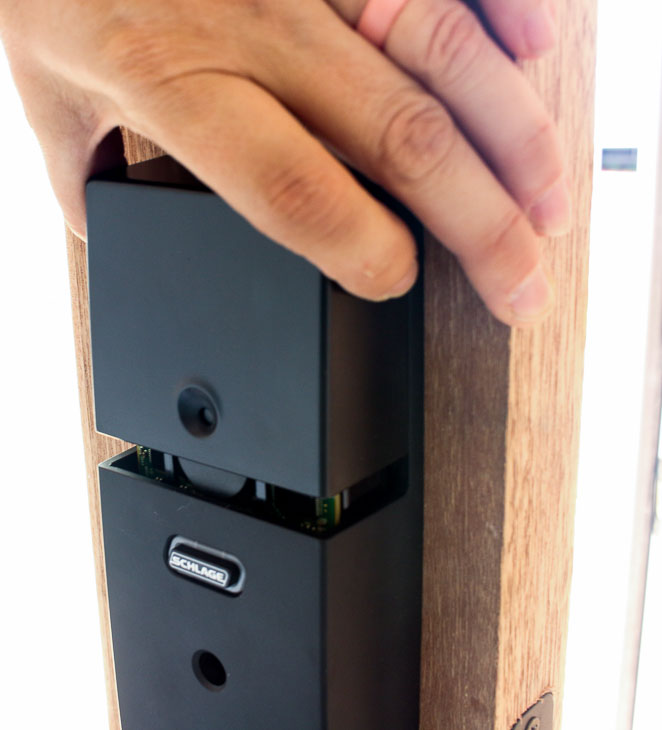
Remove the top cover on the alarm unit.
Attach the cable to the back of the interior alarm unit.
Carefully attach the alarm unit to the support plate. You may have to turn the knob to line up the slot in the back of the alarm unit with the tab in the bolt.
Secure to the mounting plate with a screw in the middle of the until and a second screw above the circuit board. (Please note: Schlage recommends using a hand held screwdriver instead of a drill. I’m a rebel, what can I say?)
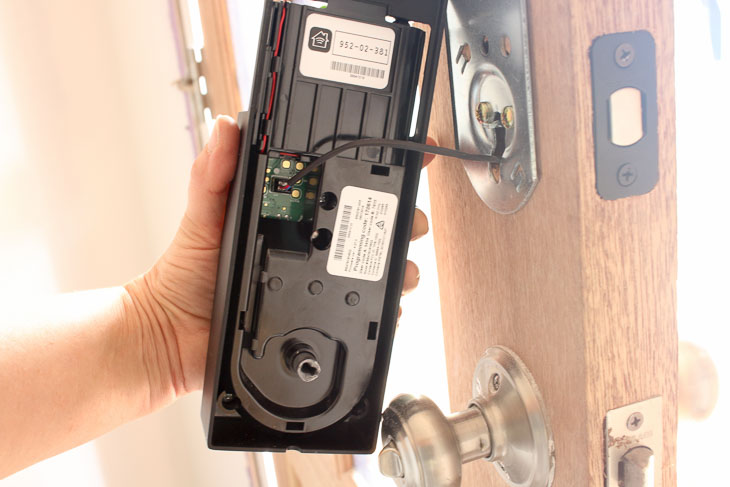
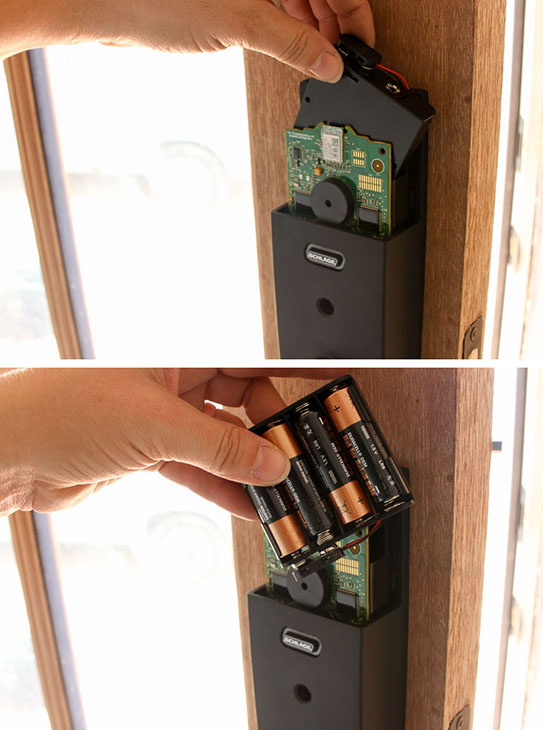
Remove the battery tray inside the alarm and insert four AA batteries.
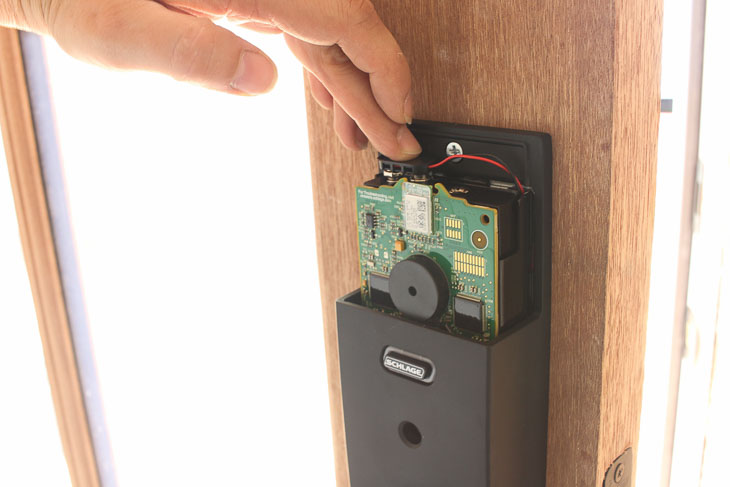
Replace the battery tray with the batteries facing the door. Re-attach the battery connector.
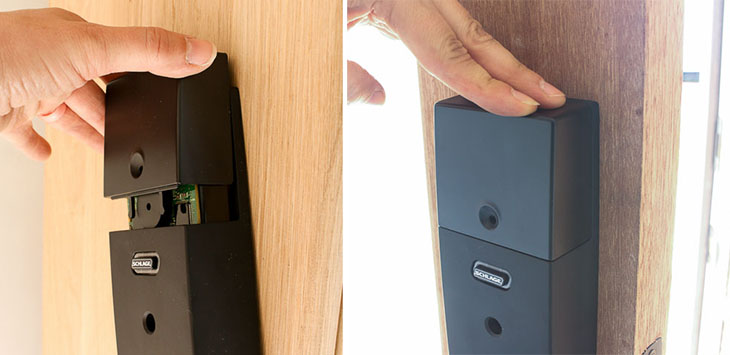
Make sure not to turn the deadbolt knob until you set up the keypad. Replace the cover.
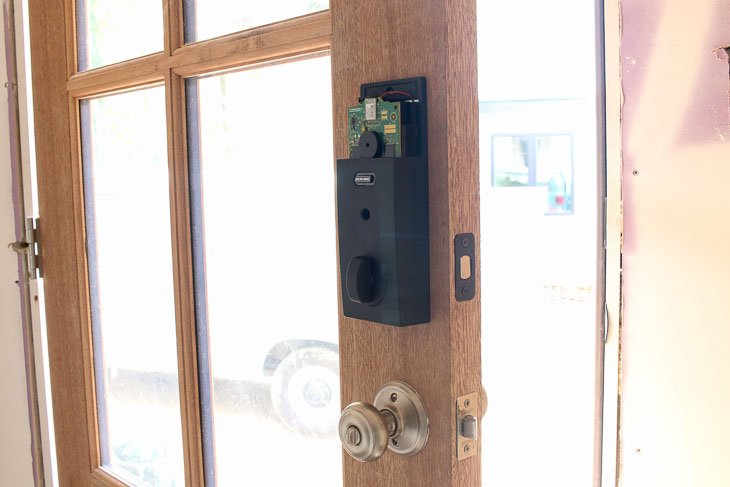
Now it’s time to test your keypad. Grab the brochure and locate the default codes on the sticker. Press the Schlage logo. The keypad should light up.
Enter the default code and the deadbolt should go through a set up routine. Let it finish, then close the door from inside the house and test the lock using the thumb turn. The bolt should still be able to open and close freely. (If not, make any adjustments to your lock or door as necessary.)
Now you can test the keypad entry. Take a key with you as you step outside. Close the door and press the Schlage logo. The door should lock.
Press the Schlage logo again (the door should stay locked.) Now enter one of the default codes and the green check mark should illuminate and unlock the door.
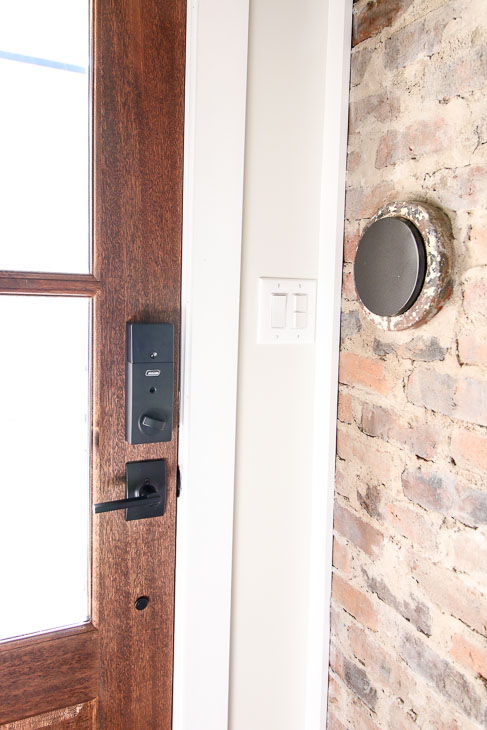
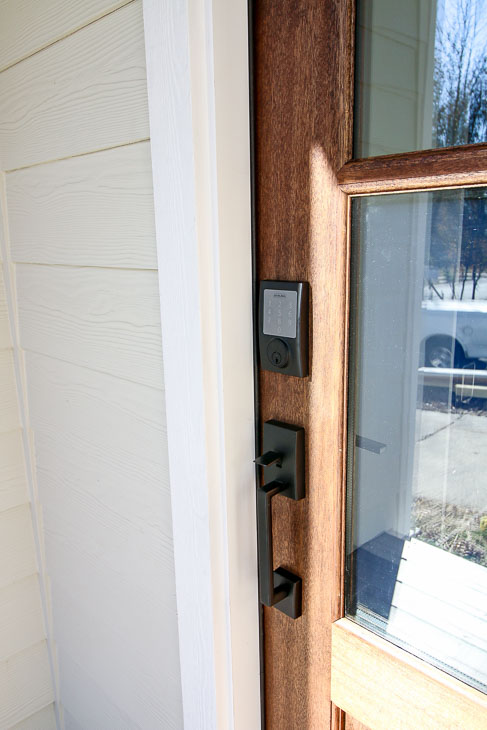
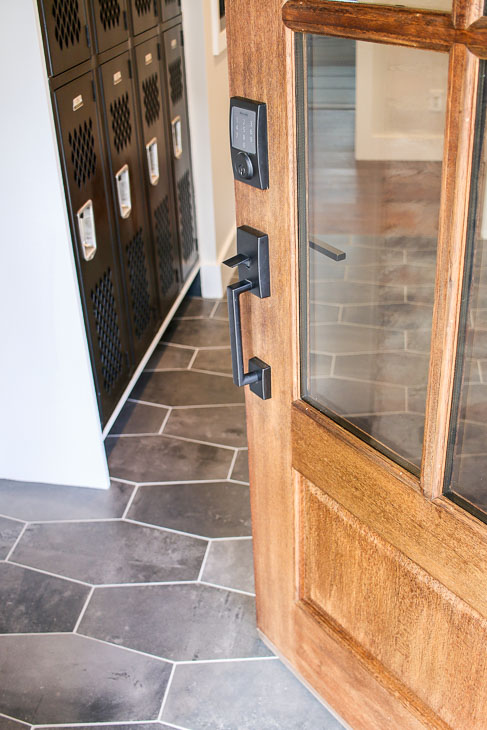
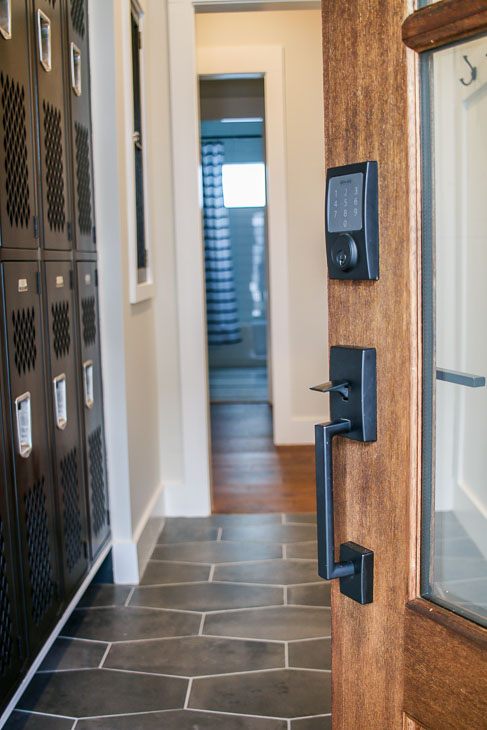
Your new Schlage Smart Sense deadbolt lock is now set up.
To manage your new smart lock, download the Schlage Smart Sense app on your smart phone and follow the instructions. You can also set up new codes, or lock and unlock it remotely.
Schlage has an installation video if you have any questions about this installation. Watch it below:
The Schlage Smart Sense Deadbolt was fantastic to have on the Saving Etta house. I was able to program temporary codes for the subcontractors and deactivate them after they finished their work.
I will definitely be looking into adding one of the Schlage Smart Sense Deadbolts to my own home. Especially because my boys are always misplacing their keys. 😉
Disclosure: As a sponsor of the Saving Etta project, Schlage sent me the Smart Sense Lock for the house. I was not told what to write, all opinions are my own.
Pin this image to help others learn more about smart locks!
https://prettyhandygirl.com/wp-content/uploads/2019/03/insert-schlage-smart-sense-keypad.jpg487730Brittany Baileyhttps://prettyhandygirl.com/wp-content/uploads/2021/07/PHG-logo-tagline-2020-1030x211-R.jpgBrittany Bailey2019-03-22 07:00:002019-03-23 21:47:52How and Why You Should Install a Smart Lock on Your Door
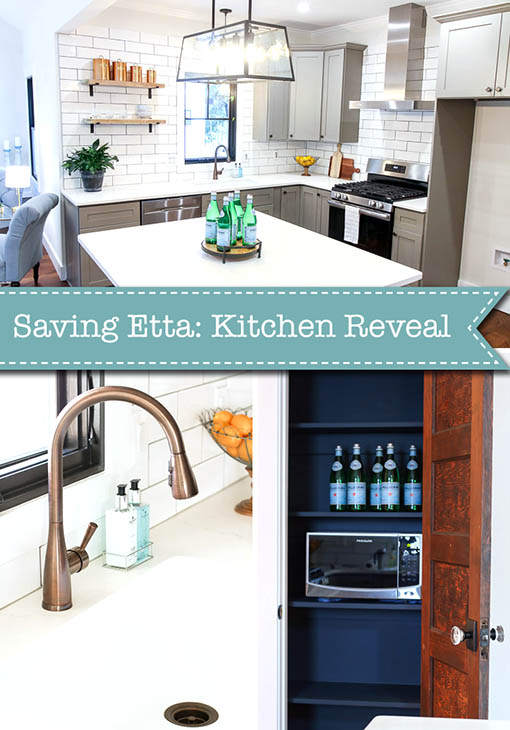
Thank you all so much for your patience with me as I put together the final Saving Etta updates. I have more to come, but for now I know you’re anxious to see the Saving Etta kitchen reveal. Get settled down with a nice cup of coffee or hot chocolate because there are many photos coming your way!
Before I show you this beautiful modern farmhouse kitchen, I want to thank the Saving Etta sponsors who made it all possible!
Plygem, Broan-Nutone, Impressions Hardwood Collection, Leviton, Ask for Purple Drywall, Wood It’s Real, STIHL, Schlage, Duluth Trading Company, Magnolia Home Paint, KILZ, Jeffrey Court Tile, The Builder Depot, Wilkinson Supply Co., Designer Drains, Liberty Hardware, and Ferguson Bath, Kitchen & Lighting Gallery
My Big Fat Crazy Push to Finish
Remember when I told you I was on a tight deadline? In early October, I had an inkling that I needed to get the house finished and listed for sale within 6 weeks. My husband thought I was crazy (and in hindsight I probably was). Market strategists had been predicting a downturn in the fourth quarter of 2018 and I could tell things were starting to get inflated near downtown Raleigh. Surrounding homes were selling for more and more since I bought Etta in May of 2017. I felt a strong need to get the house on the market before things slowed down for the holidays. This meant a final push and a self imposed crazy work schedule for me.
My day started at 5am to shower, eat, and get my sons out the door. We’d leave the house at 6:45 to drive my eldest to school. After dropping him off I’d head downtown. By 7:30am I’d arrive at the house and get straight to work planning out the tasks for the day. My subcontractors usually showed up at 8:30 or 9 am. They took a break for lunch but then got back to work until about five o’clock. By then, it was solidly dark and my subs headed home to their families. I usually worked until about 8 or 9 pm and grabbed dinner at one of several fast food restaurants on my way home.
Once home I had just enough time to answer emails and throw some tools and materials in the truck for the next day. The good part about my crazy schedule was I usually fell asleep easily after a long day’s work. The bad part was I packed on about ten pounds eating mostly fast food (even though I rarely sat still all day).
Lest you think I was working inside a cozy climate controlled house, I wasn’t. It was early November and the cold weather had set in. I bundled up and warmed myself in front of the space heater from time to time. I even bought a little used Keurig single serve maker to be able to drink warm coffee and tea. We didn’t get the gas meter hooked up and approval to run the heat until the day before the open house (almost a month after tiling the backsplash.)
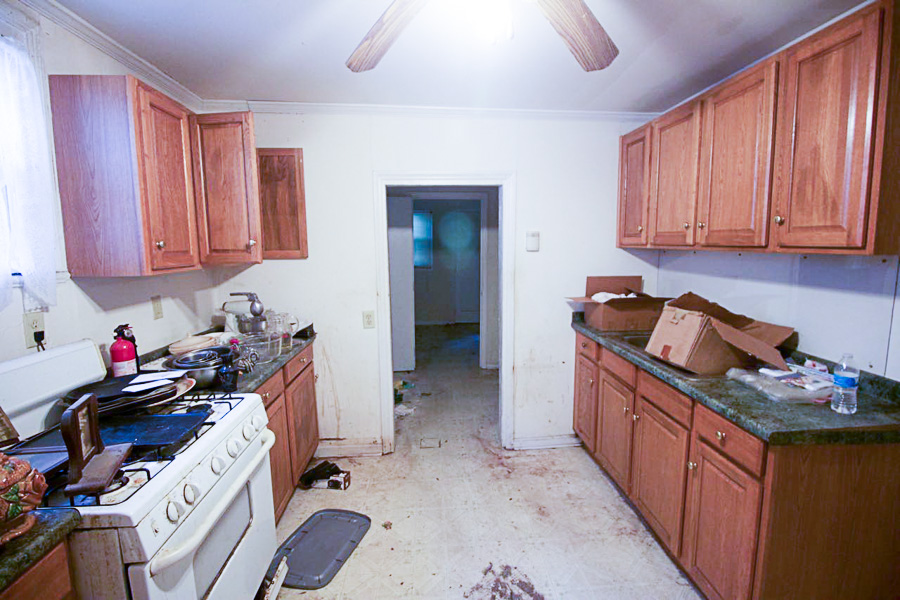
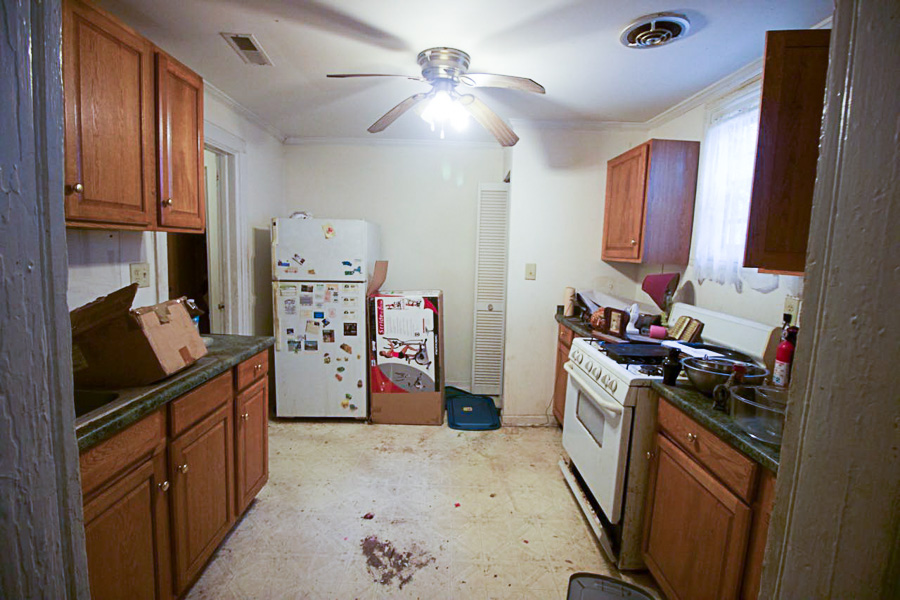
Was it all worth it? Absolutely! The house turned out amazing and I was pleased with the final results. And just a little reminder of what the kitchen looked like when I bought the house (you can see more progress shots in this kitchen update post):
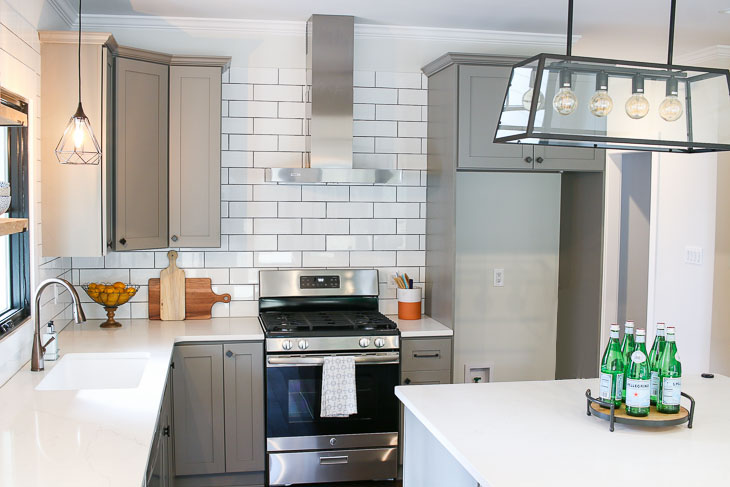
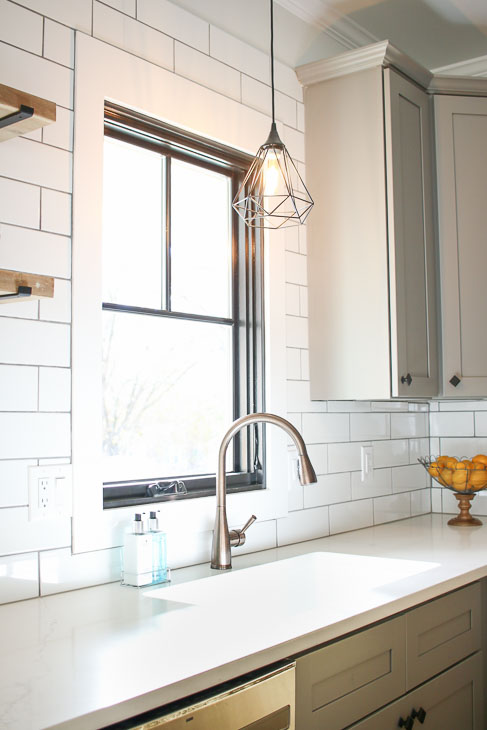
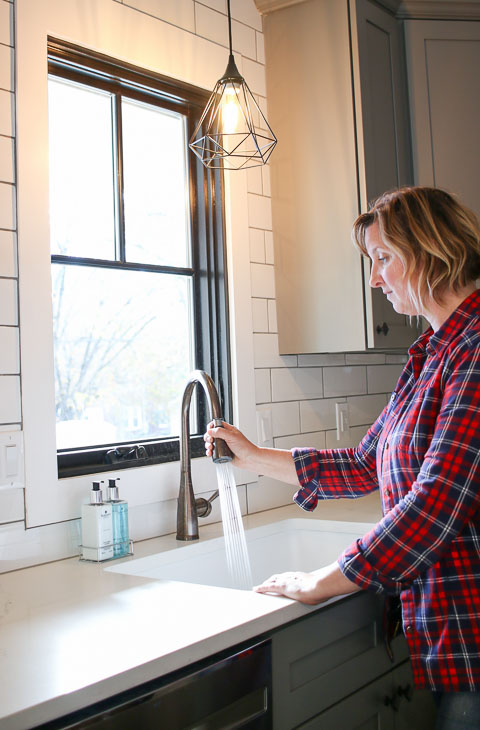
This kitchen sink, faucet, pendant light, and the window brought me joy, partly because they all lined up perfectly! Anyone who does kitchen renovations knows it can be hard to center all these elements with each other during the rough in stage without the cabinets or countertops in.
As I mentioned the other day, the pendant light was a swap I made after the first light wouldn’t cooperate. I took down the first pendant light and replaced it with this modern geometric pendant and pendant light kit from Lowe’s. I really like the open cage, no glass shade to clean!
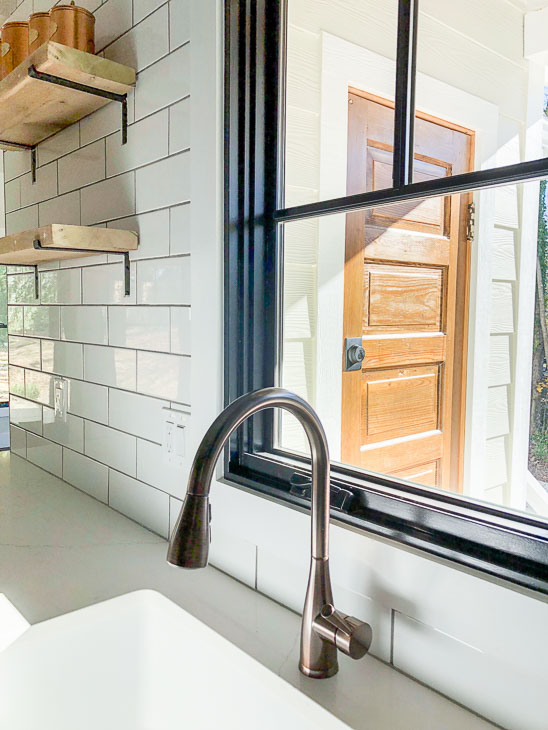
Just outside the window is one of the reclaimed doors I saved from a series of 1890-1920 houses that were slated for demolition. Behind the door is a little shed off the side porch. It’s nice being able to gaze on that gorgeous wood door while at the sink. Plus, the homeowners can see anyone pulling in the driveway from here.
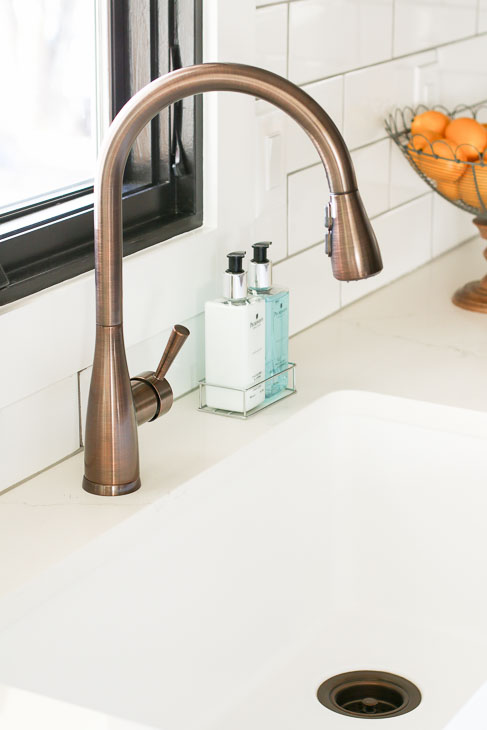
You may have noticed that beautiful faucet! It’s a: Mirabelle Calverton Pull Down Faucet in oil rubbed bronze. The finish on this faucet is beautiful and unlike anything I’ve seen before. Ferguson Bath, Kitchen, & Lighting Gallery stocks the Mirabelle line of kitchen and bath products (and provided the faucet and sink for the Saving Etta kitchen). If you’ve never been to a Ferguson showroom, you have to go! Especially if you are getting ready to remodel your kitchen, bathroom, or build a new house.
The sink is a Mirabelle Totten Single Bowl Granite Composite Sink (also available from Ferguson Bath, Kitchen, & Lighting Gallery). The granite composite is definitely a material I wasn’t familiar with. It has a very slight texture but looks like a cast iron farmhouse sink. Luckily it’s not as hard or as heavy as cast iron. Which makes it easier to install and more forgiving if you drop a glass or dish in the sink.
When I was finishing up the house, I was going to forgo staging and save some money. But, after seeing how pretty this kitchen was and how empty everything felt, I opted to hire a local stager. I discovered Minted Spaces on Instagram and immediately fell in love with Aryn’s design style. I knew her staging would appeal to a wide variety of buyers. In the end, they did a phenomenal job staging the Saving Etta house.
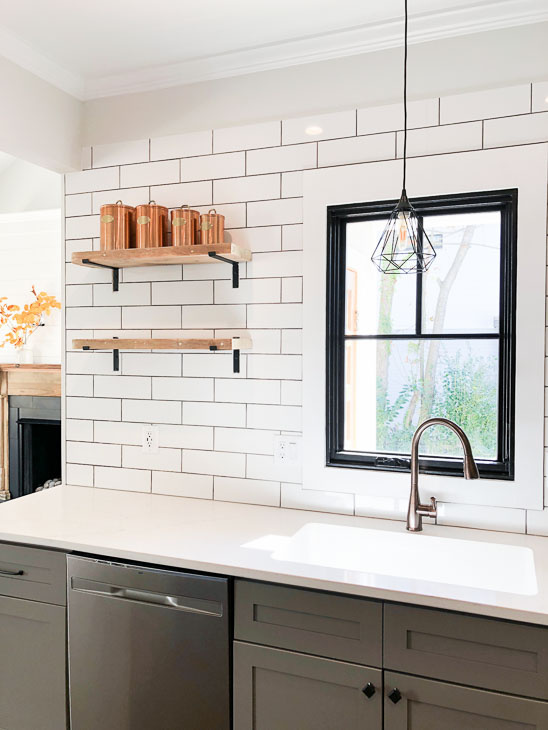
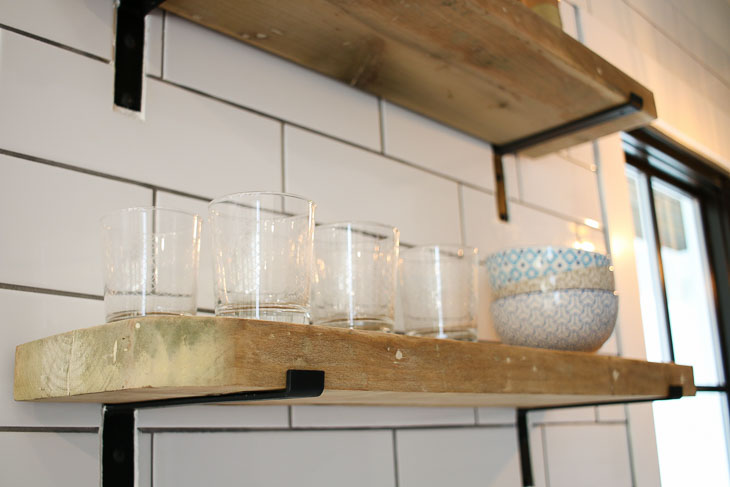
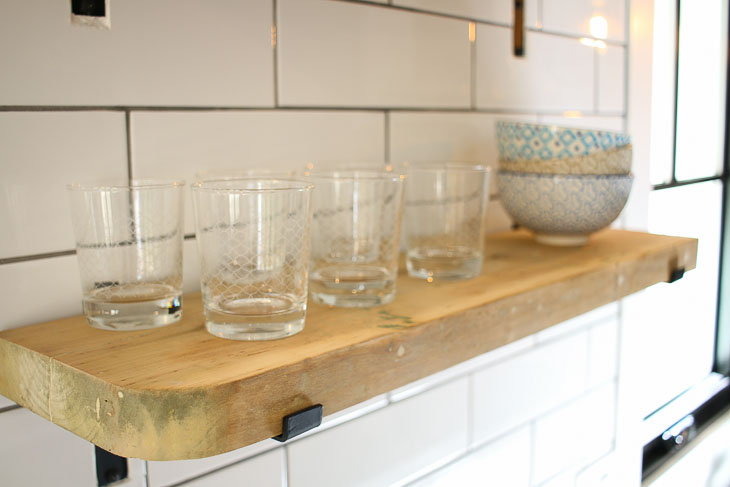
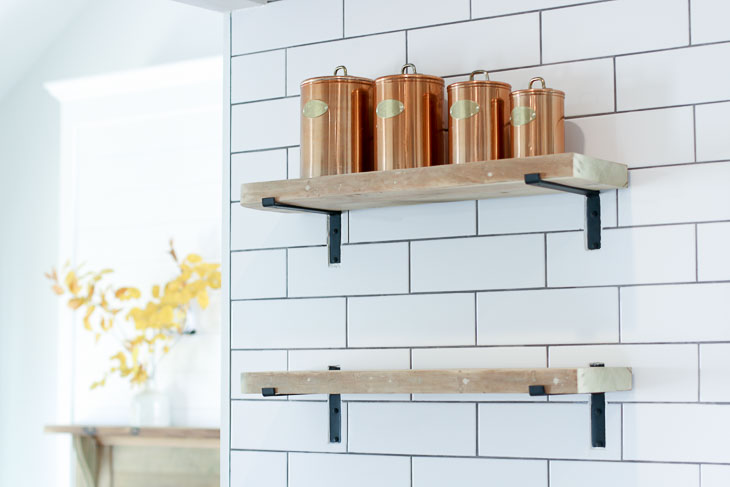
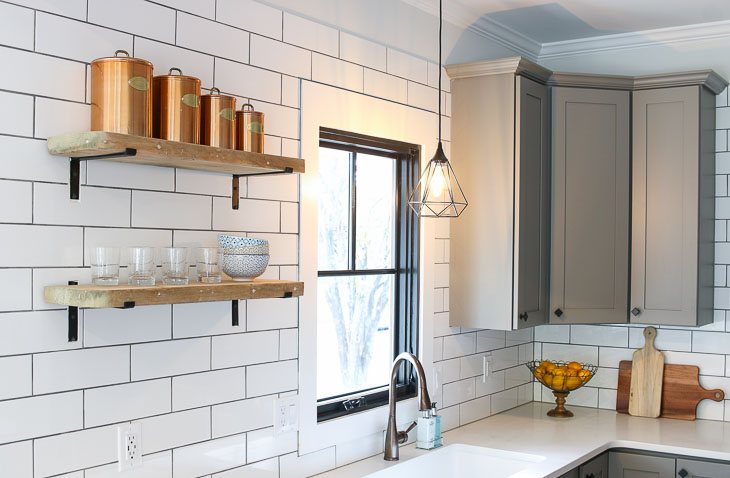
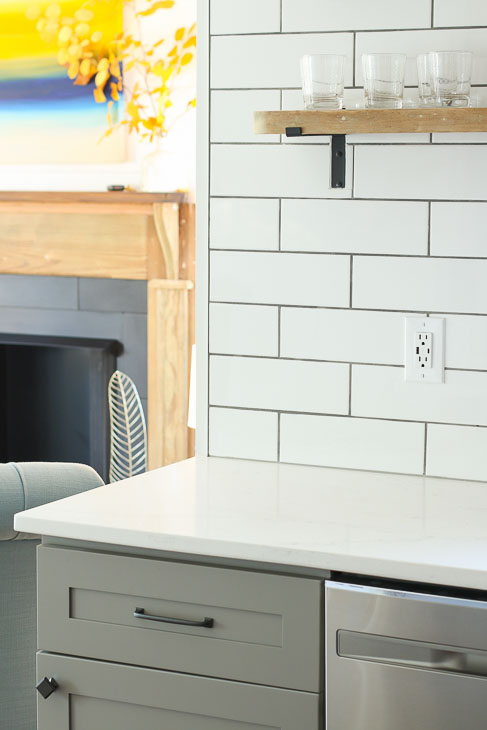
These open shelves aren’t just your random reclaimed lumber. Nay, they were made from the original mantel shelf! When I decided to salvage and re-use the 1900 mantle from one of the front rooms, I didn’t think about trying to purchase gas logs to fit inside the old mantel. Unfortunately once the fireplace was installed, I realized I needed to widen the legs to make it work.
Luckily I work with a local salvage company who found some longer lumber to match the old mantel shelf. After we rebuilt the new fireplace mantel surround, I wasn’t sure what to do with the old shelf until I realized I could cut it in half and use it for the open shelving. At first I was going to round the cut ends, but decided to leave it because it helps tell the story of it’s origin. (You can see the re-built mantel in the background below.)
All together, I’m so happy with this area of the kitchen. It has the perfect blend of modern and aged rustic elements.
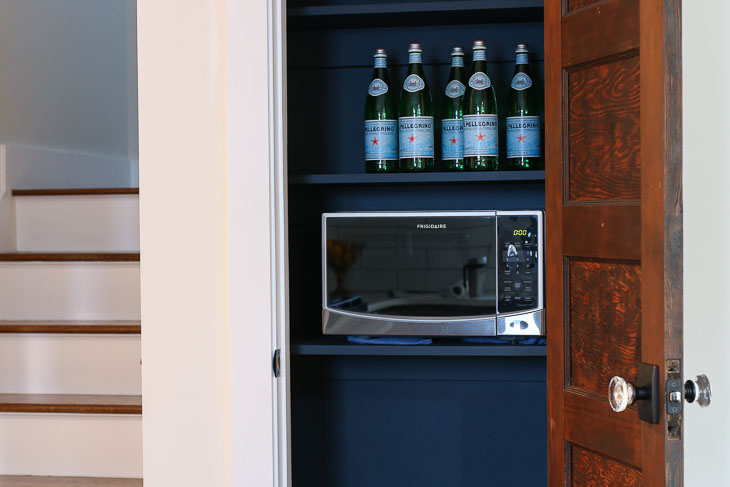
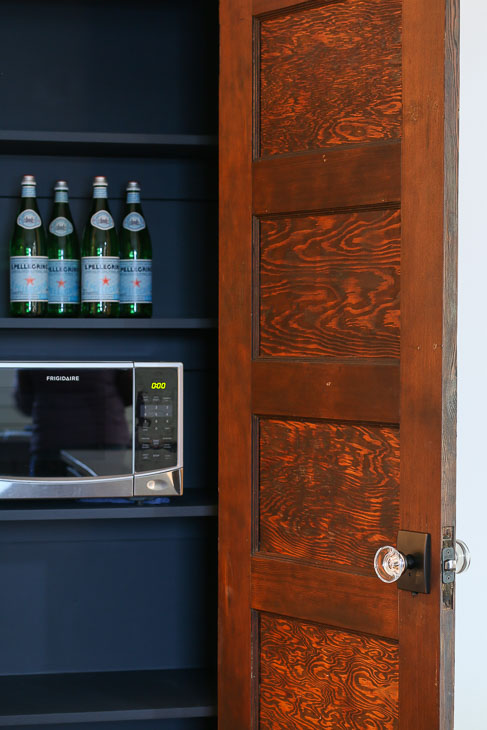
The Pantry
For some reason, I came up with the idea to paint the interior of the pantry black. It might have stemmed from my desire to do something different in there. Originally I thought about wallpaper, but I knew patterns are a personal preference, and one pattern may be loved by one person and hated by another.
When I saw photos of Blackboard from the new Magnolia Home paint line, I envisioned how the food labels and packaging would look in front of a dark background. The colors would stand out for certain! Although Magnolia Home partnered with me as the paint sponsor for the Saving Etta house, my last minute decision on the pantry color lead me to my local Ace Hardware to purchase a gallon of blackboard.
That’s how I found myself painting this little pantry Blackboard by Magnolia Home Paint. One concern I had was how durable the paint would be in the pantry. After cleaning off dirty finger prints and dings on the rest of the walls, I knew this paint could withstand a fair amount of scrubbing. But, I didn’t expect it to perform like this!
You may recognize that wood door as a twin of outside shed door. It was salvaged from the same house being demolished. For some reason this door has a much more unique wood grain on the panels than the shed door. At first I thought about covering up the grain, but the more I saw it the more I fell in love with the uniqueness of the lines.
We can’t forget the beautiful glass door knob. Did you think it was an antique knob salvaged from an old house? What would you say if I told you it’s brand new and you can buy these knobs for your house! Schlage was also a sponsor of the Saving Etta house and they provided me with those beautiful Schlage Hobson Glass Knobs with Century Trim.
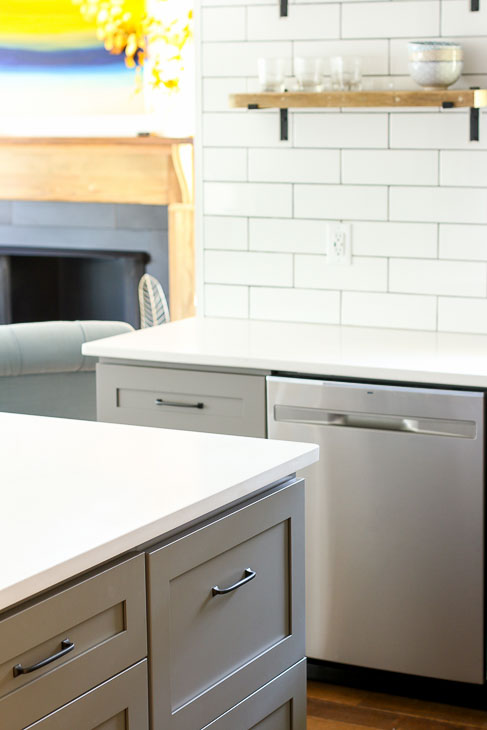
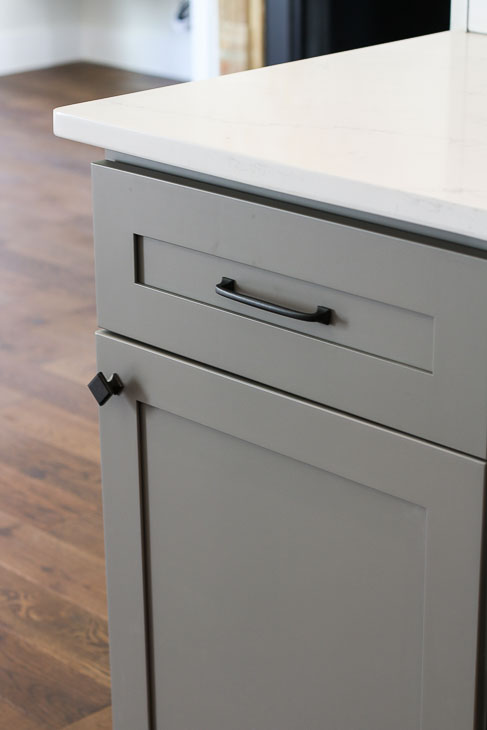
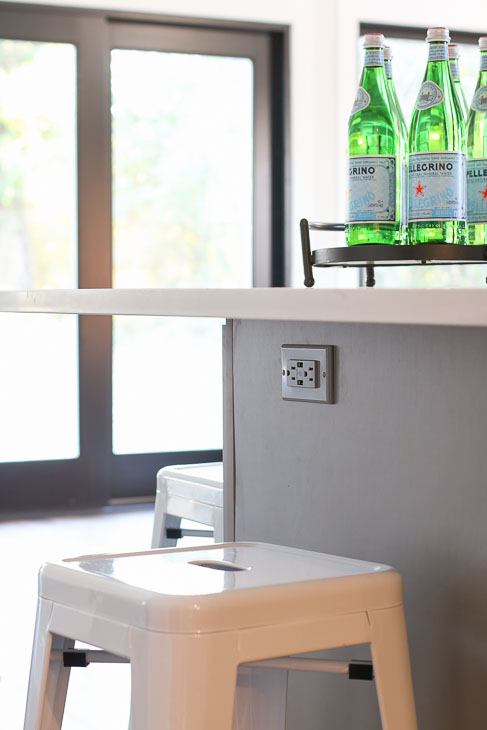
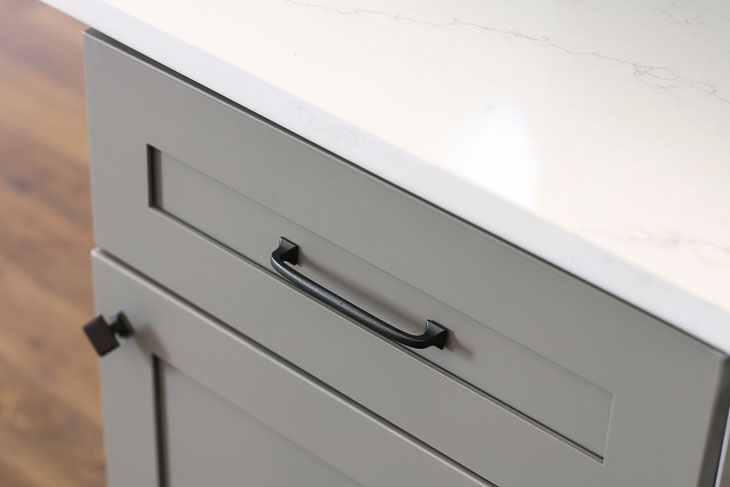
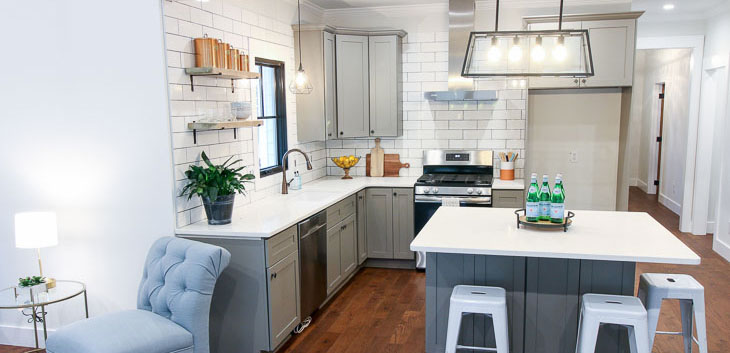
The huge island in the kitchen was a must for this space. (And because I wish we had the room in our kitchen for a big island!) The side closest to the refrigerator has two cabinets with five drawers total.
The other side of the islands has two more cabinets with shelves inside for extra storage. This side also has a one foot overhang for extra seating. I bought these cute Liberty Brand Acrylic Faceted Knob with oil-rubbed bronze and copperfor a change from the rest of the cabinet hardware.
The countertops are Carrara Venatino Quartz from Cosmos. I love the look and how similar it looks to marble without the softness of real stone.
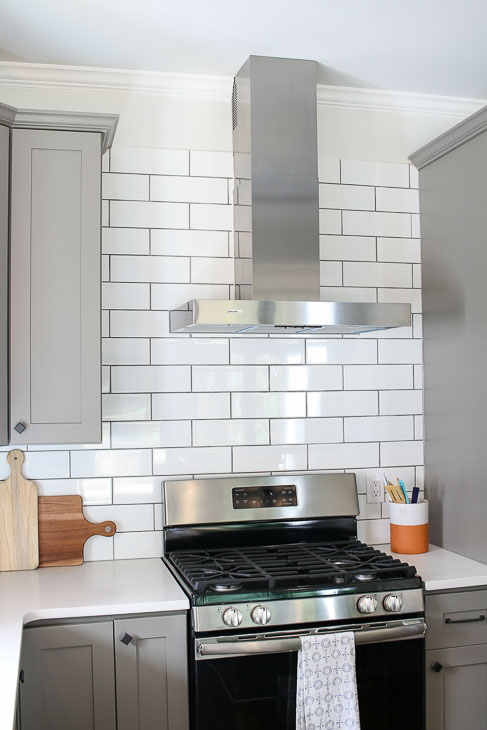
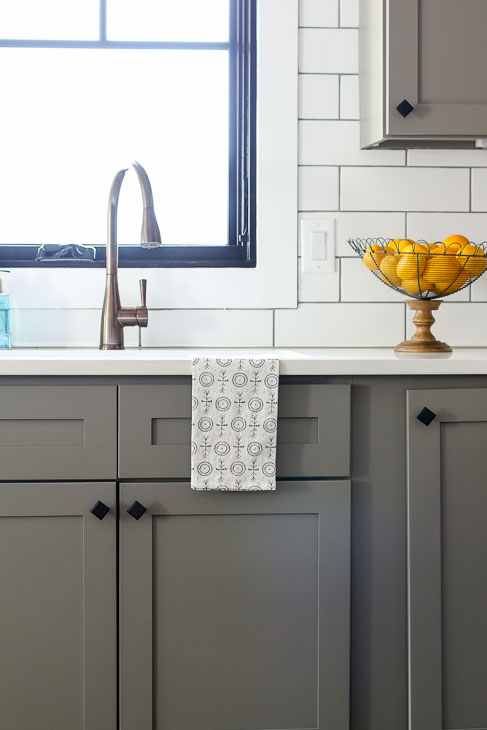
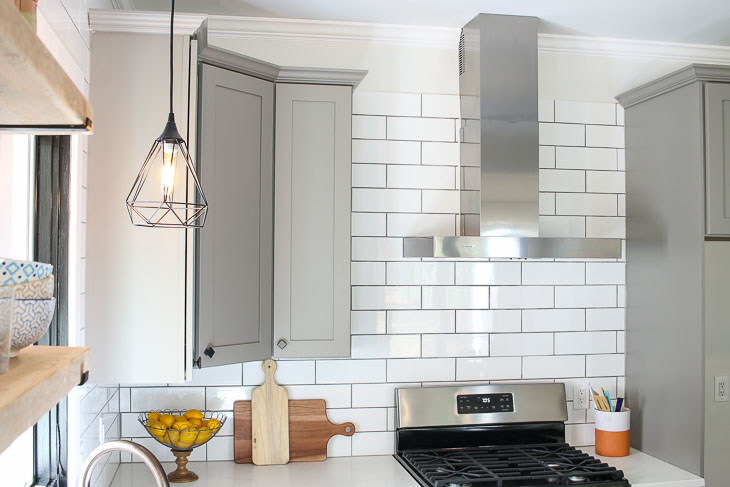
The larger scale Jeffrey Court 4 x 12 Subway Tile backsplash really makes this space in my opinion. They are classic but also modern. The white tiles provide a nice contrast against the gray cabinets.
The light fixture over the island is from Houzz. I’m not going to link to it, because frankly I’m not very pleased with the quality and it was a pain to install (remember I had to go hunt for the parts.)
I am proud of how the kitchen turned out. I poured a lot of thought and effort into the design and tried to envision how the kitchen would function for future homeowners.
I hope the kitchen reveal was worth the wait. What did you think? Do you like the fixtures I chose or if not what would you do differently?
A huge shout out to all the brands who sponsored the Saving Etta project and helped me turn this ugly duckling…
…into a beautiful swan again.
I hope you will consider using some of the sponsoring brands when you are ready to take on a new kitchen, bath, or renovation project in your home.
Which were your favorite elements in this beautiful kitchen?
Disclosure: I received materials and/or compensation from the sponsors of the Saving Etta project. These were the kitchen sponsors: Plygem, Broan-Nutone, Impressions Hardwood Collection, Leviton, Schlage, Magnolia Home Paint, KILZ, Jeffrey Court Tile, Liberty Hardware, and Ferguson Bath, Kitchen & Lighting Gallery. I was not told what to write. All opinions and words are my own. As always, I will notify you if you are reading as sponsored post or if I was compensated. Rest assured I am very particular about the brands I work with. Only brands I use in my own home or that I’ve had a positive experience with will be showcased on this blog.


 How to Install Privacy Film on Windows
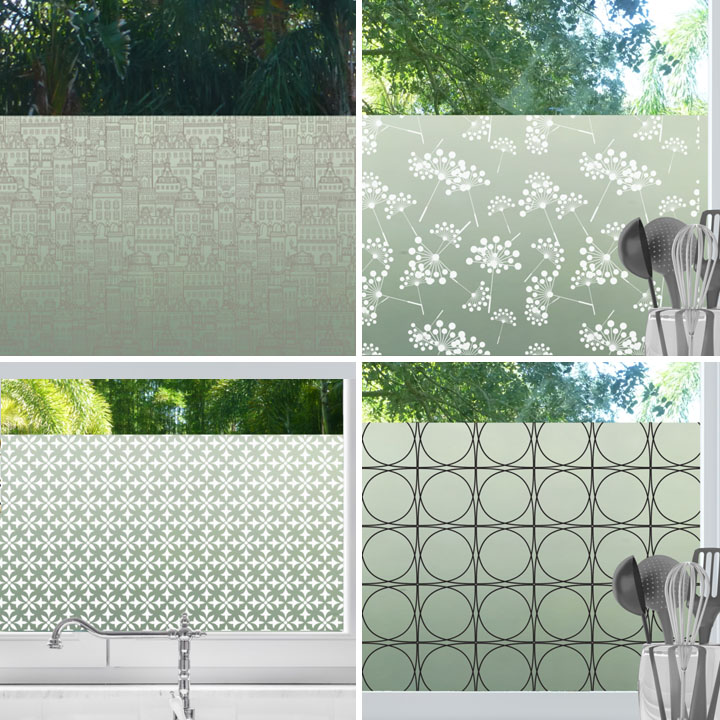


 How and Why You Should Install a Smart Lock on Your Door
 Saving Etta: The Long Awaited Kitchen Reveal